
Related Manuals for VINCENT SA-94


Summary of Contents for VINCENT SA-94
- Page 1 Vincent Bedienungsanleitung deutsch Instructions for use english Manuel d‘utilisation français SA-94 Stereovorverstärker Stereo Preamplifier Préamplificateur stéréo...
- Page 2 à la garantie ou pour les réparations après la période de garantie. Dans tous les cas, vos expériences avec les produits Vincent l'intéressent, n'hésitez pas à lui en faire part. Nous vous souhaitons beaucoup de plaisir avec notre / votre produit.
-
Page 3: Table Of Contents
Remote control Installation Operating the appliance Tips Search for errors Technical Specifications Glossary english Consignes de sécurité Autres consignes Contenu de la livraison Description de l'appareil Télécommande Installation Utilisation de l'appareil Conseils Résolution de problèmes Caractéristiques techniques Glossaire français Vincent... -
Page 4: Sicherheitshinweise
Händen an. Verwenden Sie das der Lautstärkeeinstellung um, damit Hörschäden vermie- im Lieferumfang enthaltene oder andere Netzkabel den werden. Damit Sie sich nicht unbeabsichtigt hoher von Vincent. Lautstärke aussetzen, stellen Sie vor dem Wechsel des Eingangskanals stets einen niedrigen Wert ein. Ausschalten Schalten Sie das Gerät jedes Mal aus,... -
Page 5: Weitere Hinweise
Produkte. Deshalb bleiben Ände- das Klangpotential Ihres Systems optimal auszunut- rungen an Design und technischer Konstruktion des Ge- zen, empfehlen wir, die Geräte auf Vincent Racks zu rätes, sofern sie dem Fortschritt dienen, vorbehalten. platzieren und nicht aufeinander zu stellen. -
Page 6: Lieferumfang
Diese Erkenntnisse wurden in der Konstruktion die- Verhältnis sind selbstverständlich. ser Vorstufe kompromisslos umgesetzt. Dieser Vorverstärker ist der ideale Partner für Die SA-94 ist ein fernbedienbarer Vincent Stereo- Vincent-Endverstärker wie beispielsweise SP-994, Vorverstärker für bis zu sechs Eingangsquellen. SP-995 oder die Endverstärker der Reihe SAV-P. - Page 7 3. Empfängerdiode für die Fernbedienung 6. VOLUME : Lautstärketasten Diese Tasten dienen der Einstellung der 4. Anzeige Gesamtlautstärke des Systems, regeln somit das Stellt im normalen Betrieb den Namen des Signal der Stereo-Vorstufenausgänge „OUTPUT“. gewählten Eingangskanals und die Lautstärkeein- Vincent...
- Page 8 Vorstufe stummgeschaltet (2)(12), gibt auch beinhaltet die Gerätesicherung. Beachten Sie dieser Aufnahmeausgang kein Signal aus. dazu die Sicherheitshinweise. 9. OUTPUT: Anschlussfeld für die Ausgänge des Vorverstärkers (1xXLR, 2xCinch) Über diese drei Anschluss-Paare wird das vorver- stärkte Stereo-Tonsignal der momentan gewählten Vincent...
-
Page 9: Fernbedienung
Zeit nicht benutzt wird. Verbrauchte Batterien sind aus Gründen des Umweltschutzes entsprechend der örtlichen Um- weltschutzbestimmungen zu entsorgen und nicht in den Hausmüll zu geben. 3. Schließen Sie das Batteriefach der Fernbedienung. Verwenden Sie ausschließlich Mikrozellen der Größe AAA (LR3) Vincent... - Page 10 Sollte nur aktiviert werden, wenn bei geringen Lautstärkewerten die Lautstärke schon sehr hoch ist (bei Einsatz von Endstufen mit hoher Empfindlichkeit). 16. LEVEL : Lautstärketasten Verändern Sie hiermit die Lautstärke des Systems (Signal an den Ausgängen „OUTPUT“ (9)). Vincent...
-
Page 11: Installation
Sie erst zuletzt das Netzkabel an und verbinden es mit der Steckdose. ZUR BESONDEREN BEACHTUNG Entfernen der Schutzkappen Fall, wenn beide von Vincent hergestellt wurden. Vor der ersten Installation müssen von allen ver- Werden zwei Geräte unterschiedlicher Norm ver- wendeten Anschlüssen an der Geräterückseite die bunden, wird dadurch das Signal invertiert. - Page 12 Verbinden Sie die Ausgänge dieser Quellgeräte mit den Eingängen „LINE1“ ... „LINE5“ (7) des Verstärkers. Meist sind die Ausgangsanschlüsse der Quellgeräte mit „LINE OUT“, „AUDIO OUT“ oder „FRONT OUT“ markiert. Informationen über die Anschlussmöglichkeiten der Quellgeräte finden Sie in deren Bedienungsanleitungen. Cinch-Verbindung SA-94 CD-Player, Tuner, DVD-Player, etc. LINE OUT Allgemeine Hinweise: Zur Verwendung eines Plattenspielers benötigen Sie eine so genannte Phono-Vorstufe (auch Entzerrer-...
- Page 13 Lautstärkeeinstellung (VOLUME, LEVEL), der Kanal-BALANCE und der GAIN-Funktion. Die Eingangs- signale des Anschlusses „BALANCED“ (7) sind nicht am Aufnahmeausgang verfügbar, die Wiedergabe des an „BALANCED“ angeschlossenen Gerätes kann über die SA-94 nicht aufgenommen werden. Während der Vorverstärker stummgeschaltet ist (2)(12), ist auch der Aufnahmeausgang abgeschaltet.
- Page 14 „INPUT“ oder „POWER AMP IN“ beschriftet). Achten Sie darauf, dass rechter und linker Kanal nicht ver- tauscht werden. Die Buchstaben „R“ und „L“ zeigen Ihnen die richtige Zuordnung. Der mit „2“ bezeich- nete Vorstufenausgang der SA-94 kann auf die gleiche Weise mit zusätzlichen Endstufenkanälen verbun- den oder für den Anschluss eines Kopfhörerverstärkers verwendet werden.
- Page 15 Ist die hier beschriebene Arbeitsweise nicht erwünscht, reicht es meist, die in diesem Abschnitt beschrie- benen Kabelverbindungen wegzulassen. Der SA-94 besitzt zwei Ausgangsanschlüsse für die Einschaltsteuerung. Damit kann er das Schaltsignal für weitere Komponenten einer Stereoanlage erzeugen und ausgeben. Zwei Geräte, welche das Schaltsignal erhalten sollen, können direkt an den beiden „POWER CONTROL“-Ausgängen (10) ange-...
-
Page 16: Bedienung Des Gerätes
Lautsprecher wird geringer. Ein weiterer Tastendruck bringt die Verstärkung wie- der in den ursprünglichen Zustand (00dB). Die GAIN-Funktion kann nur über die Fernbedienung ein- und ausgeschaltet werden. Im täglichen Gebrauch der Vorstufe sollte diese Taste nicht betätigt werden! Vincent... -
Page 17: Weitere Tipps
Dies kann helfen, Brummstörungen zu beseitigen. putern, elektrostatischen Lautsprechern, Subwoo- Die Schutzleiterwirkung bleibt erhalten. fern, Plattenspielern oder Kopfhörerverstärkern Ist das Brummgeräusch durch eigene Versuche hervorgerufen, sofern eine Audioverbindung zum nicht zu beseitigen, wird Ihnen Ihr Fachhändler Verstärker besteht. weiterhelfen. Vincent... -
Page 18: Fehlertabelle
Prüfen und befestigen Sie dieses Kabel. Endverstärker ist defekt oder die Steckver- bindungen lose. Eines der Lautsprecherkabel ist nicht richtig Prüfen und befestigen Sie alle Lautsprecher- an die Endstufe angeschlossen oder defekt. kabel an den Klemmen des Endverstärkers und an den Lautsprecheranschlüssen. Vincent... - Page 19 7m Entfernung und möglichst frontal auf das zu weit seitlicher Position betätigt. Gerät zu richten. Gerät nicht eingeschaltet. Schalten Sie das Gerät ein. Siehe Abschnitt „Netzbrummen“ im Kapitel Siehe Abschnitt „Netzbrummen“ im Kapitel Tiefton- Brummen „Weitere Tipps“. „Weitere Tipps“. zu hören Vincent...
-
Page 20: Technische Daten
Ausgänge: 2x Cinch stereo (PRE OUT), 1x XLR stereo (PRE OUT), 1x Cinch stereo (REC OUT), 2x Power Control (3,5mm Klinke) Maße: 430 x 84 x 360 mm (Höhe Gerätefüße 15 mm) Gewicht: 10,9 kg Farbe: silber / schwarz Vincent... -
Page 21: Lexikon/Wissenswertes
Dadurch ist diese Art der Audiosignal-Über- die als Musik-Signale für Verstärker-Eingänge tragung störsicherer. geeignet sind. Eingänge des Verstärkers (in der Regel als Cinch-Buchse ausgeführt), die für Sig- nale des CD-Players, Kassettenrecorders, DVD- Players usw. vorgesehen sind, werden auch als „Line-Level-Eingänge“ oder „Hochpegel-Eingän- ge“ bezeichnet. Vincent... -
Page 22: Safety Guidelines
Use the power Be careful with the volume setting, therefore, in order cable supplied or another one from Vincent. to prevent damage to hearing. So that you do not expose yourself to high volumes unintentionally, always set to a low level before changing the input channel. -
Page 23: Other Instructions
Iffezheim and may not be copied or distributed part- system’s sound quality, we recommend placing the ly or in full without express, written consent. equipment on Vincent racks and not putting them Vincent is a registered trademark of Sintron Vertriebs on top of each other. -
Page 24: Included In Delivery
HiFi furniture and speaker Both stereo signal paths are routed separately cables from the Vincent range, one can build a from the source inputs to the preamplifier outputs. perfectly harmonious system. -
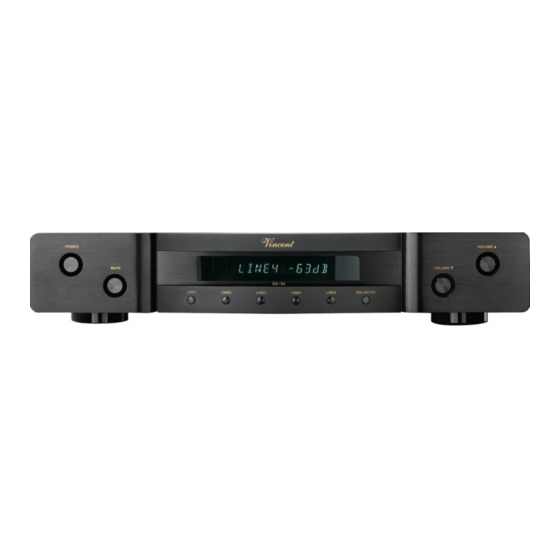
Page 25: Front View
3. Sensor diode for the remote control volume level of the system. They consequently control the signal of the preamplifier outputs 4. Display “OUTPUT” (9). In normal use the display shows the name of the selected input and the volume setting. As long as Vincent... -
Page 26: Rear View
To establish the power supply, connect the plugs PUT” does not give the music signal. of the power cable to the device and to a suitab- le wall outlet. The small plastic housing holds the fuse. Refer to the security precautions. Vincent... -
Page 27: Remote Control
For environmental reasons, used batteries should be disposed of in accordance with local environ- mental regulations and not put with domestic waste. c) Put the compartment cover back on and close the battery compartment. Only use AAA (LR3) size batteries. Vincent... - Page 28 (9) is reduced by 8 dB and thus the volume of the attached speakers. It should only be activat- ed if even at low volume settings the volume is already very high. 16. LEVEL These buttons change the amplifier’s volume level for the preamplifier outputs “OUTPUT” (9). Vincent...
-
Page 29: Installation
This is always the case if both units were channel, black or white for the left channel. made by Vincent. If two units from different stan- dards are connected, this inverts the signal. In this case the signal assignment on one side of the con- nection has to be changed. - Page 30 “LINE OUT”, “AUDIO OUT” or “FRONT OUT”. You will find information about ways to connect source equipment in their operating manuals. RCA connection SA-94 CD player, tuner etc. LINE OUT...
-
Page 31: Connection Of A Recording Device
CE and the GAIN function. The input signals at the XLR connectors can not be obtained at the recording output (8) and thus can not be used as a source for recordings. Please note that while the preamplifier is muted (2)(12) the recording output is switched off. RCA connection SA-94 Recording device, e.g. tape recorder LINE IN Connect this signal output to the signal input (“LINE IN”, “TAPE IN”... - Page 32 In the case of XLR connection choose the output labelled “BALANCED”. Please pay attention not to inter- change right with left channels. The letters “R” and “L” indicate the correct correlation. You may further use the SA-94 preamplifier output marked with “2” for a headphone amplifier or an additional main amplifier.
-
Page 33: Power Control
The SA-94 is equipped with two output connectors for the power control. Here, the switching signal gene- rated by the SA-94 is available for other components of the system. Two HiFi components that are able to react to the power control signal can be connected directly to the amplifier's power control outputs (10). -
Page 34: Operating The Appliance
“OUTPUT” (9). The GAIN operation is useful, if the combination of amplifier and speaker is so sensitive that the usable regi- on of the volume control of the SA-94 lies at the lowest values. In this situati- on the volume steps are too coarse. -
Page 35: Tips
(as TV-sets or Tuners), personal computers, electrostatic loud- If the problem occurs and cannot be solved by speakers, subwoofers, record players or headpho- yourself your audio specialist dealer will help you. Vincent... -
Page 36: Search For Errors
Channel balance has been set to the extreme Set the channel balance (13) to a reasonable right or left. value. Vincent... - Page 37 Switch on the unit. See section “Net frequency noise” in the See section “Net frequency noise” in the Humming low fre- chapter “Tips”. chapter “Tips”. quency noise is audi- ble, even as no audio source is play- ing back Vincent...
-
Page 38: Technical Specifications
2x RCA stereo (PRE OUT), 1x XLR stereo (PRE OUT), 1x RCA stereo (REC OUT), 2x Power Control (3.5mm Jack) Dimensions (W x H x D): 430 x 84 x 360 mm (height of device feet 15 mm) Weight: 10.9 kg Colour: silver / black Vincent... -
Page 39: Glossary
Those signal inputs must not be confused cable screen can be eliminated. The signal volta- with inputs that accept preamplified signals. ge level used for this type of transfer is higher, so it is a more robust less sensitive signal path. Vincent... -
Page 40: Consignes De Sécurité
Ne saisissez pas l'appareil avec les mains mouillés changer de canal d'entrée pour ne pas être exposé ou humides. Utilisez le câble fourni ou un autre sans le vouloir à une plus forte puissance sonore. câble de Vincent. Nettoyage Arrêt Débranchez le connecteur avant de Arrêtez chaque fois l'appareil avant de... -
Page 41: Autres Consignes
Pour cette rai- nous vous recommandons de placer les appareils son, des modifications de design et de construction sur des racks Vincent et de ne pas les poser l'un technique liées au progrès sont possibles. sur l'autre. -
Page 42: Contenu De La Livraison
Ce préamplificateur est, d’ autre part, le partenai- Le SA-94 est un préamplificateur stéréo avec télé- re idéal des amplificateurs de puissance Vincent commande de la marque Vincent pour un maxi- SP-994, SP-995, des lecteurs de CD/DVD et des mum de six sources d’entrée. - Page 43 à l’amplificateur (7). 3. Récepteur infrarouge de la télécommande 6. VOLUME : réglage du volume Ces touches servent au réglage du volume total du système, c’est-à-dire les signaux des sorties du préampli stéréo « OUTPUT » (9). Vincent...
- Page 44 Raccordez ici le cordon secteur et branchez-le au sourdine (2)(12), la sortie d’ enregistrement ne secteur. Le petit boîtier en plastique en dessous de transmet également aucun signal. la prise secteur contient le fusible de l’appareil. Respectez les consignes de sécurité à ce sujet. Vincent...
-
Page 45: Télécommande
Eliminez les piles usagées conformément aux dis- positions locales de protection de l'environnement c) Remettez le couvercle du compartiment et fermez et ne les jetez pas avec les ordures ménagères. le compartiment des piles. Utilisez exclusivement des piles rondes AAA (LR3). Vincent... - Page 46 élevé (avec ampli- ficateurs de puissance à haute sensibilité). 16. LEVEL : Touches de volume Réglez ici le volume du système. Les signaux des sorties du préamplificateur « OUTPUT » (9) sont également influencés par ce fait. Vincent...
-
Page 47: Installation
Cela est toujours le cas, si les ons RCA présentent les couleurs suivantes : rouge deux appareils sont de fabrication Vincent. Si deux pour le canal de droite, noir ou blanc pour le appareils de norme différente sont raccordés, le canal de gauche. - Page 48 La plupart des bornes de sortie sont désignées par « LINE OUT », « AUDIO OUT » ou « FRONT OUT ». Vous trouverez des informations sur les possibilités de raccordement des appareils source dans leur mode d’emploi. Connexion RCA SA-94 p. ex. lecteur CD, tuner LINE OUT Informations générales :...
- Page 49 « BALANCED » (XLR) ne sont pas disponibles pour la sortie d’enregistrement (REC OUT- PUT) et de plus ne peuvent pas être usagés pour l’enregistrement. Tant que le préamplificateur est mis sur silence (2)(12), la sortie d’ enregistrement est également mise en silence. Connexion RCA SA-94 p. ex. enregistreur de cassettes LINE IN Reliez pour cela cette sortie de signal par une paire de câbles RCA, à...
- Page 50 La sortie du préamplificateur marquée du symbole « 2 » peut être connectée de la même manière aux canaux supplémentaires d’amplificateurs de puissance ou utilisée pour le raccordement d’un amplificateur du casque. connexion RCA SA-94 p. ex. amplificateur de puissance stéréo INPUT Lorsque les canaux d’amplificateur de puissance offrent l’option des raccords XLR, elle devrait être utilisée de...
- Page 51 L’appareil SA-94 possède deux prises de sortie pour la commande de commutation. On peut ainsi y rac- corder directement deux appareils (10). S’il y a plus de deux appareils raccordés, qui doivent être com- mandés, il sera nécessaire, de faire passer la liaison de commande entre l’amplificateur et les autres...
-
Page 52: Utilisation De L'appareil
« OUTPUT » (9). Le réglage de GAIN est judicieux, lorsque la combinaison amplificateur avec haut-parleurs démontre une sensibilité tellement éle- vée, que la plage utile de réglage du volume du SA-94 se situe dans des valeurs fai- Réduire bles. -
Page 53: Conseils
Si vous ne parvenez pas à éliminer vous-même ce ronflement, votre revendeur vous y aidera. Vincent... -
Page 54: Résolution De Problèmes
Un des câbles de haut-parleurs n’est pas cor- Vérifiez et serrez les câbles de haut-parleurs rectement raccordé à l’amplificateur de puis- aux bornes de l’amplificateur et aux bornes sance ou est défectueux. des haut-parleurs. Vincent... - Page 55 à l’appareil sans décalage latéral. L’appareil n’est pas sous tension. Mettez l’appareil sous tension. Voir paragraphe « Ronflement du secteur » Voir paragraphe « Ronflement du secteur » Bourdonnement au chapitre « Conseils ». au chapitre « Conseils ». audible des basses Vincent...
-
Page 56: Caracteristiques Techniques
1x RCA stéréo (REC OUT), 2x Power Control (3,5mm prise Jack) Dimensions (L x H x P) : 430 x 84 x 360 mm (hauteur des pieds 15 mm) Poids : 10,9 kg Variante de couleur : argent / noir Vincent... -
Page 57: Glossaire
RCA) qui sont prévues pour les signaux du lecteur de CD, du lecteur de DVD etc. sont aussi désignées par « entrées de niveau Line » ou « entrées à haut niveau ». Vincent... - Page 58 NOTIZEN / NOTES Vincent...
- Page 59 NOTIZEN / NOTES Vincent...
- Page 60 Vincent Bewahren Sie die Kaufquittung zusammen mit der Bedienungsanleitung auf. Die Kaufquittung dient Ihnen als Nachweis für den Beginn der Garantiezeit. Die Seriennummer befindet sich an der Rückseite des Gerätes. Please keep the receipt, store it together with this manual. The receipt is your proof for the beginning of the warranty period.
Need help?
Do you have a question about the SA-94 and is the answer not in the manual?
Questions and answers