Table of Contents
Advertisement
UNVENTED (VENT-FREE) GAS LOG HEATER
OWNER'S OPERATION AND INSTALLATION MANUAL
CCL3018NR, CCL3018PR CCL3018NRA, CCL3018PRA
CCL3924NR, CCL3924PR CCL3924NRA, CCL3924PRA
CCL3930NR, CCL3930PR CCL3930NRA, CCL3930PRA
Also Design-Certified As Vented Decorative Appliances When
Not Used With Hand-Held Thermostat Remote
WARNING: If the information in this manual is not
followed exactly, a fire or explosion may result causing
property damage, personal injury, or loss of life.
— Do not store or use gasoline or other flammable
vapors and liquids in the vicinity of this or any other
appliance.
— WHAT TO DO IF YOU SMELL GAS
• Do not try to light any appliance.
• Do not touch any electrical switch; do not use any
phone in your building.
• Immediately call your gas supplier from a neighbor's
phone. Follow the gas supplier's instructions.
• If you cannot reach your gas supplier, call the fire
department.
— Installation and service must be performed by a quali-
fied installer, service agency, or the gas supplier.
For more information, visit www.desatech.com
18", 24" AND 30" REMOTE READY
(Yellow Flame Model Shown)
CHL3924NR, CHL3924PR
Save this manual for future reference.
Advertisement
Table of Contents

Subscribe to Our Youtube Channel
Related Manuals for Comfort Glow CCL3018NR


Summary of Contents for Comfort Glow CCL3018NR
-
Page 1: What To Do If You Smell Gas
UNVENTED (VENT-FREE) GAS LOG HEATER OWNER’S OPERATION AND INSTALLATION MANUAL 18", 24" AND 30" REMOTE READY CCL3018NR, CCL3018PR CCL3018NRA, CCL3018PRA CCL3924NR, CCL3924PR CCL3924NRA, CCL3924PRA CHL3924NR, CHL3924PR CCL3930NR, CCL3930PR CCL3930NRA, CCL3930PRA Also Design-Certified As Vented Decorative Appliances When Not Used With Hand-Held Thermostat Remote... -
Page 2: Table Of Contents
WARNING: Improper installation, adjustment, altera- tion, service, or maintenance can cause injury or prop- erty damage. Refer to this manual for correct installation and operational procedures. For assistance or addi- tional information consult a qualified installer, service agency, or the gas supplier. WARNING: This appliance is for installation only in a solid-fuel burning masonry or UL127 factory-built fire- place, or in a listed ventless firebox enclosure. -
Page 3: Safety Information
SAFETY INFORMATION WARNING: This product con- tains and/or generates chemicals known to the state of California to cause cancer or birth defects, or other reproductive harm. IMPORTANT: Read this owner’s manual carefully and completely before trying to assemble, oper- ate, or service this fireplace. Im- proper use of this fireplace can cause serious injury or death from burns, fire, explosion, elec-... -
Page 4: Local Codes
SAFETY INFORMATION Continued 3. To prevent performance problems, the use of a propane/LP fuel tank of less than 100 lb. capacity is not recommended (propane/LP units only). 4. If you smell gas • shut off gas supply • do not try to light any appliance •... -
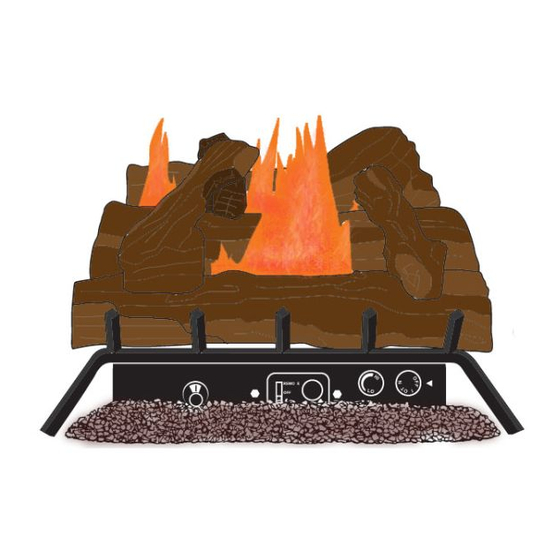
Page 5: Product Identification
PRODUCT IDENTIFICATION Log Set Optional Remote Control Piezo Ignitor Optional Selector Flame Switch Adjustment Knob Figure 1 - Vent-Free Gas Log Heater (Logs May Vary By Model) UNPACKING CAUTION: Do not remove the data plates attached to the heater base assembly. The data plates contain important war- ranty and safety information. -
Page 6: Air For Combustion
AIR FOR COMBUSTION AND VENTILATION Continued PROVIDING ADEQUATE VENTILATION The following are excerpts from National Fuel Gas Code, ANSI Z223.1/NFPA 54, Section 5.3, Air for Combustion and Ventilation. All spaces in homes fall into one of the three fol- lowing ventilation classifications: 1. -
Page 7: Combustion And Ventilation Air
AIR FOR COMBUSTION AND VENTILATION Continued * Do not include direct-vent gas appliances. Di- rect-vent draws combustion air from the outdoors and vents to the outdoors. Example: Gas water heater Vent-free fireplace + ________ Btu/Hr Total = ________ Btu/Hr 4. Compare the maximum Btu/Hr the space can support with the actual amount of Btu/Hr used. -
Page 8: Installation
INSTALLATION NOTICE: This heater is intended for use as supplemental heat. Use this heater along with your primary heating system. Do not install this heater as your pri- mary heat source. If you have a central heating system, you may run system’s circulating blower while using heater. - Page 9 INSTALLATION Continued WARNING: This appliance is equipped for (natural or pro- pane/LP) gas. Field conversion is not permitted. INSTALLATION AND CLEARANCES (Vent-Free Operation Only) WARNING: Maintain the minimum clearances. If you can, provide greater clearances from floor, ceiling, and adjoining wall. MINIMUM FIREPLACE CLEARANCE TO COMBUSTIBLE MATERIALS Side Wall 16"...
-
Page 10: Mantel Clearances
INSTALLATION Continued If Using Mantel You must have noncombustible material(s) above the fireplace opening. Noncombustible materials (such as slate, marble, tile, etc.) must be at least 1/2 inch thick. With sheet metal, you must have non- combustible material behind it. Noncombustible material must extend at least 8 inches up (for all models). -
Page 11: Floor Clearances
INSTALLATION Continued NOTICE: If your installation does not meet the minimum clear- ances shown, you must do one of the following: • operate the logs only with the flue damper open • raise the mantel to an accept- able height •... -
Page 12: Installing Heater Base Assembly
INSTALLATION Continued Damper Clamp Damper Damper Clamp Damper Masonry Fireplace Manufactured Fireplace Figure 10 - Attaching Damper Clamp INSTALLING HEATER BASE ASSEMBLY CAUTION: Do not remove the data plates attached to the heater base assembly. The data plates contain important war- ranty and safety information. -
Page 13: Connecting To Gas Supply
INSTALLATION Continued CONNECTING TO GAS SUPPLY WARNING: This appliance requires a 1/2" NPT (National Pipe Thread) inlet connection to the pressure regulator. WARNING: A qualified ser- vice person must connect heater to gas supply. Follow all local codes. CAUTION: Never connect propane/LP heater directly to the propane/LP supply. - Page 14 INSTALLATION Continued WARNING: Use pipe joint sealant that is resistant to liquid petroleum (LP) gas. We recommend that you install a sediment trap in supply line as shown in Figure 14. Locate sedi- ment trap where it is within reach for cleaning. Install in piping system between fuel supply and heater.
- Page 15 INSTALLATION Continued Test Pressures Equal To or Less Than 1/2 PSIG (3.5 kPa) 1. Close equipment shutoff valve (see Figure 15). 2. Pressurize supply piping system by either opening propane/LP supply tank valve for propane/LP gas or opening main gas valve lo- cated on or near gas meter for natural gas, or using compressed air.
- Page 16 INSTALLATION Continued 4. Install remote receiver unit onto gas log heater base using phillips head screws (see Figure 19). 5. Connect wires as shown in Figure 20. Front Screws Remote Receiver Figure 19 - Installing Remote Receiver White Wire From Receiver Red Wire From...
-
Page 17: Installing Logs
INSTALLATION Continued INSTALLING LOGS WARNING: Failure to posi- tion the parts in accordance with these diagrams or failure to use only parts specifically approved with this heater may result in property damage or personal injury. CAUTION: After installation and periodically thereafter, check to ensure that no flame comes in contact with any log. - Page 18 Front Log (#1) Figure 28 - Installing Crossover Log (#5) (CCL3930PR/NR Shown) Locate holes on the Figure 29 - Installing Crossover Log (#5) (CCL3018PR/PRA and CCL3018NR/NRA Only) , locate holes on the Pegs Log #3 Front Log (#1) Figure 30 - Installing Crossover Log (#6)
-
Page 19: Operating Heater
OPERATING HEATER FOR YOUR SAFETY READ BEFORE LIGHTING WARNING: If you do not fol- low these instructions exactly, a fire or explosion may result causing property damage, per- sonal injury or loss of life. A. This appliance has a pilot which must be lighted by hand. -
Page 20: To Turn Off Gas To Appliance
OPERATING HEATER Continued 4. Press in and turn control knob clockwise to the OFF position (see Figure 32). 5. Wait five (5) minutes to clear out any gas. Then smell for gas, including near the floor. If you smell gas, STOP! Follow “B” in the safety information, page 19. -
Page 21: Manual Lighting Procedure
OPERATING HEATER Continued MANUAL LIGHTING PROCEDURE 1. Follow steps 1 through 6 under Lighting In- structions, pages 19 and 20. 2. Depress control knob and light pilot with match. 3. Keep control knob pressed in for 30 sec- onds after lighting pilot. After 30 seconds, release control knob. -
Page 22: Inspecting Burners
OPERATING HEATER Continued Manual Mode 1. Press the POWER and LOCK buttons to- gether to turn on the hand-held remote control. 2. Press the MANU button to turn on the fire- place. 3. Press the POWER and LOCK buttons to- gether to turn off the fireplace. -
Page 23: Cleaning And Maintenance
CLEANING AND MAINTENANCE WARNING: Turn off heater and let cool before cleaning. CAUTION: You must keep control areas, burners, and circu- lating air passageways of heater clean. Inspect these areas of heater before each use. Have heater inspected yearly by a quali- fied service person. -
Page 24: Troubleshooting
WARNING: Turn off heater and let cool before servicing. Only a qualified service person should service and repair heater. CAUTION: Never use a wire, needle, or similar object to clean ODS/pilot. This can damage ODS/pilot unit. Note: All troubleshooting items are listed in order of operation. OBSERVED PROBLEM When ignitor button is pressed, there is no spark at ODS/pilot... - Page 25 OBSERVED PROBLEM ODS/pilot lights but flame goes out when control knob is re- leased Burner does light after ODS/ pilot is lit Delayed ignition burner Burner backfiring during com- bustion 111161-01D TROUBLESHOOTING Continued POSSIBLE CAUSE 1. Control knob not fully pressed in 2.
- Page 26 OBSERVED PROBLEM Slight smoke or odor during ini- tial operation Moisture/condensation noticed on windows Heater produces a whistling noise when burner is lit White powder residue forming within burner box or on adja- cent walls or furniture Remote does not function Heater produces a clicking/tick- ing noise just after burner is lit or shut off...
- Page 27 WARNING: If you smell gas • Shut off gas supply. • Do not try to light any appliance. • Do not touch any electrical switch; do not use any phone in your building. • Immediately call your gas supplier from a neighbor’s phone. Follow the gas supplier’s instructions.
-
Page 28: Illustrated Parts Breakdown And Parts List
ILLUSTRATED PARTS BREAKDOWN MODELS CCL3018PR, CCL3018PRA, CCL3018NR, AND CCL3018NRA Note: Items 16 and 17 are Natural Gas only. www.desatech.com 111161-01D... - Page 29 This list contains replaceable parts used in your heater. When ordering parts, follow the instructions listed under Replacement Parts on page 33 of this manual. PART NUMBER CCL3018PR CCL3018PRA CCL3018NR CCL3018NRA DESCRIPTION 105958-04 111340-03 105959-04 111341-03 105960-04 111342-03 105961-04 111343-03...
- Page 30 ILLUSTRATED PARTS BREAKDOWN MODELS CCL3924PR, CCL3924PRA, CCL3924NR, CCL3924NRA, CCL3930PR, CCL3930PRA, CCL3930NR, CCL3930NRA, CHL3924NR, AND CHL3924PR Note: Items 28 and 29 are Natural Gas only. www.desatech.com 111161-01D...
- Page 31 This list contains replaceable parts used in your heater. When ordering parts, follow the instructions listed under Replacement Parts on page 33 of this manual. PART NUMBER CHL3924PR CHL3924NR KEY CCL3924PR CCL3924PRA CCL3930PR CCL3930PRA NO. CCL3924NR CCL3924NRA CCL3930NR CCL3930NRA DESCRIPTION 105958-03 111340-02 105959-03 111341-02 105960-03 111342-02...
-
Page 32: Specifications
CCL3018PRA CHL3924PR 16,000/30,000 20,000/39,000 Propane/LP Propane/LP Piezo Piezo 8.0" W.C. 8.0" W.C. 14" 11" 28 lbs. 66 lbs. CCL3924NR CCL3018NR CCL3924NRA CCL3018NRA CHL3924NR 16,000/30,000 20,000/39,000 Natural Gas Natural Gas Piezo Piezo 3.5" W.C. 3.5" W.C. 10.5" 10.5" 5" 28 lbs. -
Page 33: Replacement Parts
REPLACEMENT PARTS Note: Use only original replacement parts. This will protect your warranty coverage for parts re- placed under warranty. PARTS UNDER WARRANTY Contact authorized dealers of this product. If they can’t supply original replacement part(s), call DESA Heating Products’ Technical Service De- partment at 1-866-672-6040. -
Page 34: Accessories
ACCESSORIES Purchase these fireplace accessories from your lo- cal dealer. If they can not supply these accessories, either contact your nearest Parts Central (page 33) or call DESA Heating Products’ Sales Department at 1-866-672-6040 for referral information. You can also write to the address listed on the back page of this manual. - Page 35 NOTES ___________________________________________________________ ___________________________________________________________ ___________________________________________________________ ___________________________________________________________ ___________________________________________________________ ___________________________________________________________ ___________________________________________________________ ___________________________________________________________ ___________________________________________________________ ___________________________________________________________ ___________________________________________________________ ___________________________________________________________ ___________________________________________________________ ___________________________________________________________ ___________________________________________________________ ___________________________________________________________ ___________________________________________________________ ___________________________________________________________ ___________________________________________________________ ___________________________________________________________ ___________________________________________________________ ___________________________________________________________ ___________________________________________________________ ___________________________________________________________ ___________________________________________________________ ___________________________________________________________ ___________________________________________________________ ___________________________________________________________ ___________________________________________________________ ___________________________________________________________ ___________________________________________________________ ___________________________________________________________ ___________________________________________________________ ___________________________________________________________ 111161-01D www.desatech.com...
-
Page 36: Limited Warranty
WARRANTY INFORMATION Model Serial No. Date Purchased Always specify model and serial numbers when communicating with the factory. We reserve the right to amend these specifications at any time without notice. The only warranty applicable is our standard written warranty. We make no other warranty, expressed or implied. COMFORT GLOW VENT-FREE GAS LOG HEATERS DESA Heating Products warrants this product to be free from defects in materials and components for two (2) year from the date of first purchase, provided that the product has been properly installed, operated and main-...
Need help?
Do you have a question about the CCL3018NR and is the answer not in the manual?
Questions and answers