Table of Contents
Advertisement
Advertisement
Table of Contents
Troubleshooting

Related Manuals for VEMAG HP30E


Summarization of Contents
1. Safety instructions
1.1 Sphere of application
Defines the intended use and versions of the vacuum filler.
1.2 Use in accordance with purpose
Details the proper application, limitations, and intended industrial use.
1.3 Explanation of symbols
Explains warning symbols and their meanings to ensure safe operation.
1.4 General safety instructions
Provides essential safety guidelines for operating and maintaining the machine.
1.5 Special safety instructions
Highlights critical safety procedures and warnings for specific operations.
2. Description
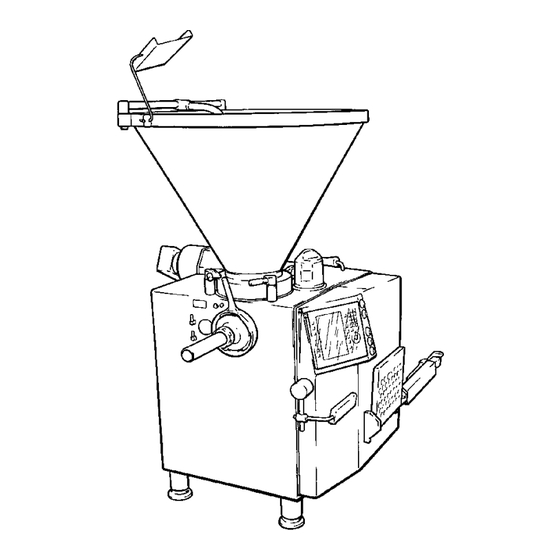
2.1 Overview HP25E / HP30E
Presents a labeled diagram of the machine's main components.
2.2 Brief description
Provides a general overview of the machine's key parts and their functions.
3. Installation and commissioning
3.1 Transporting the machine
Details safe procedures for moving and handling the machine during transport.
3.2 Setting up the machine
Guides users on properly positioning, leveling, and aligning the machine.
3.3 Electrical connection
Outlines the procedure and safety precautions for connecting the machine electrically.
3.4 Checking direction of rotation
Explains how to verify the correct direction of motor rotation for safe operation.
3.5 Levelling the lifting/tipping device (optional)
Describes the process of adjusting the lifting/tipping device for proper trolley entry.
4. Setting up
4.1 General information
Introduces the general steps and components required for setting up the machine.
4.2 Fitting the double screw housing
Details the procedure and safety warnings for installing the double screw housing.
4.3 Fitting the double screws
Provides instructions on correctly inserting and aligning the double screws.
4.4 Fitting the filling horn
Explains how to attach the filling horn and its holder to the machine.
4.5 Locking the linking gear (optional)
Describes the steps for securing the optional linking gear in place.
4.6 Fitting the linking horn (optional)
Guides the user on installing the optional linking horn and its seal.
4.7 Setting the vacuum
Details how to adjust vacuum levels for different product types.
4.8 Fitting the scraper
Explains how to attach the scraper, especially for raw sausage processing.
4.9 Adjusting the knee lever
Describes how to adjust the knee lever for operator comfort and efficiency.
5. Operation
5.1 Working with the machine
Provides a step-by-step guide for starting and operating the filling machine.
5.2 Working with provisional drive
Explains how to operate the machine using a provisional drive in case of computer failure.
6. Graphical control
6.1 Control panel
Describes the layout and integration of the screen and keys on the control panel.
6.2 Screen
Details the different areas of the screen and the information displayed in each.
6.3 Keypad
Explains the functions of the numerical keypad, function keys, and cursor keys.
6.4 Status and error messages
Describes how status and error messages are displayed and interpreted in the footer.
6.5 Principles of operation
Covers fundamental operating principles of the portioning computer.
6.6 Mode groups, modes, start/stop methods and parameters
Introduces various operational modes, start/stop methods, and adjustable parameters.
7. Cleaning
7.1 General information
Outlines daily cleaning requirements and essential safety measures before cleaning.
7.2 Removing parts to be cleaned
Details the procedures for safely disassembling machine parts for cleaning.
7.3 Cleaning the machine
Provides instructions for cleaning the machine's main components using water and brushes or low-pressure equipment.
7.4 Cleaning schedule
Presents recommended cleaning agents and schedules for different cleaning procedures.
7.5 Lubrication and assembly
Guides on lubricating and reassembling machine parts after cleaning.
8. Maintenance
8.1 General information
Provides an overview of maintenance requirements and recommends service contracts.
8.2 Grease gun
Explains the procedure for replacing cartridges in the supplied grease gun.
8.3 First-time maintenance work
Lists initial maintenance tasks to be performed at specific operating hour intervals.
8.4 Maintenance schedule
Details a comprehensive schedule of maintenance tasks based on operating hours.
8.5 Daily maintenance
Describes the daily lubrication and checks for feed unit seals.
8.6 Weekly maintenance
Covers weekly lubrication of the feed unit drive and cleaning of air filters.
8.7 Monthly maintenance
Outlines monthly checks for the double screw drive oil level and vacuum pump.
8.8 Six-monthly maintenance
Details semi-annual checks for feed unit seals and hydraulic unit oil level.
8.9 Annual maintenance
Describes annual tasks including feed unit checks and hydraulic unit oil changes.
8.10 Biennial maintenance
Specifies biennial replacement and checking of the double screw drive.
8.11 Three-yearly maintenance
Details the three-yearly oil change for the feed drive.
9. Troubleshooting
9.1 General information
Provides guidance on troubleshooting and safety precautions.
9.2 Troubleshooting table
Lists common faults, their causes, and recommended remedies.
10. Appendix
10.1 General information
Introduces technical details, lubricants, accessories, and tools.
10.2 Technical data HP25E / HP30E
Presents detailed specifications and technical data for the machine models.
10.3 Dimensional drawings HP25E / HP30E
Includes technical drawings showing the machine's dimensions and key features.
10.4 Hydraulic plan
Provides the hydraulic schematic diagram for the machine's lifting/tipping device.
10.5 Lubricants
Lists recommended oils and greases for various machine parts and their specifications.
10.6 Accessories
Details recommended double screws, filling horns, and other accessories.
10.7 Disposal
Explains procedures for the safe dismantling and disposal of the machine.
Need help?
Do you have a question about the HP30E and is the answer not in the manual?
Questions and answers