Table of Contents
Advertisement
Quick Links
Advertisement
Table of Contents

Related Manuals for Vivaldi FREENETMK3


Summary of Contents for Vivaldi FREENETMK3
- Page 1 USER AND INSTALLATION MANUAL FREEMK3 - FREENETMK3 FREESOURCEMK3...
- Page 2 3. Package content 3.1 FREEMK3 model 3.2 FREENETMK3 model 3.3 FREESOURCEMK3 model 4. Devices description 4.1 FREEMK3 - FREENETMK3 - FREESOURCEMK3 front 4.2 FREEMK3 - FREENETMK3 rear 4.3 FREESOURCEMMK3 rear 4.4 Infrared remote controller TCIR5 5. Technical specifications 6. Menu pages description 6.1 Stand by...
- Page 3 INDEX 9. Connection diagrams 9.1 Base connection FREEMK3/FREENETMK3 9.2 Keysol connection or external source on FREEMK3/FREENETMK3 9.3 Microphone connection FREEMK3/FREENETMK3 9.4 FREEMK3 connection with FREECONTROL 9.5 FREENETMK3 connection with ICONTROL4.0+ 9.6 Connection of 3 speakers on FREEMK3/FREENETMK3 9.7 Connection of 4 speakers on FREEMK3/FREENETMK3 9.8 Master/slave connection of FREEMK3/FREENETMK3...
-
Page 4: General Description
(eg. smartphone), two stereo audio inputs for external audio sources, and a microphone capsule for voice messages to other FREEmk3, FREENETmk3, FREESOURCEmk3 and iFREE in the system. The amplification is provided by a class D digital stereo amplifier, which develops a maximum power of 25W per channel at 4 Ω... -
Page 5: Package Content
3 PACKAGE CONTENT 3.1 FREEMK3 MODEL TCIR5W Pila Li CR2032 Quick start guide 3.2 FREENETMK3 MODEL TCIR5W Pila Li CR2032 Quick start guide 3.3 FREESOURCEMK3 MODEL TCIR5W Pila Li CR2032 Quick start guide www.vivaldigroup.it... - Page 6 4 DEVICES DESCRIPTION 4.1 FREEMK3 - FREENETMK3 - FREESOURCEMK3 FRONT 1. Blue LED, only active during Boot; 2. Microphone capsule for intercom/paging functionalities (see Chapter 6.2.9); 3. Left arrow key << for menu navigation and specific operations in each source;...
- Page 7 21. OC1 pin for Intercom calls control between multiple devices (Digital I/O, see Chapter 6.4.5); 22. OC2 pin (Digital I/O, see Chapter 6.4.5); 23. IL pin (Digital I/O). Command VIVALDI optional accessories and devices in combination with FREEmk3 and FREENETmk3 (see Chapter 6.4.5);...
-
Page 8: Technical Specifications
4.4 INFRARED REMOTE CONTROLLER TCIR5 3 4 5 1. ON/OFF key, switch ON/OFF FREEmk3, FREENETmk3 or FREESOUCEmk3; 2. USB key, switch the device to USB source playback mode; 3. RADIO key, switch to FM or DAB+ radio source mode; 4. MIC key, switch between MIC IN and MIC OUT mode, in rotation;... -
Page 9: Source Menu
SOURCE MENU page. When the device is ON, after holding MENU key for approximately 2 seconds. Press Enter key to access SOURCE menu. Press MICROPHONE key to go back to the previous page. After 2 minutes of inactivity, FREEmk3, FREENETmk3 or FREESOUCEmk3 will go back to the main page automatically. www.vivaldigroup.it... -
Page 10: Sources List
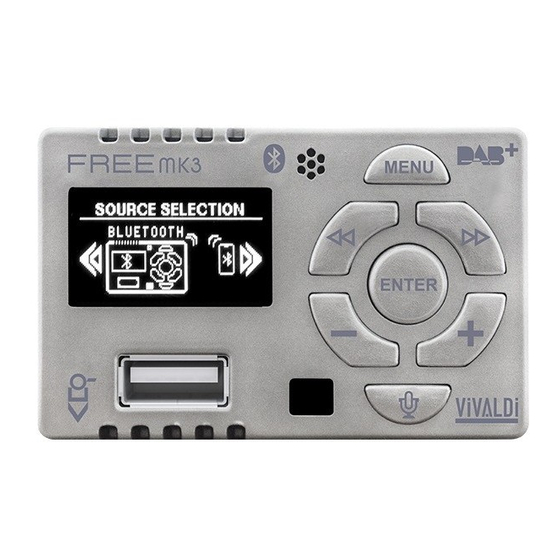
6.2.1 SOURCES LIST Sources list in FREEmk3, FREENETmk3 or FREESOUCEmk3. Scroll through available sources with + and – keys or with << and >>. Once in the desired source, press ENTER to select it. Available sources: FM RADIO, USB, BLUETOOTH, AUX1, AUX2 (on FREENETMK2, when in CA20MODE the additional sources will be displayed) MIC IN, MIC OUT. -
Page 11: Usb Source
(maximum 65534 folders) and so on. Supported audio formats: MP3, WMA, AAC. WARNING: Vivaldi does not guarantee proper operation with USB drives of higher capacity than 8GB or with diffe- rent file system than FAT16 or FAT32. -
Page 12: Bluetooth Source
(8mt in free air) audio streaming transmission from a mobile device (eg. Smartphone, laptop). To enter pairing mode press MENU key. FREEmk3, FREENETmk3 and FREESOURCEmk3 will appear on the available devices list in your smartphone with a default name VIVALDI_ , followed by a random alphanumeric code. -
Page 13: Aux 2 Source
FREESOURCEmk3 connected to each other. More specifically, MIC INPUT source allows to listen to the incoming audio signal on MIC input pin(see Chapter 4.2, section 15). Activating MIC INPUT source in one FREEmk3, FREENETmk3 or FREESOURCEmk3 and MIC OUTPUT source on another (see Chapter 6.2.8) FREEmk3, FREENETmk3 or FREESOURCEmk3, activates the monitoring of the zone set on MIC OUTPUT source. - Page 14 Press again MICROPHONE key to close the communication. After closing communications each FREEmk3 sets to its previous status. If MICROPHONE key is held during the call, the communication will be open until the key will be released.
-
Page 15: Setup Menu
If these devices are not present, it will only be possible to make collective microphone calls, that is from one device call all the others and vice-versa. With FREEmk3 it is possible to make addressed microphone calls only if FREECONTROL smart controller is present in the system. Otherwise it will only be possible to make collective microphone calls. -
Page 16: Clock Menu
CLOCK SETUP page in SETUP MENU. FREEmk3, FREENETmk3 and FREESOURCEmk3 have an integrated clock that allows the visualization of time and date on the stand-by screen. On FREEmk3, FREENETmk3 and FREESOURCEmk3 date and time can be set manually and stored as long as the device is powered. If the device is connected to a CA20/21/28L/28+ main unit or to iCONTROL4.1L/iCONTROL4.0+ smart server (only on FREE-... - Page 17 + and – keys to move between the pages. INFO page 3. This page reports the physical address for Vivaldi technical support use, the device’s ID on RS485 bus, the RS485 bus status (VivaNET). The bus status will be IDLE if the RS485 bus is inactive. This page displays also the packet latency (in ms) on the RS485 bus and a time counter from the last packet received (in ms).
- Page 18 INFO page 4. This page reports information about the current FM/DAB frequency, signal level, Signal to Noise Ratio (SNR) and RDS service availability. When FREEMmk3, FREENETmk3 and FREESOURCEmk3 is on FM RADIO or DAB+ source and this screen is visualized, it is possible to choose between the available stations with TCIR5 remote control (included) pressing <<...
-
Page 19: Alarm Menu
ALARM page on SETUP menu. With ALARM functionality, it is possible to set automatic wake-up or shutdown times on FREEmk3, FREENETmk3 and FREESOURCEmk3. It is also possible to set the source to be played and the volume level when the device wakes up automatically. Press ENTER to access the settings. -
Page 20: Advanced Setup Menu
AUDIO SETUP page on ADVANCED SETUP menu. In this page it is possible to configure all the audio parameters of FREEmk3, FREENETMmk3 e FREESOURCEmk3 , such as amplifier settings(not available on FREESOUR- CEmk3), AUX OUT and microphone input options. Press ENTER to access this section. - Page 21 Once done, press ENTER to confirm and save the settings. MN MODE: in ALL STEREO, both the power output and AUX OUT output of FREEmk3 and FREENETmk3 will be stereo. In AMPLI + PRE, both outputs will be mono. In ONLY AMPL, the power output will be mono, while the AUX OUT will be stereo.
- Page 22 MICin Vol.: values from 0 to 50. Set the volume level of MIC IN source FREEmk3, FREENETmk3 and FREE- SOURCEmk3 is called from another device connected to it. Default value: 10. IntMIC Alw ON: if ON the microphone capsule will always be active in any source or status of FREEmk3, FREE- NETmk3 and FREESOURCEmk3. Default value: OFF.
-
Page 23: Bluetooth Setup
BLUETOOTH SETUP page on ADVANCED SETUP menu. In this page it is possible to configure the Bluetooth parameters of FREEmk3, FREENETmk3 and FREESOURCEmk3. Press ENTER to access this section. BLUETOOTH OPTIONS page. Use << and >> keys to move between the parameters and pages. Use + and –... -
Page 24: Boot Setup
STBY: on YES, once the power is back after an interruption, FREEmk3, FREENETmk3 and FREESOURCEmk3 will be automatically put in stand by mode. on NO, once the power is back after an interruption FREEmk3, FREE- NETmk3 and FREESOURCEmk3, will automatically set the source and volume level specified in the next options. -
Page 25: Reset Option
6.4.4 RESET OPTION RESET OPTION page on ADVANCED SETUP menu. From this page it is possible to reset FREEmk3, FREENET- mk3 and FREESOURCEmk3. Press ENTER key to access this section. RESET OPTION page. Use << and >> keys to move between the parameters and pages. Use + and – keys to adjust the selected parameter. - Page 26 For each of the available I/O it will be possible to select through the appropriate configuration menu the following modes: 1. DISABLED : No active function 2. MIC CALL O/C : INPUT, OUTPUT or BOTH allows to make, receive an external call via the MIC signal. In HY- BRID mode the first person to make the call temporarily becomes MASTER and the remaining SLAVE.
- Page 27 I/O OPTIONS page 1. OC1 pin, connected in parallel between several FREEmk3, FREENETmk3 and FREE- SOURCEmk3 allows the collective microphone call between the devices. Use << and >> to move between the parameters. Use + and – keys to change the parameter’s value. Press ENTER to confirm.
- Page 28 CEmk3 allows to remotely turn ON/OFF the device (via a stable/unstable clean contact), or to simultaneously switch ON/OFF more devices connected to it, or control Vivaldi accessories. Use << and >> to move between the parameters. Use + and – keys to change the parameter’s value. Press ENTER to confirm.
- Page 29 Press ENTER key to access this section. VIVANET SETUP page 1. From this page it is possible to set the address of FREEmk3, FREENETmk3 and FREE- SOURCEmk3 on RS485 bus, as well as enable/disable the RS485 port. Use << and >> to move between the parameters.
-
Page 30: Firmware Update
FAT32 file system type. 6.4.8 SOURCE E SETUP ADVANCED SETUP menu screenshot that identifies the SETUP sources page of FREEmk3, FREENETMK3 and FREESOURCEmk3. On this screen you can turn off FM TUNER, DAB TUNER, USB sources by changing the value to OFF with the + and -keys. - Page 31 On this screen you can turn off the BLUETOOTH, AUX1, AUX2 sources by changing the value to OFF with the + and -keys. Sources in OFF will no longer appear in the SOURCE MENU list. By default all sources are active (ON). On this screen you can turn off MIC IN sources, MIC OUT by changing the value to OFF with the + keys and -.
-
Page 32: Adapter Assembly
7 ADAPTER ASSEMBLY 7.1 AD1 https://www.youtube.com/watch?v=02gGS1-hURQ 7.2 AD2 https://www.youtube.com/watch?v=S76XFWgrWO0 https://www.youtube.com/watch?v=h6-l8iCHYWg 7.3 AD3 https://www.youtube.com/watch?v=m3v1XL9iMck www.vivaldigroup.it... - Page 33 7.4 AD4 https://www.youtube.com/watch?v=2yqWcVNFClI 7.5 AD6 https://www.youtube.com/watch?v=SlK8eWV0fAc 7.6 AD7 https://www.youtube.com/watch?v=q8cNN6Q98bw https://www.youtube.com/watch?v=Am8_auQZMSM www.vivaldigroup.it...
- Page 34 7.7 AD8 https://www.youtube.com/watch?v=3XsAKIk2qVY 7.8 AD9 https://www.youtube.com/watch?v=kjF5Qb11g9o 7.9 AD10 https://www.youtube.com/watch?v=OR7LXJFVzDI 7.10 AD12 https://www.youtube.com/watch?v=7PwWmx2BA8k www.vivaldigroup.it...
- Page 35 7.11 AD13 https://www.youtube.com/watch?v=I2oHq6BWZow 7.12 AD14 https://www.youtube.com/watch?v=iFapvwex1Ak 8 WALL MOUNTING AND TEMPERATURES OPERATING The device must be fixed through the appropriate adapter to the support of the chosen civil series, and using screws in equipment attach it to the recessed box at a height not exceeding 2mt. It is recommended not to mount it under temperature/humidity detectors.
-
Page 36: Connection Diagrams
9 CONNECTION DIAGRAMS 9.1 BASE CONNECTION FREEMK3/FREENETMK3 MAX 4 SPKS 8Ω 2 FOR CHANNEL TO MIC PIN OF OTHERS FREE POWER SUPPLY TO ANTENNA 24 VDC SPLITTER IR OUT COMMUNICATION BUS RS 485 IR OUT AUX IN 1 AND 2... - Page 37 9.2 KEYSOL CONNECTION OR EXTERNAL SOURCE ON FREEMK3/ FREENETMK3 TO ANTENNA POWER SUPPLY POWER SUPPLY TO ANTENNA SPLITTER SPLITTER 24 VDC 24 VDC KEYSOL CONNECTOR WITH 2 FREEMK3/FREENETMK3 VIV MICRO 2 VIV MICRO 2 MINI JACK STEREO CONNECTOR NETWORK SWITCH POWER SUPPLY 9.3 MICROPHONE CONNECTION FREEMK3/FREENETMK3...
- Page 38 9.4 FREEMK3 CONNECTION WITH FREECONTROL MAX 4 SPK. 8Ω 2 FOR CHANNEL TO NETWORK SWITCH cable TO MIC PIN OF 2x1 mm OTHERS FREE POWER SUPPLY TO ANTENNA 24VDC SPLITTER vivaldigroup.it 9.5 FREENETMK3 CONNECTION WITH ICONTROL4.0+ MAX 4 SPK. 8Ω...
- Page 39 9.6 CONNECTION OF 3 SPEAKERS ON FREEMK3 FREENETMK3 IN CASE OF 3 SPEAKERS CONNECTION IT IS RECOMMENDED TO SET FREE IN MONO MODE POWER SUPPLY TO ANTENNA 24VDC SPLITTER 9.7 CONNECTION OF 4 SPEAKERS ON FREEMK3/FREENETMK3 IN CASE OF 4 SPEAKERS...
- Page 40 9.8 MASTER/SLAVE CONNECTION OF FREEMK3/FREENETMK3 FOR OC2 PIN SETTINGS SEE PARAGRAPH 6.4.5 MAX 4 SPK. 8Ω MAX 4 SPK. 8Ω 2 FOR CHANNEL 2 FOR CHANNEL MASTER DEVICE SLAVE DEVICE TO ANTENNA TO ANTENNA POWER SUPPLY POWER SUPPLY SPLITTER SPLITTER...
- Page 41 © 2022Vivaldi Srl © 2022Vivaldi Srl Vivaldi srl nel costante impegno di migliorare i propri prodotti si riserva il diritto di apportare modi che tecniche ed estetiche senza alcun obbligo di preavviso. Vivaldi srl nel costante impegno di migliorare i propri prodotti si riserva il diritto di apportare...
Need help?
Do you have a question about the FREENETMK3 and is the answer not in the manual?
Questions and answers