
Related Manuals for PROSTAT+ OEM PSP4272


Summary of Contents for PROSTAT+ OEM PSP4272
- Page 1 User Manual 7 Day Programmable Thermostat PSP2270 Up to 2-heat / 2-cool with Wi-Fi and Local API Read all instructions before proceeding. Store this manual for future reference © Copyright 2021 All Rights Reserved. Made in China...
- Page 2 Follow the Installation Instructions before proceeding. CAUTION Set the thermostat mode to “OFF” prior to changing settings in setup or restoring Factory Defaults. FCC Compliance Statement This equipment has been tested and found to comply with the limits for an intentional radiator, pursuant to Part 15, subpart C of the FCC rules.
- Page 3 Under Industry Canada regulations, this radio transmitter may only operate using an antenna of a type and maximum (or lesser) gain approved for the transmitter by Industry Canada. To reduce potential radio interference to other users, the antenna type and its gain should be so chosen that the equivalent isotropically radiated power (e.i.r.p.) is not more than that necessary for successful communication.
-
Page 4: Table Of Contents
Contents 3 Setup Step Table ........14 Features ............5 Terms ............6 How to Change Settings in the Setup Screens ........15 1 About Your Thermostat Setting the Clock and Day ......15 Front Panel ..........7 Backlight ..........15 Display ............8 Locking/Unlocking the Keypad ....16 2 Basic Operation Programming a Daily Schedule ....17 Selecting your Desired Temperature ..10... -
Page 5: Features
Congratulations and thank you for purchasing your new ProStat+ Mini thermostat. This guide is intended to help you install and setup the basic features of your Thermostat. Features • Wi-Fi Built In — Compatible with • Non-volatile memory ProStat+ Web Portal Services & •... -
Page 6: Terms
Terms Auto-Changeover: A mode in which the thermostat will turn on the heating or cooling based on room temperature demand. Cool Setpoint: The warmest temperature that the space should rise to before cooling is turned on (without regard to deadband). Deadband: The number of degrees the thermostat will wait, once a setpoint has been reached, before energizing heating or cooling. -
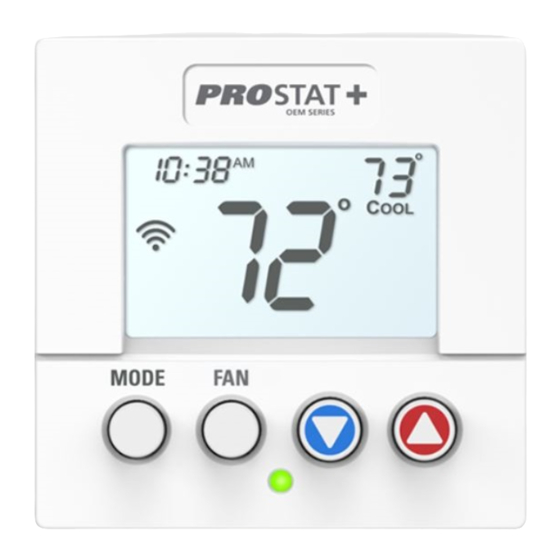
Page 7: About Your Thermostat Front Panel
1 About Your Thermostat Front Panel 1 Backlit Display 2 Up/Warmer, Down/Cooler Buttons 3 MODE Button 4 FAN Button 5 Heat or Cool Indicator Heat = Red, Cool = Green TO ENTER MENUS BUTTON PRESS Setup Steps MODE & FAN for 5 seconds Table for button presses Time Schedule MODE &... -
Page 8: Display
Display 1 Mode Indicators Selects the operational mode of the equipment. HEAT - Indicates the heating mode. COOL - Indicates the cooling mode. AUTO - Indicates the system will automatically changeover between heat and cool modes as the temperature varies. OFF - Indicates heating and cooling are turned off. - Page 9 5 Morning, Day, Evening & Night icons Indicates the day part of the time period program. 6 Setup icon Indicates the thermostat is in the setup mode. 7 Fan icon When only the Fan icon is displayed, the fan is always on. If the FAN is not on the display, then the FAN is in Auto mode and will run only when necessary to heat or cool.
-
Page 10: Basic Operation
2 Basic Operation Selecting Your Desired Temperature (adjusting the setpoints) Auto-Changeover Mode Pressing the WARMER or COOLER buttons in Auto mode will adjust both the heat and cool setpoints simultaneously. To adjust the heat and cool setpoints individually, choose HEAT mode to adjust the heat setpoint, and COOL mode to adjust the cool setpoint, then return to AUTO mode. -
Page 11: Connect To Wi-Fi
Connect to Wi-Fi Overview At minimumm the first 3 tasks below must be completed to access your thermostat remotely from a browser. The 4th step is optional (highly recommended) and only is needed to access your thermostat(s) from a mobile device. These steps are: 1. -
Page 12: Connect To Prostat
Wi-Fi Setup The ProStat+ Configurator App is needed to configure the Wi-Fi Settings of this thermostat • Download the ProStat+ Configurator App from your mobile device’s App Store. • Open the ProStat+ Configurator App - Choose the ProStat+ Mini thermostat picture. - Press and hold the FAN button of the thermostat for approximately 5 seconds to enter Wi-Fi setup screens. - Page 13 Join a Thermostat to the ProStat+ web portal If the thermostat is connected to the local Wi-Fi access point but not yet joined to an existing account, you may join the thermostat to the account by doing the following: 1. Log in to your ProStat+ web portal account. 2.
-
Page 14: Setup Step Table
3 Setup Step Table Step# Description Pg# Range FD = Factory Set Clock 12A - 12A Default Set Day of Week Monday - Sunday Setting Backlight On, Off, 6pm-6am Night Dimmer On/Off Night Dimmer Start Time 12A - 12A 8:00PM Night Dimmer Stop Time 12A - 12A 6:00AM... -
Page 15: How To Change Settings In The Setup Screens
How to Change Settings in the Setup Screens To enter the setup screens, press the MODE button, and simultaneously press FAN button for 5 seconds. Release the buttons when you see “Setup” on the display. Use the WARMER or COOLER buttons to adjust the value of your selection. -
Page 16: Locking/Unlocking The Keypad
Locking/Unlocking the Keypad To prevent unauthorized use of the thermostat, the front panel buttons may be disabled. To disable, or ‘lock’ the keypad, press and hold the MODE button. While holding the MODE button, press the WARMER and COOLER buttons together, icon will appear on the display, then release the buttons. -
Page 17: Programming A Daily Schedule
Programming a Daily Schedule Programming a Daily Schedule - To enter Time Period Programming screens, press and hold MODE and UP until the scrolling prompt appears. Select Day of Week to program - Press the WARMER or COOLER buttons to choose the day of the week. -
Page 18: Advanced Features & Operation
Copy Program - Press the UP button to Copy the current day’s program to the next day. Press Mode again to continue copying the following day. Press and hold the MODE and WARMER buttons to exit Time Period Programming at any time. Press the MODE button to cycle through OFF, then the available modes (Setup Step 28) until Program ON is displayed. -
Page 19: Factory Defaults
Factory Defaults If, for any reason, you desire to return all the stored settings back to the factory default settings, follow the instructions below. WARNING: This will reset all Time Period and Advanced Programming to the default settings. Any information entered prior to this reset will be permanently lost. Place the thermostat in the OFF mode. - Page 20 Select one of the below options using the UP or DOWN buttons. Restore the factory settings to just Wi-Fi (Wi-Fi), or just the thermostat (STAT), or both the thermostat and Wi-Fi (ALL). Press FAN for 2 seconds to restore the factory settings. After factory settings are restored, the thermostat display will return to the “all icon”...
-
Page 21: Warranty
Limited Warranty PSP Series - Thermostat Models: PSP1100, PSP1152, PSP2100, PSP2152, PSP2270, PSP2270C, PSP2111, PSP4272, PSP4273, PSP4271C, PSP4272C, PSP4272RT, PSP4273RT, PSP4272CT, PSP4273CT Who Is Providing The Warranty? For further information about this warranty contact Consumer Affairs at This warranty is provided to you by Goodman Manufacturing Company, (877) 254-4729 or by mail to 19001 Kermier Rd, Waller, Texas 77484 L.P. - Page 22 (3) For products on which a manufacture date is indicated, if the date the Some states and provinces do not allow the exclusion or limitation of owner purchases the residence from the builder or the date the product incidental or consequential damages, so the above exclusion may not is originally installed cannot be verified, the installation date is three apply to you.
- Page 23 scope or applicability of this Arbitration Clause. The arbitration Ontario, M4P 1K5, www.amic.org). These organizations’ rules can be requirement applies to claims in contract and tort, pursuant to obtained by contacting the organization or visiting its website. If the statute, or otherwise. chosen arbitration organization’s rules conflict with this Arbitration Clause, the provisions of this Arbitration Clause control.
- Page 24 Innovation, Science and Economic Development Canada ICES-003 Compliance Label: CAN ICES-3 (B)/NM8-3(B) rev. 4 05/2021 88-1471...
Need help?
Do you have a question about the OEM PSP4272 and is the answer not in the manual?
Questions and answers