Table of Contents
Advertisement
Quick Links
Commercial Smart Wi-Fi Thermostat
PSP4271C
PSP4271C User Manual.indd 1
PSP4271C User Manual.indd 1
Up to 4-heat / 2-cool with Humidity Control
OPTIONAL Wi-Fi and Local API with module
Read all instructions before proceeding.
Store this manual for future reference
User Manual
© Copyright 2021 All Rights Reserved. Made in China
6/9/21 10:37 AM
6/9/21 10:37 AM
Advertisement
Table of Contents

Related Manuals for PROSTAT+ OEM PSP4271C


Summary of Contents for PROSTAT+ OEM PSP4271C
- Page 1 User Manual Commercial Smart Wi-Fi Thermostat PSP4271C Up to 4-heat / 2-cool with Humidity Control OPTIONAL Wi-Fi and Local API with module Read all instructions before proceeding. Store this manual for future reference © Copyright 2021 All Rights Reserved. Made in China PSP4271C User Manual.indd 1 PSP4271C User Manual.indd 1 6/9/21 10:37 AM...
- Page 2 Follow the Installation Instructions before proceeding. Set the thermostat CAUTION mode to “OFF” prior to changing settings in setup or restoring Factory Defaults. FCC Compliance Statement This equipment has been tested and found to comply with the limits for an intentional radiator, pursuant to Part 15, subpart C of the FCC rules.
- Page 3 Under Industry Canada regulations, this radio transmitter may only operate using an antenna of a type and maximum (or lesser) gain approved for the transmitter by Industry Canada. To reduce potential radio interference to other users, the antenna type and its gain should be so chosen that the equivalent isotropically radiated power (e.i.r.p.) is not more than that necessary for successful communication.
-
Page 4: Table Of Contents
Contents 3 Setup Step Table ...........15 Features ...............5 Terms ................6 How to Change Settings in the Setup Screens .....17 Programming a Daily Schedule ........18 1 About Your Thermostat Backlight ..............20 Front Panel ..............7 Display .................9 4 Advanced Features & Operation Emergency Heat ............20 2 Basic Operation Wi-Fi Module .............21... -
Page 5: Features
Congratulations and thank you for purchasing your new ProStat + Smart Wi-Fi thermostat. This guide is intended to help you install and setup the basic features of your thermostat. Features • Choose 7-Day, 5/1/1 day or 1-Day Programming • Smart recovery auto-adjusts Occ 1 start time •... -
Page 6: Terms
Terms Auto-Changeover: A mode in which the thermostat will turn on the heating or cooling based on room temperature demand. Cool Setpoint: The warmest temperature that the space should rise to before cooling is turned on (without regard to deadband). Deadband: The number of degrees the thermostat will wait, once a setpoint has been reached, before energizing heating or cooling. -
Page 7: About Your Thermostat
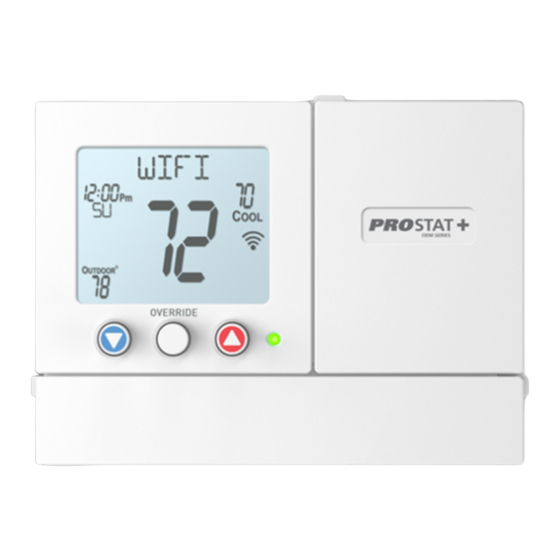
1 About Your Thermostat Front Display 1 Backlit, Scrolling LCD Display 2 OVERRIDE Button 3 Warmer & Cooler Buttons 4 Heat or Cool Indicator Heat = Red, Cool = Green 5 Setup Buttons behind door TO ENTER MENUS BUTTON PRESS Setup Steps Press SETUP button Table for button presses... - Page 8 Button Callouts Inside Doors User Manual PSP4271C User Manual.indd 8 PSP4271C User Manual.indd 8 6/9/21 10:37 AM 6/9/21 10:37 AM...
-
Page 9: Display
Display Features 1 The scrolling display will be used to help you easily navigate the setup screens in the thermostat. 2 Clock with Day of the Week Indicates the current time and day. This clock is also used to program the time period schedules. 3 Mode Indicators Selects the operational mode of the equipment. - Page 10 Display Features Desired Set Temperature Indicates desired room temperature(s). Also displays the highest and lowest temperatures for the day. Wi-Fi icons One dot indicates the thermostat recognizes the wireless module. The “full” icon indicates the thermostat is currently connected to the Local access point, via the optional Wi-Fi Module. Setup Step icon Indicates the step number when the thermostat is in the setup mode.
- Page 11 Display Features 12 AuxHeat icon Indicates 2nd stage electric strip heat is being used when the thermostat is programmed for Heat Pump operation. 13 Lo icon Indicates the lowest recorded outdoor temperature for the day.* 14 Hi icon Indicates the highest recorded outdoor temperature for the day.* 15 Fan On icon Indicates constant, continuous fan operation.
-
Page 12: Basic Operation
2 Basic Operation During Setup and Programming: Press the WARMER or COOLER buttons to modify the selection. Press the MODE button to advance and confirm through the setup steps. Setting the Clock and Day* *Not available when connected to a ProStat + Account Press the SET CLOCK button. -
Page 13: Selecting Your Desired Temperature
Selecting Your Desired Temperature (adjusting the setpoints) Auto-Changeover Mode Pressing the WARMER or COOLER buttons in Auto mode will adjust both the heat and cool setpoints simultaneously. To adjust the heat and cool setpoints individually, choose HEAT mode to adjust the heat setpoint, and COOL mode to adjust the cool setpoint, then return to AUTO mode. -
Page 14: Viewing The Temperature Sensors
If the maximum time has been set, the next press of the OVERRIDE button will reset the timer and return the thermostat to the correct time period program for the day. Occupied Operation - During programmed, occupied periods, pressing the OVERRIDE button will force the thermostat into an unoccupied period for the rest of the day. -
Page 15: Setup Step Table
3 Setup Step Table FD = Factory Default Setting Step# Description Pg# Range Prog Mode Non, 1 Day, 5/1/1 Day, 7 Day 7 Day Available Modes Heat/Cool/Auto/Off, Heat/Cool/ Heat/Cool/Off, Heat/Off, Cool/Off Auto/Off Backlight On, Off Backlight Level Off thru 7 levels of brightness Level 5 Night Dimmer On/Off... - Page 16 Step# Description Pg# Range Number of Cool Stages 0 - 2 Number Of Compressor Stages 1, 2 Number of Aux Stages 0, 1, 2 1st Stage Deadband 1 - 6 Degrees 2nd Stage Deadband 0 - 10 Degrees 3rd Stage Deadband 0 - 10 Degrees 4th Stage Deadband 0 - 10 Degrees...
-
Page 17: How To Change Settings In The Setup Screens
How to Change Settings in the Setup Screens To enter Setup screens, press the SETUP button, then press WARMER WARMER MODE. Use the WARMER or COOLER buttons to adjust the value of your selection. Press MODE to advance to the next setup step. MODE MODE Clock... -
Page 18: Programming A Daily Schedule
Programming a Daily Time Period Schedule To enable (RUN) or turn ON the Time Period Schedule press the Program button momentarily. To turn Off the Time Period Schedule press this button again. To alter the Time Period Schedule settings; press & hold this button for 5 seconds until the SET PROGRAM prompt appears. Modify the settings with the Warmer and Cooler buttons. - Page 19 Select the Mode for the Occupied period – Press the Warmer or Cooler buttons to choose the mode for the occupied period. The choices are: Off, Heat only, Cool only and AUTO changeover. Adjust the Occupied Cool Setpoint – Press the Warmer or Cooler buttons to adjust the Cooling setpoint for comfort. Adjust the Occupied Heat Setpoint –...
-
Page 20: Backlight
Backlight (Setup Steps 3-8): Press Setup and then Mode over and over to advance to step #3 Backlight (Setup Step 3) Off - Backlight turns on only with a button press and turns off after 8 seconds. On - Backlight is on continuously. Backlight Intensity Level (Setup Step 4) - The backlight can be adjusted between Off and seven levels of brightness Night Dimmer (setup step 5) - Selecting On allows for automatic dimming of the display at night. -
Page 21: Wi-Fi Module
Please follow the instructions included with the PSPAC-PWF Wi-Fi module to Wi-Fi Module connect to an Access Point or view status. The general instructions are below. Wi-Fi Module If the is present on the display then the thermosat is connected to the Wi-Fi Access Point. -
Page 22: Factory Defaults
Resetting the thermostat to Factory Defaults (for default values see Advanced Setup Table) If, for any reason, you desire to return all the stored settings back to the factory default settings, follow the instructions below. WARNING: This will reset all Time Period and Advanced Programming to the default settings. Any information entered prior to this reset will be permanently lost. - Page 23 PSP4271C User Manual.indd 23 PSP4271C User Manual.indd 23 6/9/21 10:37 AM 6/9/21 10:37 AM...
- Page 24 Innovation, Science and Economic Development Canada ICES-003 Compliance Label: CAN ICES-3 (B)/NM8-3(B) rev. 2 06/09/2021 88-1465 PSP4271C User Manual.indd 24 PSP4271C User Manual.indd 24 6/9/21 10:37 AM 6/9/21 10:37 AM...
Need help?
Do you have a question about the OEM PSP4271C and is the answer not in the manual?
Questions and answers