
Related Manuals for Spektrum SR6200A


Summary of Contents for Spektrum SR6200A
- Page 1 5-Channel 2.4GHz DSMR Radio System ® Instruction Manual Bedienungsanleitung Manuel d’utilisation Manuale di istruzioni SPM5210...
- Page 2 WARNING AGAINST COUNTERFEIT PRODUCTS Always purchase from a Horizon Hobby, LLC authorized dealer to ensure authentic high-quality Spektrum product. Horizon Hobby, LLC disclaims all support and warranty with regards, but not limited to, compatibility and performance of counterfeit products or products claiming compatibility with DSM or Spektrum technology.
-
Page 3: Table Of Contents
DSMR and DSM2 Receivers. ™ ® ® • SPM5210 includes the SR6200A DSMR receiver with AVC technology GETTING STARTED DAILY DRIVING WITH AVC 1. Turn on transmitter first 2. Turn on vehicle* (SRS6200A AVC Receiver) 3. Turn off vehicle first 1. -
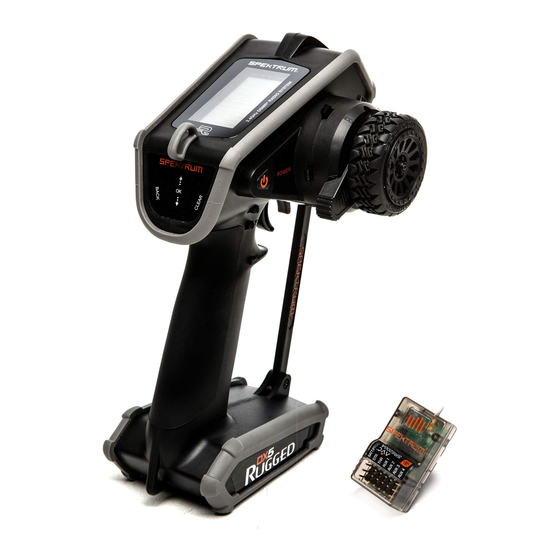
Page 4: Sr6200A Reciever
(BATT) port to power on receiver. battery data from compatible Spektrum SMART batteries. POWERING THE RECEIVER WITH AN ESC The SR6200A is compatible with the Spektrum Firma™ line of ESCs for SMART Throttle. Connect the steering servo to the steering port (STR) NORMAL SERVO SIGNAL (PWM) Connect the throttle servo to the throttle port (THR). -
Page 5: Binding And Calibrating
IMPORTANT: You must rebind the transmitter and receiver if you: • Change the servo reversing after binding Binding is the process of linking the SR6200A receiver to your Spektrum transmitter. The AVC features on the receiver can be enabled or disabled •... -
Page 6: Identifying Controls And Switches
E: Position of Steering (STR) trim F: Position of Throttle (THR) trim G: Position of Brake (BRK) trim H: Position of AUX 1 trim I: Position of AUX 2 trim J: Position of AUX 3 trim SPEKTRUM DX5 RUGGED • TRANSMITTER INSTRUCTION MANUAL... -
Page 7: Navigation
The DX5 Rugged does not allow switch assignments to be over- SPEKTRUM DX5 RUGGED • TRANSMITTER INSTRUCTION MANUAL... -
Page 8: Menu
4. Select Back Button to return to the MENU. To erase a character(s): 5. Press the Clear button while the character is selected. 6. Press the Clear button a second time to erase all characters to the right of the cursor. SPEKTRUM DX5 RUGGED • TRANSMITTER INSTRUCTION MANUAL... -
Page 9: Travel
2. Slide Up or Down to adjust the speed and press OK to save the selection. 3. Select a switch to activate/deactivate the function. If Switch ON is selected, the value will always be on for that function. SPEKTRUM DX5 RUGGED • TRANSMITTER INSTRUCTION MANUAL... -
Page 10: Rates
The DX5 Rugged Timer function allows you to program a countdown timer and stop watch (count up timer) to display on the main screen. An alarm sounds when the programmed time is reached. You can program the timer to start using the assigned switch position or automatically when the throttle moves above a pre-programmed position. SPEKTRUM DX5 RUGGED • TRANSMITTER INSTRUCTION MANUAL... -
Page 11: Bind/Frame Menu
NOTICE: Always remove the bind plug from the receiver when the bind Process is complete. Failure to do so will cause the receiver to enter bind mode the next time you power on the receiver. SPEKTRUM DX5 RUGGED • TRANSMITTER INSTRUCTION MANUAL... -
Page 12: Mixing
3. Select Switch; Inh will disable the mix, ON will activate the mix, or a switch can be assigned to turn the mix on and off. 4. Set Trim to Act or Inh (Default). When Trim is Active, adjustments to the Master trim carries over to the Slave channel. SPEKTRUM DX5 RUGGED • TRANSMITTER INSTRUCTION MANUAL... -
Page 13: Avc Programming Menu
Channel Assign allows for the assigning of a switch or trimmer as input to an AUX channel. Channel assign: 1. Select a channel to edit. Press OK to save the selection. 2. Slide Up/Down or toggle a switch/button to assign. 3. Press OK to save the selection. SPEKTRUM DX5 RUGGED • TRANSMITTER INSTRUCTION MANUAL... -
Page 14: Telemetry
Spektrum SMART batteries. SMART Throttle telemetry data shows up on your transmitter like any other telemetry sensor. For SMART Throttle to function you must have a compatible Spektrum ESC, and telemetry receiver to pair with your DX5C. Only certain Spektrum products include SMART technology compatibility, check your receiver and ESC manual for more information. -
Page 15: Settings
2. Press OK once to Activate/Inhibit. 3. Press OK to save the selection. About Displays the transmitter’s Serial Number. Start a user account at SpektrumRC.com and enter the serial number displayed on the About page register the transmitter. SPEKTRUM DX5 RUGGED • TRANSMITTER INSTRUCTION MANUAL... -
Page 16: Settings (Continued)
If the DX5 Rugged is updated, use the Validate All selection to ensure model settings are updated to be fully compatible with the new firmware. The Delete All selection will delete all model settings.v SPEKTRUM DX5 RUGGED • TRANSMITTER INSTRUCTION MANUAL... -
Page 17: Model Utilities (Continued)
OK to select it. Use the slide button to move the selected model to the position desired. Press OK when you have the model in the position desired. SPEKTRUM DX5 RUGGED • TRANSMITTER INSTRUCTION MANUAL... -
Page 18: Physical Transmitter Adjustments
Data port and tool holder. The tool holder (B) is designed to hold the transmitter is neccesary for updates. Updates require the common 4 way wrenches. SPMA3065 update cable (not included and requires a PC). SPEKTRUM DX5 RUGGED • TRANSMITTER INSTRUCTION MANUAL... -
Page 19: Avc Tuning
For example: If a truck set up for 2S is upgraded to 3S, the truck may oscillate at high speeds on 3S, requiring steering gain to be reduced. Throttle gain will have a bigger effect on 3S, so increasing throttle gain may be beneficial. SPEKTRUM DX5 RUGGED • TRANSMITTER INSTRUCTION MANUAL... -
Page 20: Troubleshooting Guide
Re-bind with the second bind plug in the disable port inserted after binding OPTIONAL PARTS LIST PART # PARTS DESCRIPTION SPM6719 Spektrum DX6R Transmitter Case Additional optional parts and details are available at SpektrumRC.com SPEKTRUM DX5 RUGGED • TRANSMITTER INSTRUCTION MANUAL... -
Page 21: 1-Year Limited Warranty
Once assembly, setup or use of the Product has been started, you must contact your local distributor or Horizon directly. This will enable Horizon to better answer your 10-15 SPEKTRUM DX5 RUGGED • TRANSMITTER INSTRUCTION MANUAL... -
Page 22: Warranty And Service Contact Information
• Connect the equipment into an outlet on a circuit different from that to which the receiver is connected. • Consult the dealer or an experienced radio/TV technician for help. Horizon Hobby, LLC 2904 Research Rd. Champaign, IL 61822 Email: compliance@horizonhobby.com Web: HorizonHobby.com SPEKTRUM DX5 RUGGED • TRANSMITTER INSTRUCTION MANUAL... -
Page 23: Ic Information
For more information about where you can drop off your waste equipment for recycling, please contact your local city office, your household waste disposal service or where you purchased the product. SPEKTRUM DX5 RUGGED • TRANSMITTER INSTRUCTION MANUAL... - Page 24 DSM, DSM2, DSMR, SmartSafe, AVC and Active Vehicle Control are trademarks or registered trademarks of Horizon Hobby, LLC. The Spektrum trademark is used with permission of Bachmann Industries, Inc. All other trademarks, service marks and logos are property of their respective owners.
Need help?
Do you have a question about the SR6200A and is the answer not in the manual?
Questions and answers