Table of Contents
Advertisement
Advertisement
Table of Contents

Related Manuals for Leica TC805


Summary of Contents for Leica TC805
- Page 2 Thank you for purchasing this Leica Total Station. This manual contains important safety directions (refer to section "Safety directions") as well as instructions for setting up the instrument and operating it. Please read carefully through the User Manual to achieve maximum satisfaction.
- Page 3 Write the model and serial number of your instrument in the space provided below, and always quote this information when you need to contact your agency or service workshop. Type: Serial no.: © Leica TC605/TC805/TC905/L-1.1.1en...
- Page 4 / or appreciable material, financial and environmental damage. Important paragraphs which must be adhered to in practice as they enable the product to be used in a technically correct and efficient manner. TC605/TC805/TC905/L-1.1.1en © Leica...
-
Page 5: Table Of Contents
Display of recorded measurements Measure and record with coding Coding Input a new code line to the code list Function "Quick-Code" Simple code input during measurements Additional entries to selected code Recording codes Searching for codes using wildcards © Leica TC605/TC805/TC905/L-1.1.1en... - Page 6 EDM Configuration (EDM CONF) 1. EDM mode 2. EGL (Guide Light) 3. INTENS 4. RETTAP Testing the instrument Battery and instrument temperature EDM Signal (INTENSITY) Configuration (CONFIG MENU) Distance corrections Display contrast (CONTRA) Data and recording parameter (REC DATA) TC605/TC805/TC905/L-1.1.1en © Leica...
- Page 7 Selecting units (UNITS) Setting time and date (TIME/DATE) Automatic switch-off (ON/OFF) TCTOOLS Other data formats Communication TC605/TC805/TC905/L and PC/Datalogger Set a point number Set station coordinates Set orientation Setting-out Checking and adjusting Determine instrument errors (CALIB) Vertical index error Line-of-sight error (Hz-collimation)
-
Page 8: Introduction
The TC605/TC805/TC905/L is particularly suitable for engineering, building and construction surveys with a focus on setting outs, volume determinations and tacheometry surveys. Fast and easy coding facilities are provided. The accuracy of angle-measuring, and the range of its EDM module, are matched to one another. -
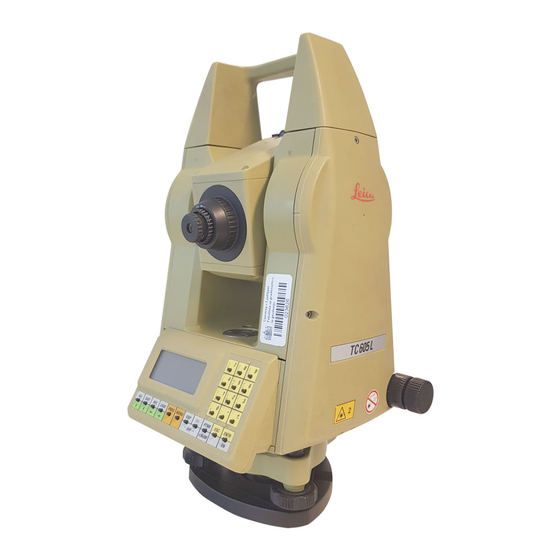
Page 9: Important Parts
TC605/L 1 Foot screw 7 Battery 2 Keyboard 8 Vertical drive 3 Display 9 Horizontal drive 4 Focusing 10 Serial Interface 5 Carrying handle RS-232 6 EDM transmitter 11 Circular level 12 Optical sight © Leica TC605/TC805/TC905/L-1.1.1en... - Page 10 3 11 1 Foot screw 8 Vertical drive 2 Keyboard 9 Horizontal drive 3 Display 10 Serial Interface 4 Focusing RS-232 5 Carrying handle 11 Circular level 6 EDM, Telescope 12 Optical sight 7 Battery 13 EGL1 (optional) TC605/TC805/TC905/L-1.1.1en © Leica...
- Page 11 3 11 1 Foot screw 8 Vertical drive 2 Keyboard 9 Horizontal drive 3 Display 10 Serial Interface 4 Focusing RS-232 5 Carrying handle 11 Circular level 6 EDM, Telescope 12 Optical sight 7 Battery 13 EGL1 (optional) © Leica TC605/TC805/TC905/L-1.1.1en...
-
Page 12: Set-Up, Getting Started
Remove TC605/TC805/TC905/L from transport case and check for completeness: 1 Instrument 6 Diskette with 2 User's Manual TCTOOLS 3 Protective cover 7 Spare battery 4 Set of pins (optional) 5 Allen key 8 Data cable (RS232) TC605/TC805/TC905/L-1.1.1en © Leica... -
Page 13: Charging Battery
GEB77 1.0 hours External batteries: GEB70 1.5 hours GEB71 5.0 hours (Refer also to chapter "Technical Data") WARNING: The battery chargers are intended for indoor use. Only use a battery charger in a dry place, never outdoors. © Leica TC605/TC805/TC905/L-1.1.1en... -
Page 14: Set-Up
Tribrach with optical plummet 5/8" thread Set-up TC605/TC805/ TC905 with tribrach GDF 22 GDF 22 and tripod GST20 GST20 TC605/TC805/TC905/L-1.1.1en © Leica... -
Page 15: Tribrach Without Optical Plummet
Tribrach without optical plummet 5/8"- thread Set-up TC605/TC805/ TC905 with tribrach GDF 21 GDF 21 and tripod GST20 GST20 © Leica TC605/TC805/TC905/L-1.1.1en... -
Page 16: Instrument With Laser Plummet
Press (for about 2 seconds) until the following display appears. The laser plummet is switched on (red spot on ground) and the electronic level is shown. PLUMMET ON: 5/8"-thread tribrach tripod Switch off plummet and quit display. TC605/TC805/TC905/L-1.1.1en © Leica... -
Page 17: Level Instrument With The Electronic Level
◊ MENU à 1.SET HZ à à 2.LEVEL à 3.DATA MANAGER LEVEL: Insufficient levelling-up LEVEL: Perfect levelling-up The TC605/TC805/TC905/L unit is correctly levelled- up when the triangles are visible only or markers are displayed between the triangles. © Leica TC605/TC805/TC905/L-1.1.1en... -
Page 18: Operating Concept
- in addition, within brackets in US ft (feet) Units of angle: - in ° ' " - in addition, within brackets in gon Units of temperature: - in °C - in addition, within brackets in °F TC605/TC805/TC905/L-1.1.1en © Leica... -
Page 19: Display And Keyboard
◊ MENU Heading à 1.SET HZ à Dialog area à 2.LEVEL 3.DATA MANAGER à Control keys The four colour groupings for the keys are: Grey: Fixed keys Orange: Programs and functions Green: Control keys Yellow: Input keys © Leica TC605/TC805/TC905/L-1.1.1en... -
Page 20: Fixed Keys
Switches between numbers and characters during input of point numbers and coding (assignment of Turns the instrument OFF. Function keys Calls up the on board applications. Calls up the main menu (short press). Calls up the configurations menu: long press (about 2 seconds). TC605/TC805/TC905/L-1.1.1en © Leica... -
Page 21: Control Keys
For input of numbers and alphanumeric characters. Enters the decimal point and alphanumeric characters. Switches between positive/negative sign; inserts a "*" for wildcard search when using the key. Confirms input and values. Interrupts active function; Deletes error messages; Quits inputs without accepting values. © Leica TC605/TC805/TC905/L-1.1.1en... -
Page 22: Inputs
"α". Available alphanumeric characters are: A to Z, Space, /, $, %, _ , , . , &. ◊ Indiv.Pt/Pt/hr iPt: à Ptα +0000B017 0.000 The entry of alphanumeric characters is the same as on mobile phones. TC605/TC805/TC905/L-1.1.1en © Leica... -
Page 23: Entering Reflector Height
à 3.DATA MANAGER à 4.EDM CONF ∧ MENU à 3.DATA MANAGER à 4.EDM CONF à à 5.TEST Cursor for indicating additional functions. ∧ SET JOB Job: The point marks a Ope: permanent indication. • Dat: 12/03/97 © Leica TC605/TC805/TC905/L-1.1.1en... -
Page 24: Menu Tree (Main Menu)
4. RETTAP Set Retro Tape as target (ON/OFF) 5. TEST INTENSITY Display of signal strengh of EDM BATTERY Display of battery voltage TEMP °C Display of internal temperature of instrument * EGL is an optional accessory for TC805/TC905/L TC605/TC805/TC905/L-1.1.1en © Leica... -
Page 25: Menu Tree (Configuration)
Beep at 90°, 180°, 270°, 360° (on, off) 3. COMP Compensator (on, off) 4. HZcomp Correction of Hz-angle for standing-axis tilt (active if on) 5. HZcoll Line of sight error (Hz-collimation) (on, off) 6. AUToff Automatic switch-off (on, off) © Leica TC605/TC805/TC905/L-1.1.1en... -
Page 26: Menu Tree (Programs)
Several settings for measuring can be carried out under (EDM conf) EDM CONF (only TC805/905/L) (eg. selecting the EDM mode, Guidelight EGL ON/OFF, setting retro tape as target, etc.) Testing (TEST) TEST contains different functions specifying status of instrument (e.g. battery etc.) TC605/TC805/TC905/L-1.1.1en © Leica... -
Page 27: Measure And Record
: Horizontal distance : Height difference : Easting (value right) : Northing (upper value) : Height : Code (description) : Reflector height : Instrument height : Atmospheric distance correction : Prism constant (Leica circular prisms = 0) © Leica TC605/TC805/TC905/L-1.1.1en... -
Page 28: Pointing And Distance Measurement
GPH1 prism holder with GZT4 target plate When pointing through windows or if reflecting surfaces are present, incorrect readings may result. For long-range work or for surveys under unfavorable conditions, multiple prisms (e.g. GPH3 triple prism) should be used. TC605/TC805/TC905/L-1.1.1en © Leica... -
Page 29: Example: For Offset Or Hidden Points
First determine the distance and then adjust the direction (e.g. for surveying corners of buildings). will record the data. The recorded V-angle always refers to the time of the completed distance measurement. Measuring DISTANCE ( Storing DATA ( © Leica TC605/TC805/TC905/L-1.1.1en... -
Page 30: Tracking Mode
Press to scroll measured data upwards or downwards block by block. By keeping pressed down, measured data are scrolled continuously up or down. Display of data, line by line within a measurement (block). Example: : 0004/0047 98.404 92.209 3.782 TC605/TC805/TC905/L-1.1.1en © Leica... -
Page 31: Measure And Record With Coding
Codes can be of max. 8 characters length. Alphanumeric code lists can be defined on the PC using TCTOOLS and then transferred to the TC605/TC805/ TC905/L unit via RS232 interface. Codes also can be appended to the code list at the... -
Page 32: Coding
à à 1.INPUT à 2.FIND à 3.VIEW ∧ *1.INPUT à 1.COORDS à à 2.CODELIST ∨ Code Input à Cod: In1: House In2: Driveway In3: Width In4: Start In5: Code Input Append > Toggles between YES/NO. Confirm input. TC605/TC805/TC905/L-1.1.1en © Leica... -
Page 33: Function "Quick-Code
There is no need to press any further keys for the first 10 codes in the code list when using this mode. Assign your 10 most often used codes to the first 10 lines in the code list when using this mode. © Leica TC605/TC805/TC905/L-1.1.1en... -
Page 34: Simple Code Input During Measurements
All codes fulfilling the search criteria will be displayed. Please refer to chapter "Coding" / "Searching for codes using Wildcards". List: 0005/0050 Find = Cod : --------- In1 : --------- TC605/TC805/TC905/L-1.1.1en © Leica... - Page 35 Codes entered in the line "Find= ..", which do not exist in the code list are automatically accepted as code. No further information can be entered for "In1" ... "In5". CODE EDIT Code recorded Confirming and record the entered code with © Leica TC605/TC805/TC905/L-1.1.1en...
-
Page 36: Additional Entries To Selected Code
In2 (? Width) With elements containing a question mark a point- specific alphanumeric value can be entered. The switches to alpha characters. Steps through the codeblock (e.g. Code, In1, ...) List: 0005/0050 Find = Cod : In1 : TC605/TC805/TC905/L-1.1.1en © Leica... -
Page 37: Recording Codes
Records the selected code or the additional entries and returns to the measuring display. Returns to the measuring display without recording the code. All "?" have to be entered or confirmed before the entire code line will be recorded. © Leica TC605/TC805/TC905/L-1.1.1en... -
Page 38: Searching For Codes Using Wildcards
Find = Cod : 10, 102 In1 : List: 0005/0050 Found code block: Find = +102 Cod : In1 : Scrolling through the code blocks which fulfill the search criteria. Viewing single elements of the code blocks. TC605/TC805/TC905/L-1.1.1en © Leica... -
Page 39: User Programs
Introduction The integrated programs enhance the functionality of the TC605/TC805/TC905/L total station. Daily survey work is simplified by using internally stored coordinates. This largely eliminates the risk of entering wrong information in the field. Points with given coordinates or measured points can be used within the programs. -
Page 40: Set Job
Obs data range of the internal memory. The information can be read out and used as a information about the next stored measurements. Data are not linked in any way to the Job. TC605/TC805/TC905/L-1.1.1en © Leica... -
Page 41: (Set Station)
à 1.Set Job à à 2.Set Station à 3.Free Station ∨ SET STATION à Get DATA>IntMem Pt : hi : 0.000 Optionally select manual input (Keyb.) or point search from internal memory (IntMem). Default setting is "IntMem". © Leica TC605/TC805/TC905/L-1.1.1en... - Page 42 Instrument stores the data in the Obs data range of the internal memory. For control purposes the actual station coordinates are displayed. They cannot be changed any more. By scrolling with the complete display can be shown. TC605/TC805/TC905/L-1.1.1en © Leica...
- Page 43 Input "1*" finds all point numbers starting with "1" but with subsequent characters. COOR: 0005/0025 Pt : à hi : 1.200 Scrolls the pointnumber fulfilling the search criteria - in this example all points are shown, starting with "1". Display single elements of the data. © Leica TC605/TC805/TC905/L-1.1.1en...
- Page 44 They cannot be changed any more. ∨ SET STATION REC : Station SET The program automatically moves to the "ORIENTATION". For more details about wildcard search facilities, please refer to chapter "Data management" / "Searching for pointnumbers and multiple recordings". TC605/TC805/TC905/L-1.1.1en © Leica...
-
Page 45: Orientation Of Horizontal Circle
Pt : Optionally select manual input (Keyb.) or point search from internal memory (IntMem) or enter the angle directly (Angle) - Select line to enter the point number entry, - Confirm entry (P1), ORIENTATION •Pt : 65°50'00 90°20'12 © Leica TC605/TC805/TC905/L-1.1.1en... - Page 46 Short display for confirmation: Orientation is set. Data are stored by the instrument and the program returns to the menu PROG. The option "Angle" acts in the same way as setting the horizontal circle reading in "SET HZ". TC605/TC805/TC905/L-1.1.1en © Leica...
-
Page 47: Free Station
Procedure 2 Not all distances are measured. In this case the shortest measured distance is used to determine the station coordinates. The point with the shortest distance is not used for orientation. © Leica TC605/TC805/TC905/L-1.1.1en... - Page 48 Input of station number and instrument height (for alphanumeric point entry see chapter "Settings" / "Entering point number and reflector height"). Confirm input. FREE STATION 2 Faces > Selection: Yes: 2 Faces No: 1 Face Confirming the selection. TC605/TC805/TC905/L-1.1.1en © Leica...
- Page 49 Change to the other face. Measure and record the data simultaneously, or measure distance and continue without recording, or use angles only and continue without recording. ◊ second point FREE STATION 2 Get DATA> IntMem à Pt : hr : 1.200 © Leica TC605/TC805/TC905/L-1.1.1en...
- Page 50 : +0°01'05 Ori : Orientation correction hi : Instrument height mp : Standard deviation of position mh : Standard deviation station point height mo : Standard deviation orientation Scrolling line by line. Page the result display. TC605/TC805/TC905/L-1.1.1en © Leica...
- Page 51 Stores the station coordinates and orientates the hori- zontal circle. Returns to the PROG menu. If the program is exit with the following message appears: FREE STATION Station not set Exit > Selection: Yes/No Confirming the selection. © Leica TC605/TC805/TC905/L-1.1.1en...
-
Page 52: Setting Out (Setout)
2.Set Station à 3.Free Station à à 4.Setout ∨ SETOUT •Pt : E0 : 150.000 N0 : 250.000 H0 : 500.000 hi : 1.200 The present station coordinates are displayed for inspection, but cannot be changed here. TC605/TC805/TC905/L-1.1.1en © Leica... - Page 53 Repeat the measurements of the distance with until the displayed difference in distance (∆ ) is within the required accuracy, i.e., close enough to "zero". Records the measured data in the Meas data range. The next point is selected. © Leica TC605/TC805/TC905/L-1.1.1en...
-
Page 54: Tie Distance (Missing Line)
H0 : 500.000 hi : 1.200 The displayed values show the station coordinates. The station point number is in the first line and therefore appears not directly on the display. With can scroll the displayed station data. TC605/TC805/TC905/L-1.1.1en © Leica... - Page 55 Input of Easting Input of Northing Input of Height Continue to next point/tie distance. Point two is now set as point one and the following measurement or the following data entry is used for the second point and so © Leica TC605/TC805/TC905/L-1.1.1en...
- Page 56 ∆ 11.025 ∆ 1.725 Display of azimuth ∆ Display of slope tie distance ∆ Display of horiz. tie distance ∆ Display of height difference TIE DISTANCE Program End Termination of program and back to the PROG menu. TC605/TC805/TC905/L-1.1.1en © Leica...
-
Page 57: Area Computation (Calc Area)
à 5.Tie Distance à à 6.Calc Area ∨ CALC AREA •Pt : E0 : 120.000 N0 : 240.000 H0 : 550.000 hi : 1.200 The present station coordinates are displayed for inspection, but cannot be changed here. © Leica TC605/TC805/TC905/L-1.1.1en... - Page 58 Get DATA> Keyb. à Pt : hr : 1.400 ∨ CALC AREA à 15.200 85.000 512.500 Manual input of coordinates. Confirming the inputs. Back into menu CALC AREA without using the inputs. Press to enter a new point. TC605/TC805/TC905/L-1.1.1en © Leica...
- Page 59 For computing an area minimum three points must be used. Continue with further points. CALC AREA Program End Short display for confirming the termination. Back to menu PROG. Conversion factors used 1 ft² = 0.092903 m² 1 acre = 0.404686 ha © Leica TC605/TC805/TC905/L-1.1.1en...
-
Page 60: Rapid Measurement And Recording (Rapid Meas)
Measurement procedure Switches to tracking mode; it is now permanently active. Distances are measured with 0.5-second interval (TC605/L) or 0.3-second interval (TC805/TC905/L). The measurements are recorded in the measurement- data range . The reflector must be sighted so that the Hz- or V-drive is continuously in motion until the reflector has been targeted with the accuracy required. - Page 61 The program is terminated. Back into menu PROG. This program requires the prisms to be sighted quickly and a good experience in observations techniques. The EDM is permanently switched on, and therefore power consumption is greater than usual. © Leica TC605/TC805/TC905/L-1.1.1en...
-
Page 62: Reference Line (Ref. Line)
Because the building line to the west is set-out perfectly parallel to the left boundary line (1 - 2) it should be used as the reference line. 2 (REF2) +∆T +∆L 1 (REF1) design TC605/TC805/TC905/L-1.1.1en © Leica... - Page 63 GER. This point is on a boundary line and defines the start of a reference line. Selection: stored point number (IntMem), manual input (Keyb.) or measured coordinates (Online). Input of point number. Confirming the input of the first point for the reference line. © Leica TC605/TC805/TC905/L-1.1.1en...
- Page 64 REF. LINE Baseline too short Entered points are only valid if the difference of the EAST or NORTH coordinates are minimum 2 mm. Please note that short base lines (mm to cm range) can result in inaccuracies. TC605/TC805/TC905/L-1.1.1en © Leica...
- Page 65 Variant shows a simple α rotation on the base point "1", i.e. valid for the horizon- tal offset "Hor = 0". A positive angle input (i.e. Ang >0) means a clockwise rotation of the base line. Hor = 0 © Leica TC605/TC805/TC905/L-1.1.1en...
- Page 66 (Ver > 0 shifts upwards, Ver < 0 shifts downwards) Using different elevations for start- and endpoint generates a slope. This slope is also applied to the rotated (α) and/or shifted (Hor) line. TC605/TC805/TC905/L-1.1.1en © Leica...
- Page 67 "∆H". The prism pole can now be moved towards the edge of the driveway until finally "∆T = 0" is shown, marking the line for the edge of the driveway. © Leica TC605/TC805/TC905/L-1.1.1en...
- Page 68 In the Tracking mode the displayed values for the reflector position are shown continuously. With key the HZ-angle difference and the horizontal and height difference can be displayed. This display sets out the position defined by L and T using the polar stakeout method. TC605/TC805/TC905/L-1.1.1en © Leica...
- Page 69 REF. LINE Program End By pressing key threefold the program proceeds step by step from the measuring display into the LINESHIFTS menu for display of the reference line definition and subsequently returns to the PROG menu. © Leica TC605/TC805/TC905/L-1.1.1en...
-
Page 70: Settings
To enter a new point number, just overwrite the existing one. You don't have to delete the old one before. For alphanumeric entry of point number refer to section "Operating concept" / "Numeric / alphanumeric entry mode". TC605/TC805/TC905/L-1.1.1en © Leica... - Page 71 This point number is not incremented and automatically be reset to the actual point number after recording. For point search refer to section "Data management" / "Searching for point numbers and multiple recordings (FIND)". The reflector height is entered under hr: © Leica TC605/TC805/TC905/L-1.1.1en...
-
Page 72: Setting The Horizontal Circle (Hz)
Hz 0° 00' 00" 0° 00' 00" Aim at point B. MENU*1.SET HZ Hz : 0°00'00 ENTR to release The Hz-angle to the new point (B) is now 0° 00' 00" (0.0000 gon). Return to measuring display. TC605/TC805/TC905/L-1.1.1en © Leica... -
Page 73: 2Nd Variant
Turn instrument until required angle (e.g. 45°00'00" , 50.0000 gon) is indicated. Hold value. Aim at the corresponding point. MENU*1.SET HZ Hz : 45°00'00 ENTR to release Release selected Hz. The target point Hz is now 45°00'00" (50.0000 gon). © Leica TC605/TC805/TC905/L-1.1.1en... -
Page 74: Setting The Display Mask (Dsp)
Setting the display Depending on desired use, four different display masks mask (DSP) can be selected on the TC605/TC805/TC905/L unit. Display of mask 1 : Point number Horizontal angle ( Hz ) : 341°17'10 Vertical angle ( V ) 87°55'10 3.782... -
Page 75: Data Management (Data Manager)
- Erasing measured data, coordinates and codes in the codelist (DELETE PNT) - Erasing the complete range of the selected file (DELETE ALL) COORD Coordinates max. 4000 Memory full eg, at 2000 coordinate points 1500 field measurements OBSERV Measurements max. 3000 © Leica TC605/TC805/TC905/L-1.1.1en... -
Page 76: Input Of Coordinates And Codes (Input)
Coordinate entry (COORDS) ∨ *1.INPUT à à 1.COORDS à 2.CODELIST ∨ Coord Input à Pt : 0.000 0.000 0.000 Confirm data entries. Confirm the display and store the coordinates. Quit the function. TC605/TC805/TC905/L-1.1.1en © Leica... -
Page 77: Code Input (Codes)
The newly entered code is appended to the existing list. Confirm the inputs in each individual line. Code Input Append > Yes Confirm Yes : The codes append to the code list. No : Returns to input mode without recording. Quit the function. © Leica TC605/TC805/TC905/L-1.1.1en... -
Page 78: Searching For Point Numbers And Multiple
Obs : 0003/0047 A012 Type: Meas. DSP to view View of single elements. Quit submenu. PtNr Obs/Find +A012 PtNr not found Error message if point number was not found. Delete error message with TC605/TC805/TC905/L-1.1.1en © Leica... - Page 79 Enter A*5 this will search for all point numbers starting with "A" and "5" at the third position from left. Enter ***A this will search for all point numbers with "A" or "a" in fourth position from left. © Leica TC605/TC805/TC905/L-1.1.1en...
-
Page 80: Point Number
The direction of search is always from the last stored point towards the first point. PtNr Obs/Find PtNr not found Warning if point number was not found. Delete warning with Quit the function. TC605/TC805/TC905/L-1.1.1en © Leica... -
Page 81: Display Of Stored Data (View)
(OBSERV; COORD; CODELIST). Viewing the single elements. Quit sub-program. If the file OBSERV was deleted or if this data range contains no data the following display appears: *3.VIEW *1.OBSERV no data found Delete warning with © Leica TC605/TC805/TC905/L-1.1.1en... -
Page 82: Delete Measurements, Coordinates And Codes
à 3.CODELIST Obs : 0004/0047 Type: Meas. DSP to view Scrolling to the point to be deleted. Viewing the single elements. PtNr Obs/Del. Delete > PtNr Obs/Del. DELETE > The selected block is deleted. Quit the function. TC605/TC805/TC905/L-1.1.1en © Leica... -
Page 83: Coordinates And Codes (Delete All)
3.VIEW à 4.DELETE PNT à à 5.DELETE ALL ∨ *5.DELETE ALL à à 1.OBSERV à 2.COORDS à 3.CODELIST Erase Data Nr of Blks: Erase > Toggles between YES/NO. The complete data range is deleted. Quit the function. © Leica TC605/TC805/TC905/L-1.1.1en... -
Page 84: Edm Configuration (Edm Conf)
The lights can be sighted up to 150 m away from the instrument. Stake out will be much easier with EGL1. ◊ MENU à 2.LEVEL à 3.DATA MANAGER à à 4.EDM CONF TC605/TC805/TC905/L-1.1.1en © Leica... -
Page 85: Intens
Within this sector both colours are blinking simultaneously. In this case the prism is already right in the line of sight. Operating range: 5 - 150 m (15 -500 ft) Divergence: 12 m (40ft) at 100m (330 ft) © Leica TC605/TC805/TC905/L-1.1.1en... -
Page 86: Rettap
Pay attention to the correct setting: retro tape and prism have different prism constants. Switching from prism to retro tape will set the internal prism constant for Leica retro tapes automatically to 0.34mm, but the displayed prism constant shows "mm=0.000". Is the EDM switched from retro tape to prism, the last entered value for the prism constant is valid again. - Page 87 3 mm 40 x 40 20 to 100 3 mm 60 x 60 60 to 120 3 mm * The accuracies quoted are valid when the retro tape is targeted at an angle of up to 45°. © Leica TC605/TC805/TC905/L-1.1.1en...
-
Page 88: Testing The Instrument
à INTENSITY BATTERY 9 = Battery full TEMP °C 1 = Battery low Low battery charge is indicated with the warning "Battery low". With low battery charge, distances cannot be measured and the instrument switches off automatically. TC605/TC805/TC905/L-1.1.1en © Leica... -
Page 89: Edm Signal (Intensity)
Under unfavorable measuring conditions (e.g. fog) the instrument can be turned to a direction with the highest intensity of returning EDM signal. - Align TC605/TC805/TC905/L - Adjust the fine drives 1, 2 (in this example max. 28% are reached) - Measure the distance. -
Page 90: Configuration (Config Menu)
Configuration (CONFIG MENU) Under "Configuration", specific settings can be carried out with the TC605/TC805/TC905/L unit so the instrument is optimally set to particular survey work. Press (for about 2 seconds) until the configuration menu appears. ∨ CONFIG MENU à à... -
Page 91: Distance Corrections
1mm in a measured distance of 100 m = 10 ppm. ∨PPM/MM à ppm: mm : Enter value. Confirm input and continue to enter the prism constant (mm). Termination and back to CONFIG MENU. © Leica TC605/TC805/TC905/L-1.1.1en... - Page 92 Prism constant (MM) The prism constant MM for Leica circular prisms is 0. It must be determined when using other types of prism. The prism constant must be always entered in units of (mm). ∨PPM/MM ppm: à mm : Enter value.
-
Page 93: Display Contrast (Contra)
: Optimal contrast if the display is above the eye level of the user (reading from below) : Ideal for reading at eye level Ideal for reading at eye level below the display. Back to the normal measuring program. © Leica TC605/TC805/TC905/L-1.1.1en... -
Page 94: Data And Recording Parameter (Rec Data)
To record measurements, a data recorder can be connected to the serial data port (RS232 interface). The parameters of the serial interface are already set for standard Leica parameters (9600, EVEN, CR/LF). They remain stored after switching off the total station. TC605/TC805/TC905/L-1.1.1en... - Page 95 The communication via the RS232 interface requires a certain protocol containing the exact command structure (for more information refer to the handbook "Leica Instruments online" ). Do not turn the Total Station during measurements until data recording is finished. The current horizontal...
- Page 96 FORMAT The Leica GSI-format can be output as a 8 or 16 digit string. However, this format setting is only relevant for the serial output of data and has no effect on the entries into the instrument. This setting is only responsible for the output string size.
-
Page 97: Selecting Units (Units)
Selecting option. Confirm selection. Units for distance measurement (DIST) = Meter US ft = feet (decimal) Units for angle measurement (ANGLE) - gon = 400gon - 360d = 359°.9999 (in decimals) - 360s = 359° 59' 59" (sexagesimal) © Leica TC605/TC805/TC905/L-1.1.1en... - Page 98 - ∞ 180° -90° Rounding of displayed angles (ROUND) high = 81°45'24" (1" Intervall) med = 81°45'25" (5" Intervall) low = 81°45'30" (10" Intervall) The rounding of the displayed angles has no affect on the instrument's accuracy. TC605/TC805/TC905/L-1.1.1en © Leica...
-
Page 99: Setting Time And Date (Time/Date)
2.SET DATE à 3.SHW TIM/DAT 1.SET TIME *1.SET TIME FORM hh:mm:ss TIME= 14:31:58 Change between input of hours, minutes and seconds. Input of actual time via number block. Confirm input and return to menu TIME/DATE. Termination without saving. © Leica TC605/TC805/TC905/L-1.1.1en... - Page 100 Input of actual date via number block. Confirm input and return to menu TIME/DATE. Termination without saving. 3.SHW TIM/DAT TIME - DATE 14:31:58 18/02/97 Exit display and return to menu TIME/DATE. Exit the display and return to the normal measurement display. TC605/TC805/TC905/L-1.1.1en © Leica...
- Page 101 Setting-out of right angles: To simplify setting-out of right angles an acoustic signal (BEEP) can be activated. Set BEP90° to ON and confirm. BEEP pulsating BEEP continuous no signal +/- 4° (5gon) +/- 30' (0.5gon) +/- 30" (10mgon) © Leica TC605/TC805/TC905/L-1.1.1en...
- Page 102 Function HZCOMP = ON corrects the Hz-angles for the tilt of the standing axis. Switching the compensator (COMP) off also sets the function HZCOMP to OFF. When switching the total station on the function is automatically set to HZCOMP = ON. TC605/TC805/TC905/L-1.1.1en © Leica...
-
Page 103: Automatic Switch-Off (On/Off)
In case of longer breaks (> 10 minutes) the setting "AUToff = ON" switches the instrument automatically off to save battery capacity. "AUToff = OFF" disables the automatic switch off and leaves the instrument permanently on until manually switched off with the -key. © Leica TC605/TC805/TC905/L-1.1.1en... -
Page 104: Tctools
TCTOOLS provides for data exchange between a PC and the TC605/TC805/TC905/L and also includes a codelist manager to create and edit codelists. The bidirectional data transfer and the conversion of the Leica GSI-format to ASCII and vice versa is supported by the individual functions. TC605/TC805/TC905/L PC (DOS) - Page 105 On the PC code lists can be created, edited, merged with each other and deleted. Transfer to the instrument is carried out via DATA TRANSFER, which also provides for receiving a codelist from the TC605/ TC805/TC905/L and deletion of a codelist on the TC605/TC805/TC905/L.
- Page 106 235.23 11025.025 45330.347 150.85 3. Leica GSI-Files Extracts coordinates out of files in Leica format. These files can also contain measurements and coding information. Only the point number and the related coordinates are extracted and transferred to the TC605/TC805/ TC905/L.
- Page 107 Data can be transferred either in Leica GSI-format or in 4. Receive data a user specific format. 1. Leica GSI-formats Measurements: Mask1 : WI11 Pointnumber WI21 Horizontal angle (Hz) WI22 Vertical angle WI31 Slopedistance (sld) WI51 PPM+MM (ppm+mm) WI87 Reflector height...
- Page 108 To download user specific formats, a format-file must be transferred to the TC605/TC805/TC905/L first. Once a user specific data format exists on the TC605/ TC805/TC905/L, this format can be selected in TCTOOLS, which downloads the data from the data ranges COORDS, OBSERV in a specific defined format.
- Page 109 TCTOOLS For data transfer the data cable (Part no. 563625) is needed. This cable is supplied with each instrument. TC605/TC805/ TC905/L TCTOOLS PC (DOS) coordinates use cable no.: 563625 TCTOOLS © Leica TC605/TC805/TC905/L-1.1.1en...
-
Page 110: Other Data Formats
The instrument is designed to have flexibility in data output formats. If you require specific data output formats, please consult your nearest Leica representative. TC605/TC805/TC905/L-1.1.1en © Leica... -
Page 111: Set A Point Number
For more detail information of command and data structures refer to the handbook "Leica Instruments On- Line" which is available from your Leica representative. Command structure: (_ = space char.) PUT/11..+12345678_CRLF Station coordinates can be transmitted from an external data recorder via RS232 interface at any time without having to reset the instrument. -
Page 112: Setting-Out
Return to data transfer (c for a new point) Terminates program function "setting-out" x After the required 4 data lines are transmitted to the TC605/TC805/TC905/L unit, the display changes automatically to the mode showing the divergence between specified direction and present instrument direction. -
Page 113: Checking And Adjusting
-key (for about 2 seconds) until the configuration menu appears. ∨ CONFIG MENU à 1.PPM/MM à à 2.CALIB 3.CONTRA> ∨*2.CALIB à à 1.V-INDEX à 2.Hz-COLLIM The measured angles are corrected with the opposite sign of the indicated instrument errors. © Leica TC605/TC805/TC905/L-1.1.1en... -
Page 114: Vertical Index Error
Select a point at a distance of about 100m which can be easily aimed and deviating no more than +/-5° from the horizontal line. 1. step > 100m +/-5° TC605/TC805/TC905/L-1.1.1en © Leica... - Page 115 Adopt the calculated value and return to the normal measuring mode. Retain the old value and switch back to menu CALIB. By doing, so you can quit the menu at any time without saving the made corrections. © Leica TC605/TC805/TC905/L-1.1.1en...
- Page 116 Values greater than 54' (1 gon) are not permissible and the above error message is displayed. Delete error message and return to the CALIB menu. When you determine the vertical index error the electronic level is adjusted at the same time. TC605/TC805/TC905/L-1.1.1en © Leica...
-
Page 117: Line-Of-Sight Error (Hz-Collimation)
This correction can be switched off. ◊ CONFIG MENU à 1.PPM/MM à à 2.CALIB 3.CONTRA> ∨*2.CALIB à 1.V-INDEX à à 2.Hz-COLLIM *2.Hz-COLLIM 0°00'00 Cnew : ---- >Measure Collim< > Aim Point < > Other Face < Change face and aim point again. © Leica TC605/TC805/TC905/L-1.1.1en... -
Page 118: Tripod
- The same key is also suitable for adjusting the articulated joints on the tripod head (1). Tighten these just enough to keep the tripod legs open when you lift it off the ground. TC605/TC805/TC905/L-1.1.1en © Leica... -
Page 119: Circular Level
Turning the adjustment screws: • to the left: the bubble approaches the screw • to the right: the bubble goes in the other direction. After adjustment no screw must be loose. © Leica TC605/TC805/TC905/L-1.1.1en... -
Page 120: Optical Plummet
Set up and level up the instrument (with plumb-bob) on the tripod. Mark the ground point. Remove the plumb- bob. Check that the crosshairs of the optical plummet intersect at the ground point. The accuracy achievable is about 1mm. TC605/TC805/TC905/L-1.1.1en © Leica... - Page 121 120° 120° Adjustments: Use a screwdriver to turn the two set screws alternately by the same small amount in order to center the crosshairs on the marked ground point. © Leica TC605/TC805/TC905/L-1.1.1en...
-
Page 122: Laser Plummet
If an adjustment is necessary due to external influences the instrument has to be returned to any Leica service departement. Checking by turning the instrument by 360°: 1. Install the instrument on the tripod and level up. - Page 123 At a distance of 1.5 m an average value of 2.5 mm diameter must be estimated. The max. diameter of the circular movement of the centre of the laser point should not exceed 1 mm at a distance of 1.5 m. © Leica TC605/TC805/TC905/L-1.1.1en...
-
Page 124: Care And Transport
Transport: When dispatching the equipment, always use the complete original Leica packaging (case and cardboard box). When transporting the equipment in the field, always make sure to: - either carry the instrument in its original transport case or - carry the tripod with its legs splayed across your shoulder, keeping the attached instrument upright. - Page 125 40 °C/ 108°F), transport case, foam inserts, and accessories. Pack up the equipment only when it is perfectly dry. After a longer period of storage or transport of your instrument always perform the field ajustments indicated in this manual before using the instrument. © Leica TC605/TC805/TC905/L-1.1.1en...
-
Page 126: Battery Charging
Charging batteries with 2 pole plug requires an adapter cable. Fast charger GKL23: Fast charging with the GLK-23 is possible with Leica NiCd-batteries equipped with a 5-pole plug. Fast charging requires 1.5 to 5 hours depending on the battery capacity. - Page 127 On the GKL12, you may not have started the timer or it may have stopped at the end of the charging period. © Leica TC605/TC805/TC905/L-1.1.1en...
-
Page 128: Safety Directions
The following directions should enable the person responsible for the TC605/TC805/TC905/L, and the person who actually uses the instrument, to anticipate and avoid operational hazards. The person responsible for the instrument must ensure that all users understand these directions and adhere to them. -
Page 129: Limits Of Use
It is the task of the person responsible for the instrument to inform the user about hazards and how to counteract them. The TC605/TC805/TC905/L total stations are not to be used until the user has been properly instructed how to use them. -
Page 130: Responsibilities
Area of responsibility for the manufacturer of the original equipment Leica Geosystems AG, CH-9435 Heerbrugg (hereinafter referred to as Leica): Leica is responsible for supplying the product, including the user manual and original accessories, in a completely-safe condition. Responsibilities of the manufacturers of non-Leica... -
Page 131: Hazards Of Use
- Touching live components - Using the charger after incorrect attempts to carry out repairs Precautions: Do not open the charger yourself. Only a Leica- approved service technician is entitled to repair it. © Leica TC605/TC805/TC905/L-1.1.1en... - Page 132 WARNING: By surveying during a thunderstorm you are at risk from lightening. Precautions: Do not carry out field surveys during thunderstorms. TC605/TC805/TC905/L-1.1.1en © Leica...
- Page 133 Inadequate securing of the surveying site can lead to dangerous situations, for example in traffic, on building sites and at industrial installations. Precautions: Always ensure that the survey site is adequately secured. Adhere to the regulations governing accident prevention and road traffic. © Leica TC605/TC805/TC905/L-1.1.1en...
- Page 134 Precautions: Adhere to the instructions given by the computer manufacturer with regard to field use in conjunction with Leica instruments. CAUTION: During the transport or disposal of charged batteries it is possible for inappropriate mechanical influences to constitute a fire hazard.
- Page 135 - Leakage of silicone oil from the compensator can damage the optical and electronic subassemblies. Precautions: Dispose of the equipment appropriately in accordance with the regulations in force in your country. Always prevent access to the equipment by unauthorized personnel. © Leica TC605/TC805/TC905/L-1.1.1en...
-
Page 136: Integrated Distancer (Edm)
Class 1 LED products are safe under reasonably foreseeable conditions of operation and are not harmful to the eyes provided that the products are used and maintained in accordance with the instructions. TC605/L Beam divergence: 2.5 mrad Impulse duration: 10 ns Maximum power output: 200 µW peak... - Page 137 TC805/TC905/L Beam divergence: 2.02 mrad Impulse duration: 10 ns Maximum power output: 360 µW peak Measurement uncertainty: ± 5% Infrared beam (invisible) exit © Leica TC605/TC805/TC905/L-1.1.1en...
-
Page 138: (Optional For Tc805/Tc905/L Series)
CAUTION: Use the Guide Light option within the specified range (at a distance of > 5 m (> 16 ft) from the telescope). TC605/TC805/TC905/L-1.1.1en © Leica... - Page 139 2.4 ° Impulse duration 2 x 35 ms 35 ms Maximum power output 0.55 mW 1.2 mW Measurement uncertainty ± 5 % ± 5 % 1 Exit for flashing red LED 2 Exit for flashing yellow LED © Leica TC605/TC805/TC905/L-1.1.1en...
-
Page 140: Laser Plummet
WARNING: It can be dangerous to look into the beam with optical equipment (e.g. binoculars, telescopes) Precautions: Do not look directly into the beam with optical equipment. TC605/TC805/TC905/L-1.1.1en © Leica... - Page 141 M ax. em i t t ed Pow er : 0. 95m W c. w . EN60825-1 Em i t t ed W avel enght : 620- 690nm St andar d appl i ed EN60825- 1 : 1994- 07 I EC825- 1 : 1993- 11 1/4s © Leica TC605/TC805/TC905/L-1.1.1en...
- Page 142 Labelling in accordance with FDA 21CFR LASER RADIATION - DO NOT STARE INTO BEAM 620-690nm/0.95mW max. CLASS II LASER PRODUCT AVOID EXPOSURE Laser radiation is emitted from this aperture TC605/TC805/TC905/L-1.1.1en © Leica...
- Page 143 0.16 x 0.6 mrad Impulse duration: c.w. c.w. Maximum power output: 0.95 mW 0.95 mW Measurement uncertainty: ± 5% ± 5% Laser beam (visible) exit Laser beam (visible) CAUTION: Allow only authorized Leica service workshops to service the total station. © Leica TC605/TC805/TC905/L-1.1.1en...
-
Page 144: Electromagnetic Acceptability
WARNING: Electromagnetic radiation can cause disturbances in other equipment. Although the total station meets the strict regulations and standards which are in force in this respect, Leica cannot completely exclude the possibility that other equipment may be disturbed. CAUTION: There is a risk that disturbances may be caused in other equipment if the total station is used in conjunction with accessories from other manufacturers (e.g. -
Page 145: Fcc Statement (Applicable In U.s.)
Although the total station meets the strict regulations and standards which are in force in this connection. Leica cannot completely exclude the possibility that the total station may be disturbed by very intense electromagnetic radiation, for instance near radio transmitters, portable radios, diesel generators etc. -
Page 146: Product Labeling
• Consult the dealer or an experienced radio/TV technician for help. WARNING: Changes or modifications not expressly approved by Leica for compliance could void the user's authority to operate the equipment. Product labeling This device complies with part 15 of the FCC Rules. -
Page 147: Error Reports And Warnings
Angle Error Measuring error angle Contact service scanning department System error System error in If fault re-occurs, contact compensator service department EDM Signal EDM signal faint, absent Inspect pointing. Check or distorted that distance is not too great © Leica TC605/TC805/TC905/L-1.1.1en... - Page 148 Level the instrument or re-adjust the V-index, which adjusts also the electronic level Invalid Data Invalid data for transfer to Press TC605/TC805/TC905/L Out of Range For determination of Bring target point within index- or collimation tolerance range error, V-angle is more than ±6°...
-
Page 149: Technical Data
Distance measurement RANGE TC605/L TC805/L TC905/L [m] (ft) Atmospheric 1 prism/ 1 prism/ 1 prism/ conditions 3 prisms 3 prisms 3 prisms poor 1) 800 (2600) 1200 (3900) 1200 (3900) 1000 (3300) 1500 (4900) 1500 (4900) fair 2) 1100 (3600) - Page 150 Working range: ±5´(±0.1 gon) Accuracy: ±2”(±0.6 mgon) Display : Liquid crystal 4 lines of 16 characters Keyboard : TC605/L: 1 Keyboard, alphanumerical TC805/TC905/L: 2 Keyboards, alphanumerical EGL1 (optional) : working range: 150m (500 ft) divergence: 12m (40ft) at 100m (330ft) TC605/TC805/TC905/L-1.1.1en...
- Page 151 4000 points with coordinates External interface : RS232 Dimensions Height, length, width : TC605/L: 344 x 175 x 194 mm TC805/L: 344 x 204 x 194 mm TC905/L: 344 x 204 x 194 mm Instrument weight (incl. battery) : TC605/L: 4.3 kg (9.5 lbs)
- Page 152 Voltage / capacity 12V / 0.6A 12V / 2.0A 12V / 7.0A No. of measurements with distance approx. approx. approx. TC605/L 1400 5000 TC805/TC905/L 2000 7000 Operating time [h] (EDM mode FINE) - angle meas. only - angle and distance...
- Page 153 Atmospheric correction in ppm with °C, mb, H (meter) at 60% relative humidity © Leica TC605/TC805/TC905/L-1.1.1en...
- Page 154 Atmospheric correction in ppm with °F, inch Hg, H (Feet) at 60% relative humidity TC605/TC805/TC905/L-1.1.1en © Leica...
-
Page 155: Index
Battery Battery chargers 126, 127 Battery charging Battery status BEEP BEP90° Boundary line Cables Calc Area Charger Charging Circular level Cleaning Code input Codelist Codes Coding Command structure Communication COMP Compensator Configuration Contrast Control keys 19, 21 © Leica TC605/TC805/TC905/L-1.1.1en... - Page 156 Distance measurement 28, 149 84, 136 EDM mode EDM Signal EGL1 Electromagnetic acceptability Electronic level 17, 114 Entering point number Error reports External batteries Fast charger FIND Fixed keys Fogging of prisms FORMAT Free Station Function keys TC605/TC805/TC905/L-1.1.1en © Leica...
- Page 157 Internal storage IntMem 43, 45, 55 Introduction Keyb 45, 53, 55 Keyboard 19, 150 Keypad Laser classification Laser plummet 16, 122, 140, 150 Leica GSI masks Leica Instruments On-Line Level sensitivity Levelling-up Limits of use Line-of-sight error © Leica TC605/TC805/TC905/L-1.1.1en...
- Page 158 Numeric entry Offset Offset or hidden points OnLine Operating concept Optical plummet 120, 150 ORIENTATION Orientation Orientation correction Orientation of horizontal circle Permitted uses Point number Power supply ppm values Prism constant 27, 92 Quick-Code 33, 151 TC605/TC805/TC905/L-1.1.1en © Leica...
- Page 159 52, 67 Setting the display mask Setting-out by PC Setting-out of right angles Settings Slope distance Storage Switch-off Target points TCTOOLS Technical data Telescope Temperature limits Temperature range Tie Distance Tracking mode 30, 60 Transport Tribrach Tripod © Leica TC605/TC805/TC905/L-1.1.1en...
- Page 160 UNITS Units for angle measurement Units for distance measurement Unpacking Up- and Download User Programs V-Angle Vertical angle 27, 98 Vertical index error VIEW Wildcards 38, 79 Zenith angle TC605/TC805/TC905/L-1.1.1en © Leica...
- Page 161 © Leica TC605/TC805/TC905/L-1.1.1en...
- Page 162 664958-1.1.1 Printed in Switzerland - Copyright Leica Geosystems AG, Heerbrugg, Switzerland 1998 Original text TC605/TC805/TC905/L-1.1.1en © Leica...
Need help?
Do you have a question about the TC805 and is the answer not in the manual?
Questions and answers