Table of Contents
Advertisement
Quick Links
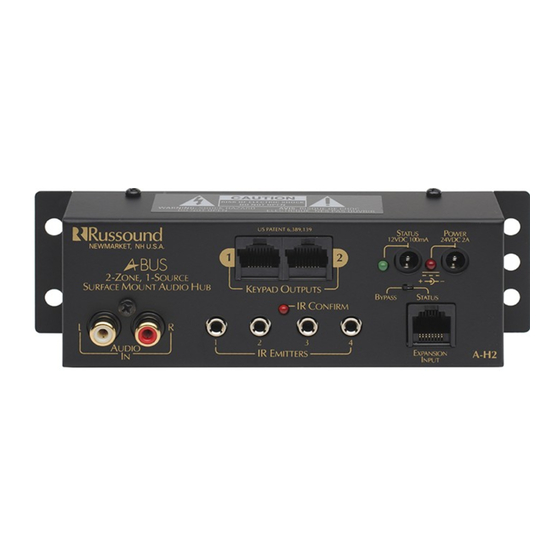
CONNECTION DIAGRAMS FOR RUSSOUND MODEL A-H2. REFER TO THE INSTRUCTIONS ON BACK. DIAGRAMS ARE NOT TO SCALE.
A-KP2 Amplified Keypad
110 punchdown connectors
on Amplified Keypad
Wire order
Alternate method:
Source Component
Connect 1 source directly
5
Audio Receiver
Standard method: Connect
multiple sources via Tape 2
or Zone 2 output of Receiver
7
A-KP RC
A-VC2
A-KP2
(optional)
Emitter attaches
to each source
component's
IR window
When wiring directly to
Amplified Keypad, use
T568A RJ45 wire con-
figuration
RJ45 Wall Plate (optional)
located near Hub
1
RJ45 CAT-5
patch cable
CAT-5
(behind wall)
8
5
2
To use Status
feature: Move to
STATUS position
and enable status
on ALL Amplified
Keypads
3
846C
Audio Receiver
to switched AC outlet
3
A-H2
4
2
RJ45 CAT-5
patch cable
• to Link Out on another A-BUS
single-source Hub (shown)
• or, to A-BUS-Ready output
SAFETY INSTRUCTIONS
1. Read Instructions - All the safety and operating instructions should be read before the appli-
ance is operated.
2. Retain Instructions - The safety and operating instructions should be retained for future refer-
ence.
3. Heed Warnings - All warnings on the appliance in the operating instructions should be
adhered to.
4. Follow Instructions - All operating and user instructions should be followed.
5. Water and Moisture - The appliance should not be used near water; for example, near a bath-
tub, washbowl, kitchen sink, laundry tub, in a wet basement, or near a swimming pool.
6. Wall or Ceiling Mounting - The appliance should be mounted to a wall or ceiling only as rec-
ommended by the manufacturer.
7. Ventilation - The appliance should be situated so that its location or position does not inter-
fere with its proper ventilation. For example, the appliance should not be situated on a bed,
sofa, rug, or similar surface that may block the ventilation openings, or placed in a built-in
installation, such as a bookcase or cabinet that may impede the flow of air through the venti-
lation openings.
8. Heat - The appliance should be situated away from heat sources such as radiators, heat regis-
ters, stoves, or other appliances (including amplifiers) that produce heat.
9. Power Sources - The appliance should be connected to a power supply only of the type
described in the operating instructions or as marked on the appliance.
10.Grounding or Polarization - Precaution should be taken so that the grounding or polarization
means of an appliance is not defeated.
11.Power Cord Protection - Power supply cords should be routed so that they are not likely to be
walked on or pinched by items placed upon or against them, paying particular attention to
cords at plugs, receptacles, and the point where they exit from the appliance.
12. Object and Liquid Entry - Care should be taken so that objects do not fall and liquids are not
spilled into the enclosure through the openings.
6
13. Damage Requiring Service - The appliance should be serviced by qualified service personnel
when:
A.
The power supply cord or the plug has been damaged; or
B.
Objects have fallen, liquid has been spilled into the appliance; or
A-PS
C.
The appliance has been exposed to rain; or
D.
The appliance does not appear to operate normally; or
E.
The appliance has been dropped or the enclosure is damaged.
4
14. Servicing - The user should not attempt to service the appliance beyond that described in the
operating instructions. All other servicing should be referred to qualified service personnel.
Precautions:
1. Power – WARNING: BEFORE TURNING ON THE POWER FOR THE FIRST TIME, READ THE FOL-
LOWING SECTION CAREFULLY.
All models are designed for use with either AC120V, 60Hz or AC240, 50Hz voltages. The unit
will autoswitch to either of these voltages.
2. Do Not Touch The A-H1 With Wet Hands – Do not handle the AH-1 or power cord when your
hands are wet or damp. If water or any other liquid enters the A-H1 cabinet, take the A-H1 to
a qualified service person for inspection.
3. Care – From time to time you should wipe off the front and side panels of the cabinet with a
soft cloth. Do not use rough material, thinners, alcohol or other chemical solvents or cloths
since this may damage the finish or remove the panel lettering.
Advertisement
Table of Contents

Subscribe to Our Youtube Channel
Related Manuals for Russound A-BUS A-H2


Summary of Contents for Russound A-BUS A-H2
- Page 1 CONNECTION DIAGRAMS FOR RUSSOUND MODEL A-H2. REFER TO THE INSTRUCTIONS ON BACK. DIAGRAMS ARE NOT TO SCALE. SAFETY INSTRUCTIONS 1. Read Instructions - All the safety and operating instructions should be read before the appli- A-KP2 Amplified Keypad 110 punchdown connectors To use Status ance is operated.
- Page 2 - Move the status switch on the Hub to the “STATUS” position. A-KP2 keypads can be operated manually or by using the optional The Russound A-H2 is fully guaranteed for Two (2) years from the date of purchase against - Using a Russound Model 846C 120V/12VDC or comparable A-KP RC remote control.
Need help?
Do you have a question about the A-BUS A-H2 and is the answer not in the manual?
Questions and answers