Table of Contents
Advertisement
Quick Links
Advertisement
Table of Contents
Troubleshooting

Related Manuals for Best 47H


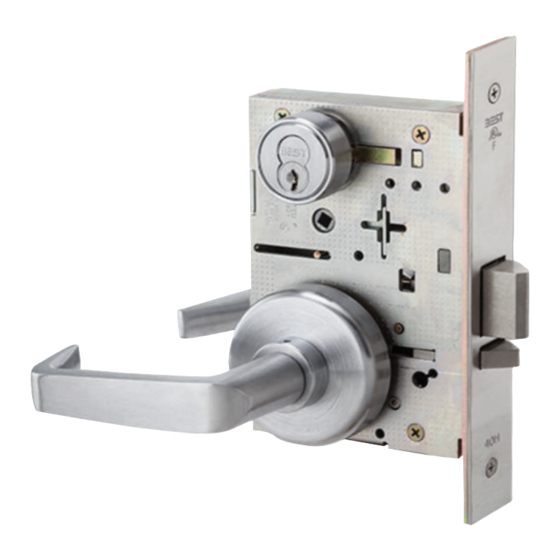
Summary of Contents for Best 47H
- Page 1 40H SERIES S E R V I C E M A N U A L HEAVY DUTY MORTISE LOCKS...
- Page 2 REDITS/COPYRIGHT Copyright ©2021 dormakaba USA Inc. All rights reserved. Information in this document is subject to change without notice and does not represent a commitment on the part of dormakaba USA Inc. The software described in this document are furnished under a license agreement or nondisclosure agreement.
-
Page 3: Table Of Contents
1–2 45HW & 47HW overview 1–4 Lock characteristics 1–4 Lock dimensions 1–4 48H & 49H overview 1–6 Lock characteristics 1–6 Lock dimensions 1–6 Documentation package 1–8 Technical support 1–8 Support services 1–8 Telephone technical support 1–8 40H Series Service Manual... - Page 4 4–4 DEL function case—Electrically locked fail safe lock 4–38 DEU function case—Electrically unlocked fail secure 4–40 G function case—communicating lock 4–22 H function case—hotel lock 4–24 HJ function case—hotel lock 4–24 IND function case—intruder lock 4–26 40H Series Service Manual...
- Page 5 How to order electrified mortis e locks 4–63 Case only components 4–64 5–1 ARTS Outside trim kits 5–2 How to order 5–2 Kit components 5–3 Inside trim kits 5–6 How to order 5–6 Kit components 5–7 40H Series Service Manual...
- Page 6 Changing the function for UNR cases 6–5 To adjust the shuttle screw positions: 6–5 To change the position of the hub toggles: 6–6 Changing the function for UNAB cases 6–6 Changing the function for UNT cases 6–6 Troubleshooting 6–7 40H Series Service Manual...
- Page 7 7–3 M function case—cylinder deadlock 7–3 R function case—classroom deadlock 7–4 48H Trim parts 7–5 49H High security deadbolt trim parts 7–6 Strikes and strike boxes 7–7 Troubleshooting 7–8 A–1 LOSSARY B–1 NSTALLATION NSTRUCTIONS C–1 NDEX 40H Series Service Manual...
- Page 8 ONTENTS 40H Series Service Manual viii...
-
Page 9: Figures
H, HJ, TD function case exploded diagram 4–24 IND, T function case exploded diagram 4–26 L function case exploded diagram 4–28 LB function case exploded diagram 4–30 TA function case exploded diagram 4–32 AD, WD, YD function case exploded diagram 4–34 40H Series Service Manual... - Page 10 5–14 Contour/angle return (style 15) 5–14 Curve / no return (style 16) 5–14 Faceplate kits 5–15 Spindle kit 2 – Standard replacement spindle 5–17 Spindle kit 4 – Hook replacement spindle 5–17 Screw kit components 5–19 40H Series Service Manual...
- Page 11 Positioning the shuttle screws and stop screw 6–6 48H & 49H L OCKS Understanding function drawings 7–2 K, L, M function case 7–3 R function case 7–4 Deadbolt trim 7–5 High security deadbolt trim 7–6 Strikes and strike box 7–7 40H Series Service Manual...
- Page 12 Figures 40H Series Service Manual...
-
Page 13: Getting Started
ETTING TARTED NTRODUCTION The 40H Series Service Manual contains essential information to help you maintain your 40H Series Locks. ERTIFICATIONS AND STANDARDS The 40H Series Locks are listed by Underwriters ■ Laboratories (U.S. and Canada) for use on 3 hr., A label doors. -
Page 14: 47H Overview
Trim one-side-only functions can be installed on doors up to 2 1/2″ thick if the mortise is centered in the door. Lock The following diagram shows the dimensions for the 45H & 47H dimensions mortise case and strike. 40H Series Service Manual 1–2... - Page 15 Getting Started Figure 1.1 45H & 47H mortise case and strike dimensions 40H Series Service Manual 1–3...
-
Page 16: 45Hw & 47Hw Overview
Trim one-side-only functions can be installed on doors up to 2 1/2″ thick if the mortise is centered in the door. Lock The following diagram shows the dimensions for the 45HW & 47HW dimensions mortise case and strike. 40H Series Service Manual 1–4... -
Page 17: 45Hw & 47Hw Mortise Case And Strike Dimensions
Getting Started Figure 1.2 45HW & 47HW mortise case and strike dimensions 40H Series Service Manual 1–5... -
Page 18: 49H Overview
†. All mortise functions, except R and trim one side only functions, can be installed on 5″ thick doors if the mortise is centered in the door. Lock The following diagram shows the dimensions of the 48H & 49H mortise dimensions case and strike. 40H Series Service Manual 1–6... - Page 19 /8 in Centerline Case 1 in 48HS1 Strike plate Faceplate Strike plate — overhead view in Dia. in Dia. Centerline 48HS2 Strike plate Figure 1.3 48H & 49H mortise case and strike dimensions 40H Series Service Manual 1–7...
-
Page 20: Documentation Package
Support When you have a problem with a 40H Series Lock, your first resource services for help is the 40H Series Service Manual . If you cannot find a satisfactory answer, contact your local dormakaba Representative. Telephone A factory-trained Certified Product Specialist (CPS) is available in your technical area whenever you need help. -
Page 21: Introducing The 40H Lock
40H L NTRODUCING THE VERVIEW The 40H Series Lock was designed to be easy to use, while at the same time maintaining the strength, durability, and dependability expected of a BEST mortise lock. In addition to the ability to quickly change... -
Page 22: Universal Locks
Three-part locks For maximum flexibility, a 40H Series Lock can be ordered in three parts—inside trim, case only, and outside trim. The kits associated with each of the three parts are designed so that when combined, all necessary components of a 40H Series Lock are present. -
Page 23: Working With Trim Kits
The table below shows how to match the appropriate inside trim kit and outside trim kit with each function. For information about how to order 45 & 47H trim kits, see Trim Parts on page 5-1. 40H Series Service Manual 2–3... - Page 24 ■ ■ ■ ■ ■ ■ †. Function can be created using a UNR case assembly. ‡. Function can be created using a UNAB case assembly. ††.Function can be created using a UNT case assembly. 40H Series Service Manual 2–4...
-
Page 25: Trim One Side Locks
40H functions can be configured as X or Z functions. Contact your local dormakaba Representative for more details. All trim one side locks use the special hook spindle to attach the remaining lever to the lock. See page 5–17 for more information about the hook spindle. 40H Series Service Manual 2–5... - Page 26 Introducing the 40H Lock 40H Series Service Manual 2–6...
-
Page 27: Lock Functions
UNCTIONS The following pages contain function descriptions for all 45H & 47H Locks and 45HW & 47HW Locks. For function descriptions for 48H & 49H Locks, see Function descriptions on page 7–2. 40H Series Service Manual 3–1... - Page 28 3–13 page 4–4 UNAB †. With the introduction of the 40H Series Lock, dormakaba changed the mortise function letter designations to align them with the BEST cylindrical lock functions. This column shows the old 30H function designation for each.
-
Page 29: 45Hw & 47Hw Lock Function Quick Reference
NXEU page 3–15 page 4–48 TDEL page 3–15 page 4–50 TDEU page 3–15 page 4–52 TWEL page 3–16 page 4–54 TWEU page 3–16 page 4–56 WWEL page 3–16 page 4–42 WWEU page 3–16 page 4–44 40H Series Service Manual 3–3... -
Page 30: Function Descriptions
If the function is ANSI defined, the ANSI designation appears by Note: the function name. Keyed cylinder Deadbolt Emergency key Thumb turn Latchbolt Visual indicator Auxiliary latch Shading indicates that the lever is fixed. Locking toggle Outside Inside Figure 3.1 Understanding function drawings 40H Series Service Manual 3–4... -
Page 31: Single-Keyed Functions
■ ■ inside thumb turn Inside and outside lever locked by: ■ Outside lever unlocked by: extending the deadbolt ■ outside key ■ inside turn knob ■ Inside lever is always unlocked 40H Series Service Manual 3–5... - Page 32 ■ outside key and latchbolt simultaneously ■ Inside lever is always unlocked Outside lever is always fixed Inside lever is always unlocked Note: Available for 45H Locks only. 40H Series Service Manual 3–6...
- Page 33 Outside lever locked by: placing the locking toggle in the ■ locked position extending the deadbolt Outside ■ lever unlocked by: outside key and placing the ■ locking toggle in the unlocked position Inside lever is always unlocked 40H Series Service Manual 3–7...
-
Page 34: Double-Keyed Functions
Inside lever locked and and latchbolt simultaneously unlocked by: Outside lever locked by: inside key ■ extending the deadbolt Outside ■ outside key ■ lever unlocked by: retracting the deadbolt ■ Inside lever is always unlocked 40H Series Service Manual 3–8... - Page 35 ■ Latchbolt is deadlocked by an auxiliary latch Outside lever is always fixed Inside lever is always fixed Note: When required, the inside cylinder may be combinated to operate by master key only. 40H Series Service Manual 3–9...
-
Page 36: Deadlocked Functions
■ ■ inside thumb turn ■ Note: Specify the hand of the door. YD–Deadlock (ANSI F18) WD–Deadlock (ANSI F16) Deadbolt operated by: Deadbolt operated by: outside key outside key ■ ■ inside key ■ 40H Series Service Manual 3–10... -
Page 37: Non-Keyed Functions
■ Inside lever is always unlocked NX–Exit lock (ANSI F31) Latchbolt operated by: inside lever ■ Latchbolt is deadlocked by an auxiliary latch Outside lever is always fixed Inside lever is always unlocked 40H Series Service Manual 3–11... - Page 38 2DT–Double dummy trim This product is a single, surface This product is a through-bolt mounted pair of matching levers mounted lever for an inactive door for an inactive door or a or a non-latching door. non-latching door. 40H Series Service Manual 3–12...
-
Page 39: Special Functions
XR–Classroom lock ZD–Storeroom lock Latchbolt operated by: Latchbolt operated by: outside key outside key ■ ■ Latchbolt is deadlocked by an inside lever ■ auxiliary latch Inside lever is always unlocked Outside lever is always locked 40H Series Service Manual 3–13... -
Page 40: Electrified Functions
Outside lever unlocked by: applying power to the solenoid; Outside lever unlocked by: ■ removing power from the remains unlocked while power is ■ solenoid continuously applied Inside lever is always unlocked Inside lever is always unlocked 40H Series Service Manual 3–14... - Page 41 Inside lever is always unlocked Deadbolt and latchbolt retracted Deadbolt and latchbolt retracted simultaneously by: simultaneously by: inside lever inside lever ■ ■ outside lever when power is outside lever when power is ■ ■ removed applied 40H Series Service Manual 3–15...
- Page 42 Inside lever unlocked by: applying power to the solenoid; Inside lever unlocked by: ■ remains locked while power is removing power from the ■ continuously applied solenoid 40H Series Service Manual 3–16...
-
Page 43: Mortise Case Parts
4–18 4–30 TDEU 4–52 4–20 4–58 TWEL 4–54 4–22 4–60 TWEU 4–56 4–22 4–6 4–4 4–4 4–10 4–42 4–12 NXEL 4–46 4–44 4–4 NXEU 4–48 4–34 4–38 4–4 4–4 4–40 4–36 4–34 4–22 4–12 4–4 40H Series Service Manual 4–1... -
Page 44: A Function Case-Office Lock
Mortise Case Parts — FUNCTION CASE OFFICE LOCK Figure 4.1 A function case exploded diagram 40H Series Service Manual 4–2... -
Page 45: Mortise Case Parts
A44193 Release lever spring C45010 Release lever sub-assembly C45000 Case sub-assembly a. For a complete case, use C45504. To order a “case only” lock, which includes a mortise case, faceplate, and strike, see page 4–62. 40H Series Service Manual 4–3... -
Page 46: At, C, D, Inl, R, W, Zd, Xr Function Case Exploded Diagram
STOREROOM LOCK — — FUNCTION CASE STOREROOM LOCK FUNCTION CASE STOREROOM LOCK — — FUNCTION CASE INTRUDER LOCK FUNCTION CASE CLASSROOM LOCK Figure 4.2 AT, C, D, INL, R, W, ZD, XR function case exploded diagram 40H Series Service Manual 4–4... - Page 47 For a complete case assembly, use C45507 and reconfigure the shuttle screws as needed. See Changing the function for universal cases on page 6-5. To order a “case only” lock, which includes a mortise case, faceplate, and strike, see page 4–62. 40H Series Service Manual 4–5...
-
Page 48: Function Case Exploded Diagram
Mortise Case Parts — FUNCTION CASE PRIVACY LOCK Figure 4.3 LT function case exploded diagram 4–6 40H Series Service Manual... - Page 49 A44193 Release lever spring C45010 Release lever sub-assembly C45000 Case sub-assembly a. For a complete case, use C45520. To order a “case only” lock, which includes a mortise case, faceplate, and strike, see page 4–62. 40H Series Service Manual 4–7...
- Page 50 Mortise Case Parts — FUNCTION CASE PASSAGE LOCK Figure 4.4 N function case exploded diagram 40H Series Service Manual 4–8...
- Page 51 A44193 Release lever spring C45010 Release lever sub-assembly C45000 Case sub-assembly a. For a complete case, use C45505. To order a “case only” lock, which includes a mortise case, faceplate, and strike, see page 4–62. 40H Series Service Manual 4–9...
-
Page 52: Nx Function Case Exploded Diagram
Mortise Case Parts — FUNCTION CASE EXIT LOCK Figure 4.5 NX function case exploded diagram 40H Series Service Manual 4–10... - Page 53 A44193 Release lever spring C45010 Release lever sub-assembly C45000 Case sub-assembly a. For a complete case, use C45506. To order a “case only” lock, which includes a mortise case, faceplate, and strike, see page 4–62. 40H Series Service Manual 4–11...
-
Page 54: Chb, Rhb Function Case Exploded Diagram
Mortise Case Parts — FUNCTION CASE HOLDBACK LOCK — FUNCTION CASE CLASSROOM HOLDBACK LOCK Figure 4.6 CHB, RHB function case exploded diagram 40H Series Service Manual 4–12... - Page 55 Release lever spring C45010 Release lever sub-assembly C45002 Holdback case sub-assembly a. For a complete case, use C45523. To order a “case only” lock, which includes a mortise case, faceplate, and strike, see page 4–62. 40H Series Service Manual 4–13...
-
Page 56: Ab Function Case-Office Lock
Mortise Case Parts — FUNCTION CASE OFFICE LOCK Figure 4.7 AB function case exploded diagram 40H Series Service Manual 4–14... - Page 57 A44193 Release lever spring C45010 Release lever sub-assembly C45000 Case sub-assembly a. For a complete case, use C45502. To order a “case only” lock, which includes a mortise case, faceplate, and strike, see page 4–62. 40H Series Service Manual 4–15...
-
Page 58: B Function Case-Entrance Lock
Mortise Case Parts — FUNCTION CASE ENTRANCE LOCK Figure 4.8 B function case exploded diagram 40H Series Service Manual 4–16... - Page 59 A44193 Release lever spring C45010 Release lever sub-assembly C45000 Case sub-assembly a. For a complete case, use C45510. To order a “case only” lock, which includes a mortise case, faceplate, and strike, see page 4–62. 40H Series Service Manual 4–17...
-
Page 60: Ba Function Case-Entrance Lock
Mortise Case Parts — FUNCTION CASE ENTRANCE LOCK — FUNCTION CASE STOREROOM LOCK Figure 4.9 BA, S function case exploded diagram 40H Series Service Manual 4–18... - Page 61 A44193 Release lever spring C45010 Release lever sub-assembly C45000 Case sub-assembly a. For a complete case, use C45517. To order a “case only” lock, which includes a mortise case, faceplate, and strike, see page 4–62. 40H Series Service Manual 4–19...
-
Page 62: Bw Function Case Exploded Diagram
Mortise Case Parts — FUNCTION CASE ENTRANCE LOCK Figure 4.10 BW function case exploded diagram 40H Series Service Manual 4–20... - Page 63 C45010 Release lever sub-assembly A44234 Self tapping screw C45000 Case sub-assembly a. For a complete case, use C45518. To order a “case only” lock, which includes a mortise case, faceplate, and strike, see page 4–62. 40H Series Service Manual 4–21...
- Page 64 Mortise Case Parts — FUNCTION CASE COMMUNICATING LOCK — FUNCTION CASE ENTRANCE LOCK — UNCTION CASE ENTRANCE LOCK Figure 4.11 G, B5, B7 function case exploded diagram 40H Series Service Manual 4–22...
- Page 65 A44193 Release lever spring C45010 Release lever sub-assembly C45000 Case sub-assembly a. For a complete case, use C45508. To order a “case only” lock, which includes a mortise case, faceplate, and strike, see page 4–62. 40H Series Service Manual 4–23...
- Page 66 Mortise Case Parts — FUNCTION CASE HOTEL LOCK — FUNCTION CASE HOTEL LOCK — FUNCTION CASE DORMITORY LOCK Figure 4.12 H, HJ, TD function case exploded diagram 40H Series Service Manual 4–24...
- Page 67 C45010 Release lever sub-assembly A44234 Self tapping screw C45000 Case sub-assembly a. For a complete case, use C45516. To order a “case only” lock, which includes a mortise case, faceplate, and strike, see page 4–62. 40H Series Service Manual 4–25...
- Page 68 Mortise Case Parts — FUNCTION CASE INTRUDER LOCK — FUNCTION CASE DORMITORY LOCK Figure 4.13 IND, T function case exploded diagram 40H Series Service Manual 4–26...
- Page 69 A44193 Release lever spring C45010 Release lever sub-assembly C45000 Case sub-assembly a. For a complete case, use C45500. To order a “case only” lock, which includes a mortise case, faceplate, and strike, see page 4–62. 40H Series Service Manual 4–27...
- Page 70 Mortise Case Parts — FUNCTION CASE PRIVACY LOCK Figure 4.14 L function case exploded diagram 40H Series Service Manual 4–28...
- Page 71 A44193 Release lever spring C45010 Release lever sub-assembly C45000 Case sub-assembly a. For a complete case, use C45509. To order a “case only” lock, which includes a mortise case, faceplate, and strike, see page 4–62. 40H Series Service Manual 4–29...
-
Page 72: Lb Function Case Exploded Diagram
Mortise Case Parts — FUNCTION CASE PRIVACY LOCK Figure 4.15 LB function case exploded diagram 40H Series Service Manual 4–30... - Page 73 A44193 Release lever spring C45010 Release lever sub-assembly C45000 Case sub-assembly a. For a complete case, use C45511. To order a “case only” lock, which includes a mortise case, faceplate, and strike, see page 4–62. 40H Series Service Manual 4–31...
-
Page 74: Ta Function Case Exploded Diagram
Mortise Case Parts — FUNCTION CASE DORMITORY LOCK Figure 4.16 TA function case exploded diagram 40H Series Service Manual 4–32... - Page 75 A44193 Release lever spring C45010 Release lever sub-assembly C45000 Case sub-assembly a. For a complete case, use C45515. To order a “case only” lock, which includes a mortise case, faceplate, and strike, see page 4–62. 40H Series Service Manual 4–33...
-
Page 76: Ad, Wd, Yd Function Case Exploded Diagram
Mortise Case Parts — FUNCTION CASE DEADLOCK — FUNCTION CASE DEADLOCK — FUNCTION CASE DEADLOCK Figure 4.17 AD, WD, YD function case exploded diagram 40H Series Service Manual 4–34... - Page 77 C44111 Cylinder retainer C44144 Cylinder retainer assembly B45090 Case sub-assembly C45000 a. For a complete case, use C45512. To order a “case only” lock, which includes a mortise case, faceplate, and strike, see page 4–62. 40H Series Service Manual 4–35...
-
Page 78: Rd Function Case Exploded Diagram
Mortise Case Parts — FUNCTION CASE CLASSROOM DEADLOCK Figure 4.18 RD function case exploded diagram 40H Series Service Manual 4–36... - Page 79 For a complete RD (LH) function case, use C45514. To order a “case only” lock, which includes a mortise case, faceplate, and strike, see page 4–62. b. For information to order screws, see page 5–18. 40H Series Service Manual 4–37...
-
Page 80: Del Function Case-Electrically Locked Fail Safe Lock
Mortise Case Parts —E FUNCTION CASE LECTRICALLY LOCKED FAIL SAFE LOCK Figure 4.19 DEL function case exploded diagram 40H Series Service Manual 4–38... - Page 81 To obtain the parts for the electronic locking toggle assembly, order: locking slide (B44611) ❥ locking bar (A44612) ❥ electronic locking toggle (B44627) ❥ toggle screws (see Screw kits on page 5–19) . ❥ 40H Series Service Manual 4–39...
-
Page 82: Deu Function Case-Electrically Unlocked Fail Secure
Mortise Case Parts —E FUNCTION CASE LECTRICALLY UNLOCKED FAIL SECURE Figure 4.20 DEU function case exploded diagram 40H Series Service Manual 4–40... - Page 83 To obtain the parts for the electronic locking toggle assembly, order: locking slide (B44611) ❥ locking bar (A44612) ❥ electronic locking toggle (B44627) ❥ toggle screws (see Screw kits on page 5–19) . ❥ 40H Series Service Manual 4–41...
-
Page 84: Wel Function Case Exploded Diagram
Mortise Case Parts —E FUNCTION CASE LECTRICALLY UNLOCKED FAIL SAFE Figure 4.21 WEL function case exploded diagram 40H Series Service Manual 4–42... - Page 85 To obtain the parts for the electronic locking toggle assembly, order: locking slide (B44611) ■ locking bar (A44612) ■ electronic locking toggle (B44627) ■ toggle screws (see Screw kits on 5–19) . page ■ 40H Series Service Manual 4–43...
-
Page 86: Weu Function Case Exploded Diagram
Mortise Case Parts —E FUNCTION CASE LECTRICALLY UNLOCKED FAIL SECURE Figure 4.22 WEU function case exploded diagram 40H Series Service Manual 4–44... - Page 87 ■ b. To obtain the parts for the electronic locking toggle assembly, order: locking slide (B44611) ■ locking bar (A44612) ■ electronic locking toggle (B44627) ■ toggle screws (see Screw kits on page 5–19). ■ 40H Series Service Manual 4–45...
-
Page 88: Nxel Function Case-Electrically Locked Fail Safe Lock
Mortise Case Parts NXEL — FUNCTION CASE ELECTRICALLY LOCKED FAIL SAFE LOCK Figure 4.23 NXEL function case exploded diagram 40H Series Service Manual 4–46... - Page 89 To obtain the parts for the electronic locking toggle assembly, order: locking slide (B44611) ■ locking bar (A44612) ■ electronic locking toggle (B44627) ■ toggle screws (see Screw kits on 5–19) . page ■ 40H Series Service Manual 4–47...
-
Page 90: Nxeu Function Case Exploded Diagram
Mortise Case Parts NXEU — FUNCTION CASE ELECTRICALLY UNLOCKED FAIL SECURE LOCK Figure 4.24 NXEU function case exploded diagram 40H Series Service Manual 4–48... - Page 91 To obtain the parts for the electronic locking toggle assembly, order: locking slide (B44611) ■ locking bar (A44612) ■ electronic locking toggle (B44627) ■ toggle screws (see Screw kits on 5–19) . page ■ 40H Series Service Manual 4–49...
-
Page 92: Tdel Function Case-Electrically Locked Fail Saf E Lock
Mortise Case Parts TDEL —E FUNCTION CASE LECTRICALLY LOCKED FAIL SAFE LOCK Figure 4.25 TDEL function case exploded diagram 40H Series Service Manual 4–50... - Page 93 To obtain the parts for the electronic locking toggle assembly, order: locking slide (B44611) ■ locking bar (A44612) ■ electronic locking toggle (B44627) ■ toggle screws (see Screw kits on 5–19) . page ■ 40H Series Service Manual 4–51...
-
Page 94: Tdeu Function Case-Electrically Unlocked Fail Secure
Mortise Case Parts TDEU —E FUNCTION CASE LECTRICALLY UNLOCKED FAIL SECURE Figure 4.26 TDEU function case exploded diagram 40H Series Service Manual 4–52... - Page 95 To obtain the parts for the electronic locking toggle assembly, order: locking slide (B44611) ■ locking bar (A44612) ■ electronic locking toggle (B44627) ■ toggle screws (see Screw kits on page 5–19) . ■ 40H Series Service Manual 4–53...
-
Page 96: Twel Function Case-Electrically Locked Fail Safe Lock
Mortise Case Parts TWEL —E FUNCTION CASE LECTRICALLY LOCKED FAIL SAFE LOCK Figure 4.27 TWEL function case exploded diagram 40H Series Service Manual 4–54... - Page 97 C45699 C45700 C45736 C45737 b. To obtain the parts for the electronic locking toggle assembly, order: locking slide (B44611) locking bar (A44612) electronic locking toggle (B44627) toggle screws (see Screw kits on page 5–19) . 40H Series Service Manual 4–55...
-
Page 98: Tweu Function Case-Electrically Unlocked Fail Secure
Mortise Case Parts TWEU —E FUNCTION CASE LECTRICALLY UNLOCKED FAIL SECURE Figure 4.28 TWEU function case exploded diagram 40H Series Service Manual 4–56... - Page 99 To obtain the parts for the electronic locking toggle assembly, order: locking slide (B44611) ■ locking bar (A44612) ■ electronic locking toggle (B44627) ■ toggle screws (see Screw kits on 5–19) . page ■ 40H Series Service Manual 4–57...
-
Page 100: Lel Function Case Exploded Diagram
Mortise Case Parts — FUNCTION CASE LECTRICALLY LOCKED FAIL SAFE LOCK Figure 4.29 LEL function case exploded diagram 40H Series Service Manual 4–58... - Page 101 To obtain the parts for the electronic locking toggle assembly, order: locking slide (B44611) ■ locking bar (A44612) ■ electronic locking toggle (B44627) ■ toggle screws (see Screw kits on 5–19) . page ■ 40H Series Service Manual 4–59...
-
Page 102: Leu Function Case Exploded Diagram
Mortise Case Parts — FUNCTION CASE LECTRICALLY UNLOCKED FAIL SECURE Figure 4.30 LEU function case exploded diagram 40H Series Service Manual 4–60... - Page 103 To obtain the parts for the electronic locking toggle assembly, order: locking slide (B44611) ■ locking bar (A44612) ■ electronic locking toggle (B44627) ■ toggle screws (see Screw kits on 5–19) . page ■ 40H Series Service Manual 4–61...
-
Page 104: Case Only Locks
Mortise Case Parts ASE ONLY LOCKS For most functions, 40H Series Locks can be ordered as complete locks or can be assembled using a “case only” lock, an inside trim kit, and an outside trim kit. A case only lock includes the items not specifically associated with inside or outside trim (lock case, faceplate, strike, strike box, fasteners for case and strike, and installation instructions). -
Page 105: How To Order Electrified Mortise Locks
RQE – Request to exit sensor LS – Latch status sensor DS – Door status sensor 24V – 24 volt solenoid SH – Security head screws 7/8-LTC – Flat-lipped strike 45HWCA – DEL – 626 – RH – 40H Series Service Manual 4–63... - Page 106 For faceplate kit information, see page 5–15. e. For part numbers for mortise cases, see the appropriate parts list in this chapter. Figure 4.31 Case only lock – faceplate and case for AB function shown 40H Series Service Manual 4–64...
-
Page 107: Trim Parts
The following pages describe the trim parts available for 45H & 47H Locks and 45HW & 47HW Locks. Information for how to order trim kits is provided. For information about 48H & 49H trim parts, see 48H Trim parts on page 7–5. 40H Series Service Manual 5–1... -
Page 108: Outside Trim Kits
40HTK – OS1 – 14 – H – 626 – By default, OS2 and OS4 include a cylinder ring for single-keyed applications. For double-keyed applications, specify the D option in the nomenclature. For door thickness information, see the table on the next page. 40H Series Service Manual 5–2... -
Page 109: Kit Components
To obtain the sectional trim emergency key kit (rose, mounting screws, and key), use A35150. The outside escutcheon assembly for J, M, and N trim includes an integrated emergency access rose. To obtain the emergency key only, use A18719. 40H Series Service Manual 5–3... -
Page 110: Os1 - Outside Lever Only
Trim Parts Sectional trim Escutcheon trim Figure 5.1 OS1 – Outside lever only Sectional trim Escutcheon trim Figure 5.2 OS2 – Outside lever & cylinder 40H Series Service Manual 5–4... -
Page 111: Os3 - Outside Lever & Access Plate
Trim Parts Sectional trim Escutcheon trim Figure 5.3 OS3 – Outside lever & access plate All trim Figure 5.4 OS4 – Outside cylinder only 40H Series Service Manual 5–5... -
Page 112: Inside Trim Kits
SH – Security head screws 40HTK – IS1 – 14 – H – 626 – IS3 and IS4 include the cylinder ring used for double- keyed applications. For door thickness information, see the table on the next page. 40H Series Service Manual 5–6... - Page 113 For information to order screw kits, see page 5–19. f. The inside escutcheon assembly for J, M, and N trim includes an integrated thumb turn. g. The cylinder ring provided is for double-keyed applications. 40H Series Service Manual 5–7...
-
Page 114: Is1 - Inside Lever Only
Sectional trim Escutcheon trim Figure 5.5 IS1 – Inside lever only Sectional trim Escutcheon trim Figure 5.6 IS2 – Inside lever & thumb turn Sectional trim Escutcheon trim Figure 5.7 IS3 – Inside lever & cylinder 40H Series Service Manual 5–8... -
Page 115: Is4 - Inside Cylinder Only
Trim Parts All trim Figure 5.8 IS4 – Inside cylinder only Sectional trim Figure 5.9 IS5 – Inside thumb turn only 40H Series Service Manual 5–9... -
Page 116: How To Order
4 3/4″ 2.674″ 40HST – 1 – 626 – – 4 3/4 center of the screw holes 5″ 2.799″ 40HST – 1 – 626 – – 5 Figure 5.10 Lip to center dimension 40H Series Service Manual 5–10... -
Page 117: Strike Packages
Figure 5.13 Strike kit 1– Universal strike package Figure 5.11 Strike kit 1– Universal strike package with flat-lipped option Figure 5.14 Strike kit 5– Magnetic strike box only Figure 5.12 Strike kit 4– Strike box only 40H Series Service Manual 5–11... -
Page 118: Lever Sets
Representative. Available door thicknesses 2″ 3 3/4″ 2 1/4″ 4″ 2 1/2″ 4 1/4″ 2 3/4″ 4 1/2″ 3″ 4 3/4″ 3 1/4″ 5″ 3 1/2″ 40H Series Service Manual 5–12... -
Page 119: Lever Sets
B45150 B45151 Socket set screw for lever handle not shown Curve / no return lever set Outside lever and spindle assembly B45182 B45183 Inside lever B45172 B45173 Socket set screw for lever handle not shown 40H Series Service Manual 5–13... -
Page 120: Solid Tube / Return (Style 3)
5–19. Figure 5.15 Solid tube / return (style 3) Figure 5.16 Knob (style 4) Figure 5.17 Curved return (style 14) Figure 5.18 Contour/angle return (style 15) Figure 5.19 Curve / no return (style 16) 40H Series Service Manual 5–14... -
Page 121: Faceplate Kits
† The faceplate in Kit 3 has the UL mark. The faceplate in Kit 9 does not have the UL mark. ‡ The faceplate in Kit 6 has the BEST logo. The faceplate in Kit 10 does not have the BEST logo. -
Page 122: How To Order
Representative. Available door thicknesses 2″ 3 3/4″ 2 1/4″ 4″ 2 1/2″ 4 1/4″ 2 3/4″ 4 1/2″ 3″ 4 3/4″ 3 1/4″ 5″ 3 1/2″ 40H Series Service Manual 5–16... -
Page 123: Replacement Spindles
For information to order screw kits, see page 5–19. b. For information to order an allen wrench, see page 5–29 Figure 5.21 Spindle kit 2 – Standard replacement spindle Figure 5.22 Spindle kit 4 – Hook replacement spindle 40H Series Service Manual 5–17... -
Page 124: Screw Kits
Representative. Available door thicknesses 2″ 3 3/4″ 2 1/4″ 4″ 2 1/2″ 4 1/4″ 2 3/4″ 4 1/2″ 3″ 4 3/4″ 3 1/4″ 5″ 3 1/2″ 40H Series Service Manual 5–18... -
Page 125: Screw Kits
Security head option accepts T15 bit. b. Security head option accepts T25 bit. c. When the thick door option is selected, a longer screw is provided. d. Security head option accepts spanner head bit. Figure 5.23 Screw kit componen 40H Series Service Manual 5–19... -
Page 126: Cylinders And Cams
Lock with sectional trim, J trim, or M trim, use the nomenclature shown in the example below. For information for ordering a cylinder and cam assembly and cylinder ring for a 40H Series Lock with N trim or a hotel function, see the tables on the next page. -
Page 127: Cylinders By Door Thickness
B35101 B35102 13/32″ (.406) 7/16″ (.438) B35103 9/16″ (.562) B35104 B35105 19/32″ (.594) 21/32″ (.656) B35106 B35107 23/32″ (.719) 13/16″ (.812) B35108 5/16″ (.312) B35109 Standard cylinder Hotel cylinder N trim cylinder Figure 5.24 Cylinders 40H Series Service Manual 5–21... -
Page 128: Cylinder Rings
Trim Parts Cylinder ring Wavy washer High security cylinder ring Figure 5.25 Cylinder rings Standard cam (C258) Cam for CHB & RHB O/S cylinder (C293) Figure 5.26 Cylinder cams 40H Series Service Manual 5–22... -
Page 129: Escutcheon Assemblies
Outside esc utcheon for D44095 L, LB, LT privacy visual indicator (with emergency key) a. The keyed visual indicator may also be used with IND, INL, and TD function locks. Figure 5.27 Outside J trim escutcheons 40H Series Service Manual 5–23... -
Page 130: Inside J Trim Escutcheons
TWEL, TWEU, W, WEL, WEU Inside escutcheon for keyed D44084 INL, IND visual indicator ″ a. For part numbers for door thicknesses other than 1 3/4 , contact your local dormakaba Representative. Figure 5.28 Inside J trim escutcheons 40H Series Service Manual 5–24... -
Page 131: M & N Trim Outside Escutcheons
A, AB, AT, B, B5, B7, D, DEL, DEU, G, IND, C44459 INL, R, RHB, S, T, TA, TD, TDEL, TDEU, W, WEL, WEU a. These escutcheon assemblies include the hardened security plate (A34377). Figure 5.29 Outside M & N trim escutcheons 40H Series Service Manual 5–25... -
Page 132: M & N Trim Inside Escutcheons
For part numbers for door thicknesses other than 1 3/4 , contact your local dormakaba Representative. b. These escutcheon assemblies include the hardened security plate (A34377). Figure 5.30 Inside M & N trim escutcheons 40H Series Service Manual 5–26... -
Page 133: Roses And Rose Rings
For part numbers for door thicknesses other than 1 3/4 , contact your local dormakaba Representative. c. For information to order screw kits, see page 5–19. Single dummy trim Double dummy trim Figure 5.32 Dummy trim parts 40H Series Service Manual 5–27... -
Page 134: Visual Indicator Trim
J trim outside escutcheon for privacy visual indicator D44095 a. For information to order screw kits, see page 5–19. Sectional trim J trim Figure 5.33 Keyed visual indicator trim Sectional trim J trim Figure 5.34 Privacy visual indicator trim 40H Series Service Manual 5–28... -
Page 135: Service Equipment
Trim Parts ERVICE EQUIPMENT Tools for use with 40H Series Locks are described in the table and figure below. Nomen- Item clature Description Used for ED212 Mortise cylinder cam Tool for assembling cams to mortise assembly tool cylinders ED211 Cylinder wrench... -
Page 136: Driver Bits
Security head trim mounting screw, thumb turn TORX T15 mounting screw, faceplate screw TORX T25 A34458 Security head case mounting screw, strike screw Spanner head A34407 Lever set screw a. TORX is a registered trademark of the Camcar Division of Textron. 40H Series Service Manual 5–30... -
Page 137: Accessories For Electrified Locks
Temperature control module not shown CECB 179-66 Electrified hinge CECB 168-66 CECB 191-66 a. dormakaba recommends one of the listed concealed electric hinges. For more information, contact your dormakaba representative. Figure 5.37 Accessories for electrified locks 40H Series Service Manual 5–31... - Page 138 Trim Parts 40H Series Service Manual 5–32...
-
Page 139: Service And Maintenance
ERVICE AND AINTENANCE This chapter contains instructions for servicing and maintaining 45H & 47H Locks and 45HW & 47HW Locks. For instructions for servicing and maintaining 48H & 49H Locks, see Troubleshooting on page 7-8. 40H Series Service Manual 6–1... -
Page 140: Changing The Hand
2. To rotate the latchbolt, insert a flat blade screwdriver into the latch access point approximately 1/2″ into the case and press to extend the latch out of the case. See Figure 6.2. 3. Rotate the latchbolt 180 degrees and allow it to retract. 40H Series Service Manual 6–2... -
Page 141: To Change The Position Of The Hub Toggles
2. To change the position of a hub toggle, remove the toggle screw, move the toggle into the desired position, and re-tighten the screw. Figure 6.3. 40H Series Service Manual 6–3... -
Page 142: Positioning The Hub Toggles
Service and Maintenance Hub toggle Hub toggle Figure 6.3 Positioning the hub toggles 40H Series Service Manual 6–4... -
Page 143: Changing The Function For Universal Cases
0, 1, 2, or 3 to position 4. Then move the shuttle screw from position 5 to position 2. Function Shuttle screw positions 2 & 4 AT, INL, R 0 & 5 D, NX, W 3 & 5 1 & 5 40H Series Service Manual 6–5... -
Page 144: To Change The Position Of The Hub Toggles
The UNT mortise case can be configured for either the L or T function. function for No change to the mortise case is required when changing between these functions; only trim changes are required. UNT cases 40H Series Service Manual 6–6... -
Page 145: Troubleshooting
If not, order the correct case and thumb turn cylinder. Universal case is Configure the case to the desired Lock does not function properly. incorrectly configured. function (pg. 6-5). 40H Series Service Manual 6–7... - Page 146 Service and Maintenance 40H Series Service Manual 6–8...
- Page 147 48H & 49H Lock parts and maintenance. UNCTION QUICK REFERENCE 48H / 49H Description Diagram Functions page number page number page 7–2 page 7–3 page 7–2 page 7–3 page 7–2 page 7–3 page 7–2 page 7–4 40H Series Service Manual 7–1...
-
Page 148: 48H & 49H Locks
Note 3: Can be used on 1 3/4″ thick doors only. 48H & 49H M ORTISE CASE PARTS The following pages contain exploded diagrams and parts lists for 48H & 49H mortise cases. 40H Series Service Manual 7–2... -
Page 149: 48H & 49H Locks
Turn knob hub spacer A35022 Double cylinder clamp plate B35402 Case sub-assembly Case mounting screw (#12-12 × 3/4” PHFH) A18724 B34353 Faceplate Faceplate screw (#8-32 × 1/4” PHFHMS) A18722 B35399 Deadbolt a. For a complete case, use B35403. 40H Series Service Manual 7–3... - Page 150 Case sub-assembly A18724 Case mounting screw (#12-12 × 3/4“ PHFH) B34353 Faceplate A18722 Faceplate screw (#8-32 × 1/4” PHFHMS) B35399 Deadbolt a. For a complete LH case, use C45524. For a complete RH case, use C45525. 40H Series Service Manual 7–4...
-
Page 151: Trim Parts
† double-keyed functions page 5–3 OS4 trim kit page 5–7 IS5 trim kit B35401 Turn knob cylinder for right hand doors B35405 Turn knob cylinder not shown for left hand doors a. Includes wavy washer. 40H Series Service Manual 7–5... -
Page 152: High Security Deadbolt Trim Parts
Inside escutcheon assembly not shown B45220 Inside escutcheon assembly C44461 not shown Outside scutcheon B45221 a. Use screw kit #2. For screw kit information, see page 5–19. b. These escutcheon assemblies include the hardened security plate (A34377). 40H Series Service Manual 7–6... -
Page 153: Strikes And Strike Boxes
1 3/4″ thick door. Item Part No. Description C34361 48HS1 strike box not shown A34360 48HS1 strike (non-beveled) B34380 48HS2 strike box C18731 48HS2 strike (beveled) 40H Series Service Manual 7–7... -
Page 154: Troubleshooting
If not, order the correct case and thumb turn cylinder. Key will not operate deadbolt. Incorrect cam has been installed. Install cylinder with proper cam (pg. 7-5). 40H Series Service Manual 7–8... -
Page 155: Glossary
The angle on the edge of a door. Door bevel A nonfunctional mortise cylinder used only to plug a Dummy cylinder cylinder hole. Trim only (without lock). Used mainly on the Dummy trim inactive door of a double door. 40H Series Service Manual A–1... - Page 156 A rectangular cavity cut into the edge of a door. Can also mean the act Mortise of making such a cavity. A lock that fits into a mortise. Other locks fit into bored holes or mount to Mortise lock a surface. See also Mortise. A–2 40H Series Service Manual...
- Page 157 Template and drilling of doors and frames. A dial assembly, used primarily hotel function locks, that shows whether Visual indicator the deadbolt or latchbolt is locked. Icons on the dial indicate vacant or occupied status. 40H Series Service Manual A–3...
- Page 158 Glossary A–4 40H Series Service Manual...
-
Page 159: Installation Instructions
NSTALLATION NSTRUCTIONS The following pages contain: Installation Instructions for 45H & 47H Mortise ■ Locks Installation Instructions for 45HW & 47HW ■ Electrified Mortise Locks Installation Instructions for 48H & 49H Mortise ■ Locks 40H Series Service Manual B–1... - Page 160 Installation Instructions B–2 40H Series Service Manual...
- Page 161 M trim or sectional trim, but does not qualify for the UL437 high security listing. This option is not available for H and HJ function locks. †† Because these holes pass through the mortise pocket, it is recommended that each hole be drilled separately rather than straight through. 1/12 BEST is a trademark of dormakaba USA Inc. ©2021 All rights reserved. T81162_D...
- Page 162 Note 1: To locate the center of a hole on the opposite side of the door, drill a pilot hole completely through the door. Note 2: For holes through the door, it is best to drill halfway from each side of the door to prevent the door from splintering.
- Page 163 0 & 5 (for deadbolt functions with fixed outside lever) D, NX, W 3 & 5 Figure 5 Setting the shuttle screws and stop screw 1 & 5 3/12 BEST is a trademark of dormakaba USA Inc. ©2021 All rights reserved. T81162_D...
- Page 164 Note: The armored front of the mortise case self-adjusts to the door bevel. 3 Secure the mortise case with the case mounting screws. Figure 8 Installing the mortise case 4/12 BEST is a trademark of dormakaba USA Inc. ©2021 All rights reserved. T81162_D...
- Page 165 Cylinder threaded in too far. retainer 2 Secure the cylinder in the mortise case with the screw cylinder retainer screw. Figure 10 Installing the concealed cylinder 5/12 BEST is a trademark of dormakaba USA Inc. ©2021 All rights reserved. T81162_D...
- Page 166 5 Use the spanner wrench to install the trim ring onto the outside trim mounting plate. Trim ring Inside escutcheon Figure 11b Installing the J trim escutcheons 6/12 BEST is a trademark of dormakaba USA Inc. ©2021 All rights reserved. T81162_D...
- Page 167 Figure 11c Installing the M trim escutcheons (47H M trim shown) Escutcheon screw Inside escutcheon Trim ring Figure 11d Installing the N trim escutcheons 7/12 BEST is a trademark of dormakaba USA Inc. ©2021 All rights reserved. T81162_D...
- Page 168 Note: The unlocked icon should show when the deadbolt is retracted. The locked icon should show when Figure 13 Installing the visual indicator trim the deadbolt is extended. BEST is a trademark of dormakaba USA Inc. ©2021 All rights reserved. 8/12 T81162_D...
- Page 169 (installed in the cylinder) into the lock case. 6 Secure the cylinder in the mortise case with the cylinder retainer screw. Cylinder retainer screw Figure 14b Installing the high-security cylinder 9/12 BEST is a trademark of dormakaba USA Inc. ©2021 All rights reserved. T81162_D...
- Page 170 2 Lower hook spindle 5 Turn the lever to check that it operates smoothly. 3 Pin 1 Upper hook spindle Figure 15b Installing the hook spindle 10/12 BEST is a trademark of dormakaba USA Inc. ©2021 All rights reserved. T81162_D...
- Page 171 Filled Note: The recommended gap between the area door and jamb is 1/8″ . Strike plate Strike Figure 17 Installing the strike box and strike plate 11/12 BEST is a trademark of dormakaba USA Inc. ©2021 All rights reserved. T81162_D...
- Page 172 1 Turn the key as if to unlock the door. 2 Remove the key at the 12 o’clock position. The latch and inside lever release, and the lock operates normally. 12/12 BEST is a trademark of dormakaba USA Inc. ©2021 All rights reserved. T81162_D...
- Page 173 Latchbolt or deadbolt status (2) Access control Door status (2) panel RQE status (2) Wire transfer Lock hinge Wiring diagram for 45HW & 47HW Electrified Mortise Locks 1/16 BEST is a trademark of dormakaba USA Inc. ©2021 All rights reserved. T81612_B...
- Page 174 You need to take the bevel into Figure 2 Aligning the templates account. Tape the templates to the door. 2/16 BEST is a trademark of dormakaba USA Inc. ©2021 All rights reserved. T81612_B...
- Page 175 Note 1: To locate the center of a hole on the opposite side of the door, drill a pilot hole completely through the door. Note 2: For holes through the door, it is best to drill halfway from each side of the door to prevent the door from splintering.
- Page 176 8WTCM per lock. This module is supplied with Door frame Door electrically locked (EL) functions and is optional with electrically unlocked (EU) functions. Figure 7 Running field wiring (Continued) 4/16 BEST is a trademark of dormakaba USA Inc. ©2021 All rights reserved. T81612_B...
- Page 177 3 Insert the door status switch assembly into the door status switch hole. Figure 8 Installing the door status switch 5/16 BEST is a trademark of dormakaba USA Inc. ©2021 All rights reserved. T81612_B...
- Page 178 2 To change the position of a hub toggle, remove the Hub toggle Hub toggle toggle screw, move the toggle into the desired position, and re-tighten the screw. Figure 10 Positioning the hub toggles 6/16 BEST is a trademark of dormakaba USA Inc. ©2021 All rights reserved. T81612_B...
- Page 179 Door frame pockets in the door and frame, being careful not to Figure 12 Installing the wire transfer hinge pinch the wires. Install the wire transfer hinge. 7/16 BEST is a trademark of dormakaba USA Inc. ©2021 All rights reserved. T81612_B...
- Page 180 Cylinder 2 Secure the cylinder in the mortise case with the retainer cylinder retainer screw. screw Figure 14 Installing the concealed cylinder 8/16 BEST is a trademark of dormakaba USA Inc. ©2021 All rights reserved. T81612_B...
- Page 181 4 Use the spanner wrench to install the trim ring onto the outside trim mounting plate. Escutcheon screw Alignment plate Trim ring Inside escutcheon Figure 15b Installing the J trim escutcheons 9/16 BEST is a trademark of dormakaba USA Inc. ©2021 All rights reserved. T81612_B...
- Page 182 Figure 15c Installing the M trim escutcheons (47H M trim shown) Escutcheon screw Inside escutcheon Trim ring Figure 15d Installing the N trim escutcheons 10/16 BEST is a trademark of dormakaba USA Inc. ©2021 All rights reserved. T81612_B...
- Page 183 2 Install the thumb turn or emergency access plate using the two screws provided (Figure 16). Figure 16 Installing the thumb turn or emergency access plate 11/16 BEST is a trademark of dormakaba USA Inc. ©2021 All rights reserved. T81612_B...
- Page 184 (installed in the cylinder) into the lock case. 6 Secure the cylinder in the mortise case with the cylinder retainer screw. Cylinder retainer screw Figure 17b Installing the high-security cylinder 12/16 BEST is a trademark of dormakaba USA Inc. ©2021 All rights reserved. T81612_B...
- Page 185 1 Secure the mortise case faceplate to the mortise case with the faceplate mounting screws. 2 Check the lock for proper operation. Figure 19 Installing the mortise case faceplate 13/16 BEST is a trademark of dormakaba USA Inc. ©2021 All rights reserved. T81612_B...
- Page 186 Note: The recommended gap between the door and jamb is 1/8″ . Strike box with magnet Magnet Strike plate Strike Figure 20 Installing the strike box and strike plate BEST is a trademark of dormakaba USA Inc. ©2021 All rights reserved. 14/16 T81612_B...
- Page 187 Caution: The control key can be used to remove cores and to access doors. Provide adequate security for the control key. View of high-security cylinder Cylinder face Figure 22 Installing the core(s) 15/16 BEST is a trademark of dormakaba USA Inc. ©2021 All rights reserved. T81612_B...
- Page 188 † Deadbolt status sensor Blue Door status sensor White ‡ Latchbolt status sensor Violet RQE status sensor Brown & Orange † Normally open ‡ Normally closed 16/16 BEST is a trademark of dormakaba USA Inc. ©2021 All rights reserved. T81612_B...
- Page 189 Figure 4 Installing the strike box and strike Figure 2 Marking the centerlines on the door Note: dormakaba suggests a 38" height as measured from floor to lock center-line. BEST is a trademark of dormakaba USA Inc. ©2021 All rights reserved. T81175_B...
- Page 190 1 Install cylinder(s) and ring(s) and fasten with cylinder clamp screw(s). 3 Turn the key 15 degrees counterclockwise and remove the key. 2 Install thumb turn if needed. Note: Follow these steps to remove the core also. BEST is a trademark of dormakaba USA Inc. ©2021 All rights reserved. T81175_B...
- Page 191 45H & 47H Locks 1–3 part drawings for 45H & 47H Locks 4–2 45HW & 47HW Locks 1–5 part numbers for 45H & 47H Locks 4–3 48H & 49H Locks 1–7 40H Series Service Manual...
- Page 192 4–38 double-keyed functions 3–8 part numbers for 45H & door status switch non-keyed functions 3–11 47H Locks 4–3 part drawings for 45HW & single-keyed functions 3–5 47HW Locks 4–38 special functions 3–13 understanding function drawings 3–4 40H Series Service Manual...
- Page 193 45H & part numbers for 45H & function description 3–11 47H Locks 4–2 47H Locks 4–3 NXEL function part numbers for 45H & case diagram 4–46 47H Locks 4–3 case parts list 4–47 function description 3–15 40H Series Service Manual...
- Page 194 RQE and latch status switch assem- TDEL function 47H Locks 4–26 case diagram 4–50 part numbers for 45H & part drawings for 45HW & case parts list 4–51 47H Locks 4–27 47HW Locks 4–38 function description 3–15 40H Series Service Manual...
- Page 195 3–10 WEL function case diagram 4–42 case parts list 4–43 function description 3–16 WEU function case diagram 4–44 case parts list 4–45 function description 3–16 wire strain relief part drawings for 45HW & 47HW Locks 4–38 40H Series Service Manual...
-
Page 196: Index
Index 40H Series Service Manual... - Page 197 T81602_C BEST is a trademark of dormakaba USA Inc. ©2021 All rights reserved.
Need help?
Do you have a question about the 47H and is the answer not in the manual?
Questions and answers