Sanyo VCC-HD2100 - Full HD 1080p Network Camera Summary Manual
Megapixel camera
Hide thumbs
Also See for VCC-HD2100 - Full HD 1080p Network Camera:
- User manual (118 pages) ,
- Specifications (7 pages) ,
- Manual (118 pages)
Advertisement
Available languages
Available languages
Quick Links
SUMMARY MANUAL
Side A
Megapixel Camera
THIS INSTALLATION SHOULD BE MADE BY A QUALIFIED
SERVICE PERSON AND SHOULD CONFORM TO ALL LOCAL
CODES.
Please read this instruction manual carefully in order to ensure correct installation.
In addition, be sure to read carefully the electronic manual (INSTRUCTION MANUAL)
contained in the supplied CD-ROM to ensure correct operation of the camera.
VCC-HD2500P/HD2500
VCC-HD2300P/HD2300
VCC-HD2100P/HD2100
Advertisement
Chapters

Related Manuals for Sanyo VCC-HD2100 - Full HD 1080p Network Camera


Summary of Contents for Sanyo VCC-HD2100 - Full HD 1080p Network Camera
- Page 1 SUMMARY MANUAL VCC-HD2500P/HD2500 VCC-HD2300P/HD2300 VCC-HD2100P/HD2100 Side A Megapixel Camera THIS INSTALLATION SHOULD BE MADE BY A QUALIFIED SERVICE PERSON AND SHOULD CONFORM TO ALL LOCAL CODES. Please read this instruction manual carefully in order to ensure correct installation. In addition, be sure to read carefully the electronic manual (INSTRUCTION MANUAL) contained in the supplied CD-ROM to ensure correct operation of the camera.
-
Page 2: Table Of Contents
Table of Contents Name and Function of Each Component ..............2 Basic Connections ....................5 Alarm Terminal Connections ..................6 Lens Adjustment ....................... 7 Network Settings ....................10 Specifications ......................11 Copyright Notice .............See “Side B” of this manual. ■ Accessories Video Cable Clamping Core... -
Page 3: Name And Function Of Each Component
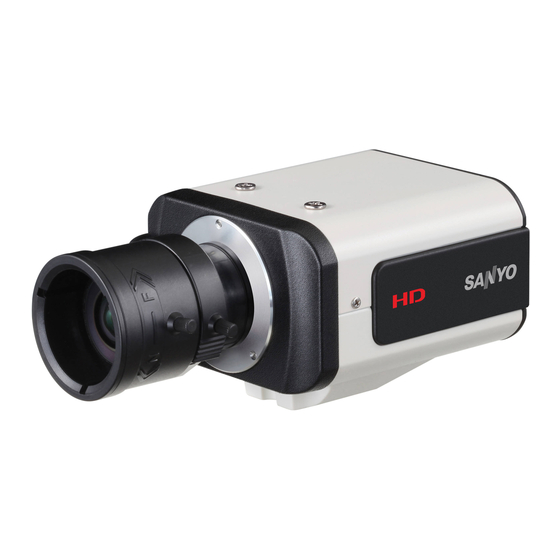
Name and Function of Each Component ■ Rear Face CLASS 2 WIRING AUDIO DC12V SD (SDHC) Card Slot (VCC-HD2500P/HD2500) Audio Output Jack (AUDIO OUT, 3.5-mm mini jack) (VCC-HD2500P/HD2500) Power Indicator (POWER) The power indicator blinks to indicate the following camera statuses. •... - Page 4 Name and Function of Each Component ■ Side Face NEAR RESET Operation Buttons • Restarting camera: Press the RESET button. OPTION SETTINGS (CAMERA REBOOT) • Stopping recording/Removing SD memory card: Press the NEAR button for 2 seconds or more. The power indicator starts blinking and then stays lit when the camera is ready for you to remove the SD memory card.
- Page 5 Name and Function of Each Component Auto Iris Lens Socket (LENS) Connect the lens cable plug to the auto iris lens socket provided on the left-side face of the camera. It is recommended that you use a CS-mount DC auto iris megapixel lens (commercially available).
-
Page 6: Basic Connections
Basic Connections VCC-HD2500P VCC-HD2500 VCC-HD2500P 24 V AC POWER CLASS2 WIRING AC24V AUDIO VCC-HD2300P DC12V AC24V ALARM 24 V AC AC24V VCC-HD2100P AC24V Monitor 1 2 COM 1 2 12 V DC Power supply AC24V 12 V DC AC24V Power Connection Connect the power terminals (24 V AC/12 V DC) of the camera to a power supply. -
Page 7: Alarm Terminal Connections
Alarm Terminal Connections To connect a cable, while pushing the protrusion of the terminal, insert the cable into the opening and then release it. (COM) External (ALARM OUT 2) peripheral (ALARM OUT 1) device Alarm input signal (ALARM IN 2) (COM) Alarm input signal... -
Page 8: Lens Adjustment
Lens Adjustment For high-resolution megapixel images, the focus assist function is useful to obtain a precise focus because otherwise it is extremely difficult. If you are using a varifocal lens, adjust the focus using the following procedure. If the focus assist function does not work properly because the camera produces too dark or too bright video images, perform iris adjustment in advance. - Page 9 Lens Adjustment ■ Fine-adjusting focus (using buttons provided on side face) NEAR RESET Use the zoom lever of the lens to adjust the angle of view and the focus lever of the lens to roughly focus on the subject. Press the SET button. (Focus adjustment screen Page 7) The camera automatically focuses on the subject.
- Page 10 Lens Adjustment ■ Adjusting iris If the camera produces too dark, too bright, or other incorrect video images, adjust the lens iris. Press the SET button for 2 seconds or more. The monitor now shows the SELECT MENU screen. SELECT MENU NEAR FOCUS ASSIST IRIS...
-
Page 11: Network Settings
Network Settings Preparing Your Computer for Network Operation Check your operating environment. ( Page 1) Connect the camera to the network to which your PC is also connected. Configue the network information on your PC. Configure information such as the IP address of your PC. Install the “H.264 Plug-in”... - Page 12 Network Settings Type your user name and password and click [OK]. The language selection screen appears. If this is the first access to the camera, log in as an admin user (administrator) using the following default authentication information. • User name: admin •...
-
Page 13: Specifications
SD Recording (SD Memory Card) (VCC-HD2500P/HD2500) Recording mode Alarm recording, backup recording in event of a network failure For the recommended SD memory cards, visit our website. http://www.sanyo-cctv.net/ ■ Video output Composite output (NTSC equivalent/ PAL equivalent) 10BASE-T/100BASE-TX (RJ-45 connector) Card slot 1 (SDHC compliant, max. - Page 14 Specifications ■ Network Image/video compression H.264/JPEG Video size (H.264) (16:9) 1920×1080, 1280×720, 640×360, 320×180 (4:3) 1600×1200, 1280×960, 1024×768, 640×480, 320×240 Video size (JPEG) (16:9) 1920×1080, 1280×720, 1024×576, 640×360 (4:3) 2288×1712, 1600×1200, 1280×960, 1024×768, 800×600, 640×480, 320×240 Picture quality QUALITY mode: BASIC, NORMAL, ENHANCED, FINE, SUPER FINE BITRATE mode: User-specified bit rate Interface...
- Page 15 MANUEL ABRÉGÉ VCC-HD2500P/HD2500 VCC-HD2300P/HD2300 VCC-HD2100P/HD2100 Côté A Caméra à mégapixels CETTE INSTALLATION DOIT ETRE EFFECTUEE PAR UNE PERSONNE QUALIFIEE DU SERVICE TECHNIQUE ET DOIT ETRE CONFORME A TOUS LES CODES LOCAUX. Veuillez lire ce manuel d’instructions tres attentivement afin d’effectuer une installation correcte.
- Page 16 Table des matières Nom et fonction de chaque composant ..............2 Branchements de base ..................... 5 Branchements des bornes d’alarme ................. 6 Réglage de la lentille ....................7 Réglages du réseau ....................10 Spécifications ......................11 Note de copyright............Voir le “Côté B” de ce manuel. ■...
-
Page 17: Nom Et Fonction De Chaque Composant
Nom et fonction de chaque composant ■ Face arrière CLASS 2 WIRING AUDIO DC12V Fente pour carte SD (SDHC) (VCC-HD2500P/HD2500) Prise de sortie audio (AUDIO OUT, mini-jack 3,5 mm) (VCC-HD2500P/HD2500) Voyant d’alimentation (POWER) Le voyant d’alimentation clignote pour indiquer les états suivants de la caméra. •... - Page 18 Nom et fonction de chaque composant ■ Face latérale NEAR RESET Boutons de fonction • Redémarrage de la caméra: Appuyez sur le bouton RESET. RÉGLAGES OPTION (RÉAMORCER CAMÉRA) • Arrêter l’enregistrement/retrait de la carte mémoire SD: Appuyez sur le bouton NEAR pendant au moins 2 secondes. Le voyant d’alimentation se met à...
- Page 19 Nom et fonction de chaque composant Prise pour lentille à iris automatique (LENS) Reliez la fiche de câble de l’objectif à la prise de lentille à iris automatique présente sur la face gauche de la caméra. Il est recommandé d’utiliser un objectif à lentille à iris automatique à mégapixels pour monture CS type CD (disponible dans le commerce).
-
Page 20: Branchements De Base
Branchements de base VCC-HD2500P VCC-HD2500 VCC-HD2500P 24 V CA POWER CLASS2 WIRING AC24V AUDIO VCC-HD2300P DC12V AC24V 24 V CA ALARM AC24V VCC-HD2100P AC24V Moniteur 1 2 COM 1 2 12 V CC Alimentation AC24V 12 V CC électrique AC24V Branchement électrique Reliez les bornes d’alimentation (24 V CA/12 V CC) de la caméra à... -
Page 21: Branchements Des Bornes D'alarme
Branchements des bornes d’alarme Pour relier un câble, appuyez sur la saillie de la borne, insérez le câble puis relâchez la saillie. (COM) Équipement (ALARM OUT 2) périphérique (ALARM OUT 1) extérieur Signal d’entrée d’alarme (ALARM IN 2) (COM) Signal d’entrée d’alarme (ALARM IN 1) (COM) -
Page 22: Réglage De La Lentille
Réglage de la lentille Pour obtenir des images en mégapixels de haute résolution, la fonction d’aide à la mise au point est utile pour faciliter la mise au point précise qui est autrement extrêmement difficile. Si vous utilisez une lentille à foyer progressif, réglez la mise au point selon la procédure suivante. - Page 23 Réglage de la lentille ■ Mise au point précise (à l’aide des boutons présents sur le côté) NEAR RESET Utilisez le levier de zoom de l’objectif pour régler l’angle de vue et le levier de mise au point de l’objectif pour effectuer une mise au point approximative sur le sujet. Appuyez sur le bouton SET.
- Page 24 Réglage de la lentille ■ Réglage de l’iris Si la caméra produit des images vidéo trop sombres, trop claires ou autrement incorrectes, réglez l’iris de la lentille. Appuyez sur le bouton SET pendant au moins 2 secondes. Le moniteur affiche à présent l’écran SELECT MENU. SELECT MENU NEAR FOCUS ASSIST...
-
Page 25: Réglages Du Réseau
Réglages du réseau Préparation de votre ordinateur pour le fonctionnement sur le réseau Vérification de votre environnement d’exploitation. ( Page 1) Connectez la caméra au réseau auquel votre ordinateur est également connecté. Configuration des informations de réseau sur votre ordinateur. Vous devez configurer les informations comme l’adresse IP de votre ordinateur. - Page 26 Réglages du réseau Tapez votre nom d’utilisateur et votre mot de passe et cliquez sur [OK]. L’écran de sélection de la langue s’affiche. S’il s’agit du premier accès à la caméra, ouvrez une session en tant qu’utilisateur admin (administrateur) à l’aide des informations d’authentification par défaut suivantes.
-
Page 27: Spécifications
Enregistrement SD (carte mémoire SD) (VCC-HD2500P/HD2500) Mode Enregistrement Enregistrement d’alarme, enregistrement de sauvegarde dans l’éventualité d’une défaillance du réseau Pour connaître les cartes mémoire SD recommandées, rendez-vous sur notre site Internet. http://www.sanyo-cctv.net/ ■ Sortie vidéo Sortie composite (équivalent NTSC/équivalent PAL) 10BASE-T/100BASE-TX (connecteur RJ-45) Fente carte 1 (compatible SDHC, taille max. - Page 28 Spécifications ■ Réseau Compression image/vidéo H.264/JPEG Taille de la vidéo (H.264) (16:9) 1920×1080, 1280×720, 640×360, 320×180 (4:3) 1600×1200, 1280×960, 1024×768, 640×480, 320×240 Taille de la vidéo (JPEG) (16:9) 1920×1080, 1280×720, 1024×576, 640×360 (4:3) 2288×1712, 1600×1200, 1280×960, 1024×768, 800×600, 640×480, 320×240 Qualité...
- Page 29 MANUAL DE RESUMEN VCC-HD2500P/HD2500 VCC-HD2300P/HD2300 VCC-HD2100P/HD2100 Lado A Cámara de megapíxeles LA INSTALACIÓN TIENE QUE SER REALIZADA POR UNA PERSONA DE SERVICIO Y TIENE QUE ESTAR DE ACUERDO CON LOS CÓDIGOS LOCALES. Leer atentamente este manual de instrucciones para garantizar que se realiza una instalación correcta.
- Page 30 Contenido Nombre y función de cada componente ..............2 Conexiones básicas ....................5 Conexiones de los terminales de alarma ..............6 Ajuste de la lente ...................... 7 Ajustes de red ......................10 Especificaciones ..................... 11 Aviso de Copyright ............ Ver el “Lado B” de este manual. ■...
-
Page 31: Nombre Y Función De Cada Componente
Nombre y función de cada componente ■ Cara trasera CLASS 2 WIRING AUDIO DC12V Ranura para tarjeta SD (SDHC) (VCC-HD2500P/HD2500) Jack de salida de audio (minijack de 3,5 mm AUDIO OUT) (VCC-HD2500P/HD2500) Indicador de alimentación (POWER) El indicador de alimentación parpadea para indicar los siguientes estados de la cámara. - Page 32 Nombre y función de cada componente ■ Cara lateral NEAR RESET Botones de funcionamiento • Reinicio de la cámara: Pulsar el botón RESET. AJUSTES OPCIONES (REINICIO CÁMARA) • Parada de la grabación/Extracción de la tarjeta de memoria SD: Pulsar el botón NEAR durante 2 segundos o más.
- Page 33 Nombre y función de cada componente Toma para la lente de autoiris (LENS) Conectar el enchufe del cable de la lente a la toma de la lente de autoiris que se proporciona en la cara lateral izquierda de la cámara. Se recomienda utilizar una lente megapixel CC equipada con autoiris y montura CS (disponible en comercios).
-
Page 34: Conexiones Básicas
Conexiones básicas VCC-HD2500P VCC-HD2500 VCC-HD2500P 24 V CA POWER CLASS2 WIRING AC24V AUDIO VCC-HD2300P DC12V AC24V ALARM 24 V CA AC24V VCC-HD2100P AC24V Monitor 1 2 COM 1 2 12 V CC Alimentación AC24V 12 V CC AC24V Conexión de alimentación Conectar los terminales de alimentación (24 V CA/12 V CC) de la cámara a una fuente de alimentación. -
Page 35: Conexiones De Los Terminales De Alarma
Conexiones de los terminales de alarma Para conectar un cable, mientras se empuja la protuberancia del terminal, insertar el cable en la apertura y a continuación soltarla. (COM) Equipo (ALARM OUT 2) periférico (ALARM OUT 1) externo Señal de entrada de alarma (ALARM IN 2) (COM) -
Page 36: Ajuste De La Lente
Ajuste de la lente Para imágenes megapixel de alta resolución, la función de ayuda al enfoque es útil para obtener un enfoque preciso que, de otra forma, resultaría muy difícil. Si se utiliza una lente varifocal, ajustar el enfoque utilizando el procedimiento siguiente. Si la función de ayuda al enfoque no funciona correctamente porque la cámara produce imágenes demasiado oscuras o brillantes, llevar a cabo previamente el ajuste del iris. - Page 37 Ajuste de la lente ■ Ajuste de precisión del enfoque (utilizando los botones que se proporcionan en la cara lateral) NEAR RESET Utilizar la palanca de zoom de la lente para ajustar el ángulo de visualización y la palanca de enfoque de la lente para enfocar aproximadamente el sujeto. Pulsar el botón SET.
- Page 38 Ajuste de la lente ■ Ajuste del iris Si la cámara produce imágenes demasiado oscuras, demasiado brillantes o con otras imprecisiones, ajustar el iris de a lente. Pulsar el botón SET durante 2 segundos o más. El monitor ahora muestra la pantalla SELECT MENU. SELECT MENU NEAR FOCUS ASSIST...
-
Page 39: Ajustes De Red
Ajustes de red Preparación del ordenador para el funcionamiento en red Verificación del entorno operativo ( Página 1) Conectar la cámara a la misma red a la cual está conectado el PC. Configuración de los datos de red en el PC Es necesario configurar algunas informaciones como la dirección IP del PC. - Page 40 Ajustes de red Teclear el nombre de usuario y la contraseña y hacer clic en [Aceptar]. Aparece la pantalla de selección del idioma. Si este es el primer acceso a la cámara, iniciar la sesión como usuario “admin” (administrador) utilizando los siguientes datos de autentificación predeterminados.
-
Page 41: Especificaciones
Modo Grabación Grabación de alarmas, grabación de copias de seguridad en caso de fallos de red Para las tarjetas de memoria SD recomendadas, visitar nuestro sitio web. http://www.sanyo-cctv.net/ ■ Salida de vídeo Salida compuesta (equivalente a NTSC/equivalente a PAL) 10BASE-T/100BASE-TX (conector RJ-45) Ranura para tarjeta 1 (conforme a SDHC, máx. - Page 42 Especificaciones ■ Compresión de imágenes/ H.264/JPEG vídeo Tamaño de vídeo (H.264) (16:9) 1920×1080, 1280×720, 640×360, 320×180 (4:3) 1600×1200, 1280×960, 1024×768, 640×480, 320×240 Tamaño de vídeo (JPEG) (16:9) 1920×1080, 1280×720, 1024×576, 640×360 (4:3) 2288×1712, 1600×1200, 1280×960, 1024×768, 800×600, 640×480, 320×240 Calidad de la imagen Modo CALIDAD: BÁSICA, NORMAL, MEDIA, ALTA, SUP.
- Page 43 VCC-HD2500P/HD2500 KURZANLEITUNG VCC-HD2300P/HD2300 VCC-HD2100P/HD2100 Seite A Megapixel-Kamera DIESE INSTALLATION IST QUALIFIZIERTEM SERVICE- PERSONAL VORBEHALTEN UND MUSS MIT ALLEN LOKALEN GESETZESVORSCHRIFTEN KONFORM SEIN. Lesen Sie bitte diese Bedienungsanleitung sorgfältig durch, um die einwandfreie Installation sicherzustellen. Lesen Sie außerdem auch die auf der CD-ROM enthaltene elektronische Anleitung (INSTRUCTION MANUAL), um die korrekte Bedienung der Kamera zu gewährleisten.
- Page 44 Inhalt Bezeichnung und Funktion der einzelnen Komponenten ......... 2 Grundanschlüsse ...................... 5 Alarmklemmenanschlüsse ..................6 Einstellung des Objektivs ..................7 Netzwerkeinstellungen.................... 10 Technische Daten ....................11 Hinweis zum Urheberrecht ........Siehe „Seite B“ dieser Anleitung. ■ Zubehör Videokabel Ferritkern Vermeidung von elektromagnetischen Störungen Kabelhalter für die Verkabelung CD-ROM...
-
Page 45: Bezeichnung Und Funktion Der Einzelnen Komponenten
Bezeichnung und Funktion der einzelnen Komponenten ■ Rückseite CLASS 2 WIRING AUDIO DC12V Steckplatz für SD-Karte (SDHC) (VCC-HD2500P/HD2500) Audioausgangsstecker (AUDIO OUT, 3,5-mm Miniklinkenstecker) (VCC-HD2500P/HD2500) Netzanzeige (POWER) Die blinkende Netzanzeige weist auf die folgenden Kamerastatus hin. • Gestoppte Aufnahme mit der SD-Speicherkarte/Erkennen der SD-Speicherkarte durch die Kamera/Aufgetretener Fehler •... - Page 46 Bezeichnung und Funktion der einzelnen Komponenten ■ Seite NEAR RESET Bedientasten • Neustarten der Kamera: Drücken Sie die RESET-Taste. OPTIONS-EINSTELLUNGEN (KAMERA-NEUSTART) • Stoppen der Aufnahme/Herausnehmen der SD-Speicherkarte: Drücken Sie die NEAR-Taste mindestens 2 Sekunden lang. Die Netzanzeige blinkt und leuchtet dann mit Dauerlicht, wenn Sie die SD- Speicherkarte aus der Kamera nehmen können.
- Page 47 Bezeichnung und Funktion der einzelnen Komponenten Buchse für die automatische Irisblende Schließen Sie den Stecker des Objektivkabels an die Buchse der automatischen Irisblende an der linken Seite der Kamera an. Es wird empfohlen, ein DC-Megapixel-Objektiv mit automatischer Irisblende (handelsübliche) mit CS-Fassung zu verwenden. 5 mm oder weniger Objektivbuchsen für Objektiv mit automatischer Blende...
-
Page 48: Grundanschlüsse
Grundanschlüsse VCC-HD2500P VCC-HD2500 VCC-HD2500P 24 V AC POWER CLASS2 WIRING AC24V AUDIO VCC-HD2300P DC12V AC24V 24 V AC ALARM AC24V VCC-HD2100P AC24V Monitor 1 2 COM 1 2 12 V DC Stromversorgung AC24V 12 V DC AC24V Netzanschluss Schließen Sie die Anschlussklemmen (24 V AC/12 V DC) der Kamera an die Stromversorgung an. -
Page 49: Alarmklemmenanschlüsse
Alarmklemmenanschlüsse Um die Anschlusskabel anzuschließen, drücken Sie den vorstehenden Teil der betreffenden Klemme, stecken Sie das Kabel ein und lassen Sie den vorstehenden Teil los. (COM) Peripheriegeräte (ALARM OUT 2) (ALARM OUT 1) Alarmeingangs- signal (ALARM IN 2) (COM) Alarmeingangs- signal (ALARM IN 1) (COM) -
Page 50: Einstellung Des Objektivs
Einstellung des Objektivs Bei hochauflösenden Megapixel-Bildern ist die Funktion „Focus Assist“ für die präzise Scharfstellung sehr nützlich, die anderenfalls nur sehr schwer einstellbar ist. Wenn Sie ein Variofokal-Objektiv verwenden, gehen Sie bei der Scharfeinstellung wie nachstehend beschrieben vor. Wenn die „Focus Assist“-Funktion nicht korrekt funktioniert, da die Kamera zu dunkle oder zu helle Videobilder liefert, nehmen Sie zunächst die Irisblendeneinstellung vor. - Page 51 Einstellung des Objektivs ■ Fokus-Feineinstellung (mithilfe der Tasten an der Seite der Kamera) NEAR RESET Verwenden Sie den Zoom-Hebel des Objektivs. um den Aufnahmewinkel einzustellen, und den Scharfeinstellungshebel des Objektivs, um das Objekt grob scharfzustellen. Drücken Sie die SET-Taste. (Siehe Bildschirm der Fokuseinstellung Seite 7) Die Kamera nimmt die Scharfeinstellung des Objekts nun automatisch vor.
- Page 52 Einstellung des Objektivs ■ Einstellung der Irisblende Stellen Sie die Irisblende ein, wenn die Kamera zu dunkle oder zu helle Videobilder oder Videobilder mit anderen Fehlern liefert. Drücken Sie die SET-Taste mindestens 2 Sekunden lang. Auf dem Monitor wird nun der Bildschirm SELECT MENU angezeigt. SELECT MENU NEAR FOCUS ASSIST...
-
Page 53: Netzwerkeinstellungen
Netzwerkeinstellungen Vorbereitung Ihres Computers für den Netzwerkbetrieb Überprüfen der Umgebungsbedingungen ( Seite 1) Schließen Sie die Kamera an das Netzwerk an, in das auch Ihr PC eingebunden ist. Konfigurieren der Netzwerkdaten auf Ihrem PC Sie müssen Informationen wie beispielsweise die IP-Adresse Ihres PCs einstellen. Installieren Sie das „H.264 Plug-in“... - Page 54 Netzwerkeinstellungen Geben Sie Ihren Benutzernamen und das Kennwort ein und klicken Sie auf [OK]. Der Bildschirm für die Sprachauswahl wird angezeigt. Melden Sie sich beim erstmaligen Zugriff auf die Kamera als „admin“- Benutzer (Administrator) an; verwenden Sie hierzu die nachstehend angeführten Standarddaten für die Authentifizierung.
-
Page 55: Technische Daten
■ SD-Aufzeichnung (SD-Speicherkarte) (VCC-HD2500P/HD2500) Aufnahmemodus Alarmaufnahme, Aufnahme einer Sicherungskopie im Falle eines Netzwerkausfalls Informationen über die empfohlenen SD-Speicherkarten finden Sie auf unserer Website. http://www.sanyo-cctv.net/ ■ Videoausgang Composite-Ausgang (entspricht NTSC/PAL) 10BASE-T/100BASE-TX (RJ-45 Anschluss) Steckplatz für Karte 1 (SDHC-konform, Unterstützung max. 32 GB) - Page 56 Technische Daten ■ Netzwerk Bild-/Videokomprimierung H.264/JPEG Videogröße (H.264) (16:9) 1920×1080, 1280×720, 640×360, 320×180 (4:3) 1600×1200, 1280×960, 1024×768, 640×480, 320×240 Videogröße (JPEG) (16:9) 1920×1080, 1280×720, 1024×576, 640×360 (4:3) 2288×1712, 1600×1200, 1280×960, 1024×768, 800×600, 640×480, 320×240 Bildqualität QUALITÄT-Modus: GRUND, NORMAL, STANDARD, FEIN, SUPERFEIN BITRATE-Modus: benutzerdefinierte Bitrate Schnittstelle 10BASE-T/100BASE-TX...
- Page 57 VCC-HD2500P/HD2500 VCC-HD2300P/HD2300 VCC-HD2100P/HD2100 CD-ROM (INSTRUCTION MANUAL)
- Page 58 目录 每个组件的名称与功能 ....................2 基本连接 ........................5 报警端子连接 ......................6 镜头调节 ........................7 网络设置 ......................... 10 规格 ........................11 版权声明 ................参见本手册的“第B面”。 ■ 附件 CD-ROM VCC-HD2500P VCC-HD2300P VCC-HD2100P ■ 检查操作环境。 • 计算机 IBM PC/AT • 操作系统 : Windows XP Professional/Windows Vista •...
-
Page 59: 每个组件的名称与功能
每个组件的名称与功能 ■ 后面 CLASS 2 WIRING AUDIO DC12V SD (SDHC) 卡插槽 (VCC-HD2500P/HD2500) 音频输出插孔 (AUDIO OUT, 3.5-mm 迷你插孔) (VCC-HD2500P/HD2500) 电源指示器 (POWER) • • 电源端子 (24 V AC/12 V DC) 音频输入插孔 (AUDIO IN, 3.5-mm迷你插孔) (VCC-HD2500P/HD2500) 网络接口 (LAN, RJ-45) • • • 100BASE-TX •... - Page 60 每个组件的名称与功能 ■ 侧面 NEAR RESET 操作按钮 • 重新启动摄像头: 按下RESET按钮。 OPTION SETTINGS (CAMERA REBOOT) • 停止录像/拆除SD记忆卡: 按住NEAR按钮两秒以上。 SD MEMORY CARD • 恢复停止的录像/让摄像头识别SD记忆卡: 按住FAR按钮两秒以上。 • 恢复出厂默认设置: 同时按下NEAR和SET按钮。 OPTION SETTINGS (FACTORY DEFULT) • 复位登录密码 (仅限默认用户): 同时按下FAR和SET按钮。 • 恢复出厂默认的后焦点位置: 同时按下NEAR和FAR按钮。 CAMERA SETTING (FOCUS ASSIST) •...
- Page 61 每个组件的名称与功能 自动可变光圈镜头插槽 (LENS) 随时保持镜头清洁。 转接环(市面出售)需要使用C-安装方式的镜头。 如果它不适合自动可变光圈镜头插槽,必须更换镜头电缆插头。如果出现此情 况,请联系您购买此产品的经销商(或提供安装服务的代理商)。 托架 考虑到摄像头安装座(市面出售)和摄像头的总重量,请将摄像头安装座牢固地安 装在一个稳固耐用的位置。...
-
Page 62: 基本连接
基本连接 VCC-HD2500P VCC-HD2500 VCC-HD2500P 24 V AC POWER CLASS2 AC24V WIRING VCC-HD2300P AUDIO DC12V 24 V AC AC24V ALARM AC24V VCC-HD2100P AC24V 1 2 COM 1 2 12 V DC AC24V 12 V DC AC24V 电源连接 (24 V AC/12 V DC) 连接到24 V AC电源... -
Page 63: 报警端子连接
报警端子连接 (COM) (ALARM OUT 2) (ALARM OUT 1) (ALARM IN 2) (COM) (ALARM IN 1) (COM) 报警输出端子连接 (ALARM OUT 1 2) • 连接报警设备之后,在ALARM SETTINGS屏幕上通过网络操作配置相应报警 输出端子 (ALARM OUT 1或2) 的输出条件。 • 亦可通过遥控操作进行报警输出端子的配置。 报警输入端子连接 (ALARM IN 1 2) 连接报警设备之后,在ALARM SETTINGS屏幕上通过网络操作配置相应报警输 入端子 (ALARM IN 1或2) 的输入条件。 VCC-HD2500P/HD2500/HD2300P/HD2300: 如要将报警输入端子用作Day/Night切换端子,请按照以下步骤进行操作。... -
Page 64: 镜头调节
镜头调节 如果由于摄像头生成过暗或过亮的视频图像聚焦辅助功能不能正常工作,请预先 进行可变光圈调节。 按住SET按钮两秒以上。 SELECT MENU SELECT MENU FOCUS ASSIST IRIS FIRMWARE VERSION NEAR NEAR UP DOWN RESET SELECT 在SELECT MENU屏幕上,所有信息都以英文显示。 使用NEAR/FAR按钮选择 [FOCUS ASSIST],然后按下SET按钮。 使用镜头的变焦杆调节视角,使用镜头的聚焦杆将FA (聚焦辅助)条 设置为最大 级。 “FOCUSING” FOCUSING FOCUSING PEAK HOLD XXXX PEAK HOLD XXXX INDICATOR XXXX INDICATOR XXXX NEAR NEAR PEAK HOLD: 显示最大聚焦级别的数值。... - Page 65 镜头调节 ■ 微调焦距(使用侧面提供的按钮) NEAR RESET 使用镜头的变焦杆调节视角,使用镜头的聚焦杆对物体进行粗略聚焦。 按下SET按钮。( 第7页的焦点调节屏幕) “FOCUSING” “ERROR” 按NEAR/FAR按钮调节焦距。 FB ( 如要在重新调节等操作中恢复后焦点默认位置,请同时按下NEAR和FAR按 钮。 在摄像头初始化后焦点位置时,状态指示器 会显示“INITIALIZING”。 按住SET按钮两秒以上。 SELECT MENU • 如果空闲5分钟以上,焦距调节屏幕也会自动关闭。 • VCC-HD2500P/HD2500/HD2300P/HD2300: 当摄像头无法在彩色或黑白模式下对物体进行聚焦时,请按照以下步骤调 节焦点。 在CAMERA SETTINGS屏幕上选择[FOCUS ASSIST],并确保 [COLOR/B/W]设置为“AUTO”。 在彩色或黑白模式下调节焦点。...
- Page 66 镜头调节 ■ 调节可变光圈 按住SET按钮两秒以上。 SELECT MENU SELECT MENU NEAR FOCUS ASSIST IRIS FIRMWARE VERSION NEAR UP DOWN SELECT 在SELECT MENU屏幕上,所有信息都以英文显示。 使用NEAR/FAR按钮选择 [IRIS],然后按下SET按钮。 IRIS IRIS LEVEL LEVEL NEAR DARK DARK LIGHT LIGHT ------ú--------40 ------ú--------40 NEAR LEFT NEAR LEFT RIGHT RIGHT 按NEAR/FAR按钮调节可变光圈等级。 •...
-
Page 67: 网络设置
网络设置 准备计算机进行网络操作 检查操作环境。( 第1页) 将摄像头连接到也与计算机相连的网络。 在计算机上配置网络信息。 将“H.264插件”从随附的CD-ROM光盘安装到计算机上。 H.264 启动Internet Explorer。 Internet Explorer Ver.6.0 SP2 Internet Explorer Ver.7.0 从Web浏览器访问摄像头。 (Internet Explorer) admin 在地址栏中键入摄像头的IP地址并按下 [Enter] 键。 若将 [SSL] 设置为“ON”,请在IP地址之前键入“https://”(而不 是“http://”)。 使用默认的IP地址尝试访问摄像头时,如果网络中的另一设备已使用了此地 址,这些访问尝试将会失败。 如果是这样,请在访问摄像头之前更改现有设备的IP地址。... - Page 68 网络设置 键入用户名和密码并单击 [OK]。 如果是初次访问摄像头,请使用以下的默认身份验证信息作为admin用户 (管理员) 登录。 • 用户名:admin • 密码:admin 单击与要使用的语言相对应的按钮。 CLOCK SETTINGS...
- Page 69 50IRE: 1.0 lx (F1.2 50IRE: 0.1 lx (F1.2 50dB ( AGC 12.5 0.5 mm (VCC-HD2500P/HD2500) H/V/HV/OFF On/Off On ( )/Off ■ SD录像(SD记忆卡) (VCC-HD2500P/HD2500) http://www.sanyo-cctv.net/ ■ (NTSC /PAL 10BASE-T/100BASE-TX (RJ-45 SDHC 32 GB) (VCC-HD2500P/HD2500) 2 (NO/NC) Day/Night 2 (NO/NC 16V 150 mA (3.5-mm...
- Page 70 规格 ■ 网络 H.264/JPEG (H.264) (16:9) 1920 1080, 1280 720, 640 360, 320 180 (4:3) 1600 1200, 1280 960, 1024 768, 640 480, 320 240 (JPEG) (16:9) 1920 1080, 1280 720, 1024 576, 640 360 (4:3) 2288 1712, 1600 1200, 1280 960, 1024 768, 800 600, 640 480, 320 240 QUALITY BASIC (...
- Page 71 VCC-HD2500/HD2300...
- Page 72 ■ ■ • • • • • • • •...
- Page 73 ■ CLASS 2 WIRING AUDIO DC12V • • • • • •...
- Page 74 ■ NEAR RESET • • • • • • • •...
- Page 76 VCC-HD2500 AC24V POWER CLASS2 AC24V WIRING AUDIO DC12V AC24V AC24V ALARM AC24V AC24V 1 2 COM 1 2 DC12V AC24V DC12V AC24V • •...
- Page 77 (COM) (ALARM OUT 2) (ALARM OUT 1) (ALARM IN 2) (COM) (ALARM IN 1) (COM) • • • •...
- Page 78 SELECT MENU FOCUS ASSIST IRIS FIRMWARE VERSION NEAR NEAR UP DOWN RESET SELECT FOCUSING FOCUSING PEAK HOLD XXXX PEAK HOLD XXXX INDICATOR XXXX INDICATOR XXXX NEAR NEAR...
- Page 79 ■ NEAR RESET • •...
- Page 80 ■ SELECT MENU NEAR FOCUS ASSIST IRIS FIRMWARE VERSION NEAR UP DOWN SELECT IRIS IRIS LEVEL LEVEL NEAR DARK DARK LIGHT LIGHT ------ú--------40 ------ú--------40 NEAR LEFT NEAR LEFT RIGHT RIGHT • •...
- Page 82 • •...
- Page 83 ■ ■ ■...
- Page 84 ■ ■ 1/4"-20UNC...
- Page 85 Side A • • • • Side B • •...
- Page 87 SANYO Electric Co., Ltd. 1AC6P1P4018-A Printed in China L5DB2, L5DJ2 (0909KR-CA)
Need help?
Do you have a question about the VCC-HD2100 - Full HD 1080p Network Camera and is the answer not in the manual?
Questions and answers