Table of Contents
Advertisement
Advertisement
Table of Contents

Related Manuals for Classe Audio OMEGA - V1.1


Summary of Contents for Classe Audio OMEGA - V1.1
- Page 1 Owner’s Manual Omega Series Omega Monoblock...
- Page 2 WARNING: TO REDUCE THE RISK OF FIRE OR ELECTRIC SHOCK, DO NOT EXPOSE THIS APPLIANCE TO RAIN OR MOISTURE. CAUTION RISK OF ELECTRIC SHOCK DO NOT OPEN CAUTION: TO REDUCE THE RISK OF ELECTRICAL SHOCK, DO NOT REMOVE COVER. NO USER-SERVICEABLE PARTS INSIDE. REFER SERVICING TO QUALIFIED PERSONNEL.
- Page 3 Important Safety Instructions CAUTION: Please read and observe all warnings and instructions in this owner’s manual and all those marked on the unit. Retain this owner’s manual for future reference. 1. Do not attempt to service this product yourself. Do not open the cover for any rea- son.
-
Page 4: Table Of Contents
Contents Welcome to the Classé family ................ 5 Unpacking and Placement ................6 unpacking your amplifier ..................6 placement ......................6 ventilation ......................7 custom installations ....................7 serial number ....................... 7 register your purchase! ..................7 please read this manual… ..................7 Operating Voltage .................. -
Page 5: Welcome To The Classé Family
Welcome to the Classé family Congratulations on your purchase of a Classé Omega product. It is the result of many years of continuous refinement, and we are confident that you will enjoy it for many years to come. We value our relationship with our customers. Please allow us to stay in touch with you by returning your warranty card now, before you put away the shipping case of your new product and forget all about it. -
Page 6: Unpacking And Placement
Unpacking and Placement unpacking your amplifier Carefully unpack your Omega Mono power amplifier according to the supplied instructions, and remove all accessories from the case. Please take proper precautions when lifting the Omega Mono, as it is ex- tremely heavy. Important! The unpacking and placement of the Omega Mono power amplifier requires two people. -
Page 7: Ventilation
ventilation Your Classé Omega Mono generates a certain amount of heat in the course of normal operation. Be sure to allow six inches of clearance above it and three inches to each side to allow heat dissipation through air circulation. The vents on the bottom, front and back of the Omega Mono must be kept free from any obstruction which would reduce the flow of air through the unit. -
Page 8: Operating Voltage
Operating Voltage The Omega Mono power amplifier is set at the factory (internally) for 100V, 120V, 230V, or 240V AC mains operation, as appropriate for the country in which it is to be sold. (230V only in European Union countries, in compliance with CE regulations.) The voltage setting may not be changed by the user. -
Page 9: Warm Up/Break-In Period
warm up/break-in period Your new Classé Omega Mono power amplifier will deliver outstanding performance immediately. However, you should expect to hear it im- prove somewhat as it reaches its normal operating temperature and its various components “break-in.” It has been our experience that the greatest changes occur within the first 300 hours, as the amplifier reaches thermal equilibrium and the capacitors fully form. -
Page 10: A Word About Installation
A Word About Installation Every effort has been made to make the Classé Omega Mono simple and straightforward to install and use. Still, we have no way to evaluate many other variables such as the size and shape of your room, its acoustics, and the associated equipment you have chosen to use with your amplifier. -
Page 11: Special Design Features
Special Design Features design team All of our components benefit from the same rigorous design goal: philosophy All Classé products must reproduce music with the harmonic and spatial integ- rity typical of fine instruments heard in a live, unamplified performance. To this end, we make extensive use of carefully optimized versions of the same basic circuit precisely matched to specific power require- ments. -
Page 12: Extensive Listening Tests
voltage here, or using a slightly different part there, may make all the difference between solid and absolutely outstanding performance. This level of refinement only comes with a great deal of experience, and is not available to those who flit from one trendy notion to the next. It accounts in no small measure for both the consistency of sonic perfor- mance among Classé... -
Page 13: Robust Protection
robust protection Finally, your new Classé amplifier incorporates a variety of protection circuits, all designed to protect both the amplifier and your loudspeakers against dangerous fault conditions. Significantly, these protection circuits do not intrude upon or limit the normal performance of the amplifier; rather, they simply shut the amplifier down when confronted with dan- gerous conditions. -
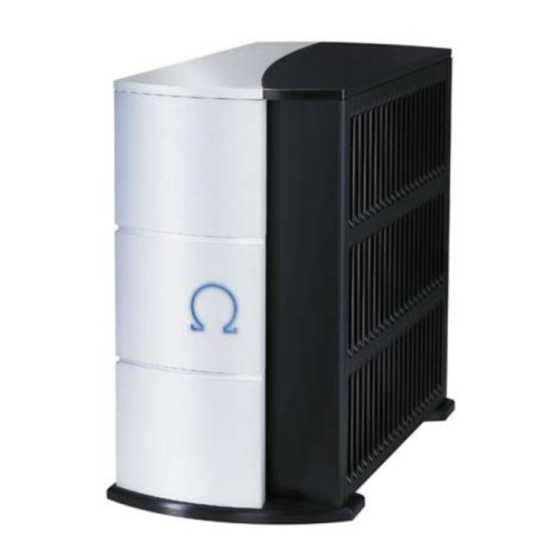
Page 15: Front Panel
Front Panel Standby button The Standby button, situated near the top of the side panel, will toggle the Omega Mono between its fully functional operate mode and a standby mode that leaves the amplifier off yet ready to re- spond to system commands via any of the supported control op- tions (e.g. -
Page 16: Rear Panel
Rear Panel The following descriptions are intended as a quick reference, should you have any questions about your new product. Please see the next section, entitled Initial Setup , for specific advice on incorporating your new am- plifier into your system. SE Button The SE button is used to configure the amplifier for single-ended operation. - Page 18 The pin assignments of this XLR input connector are: Pin 1: Signal ground PUSH Pin 2: Signal + (non-inverting) Pin 3: Signal – (inverting) Connector ground lug: chassis ground These pin assignments are consistent with the standards adopted by the Audio Engineering Society. If you are using your Classé...
- Page 19 (Many high quality loudspeakers also offer two sets of connections on their speakers. Generally, one set of the connections on the loudspeaker feeds the portion of the speaker’s crossover network that supplies the woofer with its signal; the other set of connections connects to the portion of the crossover that supplies the rest of the speaker with the midrange and high frequen- cies.) Although the binding posts on your Classé...
- Page 20 10 IR Input and Output Your Classé amplifier includes two -inch mini-jacks in order to support the IR(infrared) remote controls that are ubiquitous today. IR commands exist for toggling the amplifier between oper- ate and standby, as well as discrete command codes for either oper- ate or standby.
- Page 21 If everything seems fine, place the amplifier back into standby and carefully reconnect the input cable and power the amplifier up. If the fuse then blows (or the amplifier goes into protection), you may have a serious fault with your preamplifier/processor. Contact your authorized Classé...
-
Page 22: Initial Setup
Initial Setup Your new Classé Omega Mono amplifier is quite simple to set up and enjoy. Please follow the steps outlined below in order to safely set up and use your new amplifier. Important: The AC mains connection should be the last connection you make on your new power amplifier. -
Page 23: Configuring Amplifier Turn-On Sequences
configuring amplifier In a system that contains multiple Classé amplifiers, you may set turn-on sequences the number of seconds of turn-on delay for each amplifier, allow- ing them to turn on in the order you specified, rather than all at once. - Page 24 Make sure all the connections are snug and cannot be easily wiggled free, but do not overtighten them. If you can give the speaker wires a reasonable tug without there being any movement, they are snug. Further tightening will not make a better connec- tion, and taken to the extreme may damage the connectors.
-
Page 25: Troubleshooting
Troubleshooting In general, refer any service problems to your authorized Classé dealer. Before contacting your dealer, however, please check to see if the prob- lem is listed below. If it is, try the suggested solutions. If none of these solves the problem, contact your Classé dealer. No sound, and the Ω... - Page 26 The amplifier keeps shutting off. • Make sure you are providing adequate ventilation to the amplifier, and that the ambient room temperature is below 105°F (40°C). • Run through the troubleshooting sequence outlined above (assuming the amplifier is going into its protection mode).
-
Page 27: Care And Maintenance
Care and Maintenance To remove dust from the cabinet of your amplifier, use a feather duster or a soft, lint-free cloth. To remove dirt and fingerprints, we recommend isopropyl alcohol and a soft cloth. Dampen the cloth with alcohol first and then lightly clean the surface of the amplifier with the cloth. -
Page 28: Specifications
Specifications Classé Audio reserves the right to make improvements without notice. Power output 600W continuous rms @ 8Ω 1200W continuous rms @ 4Ω Frequency response 10Hz – 22kHz (+0/-0.1dB) 10Hz – 155kHz (+0/-3.0dB) Phase less than -10° @ 22kHz Signal-to-noise ratio better than 106dB (ref. -
Page 29: Dimensions
Dimensions (all dimensions are in inches) - Page 30 Classé Audio 5070 François Cusson Lachine, Quebec Canada H8T 1B3 +1 (514) 636-6384 +1 (514) 636-1428 (fax) http://www.classeaudio.com email: cservice@classeaudio.com Copyright © 2004 Classé Audio, Inc. Printed in Canada. v1.1...
Need help?
Do you have a question about the OMEGA - V1.1 and is the answer not in the manual?
Questions and answers