Advertisement
Advertisement
Table of Contents

Related Manuals for Heal Force Prince-100A


Summary of Contents for Heal Force Prince-100A
- Page 1 User Manual Fingertip Oximeter...
-
Page 3: Instructions To User
Instructions to User Dear Customers, Thank you very much for purchasing our product. Please read the manual very carefully before using this device. Failure to follow these instructions can cause measuring abnormality or damage to the oximeter. The manual is published in English and we have the ultimate right to explain the Manual. - Page 4 Warnings Check the device before using to make sure that there is no visible damage which may affect user's safety or its performance with regard to sensors and clips. It is recommended that the device should be inspected minimally once a week.
- Page 5 condition is found, please change the placing site of oximeter. Avoid placing the device on the same limb which is wrapped with a cuff for blood pressure measurement or during venous infusion. Do NOT clip this device on edema or tender tissue. ...
-
Page 6: Instruction For Operation
Instruction for Operation 1. The finger should be put in properly and correctly. 2. Do NOT shake the finger. Keep at ease during measurement. 3. Do NOT let anything block the emitting light from the device. 4. Do NOT put wet finger directly into sensor. 5. - Page 7 moisture. 9. Existence of high intensive light sources, such as fluorescence light, ruby lamb, infrared heater or strong sunshine, etc. may cause inaccuracy of measurement result. Please put an opaque cover on the sensor or change the measuring site if necessary.
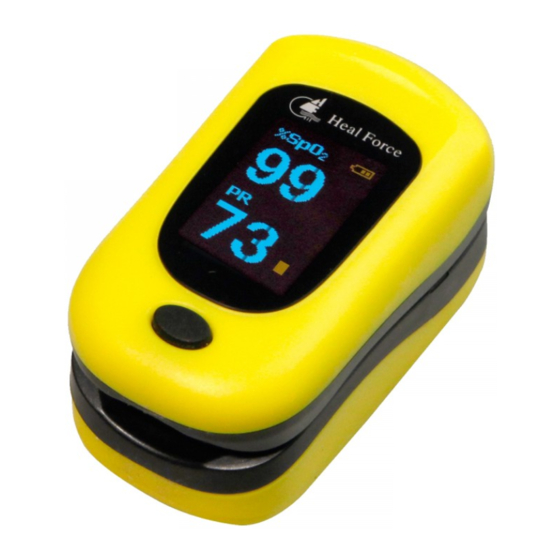
- Page 8 1 Overview 1.1 Appearance 1.1 Appearance Rubber Cushions Display Screen Display Key Figure 1 Front View...
-
Page 9: Product Name And Model
Lanyard Hole Battery Cover Nameplate Figure 2 Rear View Note: the appearance is subject to the Oximeter 1.2 Product Name and Model Name: Fingertip Oximeter Model: Prince-100D/Prince-100B/Prince-100B1/Prince-100A/POD-3 Model with Bluetooth: PC-60B5/POD-1W/PC-60NW/Prince-100NW... - Page 10 1.3 Conformation The Fingertip Oximeter consists of the main unit, sensor and/or probe. 1.4 Features The Fingertip Oximeter can be used to measure pulse oxygen saturation (SpO ) value and pulse rate (PR); Simply put your finger into sensor, SpO value and pulse rate value will be displayed on screen.
-
Page 11: Battery Installation
2 Battery Installation 1. Refer to figure 3, insert two AAA size batteries into the battery compartment properly. 2. Replace the cover Please make sure that the batteries are correctly installed, or incorrect installation may cause the device not to work. -
Page 12: Operation
Figure 3 Battery Installation 3 Operation 1. Open the clip and put finger into the rubber cushions of the clip (make sure the finger is in correct position), and then clip the finger, as shown in figure 4. - Page 13 Figure 4 Put finger into the Oximeter 2. Press the display key to start the measurement. Next enter into data display screen. User can read the values from display screen. Note: Figures on page 9 and page 10 are display interfaces of some models. Pictures for reference only specific please in kind prevail.
- Page 15 3. Change display direction Short press Display key to change display direction. Long press to switch between PR and PI.
- Page 16 4.Alarm When measuring, if SpO value or pulse rate value exceeds the preset limit, the device will alert automatically and the value which exceeds limit will flash on the screen. Wireless icon“ ”: The color of “ ” Definition “ ”...
-
Page 17: Technical Specifications
1."Wireless" function is disabled; 2. The device fails to setup a wireless connection with the surrounding host display“ ”icon within 3 minutes; 3.Hardware failure wireless transmission function while “Wireless” function is enabled. Technical Specifications 1. Display type: LCD/OLED display 2. SpO measurement measuring range: 35%~100% measuring accuracy: 75%~100%:±2%;... - Page 18 3. Pulse rate measurement PR measuring range:30bpm~240bpm PR measuring accuracy±2% or ±2bpm (which is greater) 4. Perfusion Index (PI) display range: 0.2%~20% 5. Preset over-limit: SpO low limit: 90% Pulse rate: high limit: 120bpm; low limit: 50bpm 6. Power supply requirement 2xLR03(AAA) alkaline batteries;...
- Page 19 9. Resistance to interference of surrounding light: The difference between the SpO value measured in the condition of indoor natural light and that of darkroom is less than ± 1%. 10. Dimensions: 60mm(L)×33mm(W)×30mm(H) Net weight: 60g (including batteries) 5 Classification The type of protection against electric shock: Internally powered equipment.
-
Page 20: Repair And Maintenance
Repair and Maintenance 6.1 Maintenance The life of this device is 5 years. In order to ensure its long service life, please pay attention to the maintenance. Please change the batteries when the low-voltage indicator lightens. Please clean the surface of the device before using. Wipe the device with alcohol first, and then let it air dry or wipe it dry. - Page 21 is necessary to verify its accuracy routinely, the user can do the verification by means of SpO simulator, or it can be done by the local third party test house. High-pressure sterilization cannot be used on the device. Do not immerse the device in liquid. It is recommended that the device should be kept in a dry environment.
-
Page 22: Troubleshooting
7 Troubleshooting Problem: 1. The SpO and Pulse Rate display instable 2. Can not turn on the device 3. No display Solution 1. Place the finger correctly inside and try again. 2. Let the patient keep calm. 3. Changing batteries 4. - Page 23 Appendix:keys of symbols Symbols Description With Type BF applied part Warning---See User Manual %SpO The pulse oxygen saturation Pulse rate (beats per minute) Low battery voltage Serial number Wireless symbol...
- Page 24 Warranty Clause 1. We offer 2-year free repair for the main unit and 6-month for the accessories since purchasing. The invoice date is the starting date. 2. Make sure that the Warranty is sealed. Please present both the Warranty and the Invoice when you are requesting free repair. 3.
Need help?
Do you have a question about the Prince-100A and is the answer not in the manual?
Questions and answers