
Related Manuals for Lenovo ThinkCentre M720s 10U6


Summarization of Contents
Chapter 1: Overview
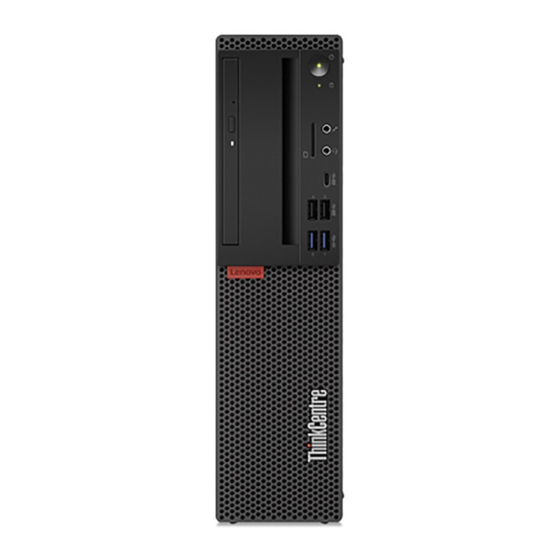
Front view
Describes the front view of the computer, detailing its components and connectors.
Rear view
Details the rear view of the computer, listing its ports and connectors.
System board
Provides an overview of the system board and its various connectors and components.
Machine Type and Model Label
Explains the location and purpose of the machine type and model label for service identification.
Chapter 2: Specifications
Power Supply Specifications
Lists available power supply wattages for the computer system.
Storage Drive Specifications
Details the types of storage drives supported by the computer.
Video Features
Describes the video output capabilities supported by the integrated graphics.
Audio Features
Lists the audio input/output capabilities of the integrated audio card.
Input/Output (I/O) Features
Details the various input and output connectors available on the computer.
Expansion Capabilities
Outlines the expansion slots and bays available for upgrading the system.
Network Features
Lists the network connectivity options available for the computer.
Physical Dimensions
Provides the physical measurements (width, height, depth) of the computer.
System Weight
States the weight of the computer in its maximum configuration.
Chapter 3: Computer Locks
Locking the Computer Cover
Explains how to secure the computer cover using a padlock loop.
Enabling or Disabling the E-lock
Describes how to enable or disable the electronic lock for the computer cover.
Attaching a Kensington-Style Cable Lock
Instructions for attaching a Kensington-style cable lock to secure the computer.
Attaching a Smart Cable Clip
Steps to secure device cables using a smart cable clip.
Chapter 4: Replacing Hardware
Before Replacing Hardware
Important precautions and notes to read before performing any hardware replacement.
Handling Static-Sensitive Devices
Precautions to prevent damage from static electricity when handling components.
Knowing FRUs (including CRUs)
Explains Field Replaceable Units (FRUs) and Customer Replaceable Units (CRUs).
Before Replacing FRUs
Guidelines and warnings to follow before replacing any FRU.
Locating FRUs (including CRUs)
Information on finding FRUs and contacting support for parts.
Self-Service CRUs
Lists components that users can easily replace themselves.
Optional-Service CRUs
Lists components requiring some technical skill for replacement.
Non-CRUs
Lists components that are not user-replaceable and require professional service.
Replacing the Keyboard or Wireless Keyboard
Instructions for replacing the computer's keyboard.
Replacing the Keyboard
Step-by-step guide to replace a wired keyboard.
Replacing the Wireless Keyboard
Steps to replace a wireless keyboard, including battery installation.
Replacing the Mouse or Wireless Mouse
Instructions for replacing the computer's mouse.
Replacing the Mouse
Steps to replace a wired mouse.
Replacing the Wireless Mouse
Steps to replace a wireless mouse, including battery installation.
Replacing the Power Cord
Procedure for replacing the computer's power cord.
Replacing the Dust Shield
Instructions for replacing the optional dust shield.
Replacing the Vertical Stand
Steps to replace the vertical stand accessory.
Removing the Computer Cover
Detailed instructions on how to safely remove the computer's outer cover.
Replacing the Front Bezel
Steps to remove and replace the computer's front bezel.
Replacing the Optical Drive
Procedure for replacing the optical drive.
Replacing the Storage Drive
Instructions for replacing the primary storage drive.
Replacing the 3.5-inch Primary Storage Drive
Detailed steps to replace a 3.5-inch primary storage drive.
Replacing the 3.5-inch Primary Storage Drive Bracket
Steps to replace the bracket holding the 3.5-inch storage drive.
Replacing the 2.5-inch Primary Storage Drive
Instructions for replacing a 2.5-inch primary storage drive.
Replacing the 2.5-inch Secondary Storage Drive
Procedure for replacing a 2.5-inch secondary storage drive.
Replacing a Memory Module
Detailed steps for installing or replacing a memory module.
Replacing a PCI Express Card
Instructions for replacing a PCI Express expansion card.
Replacing the Wi-Fi Card
Steps to replace the internal Wi-Fi card.
Replacing the M.2 Solid-State Drive
Procedure for replacing the M.2 solid-state drive.
Replacing the M.2 Solid-State Drive Bracket
Steps to replace the bracket for the M.2 solid-state drive.
Replacing the Power Supply Assembly
Detailed instructions for replacing the computer's power supply unit.
Replacing the Wi-Fi Antennas
Steps to replace the internal Wi-Fi antennas.
Replacing the Front Wi-Fi Antenna
Procedure for replacing the front Wi-Fi antenna.
Replacing the Rear Wi-Fi Antenna
Procedure for replacing the rear Wi-Fi antenna.
Replacing the Internal Speaker
Steps to replace the computer's internal speaker.
Replacing the Illuminated Red Dot Cable
Procedure for replacing the cable for the illuminated red dot.
Replacing the Thermal Sensor
Steps to replace the thermal sensor component.
Replacing the Front I/O Bracket
Instructions for replacing the front panel input/output bracket.
Replacing the Power Button
Procedure for replacing the computer's power button.
Replacing the Card Reader Board
Steps to replace the computer's card reader module.
Replacing the Heat Sink and Fan Assembly
Detailed steps to replace the CPU heat sink and fan assembly.
Replacing the Microprocessor
Procedure for replacing the computer's central processing unit (CPU).
Replacing the Coin-Cell Battery
Instructions for replacing the CMOS coin-cell battery.
Replacing the E-lock
Steps to replace the electronic lock mechanism.
Replacing the Cover Presence Switch
Procedure for replacing the switch that detects if the cover is open.
Replacing the System Board and Chassis
Comprehensive steps for replacing the motherboard and chassis.
Completing the Parts Replacement
Final steps to complete hardware installations or replacements.
Need help?
Do you have a question about the ThinkCentre M720s 10U6 and is the answer not in the manual?
Questions and answers