Table of Contents
Advertisement
Available languages
Available languages
Quick Links
PERSONAL AUDIO SYSTEM
D-AJ03
OPERATING INSTRUCTIONS
MODE D'EMPLOI
INSTRUCCIONES DE OPERACION
FOR ENGLISH READERS
POUR LES LECTEURS FRANCAIS
PARA LECTORES DE ESPAÑOL
VERTICAL LOADING SYSTEM
COMPACT DISC PLAYER
DIGEST
TRACK
EQ
SDB
CD STEREO RECEIVER
D-AJ03
40-STATIONS PRESET MEMORY
6-MODES PRESET EQUALIZER
R E M O T E
S E N S O R
PAGE
2
~ PAGE
PAGE
2, 4, 39
~ PAGE
PÁGINA
2, 4, 73
~ PÁGINA
POWER
POWER
C D
C D
SDB
SDB
FM/AM
FM/AM
AUX
AUX
EQ
EQ
VOLUME
VOLUME
TUNING/
TUNING/
PRESET
PRESET
REMOTE CONTROL UNIT
REMOTE CONTROL UNIT
38
72
106
Advertisement
Table of Contents

Subscribe to Our Youtube Channel
Related Manuals for Denon D-AJ03


Summary of Contents for Denon D-AJ03
- Page 1 PERSONAL AUDIO SYSTEM D-AJ03 OPERATING INSTRUCTIONS MODE D’EMPLOI INSTRUCCIONES DE OPERACION FOR ENGLISH READERS POUR LES LECTEURS FRANCAIS PARA LECTORES DE ESPAÑOL VERTICAL LOADING SYSTEM COMPACT DISC PLAYER DIGEST TRACK CD STEREO RECEIVER D-AJ03 40-STATIONS PRESET MEMORY 6-MODES PRESET EQUALIZER...
- Page 2 2. Do not open the top cover In order to prevent electric shock, do not open the top cover. If problems occur, contact your DENON DEALER. 3. Do not place anything inside Do not place metal objects or spill liquid inside the system.
-
Page 3: Safety Instructions
SAFETY INSTRUCTIONS Read Instructions – All the safety and operating instructions should be read before the product is operated. Retain Instructions – The safety and operating instructions should be retained for future reference. Heed Warnings – All warnings on the product and in the operating instructions should be adhered to. - Page 4 ENGLISH FRANCAIS ESPAÑOL NOTE ON USE / OBSERVATIONS RELATIVES A L’UTILISATION / NOTAS SOBRE EL USO • Avoid high temperatures. Allow for sufficient heat dispersion when installed on a rack. • Eviter des températures élevées Tenir compte d’une dispersion de chaleur suffisante lors...
-
Page 5: Table Of Contents
Copyrights It is prohibited by law to reproduce, broadcast, rent or play discs in public without the consent of the copyright holder. • CAUTION ON INSTALLATION 10 cm or greater CAUTION ✽ The ventilation should not be impeded by covering the ventilation openings with item, such as newspapers, table-cloths, curtains, etc. -
Page 6: Connections
ENGLISH CONNECTIONS • Do not plug in the power plug into an outlet until all connections have been completed. • Insert the power plug securely. An incomplete connection will cause noise to occur. (1) Connecting Antennas and Audio Equipment Assembly of the AM loop antenna 1. - Page 7 (2) Setting Up the Antennas Setting Up the AM Loop Antenna Tune in an AM broadcast (See Page 17) and while listening to the sound separate the antenna from the main unit as much as possible and place the antenna in a position where distortion and noise are at a minimum.
-
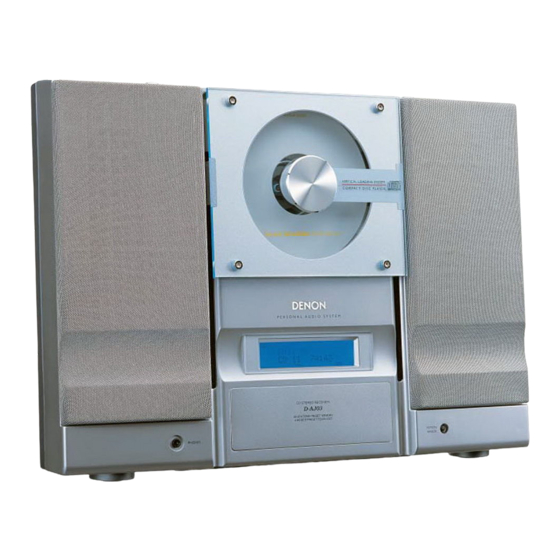
Page 8: Part Names And Functions
• Allows the use of headphones (available on the • Insertion of the headphone plug switches off the VERTICAL LOADING SYSTEM COMPACT DISC PLAYER CD STEREO RECEIVER D-AJ03 40-STATIONS PRESET MEMORY 6-MODES PRESET EQUALIZER R E M O T E S E N S O R door go down and allows a CD to be loaded. - Page 9 (2) Display TOTAL REMAIN DIGEST RANDOM PROG Main Display Portion • Displays various functions, the time, the timer settings, etc. • The following is displayed when the function is switched to CD. • Track number display section (TRACK): When a disc is loaded. Stop mode: Total number of tracks on disc Play and programmed play modes:...
-
Page 10: Names And Functions Of The Remote Control Buttons
ENGLISH (3) Names and Functions of the Remote Control Buttons Power Button (POWER) CD Play/Pause Button (CD ...(14) CD Stop Button (CD ...(15) Band Select Button (FM/AM) ...(17) External Input Selection Button (AUX) ...(6) Automatic Search Buttons ) ...(15 , 17) Tuning/Preset Button (–/+) ...(18) ENTER Button (ENTER) -
Page 11: Remote Control Unit
REMOTE CONTROL UNIT The D-AJ03 can be controlled from a distance using the included remote control unit (RC - 911). (1) Inserting Batteries q Remove the remote control unit’s rear cover. w Place two R 6 P (AA) batteries in the battery compartment in the direction indicated by the marks. -
Page 12: Clock Adjustment
ENGLISH CLOCK ADJUSTMENT (1) Clock adjustment TUNER PLAY MODE ON/STANDBY ON/STANDBY Button (Example) Set the current time to “PM7:30” (7:30 p.m.). Press ON/STANDBY power on. TIMER/DELETE Press on the remote control. Within 10 seconds, press to select “ TIME ADJUST ”. Within 10 seconds, press TUNING/ Press... - Page 13 (2) To correct the Time Redo from Operation 1. ✽ During this procedure, “ STANDBY ” is displayed in Operation 2 and the current setting time is displayed in Operation 3. NOTE: • The clock setting will be cleared when the unit is unplugged or the power failure occurs.
-
Page 14: Playing Cds
ENGLISH PLAYING CDs TUNER PLAY MODE SKIP ON/STANDBY ON/STANDBY Button (1) Playing CDs Press ON/STANDBY Press input to “CD”. Press of the main unit to open the CD door. 5 OPEN/CLOSE Set a CD and press • CD door will close automatically. •... - Page 15 TUNER PLAY MODE SKIP ON/STANDBY SKIP Button Button (2) Stopping Play During playback, press control). (3) Pausing During playback, press control). ✽ One more press of the button will start play from the paused position. (4) To locate the beginning of a track [To restart the track being played] Press on the remote...
-
Page 16: Then Press
ENGLISH TUNER PLAY MODE SKIP ON/STANDBY (5) Removing the CD Press then press 5 OPEN/CLOSE • After the CD door opens, pull out the CD. ✽ When the unit is not being used , press Precautions When Loading the CD •... -
Page 17: Listening To The Radio
LISTENING TO THE RADIO (1) Station Selection TUNER Button TUNER PLAY MODE SKIP ON/STANDBY ON/STANDBY SKIP Button Button (Example) Set the reception frequency to “89.5 MHz, FM”. POWER Press on the remote control) to turn the power on. ON/STANDBY Press on the remote control) to select FM. - Page 18 ENGLISH (2) Storing Broadcast Stations 2 Up to 40 FM and AM stations can be preset. (Example) Store the tuned “89.5 MHz, FM” to preset number “3”. Receive the broadcast station “89.5 MHz, FM” that you want to store to preset memory. ENTER Press Within 5 seconds, press...
-
Page 19: To Erase Contents Of Preset Memory
(3) Listening to Preset Stations (Example) Listen to the station of preset number “3” that was set in step (2). TUNER Button VOL. TUNER PLAY MODE SKIP DOWN ON/STANDBY FM/AM POWER Button FM/AM VOLUME TUNING/ PRESET ENTER CLEAR TUNING/ PRESET TIMER/DELETE Button PLAY MODE... -
Page 20: Volume And Tone Adjustments
ENGLISH VOLUME AND TONE ADJUSTMENTS TUNER ON/STANDBY (1) Adjust the volume Press VOL. remote control). (2) Boosting Bass Press on the remote control. (3) Changing the Tone Press on the remote control. VOL. PLAY MODE SKIP DOWN OPEN/CLOSE VOL. Button VOLUME (or, VOL. -
Page 21: Cd Functions
CD FUNCTIONS (1) Listening to the desired track of a CD ... TUNER PLAY MODE SKIP ON/STANDBY (Example) Listening to the 8th track. Loading the CD and press Press direct button ( to select the track number. • The selected track will start playing. To select a track between the 11th to 99th track. - Page 22 ENGLISH (2) Listening to tracks repeatedly/Listening in random order ... PLAY MODE Button TUNER ON/STANDBY Button Loading the CD and press PLAY MODE Press on the remote control to select the playback mode. DIGEST Starting the playback. Press • Normal play : The unit stops after the last track is played. •...
- Page 23 (3) Listening to desired tracks in a desired order ... 2 A maximum of 20 tracks can be programmed. If the total programmed track number exceeds 20, “ OVER P20 ” is displayed. TUNER PLAY MODE SKIP ON/STANDBY Button Loading the CD and press PROG.
- Page 24 ENGLISH When registration is completed Press Starting the playback Press • When playback of the track last registered is completed, the unit will stop automatically. To check which tracks are programmed While in the stop mode, press (or, on the remote control). •...
-
Page 25: Fast Reverse
(4) Search for the track while listening to the sound at high speed (CD) ... TUNER PLAY MODE SKIP ON/STANDBY SKIP Button Fast reverse: During play... Press and hold down SKIP the remote control). • Release your finger from the button when you have found the desired place. -
Page 26: Using The Timers
ENGLISH USING THE TIMERS Types of Timers and their Use • Timer play: Switches the power on/off at the desired time permitting radio reception, CD play or external input. • Everyday timer: The power can be turned on and off at the same times every day for listening to a CD, radio program or external input. - Page 27 (1) Timer Registration (Example) Use the timer to listen to the radio broadcast on 89.5 MHz (FM) that is stored in preset number 3. (Setting the to tuner on at 5:10 pm off at 6:10 pm.) Switch on the power... TIMER/DELETE Press ✽...
- Page 28 ENGLISH (1) Timer Registration (continued) TUNING/ Press , adjust the hours of the starting time and PRESET ENTER press TUNING/ Press , adjust the minutes and press PRESET ✽ Press and hold ✽ Unless the time setting is changed,the ending time will automatically be set for one hour after the starting time.
- Page 29 (1) Timer Registration (continued) TUNING/ Press , adjust the volume and then press PRESET ✽ Be careful not to turn the volume up too high. The unit will enter the standby mode and then the playback standby mode automatically. During timer playback 12:00 When the preset time is reached, playback will start.
- Page 30 ENGLISH (3) To check the timer setting While in the timer playback standby mode, press Within 10 seconds, press CALL ”. Within 10 seconds, press • After the timer setting is displayed in order, the display will return to normal. (4) To change the timer setting •...
- Page 31 (6) Sleep function • The time for switching off the power can be set at up to 120 minutes in 5-minute intervals. TIMER/DELETE Press during playback of music you wish to listen to or during radio reception. Within 10 seconds, press Within 10 seconds, press TUNING/ Press...
- Page 32 ENGLISH (7) To check the remaining time of the sleep function during the sleep operation POWER FM/AM TUNING/ PRESET ENTER CLEAR TIMER/DELETE Press during the sleep operation. Within 10 seconds, press to select “ SLEEP ”. • The display will return to normal after approximately 10 second.
-
Page 33: Set The Sleep Timer
(9) To use sleep timer and timer playback in combination Set the sleep timer. (See step 1 to 5 on page 31.) Set the timer playback. (See steps 1 to 10 on page 27.) (See steps 1, 2 on page 29.) (10) Precedence between the Timer playback and the Sleep Timer •... -
Page 34: Cleaning
ENGLISH CLEANING Cleaning the Main Unit Use a soft cloth and wipe lightly to remove dirt from the cabinet and operation panel. • When using chemically treated cloths, follow the precautions that have been written for them. Do not use benzene, thinners, or other organic solvents or insecticides on the main unit since they may cause a change in quality or color. -
Page 35: Cds
Handling Discs Discs Use compact discs that include the CD’s with special shapes (heart-shaped CD’s, octagonal CD’s etc.) cannot be played on this set. Attempting to do so may damage the set. Do not use such CD’s. Holding Discs Avoid touching the surface of discs when loading and unloading them. -
Page 36: Troubleshooting
If the set does not seem to be operating properly, check the items listed on the table below. If the cause of the problem cannot be found, the set may be malfunctioning. Immediately turn off the power and unplug the power cord, then contact your store of purchase or your nearest DENON dealer. Symptom There is no power. -
Page 37: Setup Precautions
• When leaving home for long periods of times such as for trips, be sure to unplug the power cord. When moving the D-AJ03 • Do not subject the D-AJ03 to shocks. • Always check that the disc has been removed and the connection cords disconnected before moving the D-AJ03. -
Page 38: Major Specifications
ENGLISH MAJOR SPECIFICATIONS Amplifier Section Practical maximum output: Audio input/output jacks: Tuner Section Receive frequency bands: Receive sensitivity: FM stereo separation: CD Section Wow and flutter: Sampling frequency: Light source: Clock and Timer Section Clock: Timers: Common Sections Power supply: Power consumption: Maximum external dimensions: Mass:... - Page 39 Derechos de Autor Se prohibe la reproducción, emisión, alquiler o reproducción de discos en público sin el consentimiento del titular del copyright. • PRECAUCIONES DURANTE LA INSTALACIÓN 10 cm o más Características …………………………………………………… 73 Conexiones ………………………………………………… 74, 75 Nombre de las piezas y funciones ………………………...
- Page 40 ESPAÑOL CONEXIONES • No enchufe el cable de alimentación en la toma de corriente eléctrica hasta que todas las conexiones hayan quedado realizadas. • Introduzca el enchufe firmemente. Si la conexión no está bien realizada se pueden producir ruidos. (1) Connecting Antennas and Audio Equipment Montaje de la antena de bucle de AM 1.
- Page 41 (2) Colocación de las antenas Instalación de la antena de bucle de AM Sintonice una emisora de AM (Véase la página 85), coloque la antena tan alejada del equipo como lo permita la posición en la que la distorsión y el ruido sean mínimos. En algunos casos es mejor invertir las polaridades.
-
Page 42: Nombre De Las Piezas Y Funciones
• Cuando los auriculares están conectados en este toma, en los altavoces no se produce sonido alguno. VERTICAL LOADING SYSTEM COMPACT DISC PLAYER CD STEREO RECEIVER D-AJ03 40-STATIONS PRESET MEMORY 6-MODES PRESET EQUALIZER R E M O T E S E N S O R... - Page 43 (2) Pantalla de visualización TOTAL REMAIN DIGEST RANDOM PROG Visualizador principal de pista • Visualiza varias funciones, la hora, los ajustes del temporizador, etc. • Cuando la función se cambia a CD se visualizará lo siguiente. • Sección de la pantalla de número de pista (TRACK): Cuando se carga un disco.
- Page 44 ESPAÑOL (3) Nombres y funciones de los botones del mando a distancia Botón de alimentación (POWER) Botón de reproducción/pausa de CD ) ...(82) Botón de parada de CD (CD ...(83) Botón de selección de banda (FM/AM) ...(85) Botón de selección de entrada externa (AUX) ...(74) Botones de búsqueda automática ) ...(83 , 85)
-
Page 45: Mando A Distancia
MANDO A DISTANCIA La unidad de mando a distancia incluida (RC - 911) puede utilizarse para manejar el D-AJ03 a distancia. (1) Inserción de las pilas q Extraiga la tapa posterior de la unidad de mando a distancia. w Inserte dos pilas R6P (AA) en el compartimiento de pilas en la dirección indicada por las marcas que hay dentro del... -
Page 46: Ajuste Del Reloj
ESPAÑOL AJUSTE DEL RELOJ (1) Ajuste del reloj TUNER PLAY MODE SKIP ON/STANDBY Botón ON/STANDBY (Ejemplo) Introducción de las 7:30 pm. POWER Pulse el ON/STANDBY TIMER/DELETE Pulse el del controlador remoto. Antes de 10 segundos, pulse el remoto para seleccionar “ TIME ADJUST ”. Antes de 10 segundos, pulse el remoto. - Page 47 (2) Para reajustar el reloj Repita desde el paso 1. ✽ Durante este procedimiento, aparece “ STANDBY ” en el paso 2 y la hora establecida aparecerá en el paso NOTA: • El ajuste del reloj se borrará cuando se desenchufe el aparato o ocurra una falla de la alimentación.
-
Page 48: Reproducción De Cds
ESPAÑOL REPRODUCCIÓN DE CDs TUNER PLAY MODE SKIP ON/STANDBY Botón ON/STANDBY (1) Reproducción de CDs POWER Pulse el ON/STANDBY Pulse el cambiar a la función “CD”. Pulse el en la unidad principal para abrir la 5 OPEN/CLOSE compuerta del CD. Inserte un CD y pulse el •La compuerta del CD se cerrará... - Page 49 TUNER PLAY MODE SKIP ON/STANDBY Botones Botón SKIP (2) Detener la reproducción Pulse el del controlador remoto) durante la reproducción. (3) Pausa Pulse el del controlador remoto) durante la reproducción. ✽ Para reanudar la reproducción a partir del mismo lugar pulse de nuevo el botón. (4) Para localizar el principio de una pista [Para empezar de nuevo la pista que está...
- Page 50 ESPAÑOL Botón VOL. TUNER PLAY MODE SKIP DOWN ON/STANDBY (5) Para extraer el CD Pulse el del controlador remoto) para detener el CD, luego pulse el 5 OPEN/CLOSE • Después de que se abra la compuerta del CD, extraiga el CD. ✽...
-
Page 51: Escucha De Radio
ESCUCHA DE RADIO (1) Sintonización Botón TUNER TUNER PLAY MODE SKIP ON/STANDBY Botón Botones ON/STANDBY SKIP (Ejemplo) Sintonización en FM 89,5 MHz. POWER Pulse el ON/STANDBY Pulse el FM/AM TUNER seleccionar FM. ✽ El modo sintonizador cambia de la siguiente manera cada vez que se pulsa el botón. - Page 52 ESPAÑOL (2) Sintonización prefijada 2 Podrá almacenar 40 emisoras de AM y FM en la memoria y llamarlas pulsando un botón. (Ejemplo) Preajuste de la emisora de FM 89,5 MHz en el número 3. Recibe la emisora de radio “FM 89,5 MHz” que quiere almacenar en la memoria de preselección.
- Page 53 (3) Para llamar la emisora memorizada (Ejemplo) Escuche la emisora del número de preselección “3” que ha sido fijada en el paso (2). Botón TUNER VOL. TUNER PLAY MODE SKIP DOWN ON/STANDBY Botón POWER FM/AM FM/AM VOLUME TUNING/ PRESET ENTER CLEAR Botones TUNING/...
-
Page 54: Controlador Remoto
ESPAÑOL CONTROL DE VOLUMEN Y GRAVES TUNER PLAY MODE SKIP ON/STANDBY (1) Control de volumen Pulse el VOL. controlador remoto). (2) Control de graves Pulse el controlador remoto. (3) Ecualizador Pulse el controlador remoto. Botones VOLUME VOL. DOWN OPEN/CLOSE Botones VOL. -
Page 55: Reproducción De Cd Avanzada
REPRODUCCIÓN DE CD AVANZADA (1) Escuchar la pista deseada de un CD ... TUNER PLAY MODE SKIP ON/STANDBY (Ejemplo) Reproducción de la pista 8. Cargar el CD y pulsar el Pulsar el botón de directa ( remoto para seleccionar el número de pista. •... - Page 56 ESPAÑOL (2) Escuchar pistas repetidamente / Escuchar en orden aleatorio Botón PLAY MODE TUNER PLAY MODE SKIP ON/STANDBY Botón Cargar el CD y pulsar el PLAY MODE Pulse el del controlador remoto para seleccionar el modo de reproducción. Reproducción normal NORMAL Reproducción seleccionada DIGEST...
- Page 57 (3) Escuchar las pistas deseadas en el orden deseado ... 2 Se pueden programar un máximo de 20 pistas. Si el total de números de pistas programadas supera las 20, aparecerá el mensaje “ OVER P20 ”. TUNER PLAY MODE SKIP ON/STANDBY Botón...
- Page 58 ESPAÑOL Cuando la grabación haya finalizado Pulse el Comenzar la reproducción Pulse el • Cuando haya acabado la reproducción de la última pista grabada, la unidad se detendrá automáticamente. Para comprobar las pistas que se han programado Mientras se encuentre en modo parado, pulse el SKIP SKIP...
-
Page 59: Avance Rápido / Retroceso Rápido
(4) Búsqueda de pista mientras se escucha el sonido a gran velocidad (CD) ... TUNER PLAY MODE SKIP ON/STANDBY Botones SKIP Retroceso rápido: Durante la reproducción... Pulse y mantenga pulsado el en el mando a distancia). • Retire su dedo del botón cuando haya encontrado la posición deseada. -
Page 60: Utilización Del Temporizador
ESPAÑOL UTILIZACIÓN DEL TEMPORIZADOR Tipos de temporizadores y sus usos • Reproducción temporizada: Activa/desactiva la alimentación en el momento deseado permitiendo así la recepción de radio, entrada externa o reproducción de CD. • Temporizador diario: La alimentación se puede activar y desactivar a las mismas horas todos los días con el fin de escuchar un CD, un programa de radio o una entrada externa. - Page 61 (1) Ajuste del temporizador (Ejemplo) Utilice el temporizador para escuchar la emisora de radio de la frecuencia 89,5 MHz (FM) almacenada en el número de preselección 3. (Ajustar el temporizador para que se active a las 5:10 pm y se desactive a las 6:10 pm.) Encienda el equipo...
- Page 62 ESPAÑOL (1) Ajuste del temporizador (continuación) TUNING/ Pulse el PRESET especificar las horas de la hora de inicio, y pulse luego el ENTER del controlador remoto. TUNING/ Pulse el PRESET especificar los minutos, y pulse luego el controlador remoto. ✽ Pulse y mantenga pulsados los pasos de 5 minutos.
- Page 63 (1) Ajuste del temporizador (continuación) TUNING/ Pulse el del controlador remoto para ajustar el PRESET volumen, y pulse luego el ✽ Tenga cuidado de no subir demasiado el volumen. El aparato se establecerá en el modo de reserva y luego en el modo de reserva de reproducción de forma automática. Durante la reproducción con temporizador 12:00 Cuando se llegue a la hora preajustada, se iniciará...
- Page 64 ESPAÑOL (3) Para comprobar el ajuste del temporizador Estando en el modo de reserva de reproducción con temporizador, pulse el Antes de 10 segundos, pulse el remoto para seleccionar “ TIMER CALL ”. Antes de 10 segundos, pulse el remoto. •...
- Page 65 (6) Operación de desconexión automática • La hora de apagado se puede establecer hasta en 120 minutos en intervalos de 5 minutos. TIMER/DELETE Pulse el durante la reproducción de música que desea escuchar o durante la recepción de una emisora de radio.
- Page 66 ESPAÑOL (7) Para confirmar el tiempo remanente de desconexión artomática POWER Botones TUNING/ PRESET FM/AM VOLUME TUNING/ PRESET ENTER CLEAR TIMER/DELETE PLAY MODE PROG. RC-911 TIMER/DELETE Pulse el del controlador remoto mientras se ajusta el temporizador de desconexión automática. Antes de 10 segundos, pulse el TUNING/ del controlador remoto PRESET...
- Page 67 (9) Para emplear el temporizador de desconexión automática en combinación con la reproducción con temporizador Ajustar el temporizador de apagado (Sleep). (Consulte los pasos del 1 a 5 en la página 99.) Ajuste la reproducción con temporizador. (Consulte los pasos del 1 a 10 en la página 95.) (Consulte los pasos del 1, 2 en la página 97.)
-
Page 68: Limpieza De Discos
ESPAÑOL LIMPIEZA Limpiar la unidad principal Utilice un paño suave y limpie suavemente para quitar la suciedad del equipo y del panel de funcionamiento. • Si utiliza un paño que contenga algún tipo de producto químico, siga las precauciones establecidas para él. No utilice bencina, disolventes o cualquier otro disolvente orgánico o insecticida para limpiar la unidad, ya que esto podría causar un cambio en su calidad o color. - Page 69 Manipulaci de discos Discos Use discos compactos con la marca En este equipo no es posible reproducir CDs con formas especiales (CDs con forma de corazón, CDs octagonales, etc.). Si intenta hacerlo, el equipo podrá resultar dañado. No use este tipo de CDs. Manipulación de discos Evite tocar la superficie del disco al insertarlo o al extraerlo.
-
Page 70: Resolución De Problemas
ESPAÑOL RESOLUCIÓN DE PROBLEMAS Compruebe otra vez lo siguiente antes de suponer que el sistema tiene un problema. ¿ Están bien hechas las conexiones ? ¿ Se ha utilizado el equipo según se explica en las instrucciones ? Asegúrese de verificar que esté encendido el interruptor de alimentación principal en el panel trasero. Si el sistema no funciona correctamente, compruebe la lista que figura a continuación. -
Page 71: Otras Precauciones
• Cuando esté ausente de su domicilio durante largos periodos de tiempo, asegúrese de desenchufar el cable de alimentación eléctrica. Cuando mueva el D-AJ03 • No exponga el D-AJ03 a ningún tipo de golpe. • Compruebe siempre que ha extraído el disco y que los cables de conexión están desconectados... -
Page 72: Especificaciones
ESPAÑOL ESPECIFICACIONES Sección del amplificador Potencia máxima práctica: Tomas de audio de entrada/salida: Sección del sintonizador Banda de frecuencia de recepción: Sensibilidad de recepción: Separación estéreo FM: Sección del reproductor de CD Fluctuación y trémolo: Frecuencia de muestreo: Fuente óptica: Sección del temporizador del reloj Sistema de reloj: Funciones del temporizador:... - Page 73 16-11, YUSHIMA 3-CHOME, BUNKYO-KU, TOKYO 113-0034, JAPAN Telephone: (03) 3837-5321 Printed in China 511 4095 003...
Need help?
Do you have a question about the D-AJ03 and is the answer not in the manual?
Questions and answers