
Related Manuals for ZENEC ZE-30MP3


Summary of Contents for ZENEC ZE-30MP3
- Page 1 �������� ������ ������ ���� ��� ����� Operating Instructions Einbau- & Bedienungsanleitung...
-
Page 2: Table Of Contents
Safety Information Contents PRECAUTIONS Safety Information......Page2 Use only in a 12-volt DC negative-ground electrical system. Panel Controls...........3 Disconnect the vehicle's negative battery terminal while mounting and connecting the unit. Remote Controls ........4 When replacing the fuse, be sure to use one with an identical amperage rating. Using a fuse with a higher amperage rating may cause serious damage to the unit. -
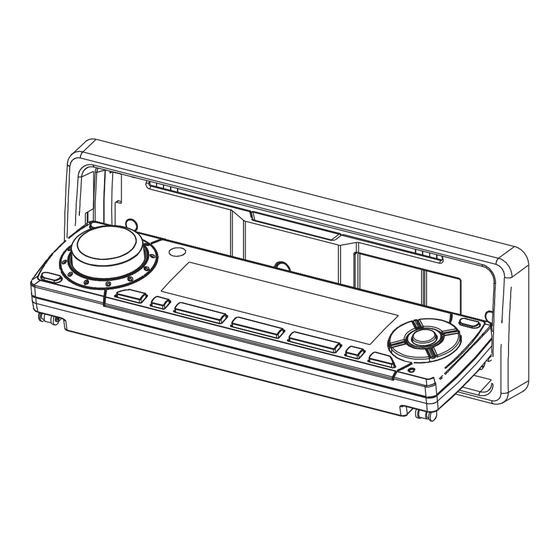
Page 3: Panel Controls
Panel Controls Power on : press any button on the panel except to turn on the unit. Press to tune in a preset station Radio Hold for more than 2 seconds to Traffic Announcements Identification store station Radio Tune Disc Play Radio Preset (when disc is in) Track Seek... -
Page 4: Remote Controls
Aux-in (optional) Push to select VOL/BAS/ Radio Preset scan TRE/BAL/FAD , use Volume MUTE button to adjust level Radio Auto Preset (ZE-30MP3 ONLY) Push more than 2 seconds SEARCH M P3 track / file search to Menu mode MENU SEARCH... -
Page 5: Button Tips
Button Tips Disc Load / Eject: Press to slide down the panel. DO NOT apply excessive Load: Insert the disc into the slot. Press to close the panel. force to the panel. Eject: Press to eject the disc. Press to close the panel. It can cause DAMAGE. -
Page 6: M P3 Playback
M P3 Play back While playing M 3 disc, the folder/file name and I D3 tag (Song title, Album and Artist) can entirely scroll on the LCD display. ALBUM MUSIC ARTIST M P3 Elapsed playing time & Track number Folder name & number File name &... -
Page 7: Mp3 Character Search
��������������������� RDS Menu Function Press the button more than 2 seconds to enter menu mode , then each press changes the mode as follows: ������������������������������������������������������� ��������������������� � ���������� � �� TA mode MASK mode DSP mode LOUD ON / OFF mode BEEP ON / OFF ���... -
Page 8: Mp3 Overview
M P3 Overview Note on M 3 MP3 is the acronym for MPEG Audio Layer 3 and refers to an audio compression technology standard. This product allows playback of MP3 files on CD-ROM (CD-R or CD-RW discs). The unit can read M 3 files written in the format compliant with ISO 9660. However it does not support the M 3 data written by the method of packet write. -
Page 9: Rds Basics
RDS ( Radio Data System ) RDS service availability varies with areas. Please understand if RDS service is not available in you area, the following service is not available, either. The following functions are available when receiving RDS stations. RDS Basics AF( Alternative Frequency list ) When reception is poor, an RDS station broadcasting the same program is tuned in automatically. -
Page 10: Rds (Continued)
RDS ( continued ) Traffic Announcements Some RDS FM stations periodically TP ( Traffice Program Identification ) TA ( Traffic Announcements Identification ) provide traffic information. Broadcasting of traffic information Radio announcements on traffic conditions TA Mode: Press TA button to turn on / off TA. When TA mode is on and TA indicator on LCD is displayed. -
Page 11: Rds (Continued)
previous Is displayed and searched if no button is pressed for 2 seconds. If there is no corresponding program type, NO PTY is displayed. -
Page 12: Rds Menu Function
RDS Menu Function Press the button more than 2 seconds to enter menu mode , then each press changes the mode as follows: TA mode MASK mode DSP mode LOUD ON / OFF mode BEEP ON / OFF VOL mode LOCAL / DX mode ST / MO mode SEEK1/2 mode (only in tuner mode) -
Page 13: Rds Menu Function (Continued)
����������������������������� ������������������������������������������������������ ����������������������������������������������������������� � �� �������� ���� �������� ������� �������� ����������� ������� �� ��� ���������������������������������������������������� �� ������������������������������������������������������������������������ ������������������������������������������������������������������ ����� ������������������������������������������������������������������ ����� ������ �������������������������������������������������������������������������������������������������������� ������������������������������������������������������������������������� �������������������������������������������������������� ���������������������� ���������������������������������������������������� ���������������������������������������������� ����� ����� ����� ����� �������������������������������� ������ ������ ������ ������������������������������������������������ ��... -
Page 14: Electrical Connections
Electrical Connections Wiring Diagram Fuse 15A Antenna Connector Yellow Pink To car battery(+) Tel. Mute Continuous+12V DC Ignition key Filter Box +12V DC Black Ground Lead When ON/ACC Motor/Electric Antenna relay control Lead Blue R(Red) Line-out Gray Amplifier relay control Lead L(White) R(Red) Line-out Brown... -
Page 15: Installation Guide
Installation Guide Insert mounting collar into the dashboard, and Installation Procedures bend the mounting tabs out with a screwdriver. First complete the electrical connections, and then check them for correctness. Make sure that lock lever ( ) is flush with the Reset mounting collar. -
Page 16: Anti-Theft System
Anti-Theft System This unit is equipped with a motorized slide-down detachable panel. Panel can be detached and taken with you, helping to deter theft. Removing the panel 1.Press to slide down the panel. 2.Press PWR button more than 2 seconds to switch off the power of the unit. 3.Pull out the left part of the panel a little, then pull out the panel from the right. -
Page 17: Trouble Shooting
Trouble shooting If You Suspect Something Wrong Immediately switch power off. Do not use the unit in abnormal condition, for example without sound, or with smoke or foul smell can cause fire or electric shock, Immediately stop using it and call the store where you purchased it. Never try to repair the unit yourself be cause it is dangerous to do so. - Page 18 Sicherheitshinweise Inhalt Vorsichtsmassnahmen Sicherheitshinweise Seite 2 • Das Gerät ist für den Betrieb an einer 12V Stromversorgung mit minus gegen Masse gedacht. Frontpanel Bedienung • Entfernen Sie die Batteriemasse, bevor das Gerät installiert und angeschlossen wird. • Wenn die Gerätesicherung ersetzt werden muss, achten Sie auf identischen Ampere Wert. Fernbedienung Die Verwendung einer Sicherung mit höherem Wert kann zu Defekten am Gerät führen.
- Page 19 Frontpanel Bedienung Power on: Drücken Sie eine beliebige Taste ausser der @ und ` um das Gerät einzuschalten. Drücken um einen abgespeicherten Radio Sender anzuwählen. Länger als 2 Sek. Traffic Announcements Identification drücken um einen Sender zu speichern Radio Tune Disc Play Radio Preset wenn Disk geladen...
- Page 20 Frontpanel Bedienung Drücken Sie eine beliebige Taste auf der Fernbedienung. Radio Tune Volume Radio Track Seek Power on/off Disk Play (wenn Disk geladen) Mute Aux-in (optional) Drücken um VOL/BAS/TRE/ Radio Preset scan BAL/FAD zu wählen. Ein- MUTE stellung mit VOL-Drehknopf Radio Auto Preset Länger als 2 Sek.
- Page 21 Bedientipps Keine rohen Kräfte am Disk Laden / Auswerfen Bedienpanel walten CD Laden: Drücken Sie ` um die Bedienfront zu senken. Führen Sie die Disk in den CD-Einzug ein. lassen, es könnte sonst CD Auswerfen: Drücken Sie @ um die Disk auszuwerfen. Drücken Sie ` um die Bedienfront zu beschädigt werden.
- Page 22 M P 3 W i e d e r g a b e Wä h r e n d d e r W i e d e r g a b e e i n e r M P 3 D i s k kann d e r O r d e r / F i l e N a m e u n d d i e I D 3 T a g I n f o ( S o n g T i t e l , A l b u m u n d K ü...
- Page 23 R D S M e n ü ( Teil 1 ) ���������������������������� �������������������������������������������������������������������������� D r üc k e n S i e d e n V O L - D r e h k n o p f f ü r m e h r a l s 2 S e k u n d e n u m i n d e n M e n ü - M o d u s z u g e l a n g e n , �������������������������������������������������������������������������������...
- Page 24 MP3 Überblick & Info's Bemerkungen zu MP3 • MP3 ist die Abkürzung für MPEG Audio Layer 3 und beschreibt ein Datenkompresionsverfahren. • Dieses Gerät ermöglicht die Wiedergabe von MP3 Files von CD-ROM, CD-R oder CD-RW Disks. • Das Gerät kann Files lesen, die mit dem ISO 9660 Format geschrieben wurden. Das Gerät kann Datenfiles die mit „Packet Write“ Verfahren auf Disk gebrannt wurden nicht lesen! •...
- Page 25 RDS (Radio Data System) Die RDS Empfangssituation variiert je nach Empfangsgebiet. Wenn sich in Ihrem Empfangsgebiet keine RDS Sender befinden, können Sie auch die im nachfolgenden beschriebenen RDS Funktionen nicht nutzen. RDS Basisfunktionen AF (Alternativ Frequenz-Liste): Wenn der Empfang eines Senders schlecht ist, wechselt der Tuner auf eine Alternativ-Frequenz, auf welcher das gleiche Programm ausgestrahlt wird.
- Page 26 RDS (Fortsetzung) Traffic Announcements (Verkehrsdurchsagen) Einige RDS-UKW Sender übertragen TP ( Traffic Program Identification) TA (Traffic Announcements Identification) wiederholt Verkehrsinfos. Die Durchsage von Verkehrsinfo’s. Radiodurchsagen von Verkehrsinfo’s. TA Modus: Drücken Sie die TA Taste um die TA Funktion zu aktivieren oder deaktivieren. Die aktivierte TA Funktion wird durch das leuchtende TA Icon im LCD Display angezeigt.
- Page 27 RDS (Fortsetzung) PTY Empfang (Program Type) UKW Sender mit RDS Kennung enthalten eine PTY Information. PTY Type Preset Zum Beispiel: News, Rock, Info, Sport, etc. Drücken Sie PTY einmal um den MUSIK Typ einzu- geben, oder 2 mal um den SPRACH Typ einzugeben. PTY Modus: Drücken Sie die PTY Taste um die PTY Funktion Benutzen Sie dann die Tasten 1 –...
- Page 28 R D S M e n ü ( Teil 1 ) D r üc k e n S i e d e n V O L - D r e h k n o p f f ü r m e h r a l s 2 S e k u n d e n u m i n d e n M e n ü - M o d u s z u g e l a n g e n , d a n n b e w i r k t j e d e s w e i t e r e d r üc k e n d i e A n w a h l f o l g e n d e r M o d i : T A M o d e d M A S K M o d e d D S P M o d e d L O U D O N / O F F M o d e d B E E P O N / O F F M o d e V O L M o d e j L O C A L / D X M o d e j S T / M O M o d e j S E E K 1/2 M o d e...
- Page 29 R D S M e n ü ( Teil 2 ) D S P M o d u s : D r e h e n S i e d e n V O L - D r e h k n o p f ROCK CLASSIC FLAT...
- Page 30 Elektrischer Anschluss Wiring Diagram Fuse 15A Antenna Connector Yellow To car battery(+) Continuous+12V DC Ignition key Filter Box +12V DC Black Ground Lead When ON/ACC Motor/Electric Antenna relay control Lead Blue R(Red) Line-out Gray Amplifier relay control Lead L(White) Pink Tel.
- Page 31 Montage Installations-Prozedur Führen Sie die Blechhalterung vom Gerät in den Schliessen Sie erst die Installation ab, dann vergewissern Sie sich DIN Schacht ein, und biegen Sie die Blech- nochmals dass alle Verbindungen korrekt ausgeführt sind! laschen mit einem Schraubenzieher um – um die Halterung im Schacht zu arretieren.
- Page 32 Diebstahlschutz Dieses Gerät ist mit einem motorisch absenkbarem und abnehmbaren Bedienteil ausgestattet. Die Bedienfront kann zum Schutz gegen Diebstahl abgenommen werden. Entfernen vom Bedienteil 1. Drücken Sie die ` Taste um die Bedienfront abzusenken. 2. Drücken Sie die PWR Taste länger als 2 Sekunden, um das Gerät auszuschalten. 3.
- Page 33 S t ö r u n g s b e h e b u n g W e n n S i e e i n e n F e h l e r v e r m u t e n , s c h a l t e n S i e d a s G e r ä t u n v e r z ü g l i c h a u s ! V e r w e n d e n S i e d a s G e r ä t n i c h t w e n n e t w a s n i c h t z u s t i m m e n s c h e i n t ( k e i n T o n a m A u s g a n g , v e r b r a n n t e r G e r u c h , R a u c h e n t w i c k l u n g ) .
-
Page 34: Specifications
Specifications MW Radio General Power supply: 12V DC(11V-16V) Frequency range: 522-1620 K Hz Usable sensitivity(S/N=20dB): 30 dB Test voltage 14.4V, negative ground Maximum power output: 45Wx4 channels Continuous power output: 20Wx4 channels (4 Ω, 10% T.H.D.) Disc Player Suitable speaker impedance: 4-8 ohms System: Disc digital audio system... -
Page 35: Warranty
Dear customer Sehr geehrter Kunde, Thank you for purchasing this ZENEC product. It is advisable to keep the Vielen Dank, dass Sie sich zum Kauf dieses Produktes von ZENEC ent- original packing material for any future transporting of the product. - Page 36 Warranty Conditions / Garantie ZENEC Model: ZE-30MP3 Dealer’s address & stamp Serial Number: ..................... Date of Purchase: ..................Name:......................Address: ...................... City:......................State: ........ZIP or Postal Code ......... Country: .....................
Need help?
Do you have a question about the ZE-30MP3 and is the answer not in the manual?
Questions and answers