
Related Manuals for ZENEC ZE-MC194


Summary of Contents for ZENEC ZE-MC194
- Page 1 MODEL NO: MODEL N0: ZE-DVBT1 0 1 CH DVB-T TUNER 1-DIN DVD-MONICEIVER WITH MOTORIZED 7" LCD DISPLAY INSTRUCTION MANUAL English · FrEnch · gErman...
-
Page 2: Table Of Contents
DEUTSCH ENGL I SH CONTENTS usB mode SElECT uSb AS PlAying SOuRCE ........................24 Before using TOuCh SCREEn COnTROlS ..........................24 START CODE ................................06 OnSCREEn COnTROl buTTOnS .........................24 FROnT PAnEl ................................06 SuSPEnD PlAybACk ...............................24 AuxiliARy lCD .................................07 STOP PlAybACk ...............................24 REmOTE COnTROl .............................. - Page 3 1. never disassemble or a djust the unit without any professional guide. For details, please 1. Only connect this unit to a 12V DC power supply with consult an authorized ZEnEC dealer for inquiry. negative grounding. 2. lf the front panel or TFT monitor is squalid, please use a clean silicone cloth and neutral detergent to wipe off the spot.
-
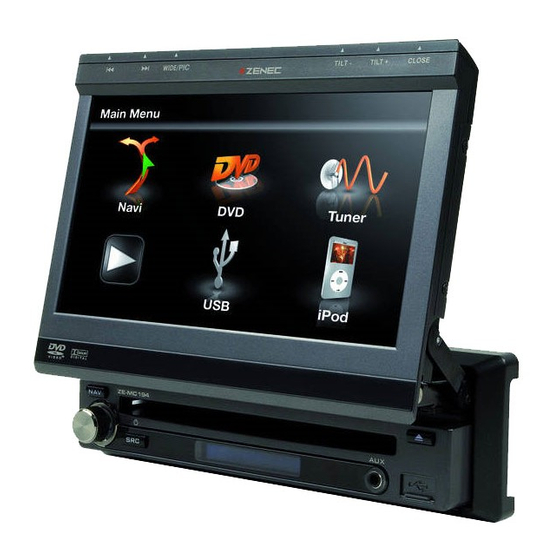
Page 4: Auxiliary Lcd
DEUTSCH ENGL I SH BEFORE USING BEFORE USING start code: 012345 (Description: Page 35) 10. [ ] Key: Eject disc 11. [open/close] Key: Open/Close the TFT monitor front panel 12. [as/tilt+] Key: Auto save/Preview scan/increase display angle 13. [Band/tilt-] Key: Change radio band/Decrease display angle auxiliarY lcd 1. - Page 5 DEUTSCH ENGL I SH BEFORE USING BEFORE USING remote control 1. [SRC] key: Select playing source notes for remote control use 2 [EjECT] key: Eject disc lntroduce of key functions 1. Aim the remote control at the remote sensor on the unit. 3.
-
Page 6: Power On/Off
DEUTSCH ENGL I SH BASIC OPERATIONS BASIC OPERATIONS poWer on/off displaY sYstem time ■ Press any key on the front panel or the [POwER] key on the remote control to turn on the ■ Press and hold the [DiSP] key on the front panel to switch the display information power under standby mode. -
Page 7: Select Radio As Playing Source
DEUTSCH ENGL I SH RADIO MODE RADIO MODE select radio as plaYing source manual save ■ Open the SOuRCE mEnu and then touch the RADlO icon. when one expected radio station has been detected ... 1. Press the [mEm] icon on the user interface and the preset menu will be opened. select one radio Band 2. -
Page 8: Af Function
DEUTSCH ENGL I SH RDS OPERATIONS RDS OPERATIONS The unit provides basic functions of RDS, including Pl (Program ldentification), radio ptY function station name, RT (Radio Text), CT (Clock Time), AF (Alternative Frequency), TA (Traffic ■ PTy is the abbreviation for Program Type which is a code defining the type of program Announcement) and PTy (Program Type) selection. -
Page 9: Insert A Disc
DEUTSCH ENGL I SH DISC MODE DISC MODE insert a disc onscreen control Buttons ■ upon inserting a disc, the unit will switch to disc mode automatically. Disc type/ mP3/wmA mPEg Picture icon notes: numeric numeric numeric numeric numeric numeric ■... -
Page 10: Repeat Playback
DEUTSCH ENGL I SH DISC MODE DISC MODE repeat plaYBacK suspend plaYBacK ■ Press the [RPT] key on the remote control repeatedly or open the onscreen control ■ Press the [/] key on the front panel or remote control or open the onscreen control buttons menu and then touch the [ ] button repeatedly to alter repeat mode according to buttons menu and then touch the [/] button. -
Page 11: Intro Playback
DEUTSCH ENGL I SH DISC MODE DISC MODE dvd menu and tltle intro plaYBacK ■ This function is only available for the DVD discs having "mEnu/TlTlE". Press the ■ when this function is on, the unit will play back the first 10 seconds of each track of a [mEnu] key on the remote control or open the onscreen control buttons menu and then VCD or CD disc. - Page 12 DEUTSCH ENGL I SH DISC MODE DISC MODE for vcd notes: ■ when PbC is on, playback goes back to the track list and starts from the first track. ■ when PbC is on, fast motion playback, slow motion playback or skip search is available but repeat playback and searching for a particular chapter or track is prohibited.
-
Page 13: Zoom In/Out
DEUTSCH ENGL I SH USB MODE USB MODE select usB as plaYing source change folder ■ Open the SOuRCE mEnu and then touch the uSb icon. ■ The operation is the same as disc mode. notes: repeat plaYBacK ■ The unit switches to uSb mode once an uSb device has been inserted. ■... -
Page 14: Select Ipod As Playing Source
DEUTSCH ENGL I SH IPOD MODE IPOD MODE select ipod as plaYing source video plaYBacK ■ The unit will switch to iPod mode automatically when an iPod player is plugged into the 1. Enter iPod video mode unit. ■ Press the [AuDiO] key on the remote control or touch the video icon on the user interface. ■... - Page 15 DEUTSCH ENGL I SH DVB-T MODE OTHER MODES select dvB-t as plaYing source ■ Open the SOuRgE mEnu and then select DVb-T, and ■ External peripheral devices with RCA audio and video outputs can be connected with touch the screen to POP uP control menu. the unit.
-
Page 16: Setup Procedures
DEUTSCH ENGL I SH SETUP SETUP setup procedures general 1. enter setup mode ■ clock mode ■ Press the [SETuP] key on the remote control or touch the setup icon [ ] on the user 12 hr: the clock displays in the type of 12 hours such as 11:18 Am. interface. - Page 17 DEUTSCH ENGL I SH SETUP SETUP audio you should set a new password ASAP. ■ drc method of changing passWord: Set the dynamic range of Dolby digital DVD discs. 1. locate the cursor on the 'password' option, press the numeric keys on the remote control or touch the 'Password' option directly to open the onscreen keypad, touch the numeric On: Playback more dynamic audio with bass.
- Page 18 ■ Do use a code you can easily remember. unlock the unit is not free of charge and can driving (just like observing things over the rearview mirror). only be done by an authorized ZEnEC service center. ■ tft auto open ts cal Auto: The TFT panel automatically opens when the unit is turned on.
- Page 19 DEUTSCH ENGL I SH TROUBLESHOOTING ■ Audio control allows you to easily adjust the audio system to get the best possible sound ■ what appears to be trouble is not always serious. Please check the following points effect. before calling a service center. 1.
-
Page 20: Notes Of Connection
DEUTSCH ENGL I SH TROUBLESHOOTING DEVICE CONNECTIONS (Continued) notes of connection ■ This unit is designed to be used in a vehicle with a 12-volt battery and negative Problem Cause Corrective action grounding. before installing this unit to a mobile home, a bus, or a truck, make sure the battery voltage is appropriate for this unit to be used, otherwise, install a transformer to Disc playback convert the output voltage to 12 V. -
Page 21: Control Cables
DEUTSCH ENGL I SH DEVICE CONNECTIONS DEVICE CONNECTIONS control caBles parKing BraKe caBle connections auto Brightness control ■ To avoid the display being too bright at night time, if the headlight cable is connected to llluml, turning on the head light will dim the backlight of the TFT lCD and vice versa. telephone mute ■... -
Page 22: Notes Of Installation
DEUTSCH ENGL I SH INSTALLATION AND UNINSTALLATION INSTALLATION AND UNINSTALLATION notes of installation Dashboard 1. before installation, please make sure proper connections are conducted and the unit operates normally. lmproper connection may result in damage to the unit. 2. use only accessories designed and manufactured for this unit and other unauthorized accessories may result in damage to the unit. -
Page 23: Audio
DEUTSCH ENGL I SH INSTALLATION AND UNINSTALLATION SPECIFICATIONS general trim ring installation Reference Supply Voltage ..................12V (DC) ■ Attach the trim ring around the front panel with two indentions on one side facing upwards. Operating Voltage Range................10.5~15.8V (DC) max Operation Current ....................10A grounding System ................ - Page 24 DEUTSCH ENGL I SH SPECIFICATIONS APPENDIX video region code normal Video input level (CVbS) ................1.0±0.2V According to DVD sale region, the whole world is divided into six regions. A DVD disc can be Video input impedance ....................75Ω played back only when its region code is compatible with that of the player in use. Video Output impedance ....................75Ω...
- Page 25 Wiring connections Dear customer Thank you for purchasing this ZEnEC product. it is advisable to keep the original packing material for any future transporting of the product. Should your ZEnEC product require warranty service, please return it to the retailer from whom it was purchased or the distributor in your country.
- Page 26 DEUTSCH FRENCH mode usB CONTENU SélECTiOnnER l'uSb COmmE SOuRCE DE lECTuRE ................72 panneau de commandes COmmAnDES DE l'éCRAn TACTilE ......................72 START CODE ..............................54 COmmAnDES Du mEnu à l'éCRAn (OSD) ....................72 PAnnEAu AVAnT ............................. 54 SuSPEnDRE lA lECTuRE ..........................72 AFFiChAgE lCD AuxiliAiRE .........................
- Page 27 DEUTSCH FRENCH CONSIGNES DE SéCURITé PRéCAUTIONS 1. ne jamais désassembler cet appareil. Pour plus de détails, veuillez contacter le centre de 1. branchez cet appareil seulement à une source service après-vente ou votre revendeur. d’alimentation +12V (DC) avec une masse négative. 2.
-
Page 28: Affichage Lcd Auxiliaire
DEUTSCH FRENCH PANNEAU DE COMMANDES PANNEAU DE COMMANDES start code: 012345 (voir page : 83) 10. touche [ ] : éjecter le disque 11. touche [open/close] : Ouverture / fermeture de l’écran TFT panneau de commandes 12. touche [as/tilt+] : mémorisation automatique / balayage / augmentation de l’angle de l’écran TFT 13. - Page 29 DEUTSCH FRENCH PANNEAU DE COMMANDES PANNEAU DE COMMANDES 1. Touche [SRC] : Sélection de la source de lecture télécommande notes pour l’utilisation de la télécommande 2. Touche {EjECT] : éjecter le disque 1) Orientez la télécommande vers le capteur infrarouge de l'appareil. 3.
-
Page 30: Utilisation De L'écran Tft
DEUTSCH FRENCH OPéRATIONS DE BASE OPéRATIONS DE BASE allumer/éteindre l’appareil afficher l’horloge ■ Appuyez sur n'importe quelle touche du panneau de commandes ou sur la touche ■ Appuyez et maintenez la touche [DiSP] du panneau de commandes pour commuter [POwER] de la télécommande pour allumer l’appareil. entre l’affichage de l’horloge et la source de lecture quand l’écran TFT est fermé. -
Page 31: Mémorisation Manuelle
DEUTSCH FRENCH MODE RADIO MODE RADIO sélectionner le mode radio en tant que source de lecture mémorisation manuelle ■ Ouvrez le menu source et touchez l’icône RADiO. Pour mémoriser une station manuellement : (1) Appuyez sur l’icône [mEm] de l'interface utilisateur afin d’ouvrir le menu de présélection. sélectionner une bande radio (2) Appuyez sur l’une des touches de présélection (P1à... -
Page 32: Fonction Af
DEUTSCH FRENCH FONCTION RDS RDS-FONCTION PTY ■ PTy est l'abréviation pour le type de programme diffusé (par exemple infos ou Rock, Cet appareil dispose des fonctions de base du RDS, incluant la fonction Pi (Program POP…). identification), le nom de la station radio, RT (Radio Text), CT (Clock Time), AF (Alternative Frequency), TA (Traffic Announcement) et PTy (Program Type). -
Page 33: Insérer Un Disque
DEUTSCH FRENCH MODE DISQUE MODE DISQUE insérer un disQue Boutons de commande à l'écran (osd) ■ lors de l’insertion d’un disque, l'appareil commute automatiquement sur le mode disque. Disc type/ mP3/wmA mPEg illustration icon note : Pavé Pavé Pavé Pavé... -
Page 34: Suspendre La Lecture
DEUTSCH FRENCH MODE DISQUE MODE DE DISQUE suspendre la lecture lecture répétée ■ Appuyez sur la touche [/] du panneau de commandes ou de la télécommande ou ■ Appuyez plusieurs fois sur la touche [RPT] de la télécommande à ou ouvrez le menu de ouvrez le menu de commande à... - Page 35 DEUTSCH FRENCH MODE DE DISQUE MODE DE DISQUE BalaYage menu dvd et titre ■ lorsque cette fonction est activée, l'appareil lit les 10 premières secondes de chaque ■ Cette fonction est seulement disponible pour les DVD ayant « mEnu /TiTlE ». Appuyez piste d'un disque VCD ou CD.
-
Page 36: Rotation De L'image
DEUTSCH FRENCH MODE DE DISQUE MODE DISQUE pour le vcd note : ■ lorsque la fonction PbC est activée, la lecture retourne à la liste des pistes et commence à partir de la première piste. ■ lorsque la fonction PbC est activée, la fonction lecture répétée et la recherche par chapitre ou piste n’est pas disponible. - Page 37 DEUTSCH FRENCH MODE USB MODE USB sélectionner l'usB comme source de lecture changer de dossier ■ Ouvrez le mEnu SOuRCE et touchez l’icône uSb. ■ Veuillez vous référer au chapitre « mode disque ». note : lecture répétée ■ l’appareil commute automatiquement sur le mode uSb lorsqu'un périphérique uSb a été inséré.
-
Page 38: Sélectionner L'ipod Comme Source De Lecture
DEUTSCH FRENCH MODE IPOD MODE IPOD sélectionner l'ipod comme source de lecture lecture vidéo ■ l'appareil commute automatiquement sur le mode iPod lorsque celui-ci est connecté. (1) Ouvrir le mode vidéo de l'iPod ■ Appuyez sur la touche [AuDiO] de la télécommande ou touchez l’icône « Vidéo » de ■... - Page 39 DEUTSCH FRENCH MODE TUNER TV DVB-T (TNT) AUTRES MODES sélectionner tuner tv dvB-t (tnt) comme source de lecture ■ Ouvrez le mEnu SOuRCE et sélectionnez DVb-T (TnT) et ■ Vous pouvez connecter à cet appareil tout périphérique externe disposant de sorties touchez l’écran pour afficher le menu des commandes.
- Page 40 DEUTSCH FRENCH RéGLAGES RéGLAGES procédures de réglage général ■ format heure (1) ouvrir le mode réglages 12hr : Affichage au format 12 heures, ex. 11h18 du matin. ■ Appuyez sur la touche [SETuP] de la télécommande ou touchez l’icône [ ] de l'interface utilisateur.
-
Page 41: Blocage Parental
DEUTSCH FRENCH RéGLAGES RéGLAGES audio Choisissez un nouveau mot de passe DES QuE POSSiblE. ■ drc méthode pour changer le mot de passe : Règle la dynamique des DVD « dolby digital ». (1) Déplacez le curseur sur l’option « mot de passe ». Appuyez sur les touches numériques de la télécommande ou touchez l'option «... - Page 42 ■ Employez un code que vous pouvez facilement se rappeler. Déverouillage n'est pas gratuite et peut seulement être effectuée par un centre autorisé de ZEnEC. manuel : lorsque vous coupez le contact du véhicule, l’écran TFT reste ouvert.
- Page 43 DEUTSCH FRENCH GUIDE DE DéPANNAGE éGALISEUR (EQ) ■ Veuillez contrôler les points suivants avant de contacter le centre de service après- ■ l’égaliseur permet d’ajuster facilement l’acoustique afin de rendre le meilleur effet vente. sonore possible. (1) ouvrir le mode égaliseur (eQ) Problème Cause Solution...
- Page 44 DEUTSCH FRENCH GUIDE DE DéPANNAGE CONNEXION DE L’APPAREIL (Suite) notes Problème Cause Solution ■ Cet appareil est conçu pour un véhicule avec batterie de 12 volts et une masse négative. Avant d'installer cet appareil dans un camping-car, un bus ou un camion, assurez-vous Playback de disque que le voltage de la batterie est approprié, dans le cas contraire faites installer par un ne peut pas insérer le disque...
- Page 45 DEUTSCH FRENCH CONNEXION DE L’APPAREIL CONNEXION DE L’APPAREIL atténuation automatique de la luminosité connexions du câBle de frein à main ■ Pour éviter un éclairage trop lumineux de l’écran le soir, connectez le fil « illumi » au fil de l’allumage des feux pour atténuer automatiquement la luminosité de l’écran lorsque vous allumes vos feux.
-
Page 46: Notes Pour L'installation
DEUTSCH FRENCH INSTALLATION ET DéSINSTALLATION INSTALLATION ET DéSINSTALLATION notes pour l'installation Tableau 1) Avant l’installation, assurez vous que toutes les connexions sont correctes et que de bord l'appareil fonctionne normalement. une connexion incorrecte peut endommager l’appareil. 2) utilisez seulement des accessoires conçus pour cet appareil. l’utilisation d’accessoires gaine en caoutchouc non compatibles peut endommager cet appareil. -
Page 47: Installation Du Cadre De Finition
DEUTSCH FRENCH INSTALLATION ET DéSINSTALLATION CARACTéRISTIQUES TECHNIQUES general installation du cadre de finition Reference Supply Voltage ..................12V (DC) Operating Voltage Range................10.5~15.8V (DC) ■ Fixez le cadre de finition autour du panneau avant avec les deux renfoncements vers le max Operation Current ....................10A haut. -
Page 48: Codes Région
DEUTSCH FRENCH CARACTéRISTIQUES TECHNIQUES ANNEXE video codes région normal Video input level (CVbS) ................1.0±0.2V le monde entier est divisé en six régions par rapport à la région de vente des DVD. un DVD Video input impedance ....................75Ω ne peut être lu que si son code région Video Output impedance ....................75Ω... - Page 49 ZEnEC. Conservez si possible l’emballage de ce produit pour tout envoi futur. Si cet appareil ZEnEC requiert la mise en oeuvre de sa garantie, veuillez le retourner au revendeur qui vous l’a vendu, ou au distributeur agréé du pays d’achat.
- Page 50 DEUTSCH GERMAN usB-modus INHALTSVERZEICHNIS uSb AlS wiEDERgAbEQuEllE AuSwählEn ..................120 TOuChSCREEn-bEDiEnung ........................120 Bedienelemente OSD-STEuERTASTEnmEnÜ ......................... 120 STARTCODE ..............................102 wiEDERgAbE unTERbREChEn ......................... 120 bEDiEnTEil ..............................102 STOPP ................................120 ZuSATZ-lCD ..............................103 AbSPiElliSTE AnZEigEn ..........................120 FERnbEDiEnung ............................104 SChnEllER VOR- unD RÜCklAuF ......................
- Page 51 1. Dieses gerät darf nie geöffnet werden. wenn ein Defekt vorliegt, darf das gerät nur von +12V (DC) und minus gegen masse geeignet. dem Servicepersonal von ZEnEC repariert werden. bei einem nicht autorisierten Eingriff erlischt der garantieanspruch. Für weitere informationen wenden Sie sich bitte an einen 2.
- Page 52 DEUTSCH GERMAN BEDIENELEMENTE 10. [ ]-taste: Eject-Taste (Disc auswerfen) 11. [open/close]-taste: TFT-bildschirm öffnen/schließen startcode: 012345 (s. Seite 131) 12. [as/tilt+]-taste: Auto Save/Preview Scan/neigungswinkel des bildschirms erhöhen Bedienteil 13. [Band/tilt-]-taste: Frequenzband ändern/neigungswinkel des bildschirms verringern ZusatZ-lcd 1. disc-indikator ■ leuchtet, wenn sich eine Disc im laufwerk befindet. 2.
- Page 53 DEUTSCH GERMAN BEDIENELEMENTE BEDIENELEMENTE fernBedienung 1. [SRC]-Taste: wiedergabequelle auswählen. anmerKungen Zur infrarot-fernBedienung 2 [EjECT]-Taste: Disc aus dem laufwerk 1. Die Fernbedienung soll in Richtung des iR-Empfängers des gerätes benutzt werden, um auswerfen. einwandfrei zu funktionieren. 3. [mEnu]-Taste: DVD mEnu/PbC. 2. Entfernen Sie die batterie der Fernbedienung oder setzen Sie eine batterieisolierung ein, 4.
-
Page 54: Gerät Ein- Und Ausschalten
DEUTSCH GERMAN ALLGEMEINE BEDIENUNG ALLGEMEINE BEDIENUNG gerät ein- und ausschalten sYstemZeit anZeigen ■ um das gerät einzuschalten, drücken Sie die [SRC]-Taste auf dem bedienteil oder die ■ bitte halten Sie die [DiSP]-Taste länger gedrückt, um zwischen der Systemzeit und der [POwER]-Taste auf der Fernbedienung. -
Page 55: Radio Als Wiedergabequelle Auswählen
DEUTSCH GERMAN RADIO-MODUS RADIO-MODUS radio als WiedergaBeQuelle ausWählen manuelles speichern von sendern ■ hAuPTmEnÜ öffnen und RADiO-icon auswählen. wenn Sie einen Radiosender gefunden haben und speichern wollen, verfahren Sie bitte wie folgt: frequenzband auswählen 1. berühren Sie das [mEm]-icon auf der benutzerschnittstelle, um das Speicherplatz-menü zu öffnen. -
Page 56: Programmtyp (Pty)
DEUTSCH GERMAN RDS-FUNkTION RDS-FUNkTION programmtYp (ptY) Das gerät hat grundlegende RDS-Funktionen wie: Pi (Programmbezeichnung), Radio- sendername, RT (Radiotext), CT (uhrzeit), AF (Alternative Frequenzen), TA (Verkehrs- ■ bei PTy handelt es sich um eine RDS-Funktion, die von immer mehr Rundfunkanstalten Ansage) und PTy (Programmtyp). unterstützt wird. -
Page 57: Disc Einsetzen
DEUTSCH GERMAN DISC-MODUS DISC-MODUS disc einsetZen osd-steuertasten ■ nach dem Einsetzen einer Disc schaltet das gerät automatisch auf den Disc-modus. Disc-Typ/ mP3/wmA mPEg Foto icon Bitte Beachten numerischer numerischer numerischer numerischer numerischer numerischer ■ Überprüfen Sie bitte, ob sich bereits eine Disc im gerät befindet, bevor Sie eine andere Tastatur- Tastatur- Tastatur-... -
Page 58: Wiedergabe Unterbrechen
DEUTSCH GERMAN DISC-MODUS DISC-MODUS WiedergaBe unterBrechen WiedergaBe Wiederholen ■ Drücken Sie die [/]-Taste auf dem bedienteil oder auf der Fernbedienung oder öffnen ■ Drücken Sie mehrmals die [RPT]-Taste auf der Fernbedienung oder öffnen Sie das OSD- Sie das OSD-Steuertastenmenü und berühren Sie die [/]-Taste. wiederholen Sie Steuertastenmenü... -
Page 59: Dvd-Menü Und -Titel
DEUTSCH GERMAN DISC-MODUS DISC-MODUS intro-WiedergaBe dvd-menÜ und -titel ■ wenn diese Funktion eingeschaltet ist, spielt das gerät die ersten 10 Sekunden jeder ■ Diese Funktion ist nur für DVDs vorhanden, die „mEnÜ/TiTEl “ haben. Drücken Sie die Spur einer VCD oder einer CD an. [mEnÜ]-Taste auf der Fernbedienung oder öffnen Sie das OSD-Steuertastenmenü... -
Page 60: Abbildung Drehen
DEUTSCH GERMAN DISC-MODUS DISC-MODUS für vcd Bitte Beachten ■ wenn die PbC-Funktion eingeschaltet ist, geht die wiedergabe zurück zur Spurliste und fängt wieder mit der ersten Spur an. ■ wenn die PbC-Funktion eingeschaltet ist, kann man die wiedergabe nicht wiederholen und nach einem bestimmten kapitel oder einer Spur suchen. - Page 61 DEUTSCH GERMAN USB-MODUS USB-MODUS usB als WiedergaBeQuelle ausWählen ordner Wechseln ■ öffnen Sie das wiedergabequellen-menü und berühren Sie das uSb-icon. ■ Die bedienung ist identisch, mit der im Disc-modus beschriebenen. Bitte Beachten WiedergaBe Wiederholen ■ Das gerät schaltet automatisch in den uSb-modus, sobald ein uSb-Speichermedium ■...
- Page 62 DEUTSCH GERMAN IPOD-MODUS IPOD-MODUS ipod als WiedergaBeQuelle ausWählen videoWiedergaBe ■ Das gerät schaltet automatisch in den iPod modus, wenn ein iPod eingesteckt wird. 1. iPod-Video-modus aufrufen ■ um den iPod-modus von einer anderen wiedergabequelle auszuwählen, öffnen Sie das ■ Drücken Sie die [AuDiO]-Taste auf der Fernbedienung oder berühren Sie das Video-icon hAuPTmEnÜ.
- Page 63 DEUTSCH GERMAN DVB-T-MODUS ANDERE MODI dvB-t als WiedergaBeQuelle ausWählen ■ öffnen Sie das hAuPTmEnÜ und wählen Sie DVb-T aus. ■ Externe Einheiten mit RCA-Audio- und Videoausgänge können an das gerät ange- berühren Sie den bildschirm, um das STEuERmEnÜ an- schlossen werden. zuzeigen.
- Page 64 DEUTSCH GERMAN SETUP SETUP einstellungsmöglichKeiten general (allgemein) 1. systemeinstellungsmenü aufrufen ■ clock mode (Zeitformat) 12hr: Zeitanzeige im 12-Stunden-Format, z.b. 11:18 Am. ■ Drücken Sie die [SETuP]-Taste auf der Fernbedienung oder berühren Sie das Setup- icon [ ] auf der benutzerschnittstelle. 24hr: Zeitanzeige im 24-Stunden-Format z.b.
-
Page 65: Rating (Jugendschutz-Sicherung)
DEUTSCH GERMAN SETUP SETUP audio Sie sollten so schnell wie möglich ein neues kennwort eingeben. ■ drc KennWort ändern Dynamikwerte der „Dolby Digital“-DVD-Discs einstellen. 1. bewegen Sie den Cursor auf die „Passwort“-Option, drücken Sie die Zifferntasten auf Ein: Verbesserung der Dynamik bei leiseren lautstärken. der Fernbedienung oder berühren Sie die „Passwort“-Option direkt auf dem bildschirm, Aus: normale Audio-Ausgabe. -
Page 66: Codeeingabe Des Diebstahlschutzes
■ merken Sie sich den Code gut, das Entsperren des gerätes ist kostenpflichtig und kann Auto: Der TFT-bildschirm öffnet sich automatisch, wenn das gerät eingeschaltet wird. nur von einer autorisierten ZEnEC-Servicestelle durchgeführt werden. manuell: wenn die Zündung abgeschaltet wird, bleibt das TFT bildschirm geöffnet, wenn er vorher geöffnet war. -
Page 67: Bitte Beachten
DEUTSCH GERMAN FEHLERSUCHE EQ (EQUALIZER) ■ Es muss nicht immer ein schwerer Defekt am gerät vorliegen. Sie können anhand der ■ Diese Einstellungsmöglichkeiten ermöglichen den klang nach eigenen bedürfnissen Problembeschreibungen das vorliegende Problem gegebenenfalls selber beheben. bestmöglich anzupassen. 1. eQ-setup-modus Problem ursache lösung... -
Page 68: Anmerkungen Zum Anschluss
DEUTSCH GERMAN FEHLERSUCHE ANSCHLüSSE anmerKungen Zum anschluss Problem ursache lösung ■ Dieses gerät ist nur in Fahrzeugen, die mit einem bordnetz mit +12V (DC) und minus Disc-wiedergabe gegen masse geschaltet sind, zu benutzen. bevor Sie dieses gerät in einem Pkw oder in einem lkw installieren, stellen Sie sicher, dass die batteriespannung korrekt ist, Disc kann nicht eingelegt Aktuelle Disc auswerfen und eine neue Disc... - Page 69 DEUTSCH GERMAN ANSCHLüSSE ANSCHLüSSE steuerleitung verBindungen handBremse-KaBel automatische helligkeitseinstellung ■ um eine zu helle bildschirmanzeige während der nacht zu vermeiden, schließen Sie das „illumi“-kabel an das Scheinwerfersteuerungskabel an. wenn Sie die Scheinwerfer einschalten, verdunkelt sich die hintergrundbeleuchtung des TFT-bildschirms und umgekehrt.
-
Page 70: Anmerkungen Zur Installation
DEUTSCH GERMAN EINBAU UND AUSBAU EINBAU UND AUSBAU anmerKungen Zur installation Armaturenbrett 1. Vor dem Einbau stellen Sie bitte sicher, dass die Anschlüsse korrekt verlegt sind und dass das gerät einwandfrei funktioniert. unkorrekte Anschlüsse können zu einem Schaden des gerätes führen. gummihülle 2. -
Page 71: Gerät Ausbauen
DEUTSCH GERMAN SPEZIFIkATIONEN EINBAU UND AUSBAU general aBdecKZierrahmen Reference Supply Voltage ..................12V (DC) Operating Voltage Range................10.5~15.8V (DC) ■ bringen Sie den Abdeckzierrahmen um die Frontabdeckung mit den zwei Einrückungen max Operation Current ....................10A aufwärts an. grounding System ................ Car battery negative Pole installation Dimension (wxhxD) ..........178mm x 50mm x (165+25) mm installation Angle ...................... -
Page 72: Vorsichtsmassnahmen Zur Benutzung Der Discs
DEUTSCH GERMAN video ANHANG normal Video input level (CVbS) ................1.0±0.2V regionalcode Video input impedance ....................75Ω Video Output impedance ....................75Ω Entsprechend der Verkaufsregion der DVD wird die ganze welt in sechs Regionen unterteilt. Video Output level ....................1.0±0.2V Eine DVD kann nur abgespielt werden, wenn ihr Regionalcode mit dem Regionalcode des gerätes kompatibel ist. - Page 73 Sehr geehrter kunde, verKaBelungs-anschlÜsse vielen Dank, dass Sie sich zum kauf dieses Produktes von ZEnEC entschlossen haben. wir bitten Sie, die Originalverpackung aufzuheben, z.b. für den Transport bei einem garantiefall. wenn Sie garantie-leistungen für dieses ZEnEC-Produkt beanspruchen, wenden Sie sich bitte direkt an den händler, bei dem das gerät gekauft wurde.
- Page 74 Country: ............................Si cet appareil ZEnEC requiert la mise en oeuvre de sa garantie, veuillez le retourner au revendeur qui vous l’a vendu, ou au distributeur agréé du pays d’achat. Ce produit ZEnEC est garanti contre tout défaut matériel, pièces et main d’oeuvre pour une période de DEux AnS après sa date d’achat.
-
Page 75: Model No
MODEL NO: ZE-DVBT1 0 1 CH DVB-T TUNER ZENEC · By ACR AG · Bohrturmweg 1 · Bad Zurzach · Switzerland...
Need help?
Do you have a question about the ZE-MC194 and is the answer not in the manual?
Questions and answers