Table of Contents
Advertisement
Advertisement
Table of Contents

Related Manuals for Yaesu FT-50


Summary of Contents for Yaesu FT-50
- Page 1 FT-5OR Dual-Band Amateur Hand-Held Transceiver with Digital Voice Recorder Option...
-
Page 2: Table Of Contents
Contents Memory-only Mode, Locking the Controls, T Description Tone Squelch Modes (CTCSS, DCS) Accessories and Options CTCSS or DCS Bell Paging Optional FTT-12 Keypad Tone/Code Scanning, DTMF Code Squelch/Paging Control and Connectors Programming/Selecting DTMF Paging Code Memories 37 Display Indications DTMF Paging Operation (receiving/sending page calls) 38 Specifications Trigger Paging, Auto-Respond Paging... -
Page 3: Description
Description battery The compact “clamshell” design mounts the on the rear, for optimum simplicity and portability. A multi-function knob with concentric volume control allows setting most functions, minimizing the need for complex key sequences. The front half of the case high-impact polycarbonate plastic, while the transceiver chassis/heat sink is die-cast alloy. - Page 4 served for decoding and displaying DTMF digits off- store tuning steps, tone selections, and transmit the-air. power level. Standard channel steps from 5 to 50 kHz, plus l-MHz steps, are available for tuning. You Also, DTMF-based selective calling and private pag- can assign 4-character names to memories.
-
Page 5: Accessories And Options
Check with your Ni-Cd Battery Chargers Yaesu dealer for changes to the above list. NC-50 Dual-Slot Rapid Charger CA-l 4 Charger Sleeve (required w/NC-50) NC-GOB/C Compact 15-Hour Charger (‘B’... -
Page 6: Optional Ftt-12 Keypad
See seal around the keypad periphery (no “pinching”). your Yaesu dealer for pricing and availability. m Replace the two screws removed from the slot behind the keypad, making sure the keypad and gasket fit evenly, without pinching. - Page 7 117-V AC, or with a “C” suffix for operation from be supplied with the transceiver. If you need a bat- 220-234-V AC. tery, contact your Yaesu dealer. We do not recom- mend using any other type of battery, and doing so NC-50 Dual-Slot Rapid Charger may affect your warranty.
- Page 8 Headset VC-23 VOX replace all four batteries, paying attention to the polarity indicated inside the case. MIC/EAR The VC-23 connects to the jack on the right side of the radio. It consists of a headband-supported To replace the battery case panel, align the two earphone and attached boom microphone, allowing notches at the bottom edge first, then press the top hands-free VOX (voice-actuated transmit) operation...
-
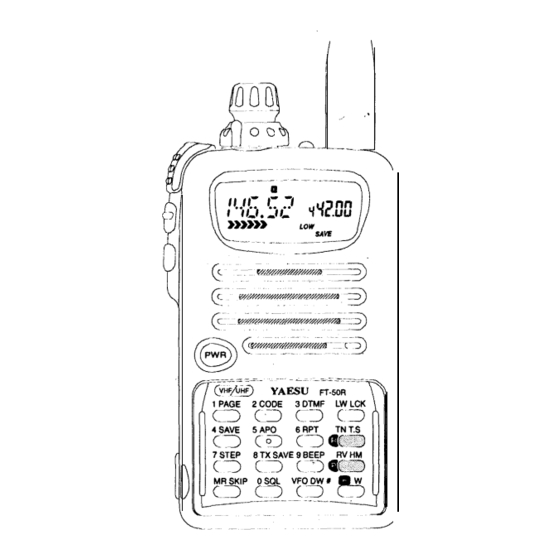
Page 9: Control And Connectors
Controls & Connectors & Front Panel @ The outer ring adjusts receiver volume, and the inner knob tunes, selects memories and other menu functions and settings. @ This LED glows red when transmitting, and green when the noise squelch is open (channel busy) dur- ing reception. - Page 10 The (lower) button illuminates the display LAMP when operating in the dark. @ This 4-mm coaxial jack accepts 5-13 VDC at 2A, via the E-DC-5B cable, to power the transceiver from an external supply. We recommend using this jack only with the optional cable. @ This Q-conductor, 3.5-mm mini phone jack pro- vides 8-R audio output and accepts microphone in- put (2-kQ) for using an optional earphone,...
-
Page 11: Display Indications
Display Indications HoME Channel CTCSS CTCSS Digital Page Code Enable Alt. Key Functions Active DTMF Autodial Rx Signal Strength DW SKIP T.PAGE CODE -------yL -..-_-..-_ -/IL, ..,._” __ I- . _-- .--- Auto Power Off ’ Weak Battery Voltage Memory Scan DTMF paging I..~w Battery ’... -
Page 12: Specifications
Specifications Receiver General Circuit type: Double-conversion superheterodyne Frequency range (MHz): 45.1 MHz & 455 kHz (transmit) IFS: 144 ~ 148,430 ~ 450 76 ~ 200,300 - 400 , (receive)* 0.16uV for 12 dB SINAD (VHF) Sensitivity: 400 ~ 540,590 ~ 999 0.18uV for 12 dB SINAD (UHF) (cellular blocked on 800 MHz) Adj. -
Page 13: Before You Begin
Before You Begin A Few Notes on Safety When properly cared for, the FT-S5OR should provide Never allow the charging terminals on many years of operating pleasure. However, please the battery to short - the ceils can be damaged and the heat generated can read the following items concerning its use: burn the skin! Battery Charging... - Page 14 RF Radiation Hazard Statement Exposure to Water In 1985, the US. Federal Communications Commis- While the FT-50R utilizes a water-resistant “clam- sion (FCC) adopted a safety standard for human shell” design with rubber o-rings to seal out moisture, exposure to Radio Frequency (RF) electromagnetic common sense must prevail...should the radio be- radiation generated by FCC-regulated equipment.
-
Page 15: Getting Started
Getting Started First Steps antenna Before operating the transceiver the first time: installation n Charge the battery pack completely (if using a rechargeable pack). If using an FBA-15 dry-cell battery case, install alkaline batteries as described on page 5. m Mount the battery pack on the back of the radio: hold it -‘t with the rounded top edge... - Page 16 Rotating the knob tunes in the default step size on Powering On the VFO, or else selects programmed memories dur- To turn the transceiver on, push in the orange ing MR (Memory Recall) operation. button for M second. If the radio has not been used before, the display should appear like that below.
- Page 17 Let’s start by setting the receiver squelch: Note - Pressing the knob with a menu active replaces a Hold (> 0.5 sec.) the knob down until the beep the function number (at the right in the sub display) sounds, then turn the knob (if necessary) to select with either a number (8), letter or abbreviation GIL -or-.
- Page 18 To indicate when several keys have to be pressed in The Keypad sequence, we show an arrow (-+) between them. Do The standard FTT-11 keypad permits quick access not press more than one key at time unless the to the most commonly-used transceiver functions. instructions say so.
-
Page 19: Adjusting The Volume
Tuning & Direct Frequency Entry Your first Q S O n Tune to the desired frequency using the inner knob: Adjusting the Volume press 8 at the lower right momentarily, and turn 0 Turn the outer ring of the knob on the top panel the knob to select the MHz range, then wait 5 control to adjust the volume. - Page 20 m Refer to the following table for power output vs. This angle of PTT switch actuation is designed to be battery type: ergonomically optimum when the radio is being held in the palm of your hand. watts) VHF/UHF Display PO Meter BUSY/TX When you transmit, the LED turns red, and...
-
Page 21: Basic Operation
Basic Operation MR (Memory Recall) LrH - I Frequency Selection Modes Use this to select and operate on stored memories. There are two frequency selection modes. These There are 100 memories, each of which stores re- affect the behavior of the knob and keys when tuning peater shift, transmit power level, tone settings, and or keying in frequencies, scanning coverage, and the tuning steps (for the Memory Tune mode), and can... -
Page 22: Sub Display Options, Tuning, Transmitting
Tuning Steps Sub Display Options The right side of the display (with the smaller digits) Channel (tuning) steps can be set to match the is referred to as the sub-display. It normally displays standard channel spacing in your region: typically 25 the channel selection for VFO B;... - Page 23 last longer and you cause minimum interference by fl Press it momentarily again, then press the PTT to using the lowest level possible. save the entry and exit (@a now appears at the top of the display). Note that if you decide to change the power settings on a memorized channel, you must first re-load that memory (otherwise it reverts to the original memo- rized power level the next time it is recalled).
-
Page 24: Extended Recption, Wfm Sql, Auto-Mode Select
WFM Squelch Setting t:E;m. -313- Extended Reception The default squelch threshold for WFM (wide band- Introduction width FM) is preset to 0 (recommended for broadcast reception). To change this setting: In addition to amateur band operation, the FT-50R offers extended receiver tuning and scanning. This m While tuned to a FM or TVbroadcast band, hold the feature may not be available in all countries and all knob down for % second, then turn it to select... -
Page 25: Rx Mode Override, Repeater Operation, T X Offset
ARS-Repeater Subbands If you would like to disable the auto-mode selection: Version A fl Hold the knob down for M second, then turn it to ,451 146.6 146. 6 ~- , r+ , 146.4 14e.* r;'4y+'4i.4 "pi". select fV?Cf fl - 3 I - . ,4~~,wwan Version m Press it again to display the default setting, then rotate the knob to select on or oFf: (reception de-... -
Page 26: Repeater Shift, Input Track, Input Monitor
RPTR-0ti- f3PTL -w Repeater Input Track Repeater Shift If you would like to view the repeater input frequency When a repeater shift is active, either CI or 13 ap- pears in the display. If neither appears when tuned to along with the output, and have it track as you tune a repeater output frequency, you can activate the channels, this can be done using the sub-display: shift manually:... -
Page 27: Memory Operation
Memorv Otxxation MR (Memory Recall) Storing and Displaying Memories When you store a memory, the current tuning step, Pressing “!l* changes from VFO to MR (memory displayed receive frequency, repeater shift, transmit- recall) operation. The memory number appears at ter power level, DCS, and CTCSS tone settings are the right, and the receive frequency to the left (unless copied into a memory slot. -
Page 28: Mr-+Vfo, Home Memory, Custom T X Offset, Mt
MR -> VFO (copying a memory into a VFO) fl Press and ho/d the Pl”7’ switch while pressing ?I momentarily (this does not key the transmitter). Or After storing memories, you may want to copy one course, if you’re storing this in the HOME channel, back to a VFO. -
Page 29: Scanning, Scan Resume Modes, Skip Scan, Lamp
!mbi m Press the knob M second, then turn it to nE srf Scanning - ff - . Press it again momentarily to display the current setting (5 or I: R f r ), Before scanning, ensure the squelch is closed. You can scan either stored memories, or each VFO at the Turn it to choose the desired setting, and press the selected tuning step. -
Page 30: Pts (Preset Tuning And Scanning)
PTS (Preset Tuning and Scanning) You can set the transceiver to tune or scan on/y Channel Resolution for PTS Limits within a preset band. Ten special memories (which Although you can tune and scan in the default chan- form five preset pairs when programmed) are avail- step size during PTS operation, you can only able for PTS operation. -
Page 31: Advanced Operation
Advanced Operation M/M Dual Watch Dual Watch OW To set up M/M dual watch: Dual watch receives on the main channel while checking for stations on the sub channel. If activity is m Store a frequency that you want dual watch to detected, operation shifts there while the signal is check in memory t 14 - I- . -
Page 32: Naming Memories
Naming Memories NFWE - 03 - sub channels briefly switch as this occurs). For VN dual watch, the sub channel is sampled much faster You can assign a name of up to 4 characters to (every 200 ms), and this checking is “transparent” to memories, and have it displayed with name or fre- the operator. -
Page 33: Memory Masking 3
Memory Masking You can mask stored memories from selection and display. Stored data remains and can be restored, until you overwrite it or reset the CPU. You can also - . - - . . _ ” _ . ___ -2 restore unused memories, in which case you will find they are set to the bottom edge of the band. -
Page 34: Memory-Only Mode, Locking The Controls, T Xtot
Locking the Controls L 13 E I{ - II- Memory-Only Mode This allows operation only on stored memories, The keypad buttons, knob and PTT can each be which are displayed by name (if any) at the left, and “locked” (disabled), to prevent inadvertent transmis- the memory channel number to the right. -
Page 35: Tone Squelch Modes (Ctcss, Dcs)
To activate CTCSS or DCS operation, press a: Tone Squelch Modes 88 (encode) appears when the CTCSS tone gener- These systems allow silently monitoring until a call ator is activated for transmission only. directed to you is received, and offer privacy on an otherwise busy channel. -
Page 36: Ctcss Or Dcs Bell Paging
CTCSS or DCS Bell Paging W BELL - 18- CTCSS/DCS settings are stored in each memory along with other data. To change a programmed Bell Paging adds an alert ringer to CTCSS and DCS tone/code or state, recall the memory, change the tone squelch operation, for added convenience. -
Page 37: Tone/Code Scanning, Dtmf Code Squelch/Paging
Tone/Code Scanning (CTCSWDCSj DTMF Code Squelch/Paging Modes DTMF (Dual-Tone, Multi-Frequency) encoding and When using CTCSS tone squelch (FTT-12 required) decoding allow paging and selective calling using or DCS, you can have the radio scan through the 3-digit codes transmitted as DTMF sequences. Your tones or codes to determine which one is present on receiver remains silent until it receives three DTMF a received signal. - Page 38 memory C, which automatically displays the identity Now, with your 3-digit squelch code stored, you can of the calling station. activate DTMF Code Squelch operation: Group Call - You can receive paging calls for up to g Press CL”,-+‘??, then ‘I!? again until appears six other groups (paging codes match one of those at the display bottom.
-
Page 39: Programming/Selecting Dtmf Paging Code Memories
Select Code Memories for Operation Programming DTMF Paging Code Memories In the previous step, you entered your private paging Before using DTMF Paging, you will need to store ID in code memory P, along with other group codes your ID code in Code Memory P to receive private in memories l-6. -
Page 40: Dtmf Paging Operation (Receiving/Sending Page Calls)
You can still find out who called your group or friend, DTMF Paghg Operation remember that code memory C (read-only) always Receiving DTMF Paging Calls PAGE holds the ID of the station sending the page call. This time, you must recall it manually (it only appears The only difference between receiving private and automatically for private calls). -
Page 41: Trigger Paging, Auto-Respond Paging
T.PAGE To send a page call: When a call is received, blinks, and the alert ringer sounds. If the other station @also using trigger fl Press &“,-->E and turn the knob to select (dis- paging, you can respond by just pressing the PTT play) the code memory of the station you want to and talking within 3 seconds after the DTMF code page. -
Page 42: Paging T X Delay, Playback Speed, Paging Bell
the PTT and transmission of the first DTMF code To enable auto-respond paging: digit. Set it to IS0 ms or IDOEf ms if operating fl Recall Pf?ti E - ?I- , press the knob momentarily, through a repeater that cuts off the first digit. then turn it to select RzJ!: . -
Page 43: Arts (Auto Range Transpond System) 4
If you move out of range for more than one minute ARTS Auto Range Transpond System (four pollings), your radio senses that no signal has This system uses DCS signaling to inform you when been received, three beeps sound, and RRfJG you and another ARTS-equipped station are within b/inks. -
Page 44: Arts Modes, Cw (Morse Code) Ider
mn-i5i- CW ID (Morse Identifier) with your operating frequency at the right, and with @B# blinking. The CW IDer sends your CW ID about once every 16 - - - pollings during ARTS polling and DTMF answer-back m To cancel ARTS operation, press &!I, and then paging (covered later). -
Page 45: Arts Polling Speed, Beeper, Dtmf Autodial Feature
ARTS Polling Speed DPMF Autodial Feature Eight autodial memories each store DTMF tone se- You can increase the ARTS polling rate, to have the quences of up to 16 digits for remote DTMF control, radio check propagation state more frequently, such or telephone numbers for autopatch calls. -
Page 46: Autodialer Playback, Dtmf Decoder
cfl Hold err, for %-second, then press any numbered If you make a mistake, hold the knob for %-second to clear all entries for that memory and re-enter all the key to display and play that DTMF memory. Turn d i g i t s , the knob to review each stored digit. -
Page 47: Digital Voice Recorder, Microphone Recording
To partition the voice memory recording time: Digital Voice Recorder (requires FTT-12) The FTT-12 includes a digital voice recorder that m Hold the knob down for % second, then release stores one or two messages up to 20 seconds long. and turn it to display P T 1 If - 78 - . -
Page 48: Spkr. Playback, Rx Rec., T X Playback, Record Protect
Speaker Playback Transmitter Playback m To play back a message recorded as REL’ or You can manually play back any recorded messages over the air. You can hear them through the speaker RE[ I, hold fl for M second. The left side of the during transmission. -
Page 49: Vmps (Voice Mail Paging System)
ri Activate DTMF paging or Trigger paging VMPS (Voice Mail Paging System) The DTMF Paging and Automatic Recording ca- pability of the FTT-12 keypad may be utilized to rj Hold the Knob for l/2 second, then release it and allow the storage of “Voice Mail” in an FT-50R turn it to display PRG E - 7 1 - . -
Page 51: Addendum
Addendum Once it turns off, you must switch the radio back on Extending Battety Life for use. If you need to monitor for a long period, or if Operating time depends largely on b&x duty cycle, using an external DC supply, you can deactivate and how you care for the battery pack. - Page 52 Tr;fWis- BEEP- 13- Beeper Disable Transmit Battery Saver Always use the lowest transmitter power necessary The keypad beeper draws several milliamperes, so to maintain reliable communications (this may be the you may want to disable it if you need to conserve law in your country).
- Page 53 Lamp Illumination Modes uwf -a?- Battery Care The (lower) LAMP button illuminates the display As the battery discharges, the voltage drop (espe- when operating in the dark. By default, it lights for 5 cially when transmitting) increases. When battery seconds, but you can change it so that it lights (for 5 voltage drops to around 4.0 volts, C 41 blinks at the seconds) every time a key is pressed or the knob bottom right of the display, indicating the batteries...
-
Page 54: Packet Radio
Packet Radio To use the radio for packet, the receiver battery saver should be disabled (see page 49), since the “sleep” periods used in power saving can cause packets to be missed. Construct a TNC interface cable as shown in the MICIEAR drawing, and connect the jack to your TNC. -
Page 55: Cloning
Cloning You can copy all memories and settings from one If successful, c L Cf!J reappears on both displays. radio to another of the same type, as follows: Otherwise, E ERR appears, indicating an error oc- curred (see box). m Set the squelch threshold level (5 0 L - 0 I- ) to below /-J Restore the original squelch threshold level, as if necessary. -
Page 56: Customizations, Mon Switch, Rv/Hm Key
C u s t o m i z a t i o n s I m,w1- MM RE1: c? Key Function 1; E 3 - Z 1 !! 0 f3 T L’ f?L MON Switch Function By default, pressing &?I reverses ‘repeater shift By default, pressing the middle switch on the left side (tx/rx frequencies), while pressing c!?$-@? of USA version transceivers disables the receiver... -
Page 57: Appendix
Appendix ) I PR5E I?: 1 FTISOR Menu Function Table Pager settings Menu # Function /??I# 28 Digital record time page RPRT I?5 Record protect E;w”L ot Receiver squelch threshold Kl;w”L 3il T::Pu” 02 Wide-FM squelch threshold TX power level n::u”3 31 ::nr:L: If3 Auto Rx mode select... - Page 58 1 u ‘B Recall/select DTMF code , and C. memories l-6. P i ‘??s 1 43 Activate DTMF autodialer. 1 Select Rx battery saver feature. 1 49 r”-, Enable/disable APO SAP0 ( auto power off) feature. Select simplex or duplex (+/- T offset) operation.
- Page 59 CAUTION ! Changes or modifications to this device not expressly approved by Yaesu Musen could void the user’s authorization to operate this device. *_*____._.__*____.______________________-.**.-----.. ,..__.__.___________.-.--.*.---*----.-..---. ‘. 1 . C h a n g e s o r m o d i f i c a t i o n s t o t h i s d e v i c e n o t e x p r e s s l y a p p r o v e d b y Y a e s u Musen could void the user’s authorization to operate this device.
- Page 60 Y A E S U Peformance without compromise.SM YAESU MUSEN CO., LTD. l-20-2 Shimomaruko, 0%.Ku, Tokyo 146. Japan YAESU U.S.A. Copyright 1996 17210 Edwards Rd., Cerritos, CA 90703, U S A. YAESU INTERNATIONAL DIVISION, (Caribbean. Mexico. Central 8 So America) Yaesu Musen Co., Ltd.
- Page 61 This document was scanned with a Epson 636U scanner with using PaintShop Pro and converted into PDF with Adobe Acrobat 4.0 . The contents of this manual is copyright Yaesu Musen Co. For a printed copy of this manual go to http://www.yaesu.com or email yaesuparts@yaesuusa.com...
Need help?
Do you have a question about the FT-50 and is the answer not in the manual?
Questions and answers