Table of Contents
Advertisement
Quick Links
Advertisement
Table of Contents

Related Manuals for COMPRO COMPROPVR2

Summary of Contents for COMPRO COMPROPVR2
- Page 1 ComproPVR 2 User’s Guide Compro Technology, Inc. www.comprousa.com...
- Page 2 Copyright © 2001-2005. Compro Technology, Inc. No part of this document may be copied or reproduced in any form or by any means without the prior written consent of Compro Technology, Inc. Compro, VideoMate, Poladyne, Play with Power, and the Compro logo are trademarks of Compro Technology, Inc.
-
Page 3: Table Of Contents
Table of Contents Table of Contents 1 Introduction ..............1 Key Features..............2 Installation ..............4 Updates................ 4 Remove the Software........... 4 2 Remote Control ............5 Definitions and Usage..........5 3 ComproPVR User Interface ........9 Control Panel ............... 9 Configuration.............. - Page 4 ComproPVR User's Guide Why does the remote control fail? ......49 Why does ComproPVR start by itself? ....50 Contacting Compro Technical Support ....50...
-
Page 5: Introduction
Introduction Introduction ComproPVR is a complete digital entertainment solution for your PC. Watch and record TV programs on your PC, in full-screen mode or in a window. Timeshifting lets you watch TV, pause live TV, or review your favorite scenes without missing a minute of the program. -
Page 6: Key Features
ComproPVR User's Guide Key Features Watch and record TV programs. Supports all TV channels. View all available TV programming. Never miss a second with Timeshifting. Powerful and easy to use schedule recording functioning. Capture video from analog video sources and encode them to digital MPEG-1, MPEG-2 or MPEG-4 formats. - Page 7 Introduction channel. Auto splitting of recording files. Support for plug-in CODECs. Auto tune for best picture quality frequencies. Parental control to lock out selected channels. Note ComproPVR cannot duplicate VHS tapes and DVDs protected by Macrovision™ technology.
-
Page 8: Installation
“setup.exe” in the folder named ComproPVR. ComproPVR will be installed right away. Updates User satisfaction is the first priority for Compro Technology. Your opinion is crucial in improving our products. Therefore, Compro Technology is continuously improving our products. You can download the latest version of ComproPVR from our website at http://www.comprousa.com/... -
Page 9: Remote Control
There are different kinds of remote controls. The following illustrate one of the kinds only. Please refer the product installation guide for more information. The Compro remote control cannot be reprogrammed to control other appliances such as your VCR or satellite decoder box. - Page 10 ComproPVR User's Guide...
- Page 11 Remote Control Number ComproPVR Function Number keys Mute sound Zoom In/Out (Full Screen) Start/Stop ComproDVD (if available) Start/Stop ComproFM (if available) Start/Stop ComproPVR Replay Pause when playing MPEG files or enable timeshifting when watching live TV Advance Jump to previous channel Stop MPEG file playback or stop timeshifting mode Tab function in play list...
- Page 12 ComproPVR User's Guide...
-
Page 13: Compropvr User Interface
ComproPVR User Interface ComproPVR User Interface Control Panel The ComproPVR control panel resembles the controls on a VCR. Keep in mind that not all options are available at all times, and may be grayed out or inaccessible depending on your hardware setup and TV services available. - Page 14 ComproPVR User's Guide Icon HotKey Description Enable/Disable Always-on-Top function for TV window.(Oregon circle on the upper-right corner of the TV window) Sleep function Note: Language select is only available while the program supports it. Watching After installation, just press the PVR/TV button on the remote or double click the ComproPVR icon on the desktop you will be able to watch TV.
-
Page 15: Configuration
ComproPVR User Interface Configuration Click on the Options button to open the Options dialog box. Channel Options... - Page 16 ComproPVR User's Guide Follow these steps to customize and configure your channel list. Video Source First, select your video source, Cable or Antenna. Autoscan The first time you start ComproPVR, Autoscan will automatically scan for available TV channels for both Cable signal and Antenna signals.
- Page 17 ComproPVR User Interface Step3. Repeat steps 1 through 2 for any other channels you wish to rename. Step4. Click OK to confirm your modifications. Note If you enable the checkbox of “Clear Description field while Autoscan,” then the text in the field will be erased while Autoscan.
- Page 18 ComproPVR User's Guide Step2. Click on the Password button and enter the new password in the fields labeled Password and Confirm. Step3. If you previously set a password, you must also enter the old password in the appropriate field. Step4. Click on the OK button. Change Password Click on the Password button.
- Page 19 ComproPVR User Interface My Favorite Channels List ComproPVR includes a channels sorting and re-ordering feature. Check the “Use My Favorites as My Channel Lists” checkbox. You can see the window below. Select the channel you wish to add to my favorite and press the proper arrow button.
-
Page 20: Video/Audio Options
ComproPVR User's Guide Video/Audio Options Source Select the video source from among TV, S-Video, or Composite. Also you can click the button on the control panel to switch video sources. - Page 21 ComproPVR User Interface Preview Video Size ComproPVR supports the resolution from 160*120 to 720*480 for NTSC and from 160*120 to 720*576 for PAL. You can choose the resolution here. Note This influences the snapshot resolution. Country/Region Use the pull-down menu to select the country you are in. This allows ComproPVR to use the correct set of frequencies for TV tuning.
- Page 22 ComproPVR User's Guide Contrast: Adjusts the gradation of tone between the image highlights, mid-tones, and shadows. Saturation: Adjusts the color intensity of the image. Sharpness: Adjusts the sharpness of the image. Press the Default button to reset the sliders to their original positions.
-
Page 23: Recording Options
ComproPVR User Interface Recording Options Path (Recorded Programs Folder) Click on the button to set the folder where recorded programs are stored. Check that you have ample disk space to store recorded programs. - Page 24 ComproPVR User's Guide Quality Here you can select the video and audio quality settings of recorded programs. ComproDTV includes useful quality presets, from VCD to DVD-quality. However, Custom settings may not be compatible with standard formats. Use it with caution You can also use custom settings by following these steps.
- Page 25 MPEG-4 and DiVX CODECs. In addition to the CODEC supplied by Compro, ComproPVR can use third-party CODECs that are already installed on your system. Select “Use Customer Encoder” in other to use third-party CODECs.
- Page 26 After installing the CODEC software, you will see the MPEG-4 format appear in the field of recording quality. Compro does not guarantee compatibility or performance with third-party CODECs. Performance You can choose the encoder performance here. The better you choose, the picture quality will be better.
-
Page 27: Timeshifting Options
ComproPVR User Interface Timeshifting Options Buffered Time Set the amount of programming that is stored, or “buffered” during Timeshifting. It also shows the total recording time available. Do not set the Buffered Time to consume all free disk space. - Page 28 ComproPVR User's Guide Path (Buffer file storage location) Choose the folder where the Timeshifting buffer file is stored. Choose a folder in a disk partition with ample free disk space. See the video format table for estimates of the amount of disk space needed. Quality Choose the recording quality used during Timeshifting.
-
Page 29: User Interface
ComproPVR User Interface User Interface Path (Snapshot file storage location) Choose the folder where the snapshot pictures are stored. Choose a folder in a disk partition with ample free disk space. See the video format table for estimates of the amount of disk space needed. - Page 30 ComproPVR User's Guide File Type (Snapshot file type) Choose the snapshot file type. There are BMP and JPEG format available. If you choose JPEG format, you can also adjust the JPEG Compression Quality on the bar of right side. Channel Surfing Choose the number of channel surfing.
- Page 31 ComproPVR User Interface the TV picture. ComproPVR, on the other hand, can show you the entire picture, including the "green line." OSD (On-Screen Display) When you select the checkbox next to enable OSD, channel information such as channel numbers, channel names, and audio quality will be displayed as you switch channels.
-
Page 32: System Devices Options
ComproPVR User's Guide System Devices Options Video Device Please refer the product manual for more information about it. If you don’t see the device name here, then you didn’t install the device driver properly. Please refer the trouble shooting section in the product manual. - Page 33 You can download the latest update from our website. Many issues may be solved on the newer version. If you click on the E-mail Info button, ComproPVR will attempt to e-mail this information to the Compro Technical Support team. ( support@comprousa.com...
- Page 34 ComproPVR User's Guide When you contact the Compro Support team about a problem, please write enough details to help us determine the problem. Please also provide the product serial number (19 digits numbers) on the PCI TV tuner card. You can submit your problem in the support form provide by our website.
-
Page 35: Using Compropvr
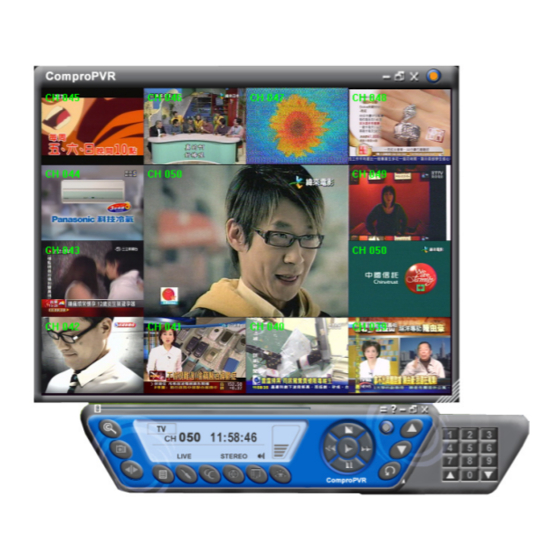
The keyboard shortcuts Page Up and Page Dn, and the Compro remote control can also be used. Jump directly to the desired channel by using the number pad on your keyboard or remote control. - Page 36 ComproPVR User's Guide Channel Surfing While watching TV, the channel surfing feature displays a 4x4 grid of channel images to give you an overview of available programming. To start the channel surfing feature, press the Channel Surfing button on the ComproPVR control panel. Thumbnail images will begin to appear in the display window.
- Page 37 Using ComproPVR Right-Click Mouse Menu If using mouse to right-click on the TV screen, you can see the menu below. There are many useful options for your convenience. Zooming image If you like to see more detail on the part of video image, you can press the mouse right button to drag a zone of the screen.
-
Page 38: Recording
ComproPVR User's Guide Recording ComproPVR is a digital video recorder. ComproPVR can record full-motion video and audio from your video source and save it to your hard disk. ComproPVR supports MPEG-1, MPEG-2, MPEG-4 encoding, which saves disk space while providing high video quality. To instantly start recording: 1. - Page 39 Using ComproPVR Video File Formats Table Video Audio Typical Screen Bit Rate Bit Rate Disk Format Size (Mbps) (Kbps) Usage NTSC DVD 720*480 3 GB/hr NTSC 352*480 1.7 GB/hr 1/2-DVD NTSC 352*240 1 GB/hr 1/4-DVD NTSC VCD 352*240 MB/hr NTSC SVCD 480*480 1 GB/hr NTSC PC...
-
Page 40: Scheduled Recording
ComproPVR User's Guide Scheduled Recording ComproPVR can be scheduled to record a TV program later or remind you of an upcoming program. The schedule can be set for a one-time or a recurring session. You can repeatedly record any regularly scheduled programming. - Page 41 Using ComproPVR Event Information: Shows details about your recording schedule. Scheduled Recording Settings You can see the following after clicking Create. Event Name: Type the event name. The saved recording file will also use this name. If you leave this field blank, ComproPVR will automatically create the Event Name and file name.
- Page 42 Start Time: Check this box to add the start time to the names of the recording files. Power Up Scheduling feature If your hardware supports Compro Power Up Scheduling, ComproPVR can wake your PC from the Shutdown (ACPI:S5) or Stand by (ACPI:S3) states.
- Page 43 Using ComproPVR wake up the computer from Shutdown or Stand by states for scheduled recording. This option is available only if your hardware supports Power Up Scheduling. Power Up will start your computer 5 minutes in advance of the scheduled time. If you set schedule to 4 o’clock, Power up will wake up your computer at 3:55.
- Page 44 ComproPVR User's Guide There are three fields in the Automatic Logon window. User: ComproPVR will detect your current user name automatically. Unless you wish to logon by a different user, there is no need to change it. Password: Type in your password. Domain: ComproPVR will automatically detect your Windows Domain name, if any.
- Page 45 Using ComproPVR showing the program without recording it. Video Source: Select video source from CATV or Antenna. Channel: Select the channel you want to record. Audio mode: Select the audio source you want to record. Mute speakers while recording: Check this box to mute speakers while recording.
-
Page 46: Timeshifting
ComproPVR User's Guide Timeshifting Timeshifting lets you pause, replay, or skip commercials during live TV, without interrupting an ongoing recording session. Timeshifting gives you absolute control over how you watch television, like never before. For example, you watch your favorite sporting event, pause the live action and help yourself to an ice-cold beverage from the fridge. - Page 47 Using ComproPVR Additional Discussion In timeshifting, you are recording to and playing back from the same video file or buffer. You can playback from various locations in that buffer. Similar to video playback, you can pause, fast-forward, and rewind. A major difference, however, is that ComproPVR is simultaneously recording live television.
-
Page 48: Still Image Capture
ComproPVR User's Guide Still Image Capture Click on the capture icon on the control panel or hit the "Space Bar" of the keyboard shortcut to capture an image of the display window. You can see the screen capture dialog as below. Click on the Shoot to take another shot. -
Page 49: Playback
Using ComproPVR Playback ComproPVR can play recorded video files. Press the Play button to open the Play dialog box. Highlight the file name in the program list, double-click or press Play to start playback. During playback, the display area of the control panel provides information about currently playing program and provides playback control functions. - Page 50 ComproPVR User's Guide...
-
Page 51: Troubleshooting
Troubleshooting Troubleshooting OS requirement ComproPVR 2 has to work on Windows XP / Windows 2000 or above OS. It’s recommended to www.WindowsUpdate.com website for the Service Pack update of Microsoft. Driver Installation The most common cause of problems with ComproPVR is incorrect installation of TV Tuner product drivers. -
Page 52: No Audio On The Recorded File
ComproPVR User's Guide Please refer to your hardware installation guides for more information. No audio on the recorded file This may be a result of choosing the wrong record audio source in the System Device in ComproPVR Settings. If you are using an external audio patch cable, verify that it is connected between the Audio-Out of TV tuner card and Line-In of your sound card and that you selected the audio source to be “Line-In.”... -
Page 53: Why Can't I Choose Mpeg-4 Format For Recording?49
Troubleshooting applications while recording or use a lower recording resolution, such as VCD or SVCD formats. Why can’t I choose MPEG-4 format for recording? If you would like to record video in MPEG-4 format, you must supply your own MPEG-4 CODEC. Furthermore, the CODEC must be installed before using ComproPVR. - Page 54 Many issues should be solved on the newer version. When contacting Compro for technical support, please use the Compro support request form and provide as much of the requested information as possible. Please write the details in order to determine the problem. And also provide the product serial number (19 digits numbers) on the PCI card.
- Page 55 Troubleshooting In order to solve the problem quickly, it is very important to provide as much detail regarding the problem as possible.
Need help?
Do you have a question about the COMPROPVR2 and is the answer not in the manual?
Questions and answers