Table of Contents
Advertisement
Advertisement
Table of Contents

Related Manuals for DigiTech TIME BENDER


Summary of Contents for DigiTech TIME BENDER
- Page 1 Master Time, Space, and Dimension Owner’s Manual...
- Page 2 IMPORTANT SAFETY INFORMATION WarnInG for your ProtectIon reaD tHe foLLoWInG: KEEP THESE INSTRUCTIONS HEED ALL WARNINGS FOLLOW ALL INSTRUCTIONS the symbols shown above are internationally accepted symbols that THE APPARATUS SHALL NOT BE ExPOSED TO DRIPPING OR SPLASHING LIqUID warn of potential hazards with electrical products. the lightning flash AND NO OBjECT FILLED WITH LIqUID, SUCH AS vASES, SHALL BE PLACED ON THE APPARATUS with arrowpoint in an equilateral triangle means that there are dangerous...
- Page 3 February 24, 2009 place. replacement fuse covers can be obtained from your local retailer. replacement fuses are 13 amps and european contact: Your local digitech sales and service office or must be AstA approved to Bs1362. harman music Group...
- Page 4 Warranty We at DigiTech® are very proud of our products and back up each one we sell with the following warranty: 1. The warranty registration card must be mailed within ten days after purchase date to validate this warranty, or you can register via our website (www.digitech.com).
-
Page 5: Table Of Contents
Congratulations! Table of Contents Introduction ....................1 Included Items ...................1 Features ....................2 Guided Tour - Front Panel ................3 Guided Tour - Rear Panel ................8 Tutorial ......................10 Make Connections ................10 Set Up the TimeBender ..............11 Create a Basic Digital Delay ..............11 Try a Different Pattern ...............11 Change the Multiplier Value ..............12 Set the Key by Strumming a Chord ...........12 Set the Tempo by Strumming with Muted Strings ......12... - Page 6 Table of Contents Dynamic Digital .................19 Dynamic Analog ................19 Dynamic Repeats ................19 Time Warp ..................19 Reverse ....................20 Envelope ....................20 Looper ....................20 Voicings .....................21 Scalic Voicings ...................21 Triad-Centered Voicings ..............22 Fixed Shift (Chromatic) Voicings ............22 Random Voicings ................22 Time Patterns ....................23 Simple Delay ..................23 Dual Delay ..................23 Multi-tap Pattern Delay ..............23...
-
Page 7: Introduction
® delay! The DigiTech TimeBender is a new kind of delay pedal. It completely rebuilds the idea of delay and what it can add to your performance. It has an entire pedalboard worth of different kinds of delays built right into it: Digital, Analog, Variable Speed and Moving Head Tape, plus several more. -
Page 8: Features
Introduction Features • Five seconds of true stereo delay. • Selectable voicings, for musically intelligent arpeggios and harmony-based delays. • Set tempo, key, and even time patterns just by strumming your guitar. • Strum Pattern allows you to easily create and save custom delay patterns on the fly. -
Page 9: Guided Tour - Front Panel
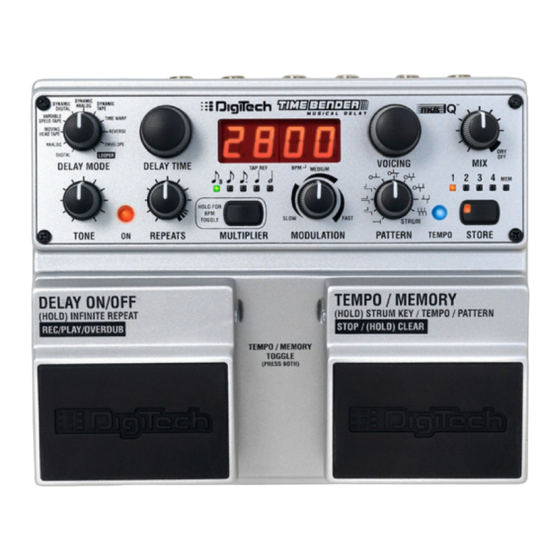
Guided Tour - Front Panel DYNAMIC DYNAMIC DYNAMIC ANALOG DIGITAL REPEATS VARIABLE TIME WARP SPEED TAPE MOVING REVERSE HEAD TAPE ANALOG ENVELOPE DIGITAL LOOPER VOICING DELAY TYPE DELAY TIME TAP REF MEDIUM 1 2 3 4 17 1 HOLD FOR SLOW FAST TOGGLE... - Page 10 Guided Tour - Front Panel When you turn the Voicing knob, the display shows the currently selected voicing. If the Voicing knob is untouched for two seconds, the display goes back to showing the current delay time. The display also shows the selected delay when you turn the Delay Type knob.
- Page 11 Guided Tour - Front Panel Memory Location LEDs The Memory Location LEDs indicate which memory location is currently loaded. To make it easier to see at a glance which memory location is being used, all LEDs up to and including the currently loaded location are illuminated. When no memory LEDs are illuminated, no memory location is loaded, and the TimeBender is set exactly how the controls, LEDs, and (optional) expression...
- Page 12 Guided Tour - Front Panel When Time Warp is selected, the Modulation knob adds synchronized pitch vibrato to the delay signal in three different sync ranges. Multiplier Button The Multiplier button changes the repeat rate by a fixed multiple or sub-multiple of the quarter note reference delay time (up to a maximum of five seconds;...
- Page 13 Guided Tour - Front Panel Delay On/Off Footswitch The Delay On/Off footswitch turns the delay effect on and off. When the delay is off, your guitar signal is never digitized, so your tone is preserved. If any repeats are being heard when the delay is turned off, the repeats fade out instead of silencing instantly.
-
Page 14: Guided Tour - Rear Panel
Guided Tour - Rear Panel 9VAC 1300mA POWER 1 1 1 1 2 2 2 2 3 3 3 3 4 4 4 4 5 5 5 5 6 6 6 6 Left (Mono) Input If you have separate left and right inputs, connect your left input to this jack. If you’re using a mono input/stereo output configuration, connect to this input if you want the delays to “ping-pong”... - Page 15 Guided Tour - Rear Panel is selected, the left button takes you directly to overdubbing. Connect or disconnect the optional FS3X footswitch only when the TimeBender is turned off. Expression Pedal Input Connect a mono (tip/sleeve) passive expression pedal to this input to morph between two different delay settings.
-
Page 16: Tutorial
Tutorial This section walks you through some basic functions and helps you get familiar with the controls. It also gives you an idea of what the TimeBender is capable of. This Tutorial uses the Mono In/Mono Out setup, as shown below. Make Connections Before connecting the TimeBender, make sure that the power to your amplifier or P.A. -
Page 17: Set Up The Timebender Tm
Tutorial Set Up the TimeBender Before you begin the tutorial, follow these steps to set up the TimeBender Make sure your guitar is in tune using a tuner set to A-440. Set the right footswitch to advance the memory locations. To do this, step on both footswitches so that the Memory Indicator LED is lit. -
Page 18: Change The Multiplier Value
Tutorial Change the Multiplier Value Press and release the Multiplier button one time, so the half note is selected. The delay time shown in the display should now be 1.000. Play a single note. Notice how the repeats take twice as long as they did when the quarter note was selected. -
Page 19: Set The Repeat Pattern By Strumming (Smart Strum)
Tutorial Tempo LED blinks in time with the tempo of your strumming, and the display shows G. (Minor keys are indicated by a dash after the note in the display.) Note: The outputs are muted while setting key and tempo by strumming. Set the Repeat Pattern by Strumming (Smart Strum) Turn the Time Pattern Knob to the last position to select the Strum pattern ( Str). -
Page 20: Change The Delay Type
Tutorial Change the Delay Type Turn the Delay Type knob to Analog. Play a single note and notice how the repeats gradually decrease in fidelity. Add Modulation Turn the Modulation knob to the 12 o’clock position. Play your guitar and listen to the chorus-like effect applied to the repeats. Store the Current Settings to a Memory Location Press the Store button. - Page 21 Tutorial When recording your loop, you hear what is actually being recorded. The only effect that you hear before recording is the pitch shift (so you can record a bass line and then a regular guitar line, for example). That means you won’t hear the mix, modulation and tone effects until the loop is being played back since they are applied after record- ing.
-
Page 22: Using An Expression Pedal
Tutorial position), the display will read Loop and the loop memory will be cleared. Recording a Loop To begin recording a loop, start playing your guitar as you press and release the left footswitch. The display will begin to count down the available recording time, and the On LED will turn red. -
Page 23: Using The Envelope Delay Type
Tutorial Plug your expression pedal’s standard 1/4” connector into the Expression Pedal input on the back of the TimeBender Delay. Set the expression pedal to the minimum (heel) position. Adjust the controls on the TimeBender to get a starting sound that you like. Step forward on the expression pedal to put it into the maximum (toe) position. -
Page 24: Delay Types
Delay Types The TimeBender includes 11 different delay types. Some recreate classic delays that have remained popular for decades, while others (like Dynamic Repeats and the TimeBender’s unique Envelope) are totally new, ready for you to try them out for the first time. -
Page 25: Dynamic Digital
Delay Types physical tape. When changing delay time, you’ll hear the pitch of the delayed signal change in exactly the same way as if you had changed the speed of a real tape recorder—the pitch shift amount will depend on the difference between the speed that the delayed signal was recorded at and the new speed. -
Page 26: Reverse
Delay Types Reverse ( The Reverse delay type records the input signal in “chunks” with a length equal to the current delay time setting, and then plays these sound segments back in reverse. Unlike other reverse effects in which the chunks are arbitrary, the TimeBender starts chunks at note onsets where possible in order to avoid having notes cross chunk boundaries. -
Page 27: Voicings
Voicings Voicings (Pitch-shifted Repeats) One of the most exciting features of the TimeBender is its ability to change the pitch of the delayed signals. When the voicing is set to Unison (U), the delayed signal has the same pitch as the guitar input, just like with traditional delay pedals. But with the TimeBender, you can change the delays’... -
Page 28: Triad-Centered Voicings
Voicings Triad-Centered Voicings Note: the triad-centered voicings are very similar to the scalic voicings shown on the previous page, but with additional voicings listed below. Display Description Same as Scalic 6L except for the 5th of the scale which is shifted to the root. Same as Scalic 3L except for the root of the scale which is shifted to the 5th. -
Page 29: Time Patterns
Time Patterns Time Patterns The TimeBender includes several ready-made delay patterns you can choose with the Pattern knob. They’re described here and in the table that follows, but you may find it easier to sit down and listen to each one while using the TimeBender. Each pattern has one or more “taps”... -
Page 30: Root-Based Pattern Delay
Time Patterns Root-Based Pattern Delay The Root-Based Pattern delay is a new concept that, when combined with the Time- Bender ’s pitch shifting abilities, can create a wide variety of new sounds. Unlike Multi-tap Pattern delays, every repetition in a root-based pattern begins with the origi- nal unshifted note that you played. - Page 31 Time Patterns Pattern Symbol Number Description of Taps Root-Based Pattern Delay (3/4 time) Tap 1 : Delay = 33% Pan = Left, Voice = V1 Tap 2 : Delay = 66% Pan = Right, Voice = V2 Root-Based Pattern Delay (4/4 time) Tap 1 : Delay = 25% Pan = Left, Voice = V1 Tap 2 : Delay = 50% Pan = Right, Voice = V2 Tap 3 : Delay = 75% Pan = Left, Voice = V1...
-
Page 32: Connection Diagrams
Connection Diagrams Connection Diagrams The following diagrams show different ways of hooking up your TimeBender Mono In/Mono Out Optional FS3X footswitch. Connect your guitar to the TimeBender ’s Left input. 9VAC 1300mA POWER Connect the TimeBender’s Optional expression pedal. Left output to your amp’s input. -
Page 33: Mono In/Stereo Out (Ping-Pong Delays)
Connection Diagrams Mono In/Stereo Out (Ping-Pong Delays) Connect your guitar to the TimeBender ’s Left input. 9VAC 1300mA POWER Connect the TimeBender’s stereo outputs to two amps or two channels on a mixer. -
Page 34: Mono In/Stereo Out (Centered Delays)
Connection Diagrams Mono In/Stereo Out (Centered Delays) Connect your guitar to the TimeBender ’s Right input. 9VAC 1300mA POWER Connect the TimeBender’s stereo outputs to two amps or two channels on a mixer. -
Page 35: Timebender Tm In An Effects Loop
Connection Diagrams TimeBender™ in an Effects Loop Connect your guitar to your amp’s input. Connect the TimeBender’s Left output to your amp’s Connect your amp’s effects effects return. send to the TimeBender™’s Left input. 9VAC 1300mA POWER... -
Page 36: Timebender In An Effects Chain (Stereo In/Stereo Out)
Connection Diagrams TimeBender in an Effects Chain (Stereo In/Stereo Out) Connect your guitar to your effects chain input. DIGITECH® CHORUS/FX OVERDRIVE WHAMMY (POST) 9VAC 1300mA POWER REVERB... -
Page 37: Appendix
Appendix Factory Reset The Factory Reset procedure replaces all the memory locations with their default settings as shipped from the factory. Warning: Performing this procedure erases any changes you have made to the memory locations! Press and hold the Store button for three seconds. All the Memory Location LEDs flash and the display reads FAC. - Page 38 Appendix Specifications the Strum pattern may have been saved to the current heel or toe position. To get the TimeBender back to what the controls show, make sure the Memory Indicator LED is lit (step on both footswitches if it isn’t), then press and release the right footswitch until no Memory Location LED is lit.
-
Page 39: Specifications
9 VAC 1.3 A Power Consumption: 7 Watts General Dimensions: 6.7” Width x 5.6” Length x 2.6” Height Weight: 2.88 lbs DigiTech® engineers are constantly working to improve the quality of our products. Specifications are therefore subject to change without notice. - Page 40 PH (801) 566-8800 FAX (801) 566-7005 www.digitech.com TimeBender Owner’s Manual 18-0686-A Printed in the USA 3I2009 DigiTech is a registered trademarks of Harman International. musIQ® is a registered trademark of 3dB Research Ltd. ©2009 Harman International Industries, Incorporated. All rights reserved...
Need help?
Do you have a question about the TIME BENDER and is the answer not in the manual?
Questions and answers