Table of Contents
Advertisement
Advertisement
Table of Contents

Related Manuals for DigiTech RP200A


Summary of Contents for DigiTech RP200A
- Page 1 User’s Guide...
- Page 2 Warning - For Your Protection: 1. Read these instructions. 2. Keep these instructions. 3. Heed all warnings. 4. Follow all instructions. 5. Do not use this apparatus near water. 6. Clean only with dry cloth. These symbols are internationally accepted symbols that 7.
-
Page 3: Declaration Of Conformity
89/336/EEC as amended by Directive 93/68/EEC. Vice-President of Engineering 8760 S. Sandy Parkway Sandy, Utah 84070, USA Date: February 21, 2003 European Contact: Your local DigiTech Sales and Service Office or Harman Music Group 8760 South Sandy Parkway Sandy, Utah 84070 USA Ph: (801) 566-8800... -
Page 4: Warranty
In no event shall Digitech or its dealers be liable for special or consequential damages or from any delay in the performance of this warranty due to causes beyond their control. -
Page 5: Table Of Contents
Table of Contents Amp Modeling ..............17 Safety Information .............I EQ...................18 Declaration of Conformity ..........II Cabinet/Gate ..............18 Warranty ................III Effects................20 Table of Contents ............IV Chorus................20 Section One - Introduction Flange................20 Getting Acquainted ............1 Phaser................21 Included Items ..............1 Tremolo ...............21 A Guided Tour..............2 Panner................21 Front Panel ..............2... -
Page 7: Section One - Introduction
Section-1 Introduction Getting Acquainted Congratulations on your purchase of the RP200 Artist.You now have the flexibility, and power to produce sonic creations never before thought possible. Although the RP200 Artist is so user friendly you may not even need to read this manual, we recommend that you become better acquainted with us, and what we have to offer by going through this User’s Guide with your RP200 Artist in front of you. -
Page 8: A Guided Tour
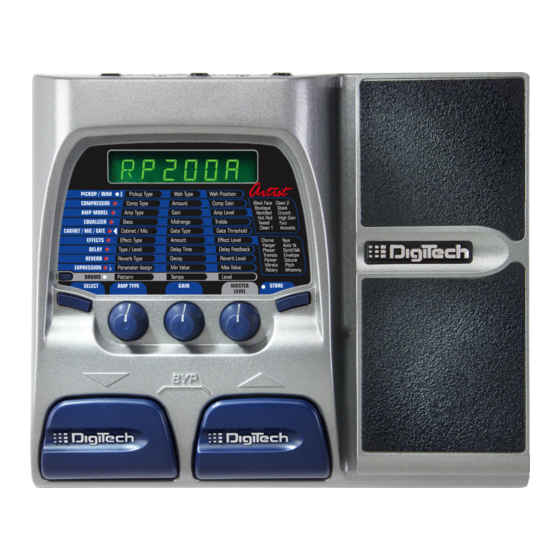
A Guided Tour of the RP200 Artist The Front Panel... - Page 9 1. Footswitches - These 2 Footswitches are used to select Presets, access the Tuner, or bypass the RP200 Artist.The Footswitch on the right will increase, and the Footswitch on the left will decrease the selected Preset. Pressing both Footswitches together will bypass the currently selected Preset. Pressing and holding both Footswitches will access the Tuner.
- Page 10 6. Display - The Display provides information for different functions depending on the mode that has been selected. In Performance mode, the Display will show the currently selected Preset name and number. In Edit mode, the Display will show the name and value of the parameter being adjusted.
-
Page 11: Rear Panel
TRS stereo “Y” cord to connect to the inputs of 2 amplifiers for stereo applications. 4. Headphones - Connect a pair of stereo headphones to this 1/8” jack. 5. Power Input - Connect only the DigiTech PS0913B power supply to this jack. -
Page 12: Getting Started
Getting Started Making Connections There are several different connection options available with the RP200 Artist. Before connecting the RP200 Artist, make sure that the power to your amplifier and the RP200 Artist is turned off. There is no power switch on the RP200 Artist.To turn the RP200 Artist on or off, simply connect or disconnect the included PS0913B power supply from the Power Jack to an AC outlet. -
Page 13: Stereo Operation
Stereo Operation For stereo operation connect the guitar to the Input of the RP200 Artist. Connect a TRS stereo “Y” cord to the RP200 Artist’s Output. Connect one end of the “Y” cord to the input of one amplifier, channel of a mixer, or power amp. Connect the second end of the “Y” cord to a second amplifier, second channel of a mixer, or power amp. -
Page 14: Applying Power
Applying Power Before applying power to anything, set your amp(s) to a clean tone and set the tone controls to a flat EQ response (on most amps, this would be 0 or 5 on the tone controls).Then follow the steps listed below. 1.Turn the amp volume all the way down. -
Page 15: About The Rp200
LEDs in the Effect Matrix. The RP200 Artist comes with 40 User Presets (Presets 1-40), 40 Factory Artist Presets (Presets 41-80), and 40 DigiTech factory presets (81- 120). The User Presets are locations where your creations may be stored. The Factory Artist and Factory Presets will not allow you to store any changes to them. -
Page 16: Tuner Mode
Tuner Mode The Tuner in the RP200 Artist allows you to quickly tune or check the tuning on your guitar. Enter Tuner mode by pressing and holding both Footswitches simultaneously.The Display will briefly show indicating that you are in Tuner mode. To begin tuning, play a note on your guitar (a harmonic at the 12th fret usually works best).The Display shows the note being played. -
Page 17: Section Two - Editing Functions
Section Two - Editing Functions Editing/Creating Presets Creating your own signature sound with the RP200 Artist is easy and intuitive.The RP200 Artist lets you create your own Presets, or fine tune existing Presets to suit your needs. When creating or editing a sound, you must first start with one of the User or Factory Presets. It is not possible to start with a completely empty Preset.The Preset number does not necessarily need to be the location which you intend to have it reside, as you can save your creation to any User Preset location during the store process. -
Page 18: The Matrix
The Matrix The Matrix is where all Effects and Parameters are selected for editing. In Edit mode, successive presses of the Select button will advance to the next Effect row.The LED will light indicating which Effect group has been selected. Each Effect group will have up to 3 Parameters which can be modified.The Knob under each column of Parameters is used to change the value for the corresponding Parameter of the selected Effect. -
Page 19: Storing/Copying/Naming A Preset
Storing/Copying/Naming a Preset Once the Preset has been modified to your liking, you may store your settings to any of the 40 User Preset locations (Presets 1-40). The following steps outline the procedure for storing changes to a Preset or copying a Preset to a different location: 1. - Page 20 5. Press the Store button again to save the changes. The procedure for copying one Preset to another Preset location is the same. Use the Footswitches to select the Preset that you want to copy, then follow the steps 1-4 for storing a preset on the previous page.
-
Page 21: Section Three - Effects And Parameters
Section Three - Effects and Parameters About the Effects The RP200 Artist can be thought of as several different “virtual” amplifiers and individual, hi-tech stomp boxes in a single programmable package.With stomp boxes, the order in which they are connected can drastically affect the overall sound quality.The RP200 Artist has placed the Effects in an order for optimum sound quality.The following diagram shows the order of the effects contained in the RP200 Artist. -
Page 22: Pickup/Wah
Pickup/Wah The Pickup Simulator provides the thick tone of a humbucker pickup to a guitar with single coil pickups, or the bright edgy sound of a single coil pickup to a guitar with a humbucker.This allows you to have the best of both worlds without having to change guitars during a performance. -
Page 23: Amp Modeling
Marshall® is a registered trademark of Marshall Amplification Plc. Vox® is a registered trademark of Korg UK. Fender, Matchless, and Mesa Boogie, are trademarks of their respective companies and are in no way associated with DigiTech. Amp Gain - The Parameter 2 knob adjusts the Gain (distortion) for the selected Amp Model (not available for Acoustic).The Gain parameter ranges from... -
Page 24: Cabinet/Gate
Equalization is an extremely useful tool used to further shape the tonal response of your guitar signal.The EQ in the RP200 Artist is similar to the tone knobs on an amplifier. All three EQ parameters range from -12dB to +12 dB. - The Parameter 1 knob adjusts the amount of low end enhancement (Bass). - Page 25 Gate Type - The Parameter 2 knob selects between the Silencer ™ Noise Gate, or the Auto Swell volume swell effect.Values include: (Turns the Noise Gate off), (Selects the Silencer™ Noise Gate) and through (Selects the Auto Swell volume swell effect. These settings will automatically ramp up the volume from a 200 milliseconds volume fade in to a 2 second volume fade in).
-
Page 26: Effects
Effects The Effects row in the RP200 Artist is a multi-function module, allowing you to select effects such as; Chorus, Flanger, Phaser,Tremolo, Panner,Vibrato, Rotary Speaker,YaYa™, AutoYa™, SynthTalk™, Envelope Filter (auto wah), Detune, Pitch Shift, and Whammy™ effects. When the Effects row is selected, the Parameter 1 knob is used to choose the type of Effect or turn the Effect module off ( ). -
Page 27: Phaser
Phaser ( A phaser splits the incoming signal, and then changes the phasing of the signal.This signal is then taken in and out of phase and mixed back in with the original signal. As the phasing changes, different frequencies get canceled resulting in a warm sort of twisting sound. Amount - The Parameter 2 knob simultaneously adjusts the rate (Speed) and intensity (Depth) of the Effect. -
Page 28: Vibrato
Level - The Parameter 3 knob controls the mix level of the Effect. Ranges from YaYa™ ( The YaYa™ is another effect exclusive to DigiTech products. Like the AutoYa™, it combines the characteristics of a wah and a flanger together providing a unique talk box type of effect, but is controlled by the Expression Pedal. -
Page 29: Auto Ya
Level - The Parameter 3 knob controls the mix level of the AutoYa™. Ranges from SynthTalk™ ( SynthTalk™ is another effect exclusive to DigiTech. It makes your guitar seem to be speaking based upon the attack or how hard you strike the strings. -
Page 30: Detune
Detune ( A Detuner will make a copy of your incoming signal, take the copied signal slightly out of tune from the original, and mix the two signals together.The result is a doubling type of effect as if two guitars were playing the same part together. Amount - The Parameter 2 knob adjusts the amount of pitch difference applied to the copied signal. -
Page 31: Delay
Harmony Bends (Dry Signal Added) Whammy (no Dry Signal) (a minor third to a Major third) (1 octave above) (a second above to a Major third above) (2 octaves above) (a third above to a fourth above) (a second below) (a fourth above to a fifth above) (a second below reversed pedal action) (a fifth above to an octave above) -
Page 32: Reverb
Reverb Using reverb in recorded program material gives the listener a sense that the material is being performed in an actual room or hall. It is this similarity to actual acoustic spaces that makes reverberation a useful tool in recorded music. Reverb Type - The Parameter 1 knob selects the Type of Reverb or acoustic space. -
Page 33: Section Four - Other Functions
Section Four - Other Functions Drum Machine The RP200 Artist includes several sampled drum patterns which are useful for developing a good sense of timing. Pressing the Drums button will enable the drum machine and start playback of the selected drum pattern (except when in Store or Bypass mode). When Drums is active, the Parameter 1 knob selects the drum Pattern, the Parameter 2 knob adjusts the drum Tempo, and the Parameter 3 knob adjusts the Level of the drum pattern. - Page 34 (Wah) - The Expression Pedal acts as a Wah when the Wah Effect is engaged. (Amp Gain) - Expression Pedal controls the Amp Gain or amount of distortion for the selected Amp Type. (Amp Level) - Expression Pedal controls the Volume of the selected Amp Type. (Amount) - Expression Pedal controls the Amount of the selected Effect Type.
-
Page 35: Factory Reset
Factory Reset This function resets the RP200 Artist to its original factory settings.This procedure will erase all custom user Presets, and recalibrate the Expression Pedal. ATTENTION: Performing this function will erase all user-programmed data. All such data will be lost forever! Be sure you want to erase the memory and start fresh before continuing with this procedure. -
Page 36: Expression Pedal Calibration
Expression Pedal Calibration The Expression Pedal on the RP200 Artist needs to be recalibrated for use after a factory reset has been performed.This calibration procedure is automatically entered after a factory reset procedure. In the event the Pedal’s calibration fails, or if the Pedal does not function properly, it can be re-calibrated using the Pedal Calibration procedure.This will not erase the User Presets. -
Page 37: Section Five - Appendix
Section Five - Appendix Specifications Input: 1/4” TS Jam-A-Long: 1 - 1/8” Stereo TRS Output: 1 - 1/4” Stereo TRS Headphone: 1/8” Stereo TRS A/D/A: 24 bit Delta Sigma Power Supply: 9 VAC, 1.3A (PS0913B) Power Consumption: 6.8 Watts Memory: 40 User Artist/40 Factory Artist/40 Factory Effects: Pickup Simulator,Wah, Compressor, Amp Modeling, Acoustic Guitar Simulator, 3 band EQ, Noise Gate, Cabinet Modeling, Mic Placement, Chorus, Flange, Phaser,Tremolo, Panner,Vibrato, Rotary Speaker, AutoYa™,YaYa™, SynthTalk™, Enveloped Filter, Pitch... -
Page 38: Preset List
Preset List Number Artist Name Preset Name Number Preset Name Preset Name James Fukai Evil D Dan Donegan Joey Z Dan Donegan Joey Z Jennifer Batten Metal Mike Chlasciak Jennifer Batten Metal Mike Chlasciak Mike Einziger Metal Mike Chlasciak Mike Einziger Michael Wilton Clint Lowery Michael Wilton... - Page 39 Number Preset Name Display Name Number Preset Name Display Name...
- Page 40 International Distribution 8760 South Sandy Parkway Sandy, Utah 84070 PH (801) 566-8800 FAX (801) 566-7005 DigiTech and the RP200 Artist are trademarks of the Harman Music Group Printed in the USA RP200 Artist User’s Guide 18-6407-A Please visit us on the World Wide Web at:...
Need help?
Do you have a question about the RP200A and is the answer not in the manual?
Questions and answers