DigiTech JAMMAN Manual
Looper/phrase sampler
Hide thumbs
Also See for JAMMAN:
- Owner's manual (80 pages) ,
- User manual (2 pages) ,
- Owner's manual (68 pages)
Table of Contents
Advertisement
Advertisement
Table of Contents

Related Manuals for DigiTech JAMMAN


Summary of Contents for DigiTech JAMMAN
- Page 4 Warranty We at DigiTech® are very proud of our products and back up each one we sell with the following warranty: 1. The warranty registration card must be mailed within ten days after purchase date to validate this warranty, or you can register via our website (www.digitech.com).
-
Page 5: Table Of Contents
Congratulations! Table of Contents Thank You ......................3 Quick Start ......................4 Guided Tour - Front Panel ..................8 Guided Tour - Rear Panel ..................12 Making Connections ....................14 Recording an Instrument or Vocal/Acoustic Phrase ..........16 Recording with the Aux Input ................17 Recording Overdubs ....................19 Undo, Redo, and Clear ...................21 Undo an Overdub ...................21 Redo an Overdub ...................21... -
Page 7: Thank You
. . . it becomes a band in a box. Slow down or speed up any song without changing pitch. With the DigiTech JamMan in your bag of tricks, the possibilities are literally endless. -
Page 8: Quick Start
Quick Start 1. Get Connected Before powering up your JamMan®: a. Make Connections 1. Connect a guitar or bass to the INSTRUMENT INPUT jack and/or a mic to MIC INPUT on the JamMan’s rear panel. 2. Connect the JamMan’s OUTPUT to the input of an amplifier, a channel of a mixer, or to headphones. - Page 9 Quick Start 2. Select an Empty Loop Rotate the SELECT knob until the LOOP LED and the SINgLE LED are off. Turn the SELECT knob..until these LEDs are off. 3. Select the Record Mode Press the RECORD MODE button repeatedly until the INST/MIC LED lights. Press the RECORD MODE button...
- Page 10 Quick Start 4. Adjust the Recording Level Play your guitar (or sing into the mic) at the level you will be recording. Adjust the INST LEVEL (or MIC LEVEL) knob until the PEak LED occasionally flickers on the loudest notes. Set the loop level and rhythm level knobs to the 9 o’clock position.
- Page 11 Quick Start 6. Stop Recording, Start Playback Press the REC/PLaY/OVERDUb (left) footswitch while recording to stop recording and start playing back from the beginning. The PLaY LED lights. Adjust the LOOP LEVEL and RHYTHM LEVEL knobs as needed. Press the REC/PLAY/OVERDUB (left) footswitch while recording The PLAY to stop recording and start playback.
-
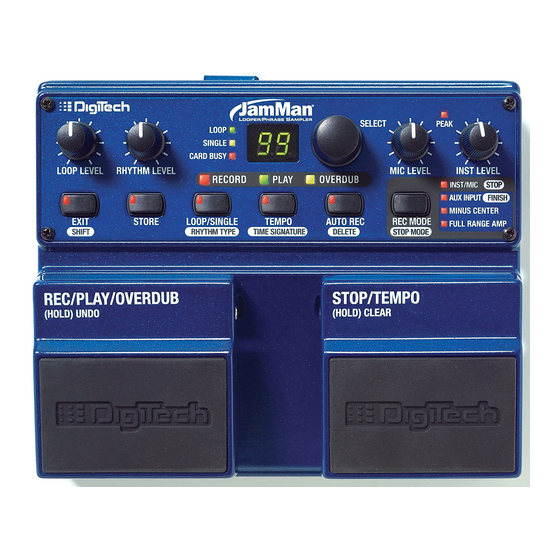
Page 12: Guided Tour - Front Panel
Guided Tour - Front Panel 1. Loop Level Knob Controls playback level of recorded loops. 2. Rhythm Level Knob Controls the level of the rhythm guide track. 3. Loop/Single/Card Busy LEDs LOOP Lights when a repeating Loop resides in the selected memory location. - Page 13 Guided Tour - Front Panel SINgLE Lights when a Single playback phrase resides in the selected memory location. CaRD bUSY Lights when there is read/write activity on the CompactFlash card. The card ® should not be removed when the CaRD bUSY LED is lit. 4.
- Page 14 Guided Tour - Front Panel 10. Record Mode (Stop Mode) Button Press this button to select the inputs that are to be recorded: Inst/Mic or Aux Input with options of Minus Center and/or Full Range Amp (indicated by the LEDs next to the button). Press this button while the button is lit to select one of two Stop Modes: Stop or Finish (indicated by the LEDs next to the button).
- Page 15 Guided Tour - Front Panel 14. Rec/Play/Overdub Footswitch Starts and toggles between recording, playback and overdubbing. Press and hold this footswitch for two seconds to undo the last overdub. 15. Loop/Single (Rhythm Type) Button Changes the playback status of a recorded phrase. When LOOP is lit the phrase will play back in an endless loop.
-
Page 16: Guided Tour - Rear Panel
Guided Tour - Rear Panel 1. 1/4” Inst Input Jack Connect a guitar, bass, or keyboard output here. 2. XLR Mic Input Jack Plug your microphone in here. Accepts low impedance dynamic or self powered condenser microphones. 3. 1/8” Aux Input Jack Plug your CD or other music playback source in here. - Page 17 Guided Tour - Rear Panel 5. 1/4” Footswitch Jack Plug the optional FS3X Footswitch in here. (FS3X functions control next/ previous loop selection and Auto Record on/off.) See pages 35 and 36 for more information about the FS3X Footswitch. 6. CompactFlash Card Slot ®...
-
Page 18: Making Connections
Making Connections CD/MP3 Player Amplifier MODE DOWN (or mixer, or headphones) DigiTech FS3X Footswitch ® Microphone (Optional) CompactFlash Card CompactFlash 256 MB Computer (USB Cable) Power Supply Instrument Instrument and Microphone Connect a guitar, bass, or keyboard to the INSTRUMENT INPUT jack, or plug a microphone into the MIC INPUT jack. - Page 19 Making Connections ® DigiTech FS3X Footswitch (Optional) Connect the optional FS3X Footswitch to the 1/4” FOOTSWITCH jack using a TRS stereo cable. The FS3X provides hands-free loop selection and enables the Auto Record feature. CompactFlash Card ® Insert a formatted Type I CompactFlash card here (to learn how to format ®...
-
Page 20: Recording An Instrument Or Vocal/Acoustic Phrase
Recording an Instrument or Vocal/Acoustic Phrase The JamMan is very simple to use once you set it up for your particular use. ® This section explains how to record an instrument or vocal/acoustic phrase and play it back as a continuous loop. You should have a guitar/instrument and/or a mic connected before proceeding. -
Page 21: Recording With The Aux Input
Recording with the Aux Input This section explains how to use the aUx INPUT for phrase recording and looping. You should have an audio source connected to the aUx INPUT before proceeding. 1. Select an empty memory location using the SELECT knob (the LOOP and SINgLE LEDs will be off). - Page 22 Recording with the Aux Input 7. When you are finished, press either the REC/PLaY/OVERDUb footswitch to have the phrase play back in a repeating loop or press the STOP/TEMPO footswitch to stop recording. Note: The minimum loop length is 3.5 seconds. Once you are finished recording, the STORE button will be lit indicating the phrase must be stored to memory to be recalled later (see the Storing/ Copying Phrases section on page 22).
-
Page 23: Recording Overdubs
Recording Overdubs Once a loop phrase is recorded, you can add overdubs over the top of it. Overdubs can only be recorded to Loop phrases and not to Single phrases. If a phrase has had the tempo changed, it must first be stored to memory before overdub recording can proceed. - Page 24 Recording Overdubs The STORE button lights as soon as any changes to the loop have been made, indicating the phrase must be stored to memory to be recalled later (see the Storing/Copying Phrases section on page 22). If you don’t want to store the overdubs, press and hold the STOP/TEMPO footswitch for two seconds to clear any unstored audio and leave the original loop intact.
-
Page 25: Undo, Redo, And Clear
Undo, Redo, and Clear You can undo your last overdub anytime the current loop number selection remains unchanged. If you change your mind after undoing something, you can redo it. Note : Changing loops or plugging into a computer via USB discards any unstored changes. -
Page 26: Storing/Copying Phrases
Storing/Copying Phrases Anytime a change is made to a loop memory location (Rhythm Type, Tempo, Time Signature, Record, Overdubs etc.) the STORE button LED will immediately light indicating that the changes will be lost unless a store procedure is performed before selecting a new loop memory location, turning off the power, or connecting to the computer via USB. -
Page 27: Setting A Loop Tempo For Recording
Setting a Loop Tempo for Recording Before you begin recording a phrase, you may want to set a tempo at which you want to record the loop at. Setting the tempo in an empty loop memory location automatically starts playing the rhythm guide track (Rhythm Level must be turned up to hear it). -
Page 28: Auto Record Mode
Auto Record Mode The aUTO REC (auto record) button starts recording when you start playing. Press this button on an empty track (you can’t auto-record on an existing track) and the button lights. Now when you press the REC/PLaY/OVERDUb footswitch, the JamMan® is armed for recording but won’t start recording until you start playing (the RECORD LED will flash to show that the JamMan is armed). -
Page 29: Stop Modes
Stop Modes Loop Phrases can be stopped in two ways: Immediately stop when the STOP/TEMPO footswitch is pressed or finish playing through to the end of the phrase and stop. These two Stop Modes are called Stop and Finish. To change Stop Modes, follow these steps: 1. -
Page 30: Changing Loop Tempo
Changing Loop Tempo Once a loop phrase is recorded, you can speed up or slow down the playback of the phrase without changing its pitch. Once a phrase has had the tempo changed, it must first be stored to memory before any overdubs can be added. -
Page 31: Loop / Single Phrases
Loop / Single Phrases Any phrase recorded into the JamMan can be played in two ways: either ® as a continuous Loop, or as a Single “one-shot” sample. Single phrases are designed to play through only once and stop. All phrases are recorded as loops first but they can be changed to a Single if desired and can always be changed back to Loops later without harming the phrase. -
Page 32: Time Signature
Time Signature The JamMan® is capable of recording in different Time Signatures. A Time Signature must be set up prior to recording in a memory location. Once a phrase has been recorded, Time Signature cannot be changed. To set the Time Signature, follow these steps: 1. -
Page 33: Rhythm Type
Rhythm Type The JamMan has several Rhythm Type guide tracks you can select from. ® These range from a simple click metronome to using high quality drum samples as the rhythm guide (a tempo must be set and the rhythm level must be turned up to hear the rhythm). -
Page 34: Usb File Transfer
USB File Transfer The JamMan® features a USB port which is used for file transfer of loops to and from your computer. We recommend only connecting the JamMan to computers using Windows XP and Mac OS X operating systems. Once the ®... - Page 35 USB File Transfer directories that have been recorded. 5. To move them from the card to your computer, either drag them to your computer’s desktop or select the directories you wish to move and select Edit>Copy in the task bar. 6.
-
Page 36: Deleting Phrases
Deleting Phrases The JamMan® has 99 memory locations and at some time you may need to delete the contents of a memory location so it may be reused. To delete a loop from a memory location, follow these steps: 1. Press the button. -
Page 37: Erasing All Loops / Formatting The Compactflash ® Card
Erasing All Loops / Formatting the CompactFlash Card ® The JamMan® has two types of card erase procedures: Erase Loops and Format Card. The Erase Loops procedure only erases JamMan loop data. All other data and files on the card are left untouched. The Format Card procedure erases all data and files on the CompactFlash card. -
Page 38: Unformatted Cards
Erasing All Loops / Formatting the CompactFlash Card ® Unformatted Cards If a card is inserted into the JamMan that does not have a valid format, the JamMan® will not recognize it and the DISPLaY will read nF. The card must be formatted before the JamMan can use it. -
Page 39: Optional Fs3X Footswitch
Optional FS3X Footswitch Selects the next higher memory location. MODE Turns Auto Record on and off. DOWN Selects the next lower memory location. The optional FS3X Footswitch gives you hands-free control over loop selection and Auto Record functions. Mode Switch Turns the Auto Record feature on and off. -
Page 40: Multiple Loop Playback Using The Fs3X
Multiple Loop Playback Using the FS3X Another great feature of the JamMan is its ability to play different loops ® back to back during performance using the optional FS3X Footswitch. This lets you play a verse > chorus > verse > bridge progression seamlessly using three different loops. -
Page 41: Compactflash Capacity
Specifications CompactFlash Capacity ® The JamMan supports Type I CompactFlash cards up to 2GB. The ® ® following table shows approximate storage capacity in minutes for standard CompactFlash card sizes, based on 44.1 KHz 16 bit mono audio files. Memory Size in MB Record Time in Minutes* 1024 2048... -
Page 42: Specifications
Specifications *Approximate values Digital A/D/A Converters: 24-bit audio Sampling Frequency: 44.1 kHz Type: USB 1.1 Full Speed, supports USB 2.0 Protocol: Mass Storage Connector: Type B Memory CompactFlash Type I solid state only (Type II cards or IBM/ ® Hitachi Microdrives™ not supported) Size: 8 MB to 2 GB Capacity:... - Page 43 9 VAC 1.3 A Power Consumption: 7 Watts General Dimensions: 6.7” Width x 5.6” Length x 2.6” Height Weight: 2.88 lbs DigiTech® engineers are constantly working to improve the quality of our products. Specifications are therefore subject to change without notice.
- Page 44 JamMan owner’s Manual 18-0338V-C ® Digitech® and JamMan® are registered trademarks of Harman international. all other product name and trademarks are the property of their respective owners, which are in no way associated with Digitech. ©2005 Harman international industries, incorporated. all rights reserved...
Need help?
Do you have a question about the JAMMAN and is the answer not in the manual?
Questions and answers
Will the jamman work with an unpowered sound mixer? It's been awhile since I've used it & I may have still had a powered mixer then.
Yes, the DigiTech JamMan can work with a sound mixer. According to the manual, it has a Left (Mono) OUT that can be connected to a mixer channel. However, if the mixer is unpowered, you will need an external amplifier or powered speakers to produce sound.
This answer is automatically generated
When i first used my JamMan Looper, I could record 4 minutes or longer. Now after about 90 seconds the record light goes off and nothing is recorded.