Advertisement
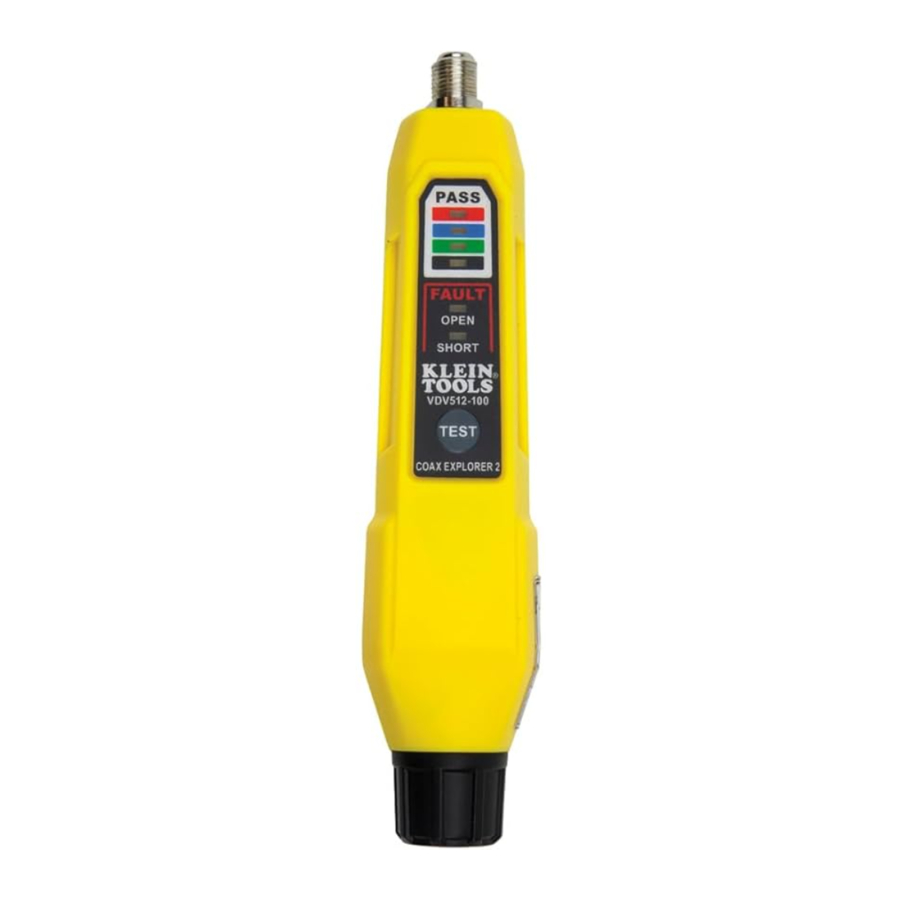
OVERVIEW

- Test Remote #1 (Red)
- F-Connector
- Battery Cap
- 2x AAA Batteries (included)
- TEST Button
- PASS LEDs
- OPEN Fault LED
- SHORT Fault LED
- Pocket Clip (Back)
NOTE: There are no user-serviceable parts inside tester.
GENERAL SPECIFICATIONS
The Klein Tools Coax Explorer® 2 verifies proper continuity of F-connector coaxial cables and maps their location. Color-coded push-on remotes allow for up to four cables to be tested and mapped, displaying cable status via LED indicators (PASS, OPEN, or SHORT) that also identify the cable/remote location. Remote #1 (red) is included, additional remotes are available separately.
- Environment: Indoor
- Operating Altitude: 10000 ft. (3000 m) maximum
- Operating Temperature: 32° to 122°F (0° to 50°C)
- Storage Temp: -4° to 140°F (-20° to 60°C)
- Relative Humidity: 10% to 90% non-condensing
- Dimensions (including remote holder): 5.7" x 2.3" x 1.1" (145 x 32 x 29 mm)
- Weight (including batteries): 4.8 oz. (136 g) Specifications subject to change.
TESTING/MAPPING CABLES
NOTE: Not for use on powered circuits or outlets.
- Connect test remote
![]() to one end of the cable or outlet to be tested. If necessary, use an F-adapter (not included) to connect the test remote to the cable.
to one end of the cable or outlet to be tested. If necessary, use an F-adapter (not included) to connect the test remote to the cable. - Connect the opposite end of the cable or outlet to be tested to the F-connector
![]() on the Coax Explorer® 2.
on the Coax Explorer® 2. - Press and hold the TEST button
![]() . If the cable is wired correctly, the top (red) PASS LED
. If the cable is wired correctly, the top (red) PASS LED ![]() will light. If there is a problem with the cable, one of the FAULT LEDs (OPEN
will light. If there is a problem with the cable, one of the FAULT LEDs (OPEN ![]() or SHORT
or SHORT ![]() ) will light.
) will light.
 to one end of the cable or outlet to be tested. If necessary, use an F-adapter (not included) to connect the test remote to the cable.
 on the Coax Explorer® 2.
 . If the cable is wired correctly, the top (red) PASS LED
  will light. If there is a problem with the cable, one of the FAULT LEDs (OPEN
  or SHORT
  ) will light.
TESTING AN UNINSTALLED CABLE
- Using an F-adapter (not included), connect a test remote
![]() to one end of the cable to be tested.
to one end of the cable to be tested. - Connect the opposite end of the cable to be tested to the F-connector
![]() on the Coax Explorer® 2.
on the Coax Explorer® 2. - Press and hold the TEST button
![]() . If the cable is wired correctly, the corresponding PASS LED
. If the cable is wired correctly, the corresponding PASS LED ![]() will light. If there is a problem with the cable, one of the FAULT LEDs (OPEN
will light. If there is a problem with the cable, one of the FAULT LEDs (OPEN ![]() or SHORT
or SHORT ![]() ) will light.
) will light.
BATTERY REPLACEMENT
(FIG. 1)
When the TEST button is pressed and no LEDs light, the batteries must be replaced.
- Unscrew the battery cap
![]() .
. - Remove and recycle the two spent AAA batteries
![]() .
. - Install two new AAA batteries, with the positive (+) side facing into the tester as shown.
- Screw battery cap tightly back into place.
 .
. .
.STORAGE
Remove the batteries when the tester is not in use for a prolonged period of time. Do not expose to high temperatures or humidity. After a period of storage in extreme conditions exceeding the limits mentioned in the GENERAL SPECIFICATIONS section, allow the tester to return to normal operating conditions before using.
CUSTOMER SERVICE
KLEIN TOOLS, INC.
450 Bond Street, Lincolnshire, IL 60069
1-877-775-5346 customerservice@kleintools.com
www.kleintools.com
Documents / Resources
References
Download manual
Here you can download full pdf version of manual, it may contain additional safety instructions, warranty information, FCC rules, etc.
Advertisement


Need help?
Do you have a question about the Coax Explorer 2 and is the answer not in the manual?
Questions and answers