Klein Tools Coax Explorer 2 VDV512-100 Manual
- Instructions (3 pages)
Advertisement
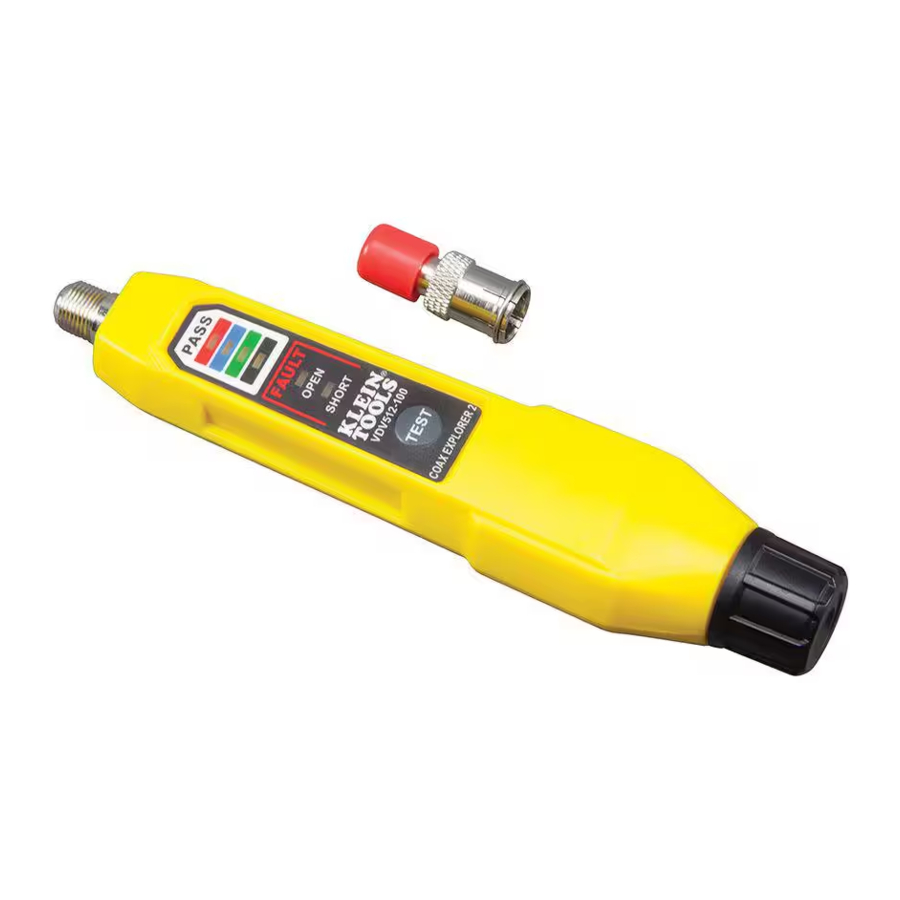
PRODUCT OVERVIEW

(FIG. 1)
- Test Remote #1 (Red)
- F-Connector
- Battery Cap
- 2x AAA Batteries (included)
- TEST Button
- PASS LEDs
- OPEN Fault LED
- SHORT Fault LED
- Pocket Clip (Back)
NOTE· There are no user-serviceable parts inside tester.
GENERAL SPECIFICATIONS
The Klein Tools Coax Explorer 2 verifies proper continuity of F-connector coaxial cables and maps their location. Color-coded push-on remotes allow for up to four cables to be tested and mapped, displaying cable status via LED indicators (PASS, OPEN, or SHORT) that also identify the cable/remote location. Remote #1 (red) is included, additional remotes are available separately.
- Environment: Indoor
- Operating Altitude: 10000 ft. (3000 m) maximum
- Operating Temperature: 32° to 122°F (0° to 50°C)
- Storage Temp: -4° to 140°F (-20° to 60°C)
- Relative Humidity: 10% to 90% non-condensing
- Dimensions (including remote holder): 5.7' x 2.3' x 1.1' (145 x 32 x 29 mm)
- Weight (including batteries): 4.8 oz. (136 g)
Specifications subject to change.
TESTING/MAPPING CABLES
NOTE: Not for use on powered circuits or outlets.
- Connect test remote
![]() to one end of the cable or outlet to be tested. If necessary, use an F-adapter (not included) to connect the test remote to the cable.
to one end of the cable or outlet to be tested. If necessary, use an F-adapter (not included) to connect the test remote to the cable. - Connect the opposite end of the cable or outlet to be tested to the F-connector
![]() on the Coax Explorer 2.
on the Coax Explorer 2. - Press and hold the TEST button
![]() . If the cable is wired correctly, the top (red) PASS LED
. If the cable is wired correctly, the top (red) PASS LED ![]() will light. If there is a problem with the cable, one of the FAULT LEDs (OPEN
will light. If there is a problem with the cable, one of the FAULT LEDs (OPEN ![]() or SHORT
or SHORT ![]() ) will light.
) will light.
 to one end of the cable or outlet to be tested. If necessary, use an F-adapter (not included) to connect the test remote to the cable.
  on the Coax Explorer 2.
  . If the cable is wired correctly, the top (red) PASS LED
  will light. If there is a problem with the cable, one of the FAULT LEDs (OPEN
  or SHORT
  ) will light.
 TESTING AN UNINSTALLED CABLE
- Using an F-adapter (not included), connect a test remote
![]() to one end of the cable to be tested.
to one end of the cable to be tested. - Connect the opposite end of the cable to be tested to the F-connector
![]() on the Coax Explorer 2.
on the Coax Explorer 2. - Press and hold the TEST button
![]() . If the cable is wired correctly, the corresponding PASS LED
. If the cable is wired correctly, the corresponding PASS LED ![]() will light. If there is a problem with the cable, one of the FAULT LEDs (OPEN
will light. If there is a problem with the cable, one of the FAULT LEDs (OPEN ![]() or SHORT
or SHORT ![]() ) will light.
) will light.
BATTERY REPLACEMENT
(FIG. 1)
When the TEST button is pressed and no LEDs light, the batteries must be replaced.
- Unscrew the battery cap
![]() .
. - Remove and recycle the two spent AAA batteries
![]() .
. - Install two new AAA batteries, with the positive (+) side facing into the tester, as shown.
- Screw battery cap tightly back into place.
 .
.  .
. STORAGE
Remove the batteries when the tester is not in use for a prolonged period of time. Do not expose to high temperatures or humidity. After a period of storage m extreme conditions exceeding the limits mentioned in the GENERAL SPECIFICATIONS section, allow the tester to return to normal operating conditions before using.
Test Equipment Depot - 800.517.8431 - 99 Washington Street Melrose, MA 02176 - TestEquipmentDepot.com
Documents / Resources
References
Download manual
Here you can download full pdf version of manual, it may contain additional safety instructions, warranty information, FCC rules, etc.
Advertisement


Need help?
Do you have a question about the Coax Explorer 2 VDV512-100 and is the answer not in the manual?
Questions and answers