
Related Manuals for Yashica DigiMate


Summary of Contents for Yashica DigiMate
- Page 1 MANUEL YASHICA DIGIMATE 100 NOTICE D’UTILISATION Tous nos magasins Tous nos Tutos vidéo Communauté SAV Darty...
-
Page 2: Digital Camera
Digital Camera User Manual... -
Page 3: Table Of Contents
Machine Translated by Google Contenu P. 2 Commencer Présentation d u p roduit P. 3 P. 5 1 0 Instructions o pérationnelles P. 1 1 1 9 Aperçu d e l 'affichage P. 1 9 Nettoyage ... -
Page 4: Commencer
Machine Translated by Google Commencer Présentation d u p roduit Veuillez l ire a ttentivement l e m anuel a vant u tilisation p our g arantir u ne u tilisation a ppropriée d es f onctions d u p roduit. Veuillez ... -
Page 5: Instructions O Pérationnelles
Machine Translated by Google Instructions o pérationnelles Première u tilisation d e Y ASHICA D igiMate Insertion d e l a c arte T F/MicroSD 1. L entille Ouvrez l e c ouvercle d e l a b atterie e n b as à g auche ( objectif d e l a c améra f ace à l 'utilisateur) p our i nsérer l a c arte T F/MicroSD d ans l e T F/ lentille ... - Page 6 Machine Translated by Google 8. B outon D roite/Réglage d u f lash/Avance r apide Bouton d e r églage d e l a m inuterie/du b as En h aut : A ller à d roite d ans l es p aramètres d u m enu Gauche : ...
- Page 7 Machine Translated by Google Instructions o pérationnelles Interface a udio 3 ,5 m m Paramètres d e l 'appareil photo L 'appareil p hoto p rend e n c harge l es p hotos e t l es v idéos d ans l es m odes c orrespondants. Branchez ...
-
Page 8: Aperçu D E L 'Affichage
Machine Translated by Google Aperçu d e l 'affichage Comment l ire e t s upprimer d es f ichiers ( photos e t v idéos) 1 . Appuyez s ur l e b outon d e r églage d u m ode p our c hoisir l a l ecture. 1 ... - Page 9 Machine Translated by Google Paramètres d u m enu p our l e m ode p hoto Résolution p hoto Balance d es b lancs Vous p ouvez c hoisir d e d éfinir l es p hotos d ans l es r ésolutions s uivantes : Vous ...
- Page 10 Machine Translated by Google Paramètres d u m enu p our l e m ode v idéo Balance d es b lancs Résolution v idéo Vous p ouvez c hoisir l a b alance d es b lancs p armi A uto, E nsoleillé, N uageux, L umière i ncandescente, L umière f luorescente. Vous ...
- Page 11 Machine Translated by Google Paramètres g énéraux d u s ystème Économiseur d 'écran a utomatique Langue I l y a Vous p ouvez c hoisir d e d ésactiver l 'économiseur d 'écran, d e l e d ésactiver p endant 1 0, 2 0 o u 3 0 s econdes. L e r églage 1 0/20/30 s econdes s ignifie q ue l 'appareil p hoto 11 ...
-
Page 12: Nettoyage E T E Ntretien
Machine Translated by Google Comment t élécharger d es f ichiers p hoto/vidéo s ur u n o rdinateur a vec u n l ecteur d e c arte U SB C onnectez l a Remarques p our l a b atterie : carte ... -
Page 13: Dépannage
Machine Translated by Google Dépannage Spécification Nom d u p roduit YASHICA D igiMate Problème Solution Numéro d e m odèle YASDGM100 Capteur Capteur C MOS 8 MP La b atterie n 'est p as c hargée. V euillez l a c harger ; l 'indicateur d e c harge d eviendra r ouge. -
Page 14: Politique D E G Arantie
Pour t oute d emande d e r enseignements, n 'hésitez p as à e nvoyer u n e mail à cs@yashica.com A dresse : S alle 4 03, É tage 4 , B âtiment i ndustriel S hiu F at, 1 39141 W ai Y ip S treet, K wun T ong, K owloon, H ong K ong Les ... - Page 15 Contents Getting Started P. 2 Product Overview P. 3 Operational Instructions P. 5 - 10 Display overview P. 11 - 19 Cleaning and Maintenance P. 19 Troubleshooting P. 20 Specification P. 21 Warranty Policy P. 22...
-
Page 16: Getting Started
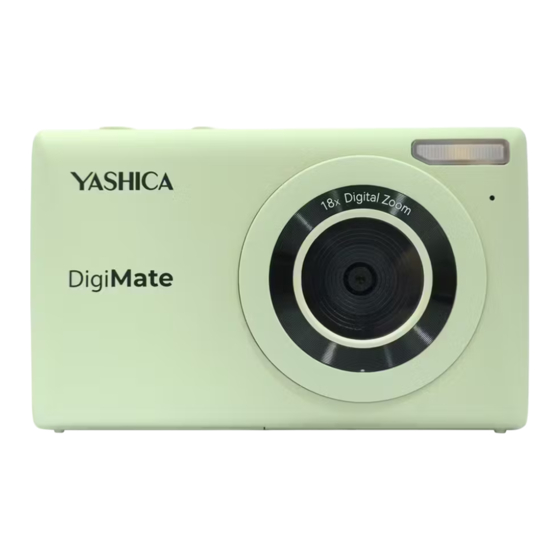
Getting Started Product Overview Please read the manual carefully before use to ensure appropriate use of product functions. Please keep this manual for future inquiries. What is in YASHICA DigiMate? 1. YASHICA DigiMate Camera 2. Storage bag 3. User Manual 4. -
Page 17: Operational Instructions
Operational Instructions First time using YASHICA DigiMate Inserting the TF/MicroSD Card 1. Lens Open the battery cover on the left bottom (camera lens facing the user) to insert the TF/MicroSD Card into the TF/ Focus lens MicroSDCard Slot. When the card is locked, you will hear a “click” sound. - Page 18 8. Right/Flash setting/Fast Forwarding Button Down/Timer Setting Button Up: Going right in the menu settings Left: Going left in the menu settings Press once to turn on the flashlight. Timer: Press two times to turn on auto the flashlight when there is not enough light in the detection. Press once to set the 3-second timer.
- Page 19 Operational Instructions Camera settings 3.5mm Audio Interface The camera supports photos and videos in corresponding modes. Plug in professional microphones or instrument to improve the sound quality How to Take A Photo Tripod Mount The camera is in photo mode by default when you turn on the camera. Press Shutter Button to take a photo.
-
Page 20: Display Overview
Display overview How to Playback and Delete Files (Photos and Videos) Press the Mode Setting Button to choose the Playback. Press Left or Right Button to select and go back and forth for photos and videos. Press Up Button. Choose from the option “Delete current file/ Delete all files/Cancel” Press OK and a box pops out. - Page 21 Menu Settings for Photo Mode Photo Resolution White Balance You can choose to set the photos in the following resolutions: You can choose the white balance to be Auto, Sunny, Cloudy, Incandescent Light, Fluorescent Light. 48MP/44MP/30MP/24MP/20MP/12MP/8MP/5MP/3MP. The default setting is Auto. The default setting is 48MP.
- Page 22 Menu Settings for Video Mode White Balance Video Resolution You can choose the white balance to be Auto, Sunny, Cloudy, Incandescent Light, Fluorescent Light. You can choose to set the video resolution in the following resolutions: The default setting is Auto. 4K 30 FPS 720P 120FPS You can choose the photo effects based on your preference.
- Page 23 You can choose to turn on or off the button sound. The default setting is on. Firmware Version You can see the firmware information. Power on/off sound Model: DigiMate You can choose to include the power on or off sound. Version: V1.2.0 The default setting is on. P. 17...
-
Page 24: Cleaning And Maintenance
Keep the battery pack out of the reach of young children. Keep the battery pack dry. Connecting the PC Camera mode: Replace only with the same battery with YASHICA. This camera can be used as a web cam. Dispose of used battery packs promptly as described in the instructions. -
Page 25: Troubleshooting
Troubleshooting Specification Product Name YASHICA DigiMate Problem Solution Model Number YAS-DGM100 Sensor 8MP CMOS sensor The battery is not charged. Please charge the battery and you will see the Auto, 100, 200, 400, 800, 1600, 3200 The camera cannot be turned on because charging indicator turns red. -
Page 26: Warranty Policy
YASHICA products are guaranteed against manufacturing defects one (1) year from the original date of purchase. YASHICA’s sole obligation in the event of defects during the said period is to repair or replace the defective part or product with a comparable part at YASHICA’s discretion. Damage resulting from use, accident, or normal wear and tear is not covered by this or any warranty. -
Page 27: Guida Introduttiva
Conservare il manuale per eventuali richieste future. Panoramica del prodotto P. 26 - 28 Istruzioni operative P. 29 - 34 Cosa contiene YASHICA DigiMate? 1. Telecamera YASHICA DigiMate Panoramica del display P. 35 - 44 2. Custodia 3. Manuale d'uso Pulizia e manutenzione P. -
Page 28: Panoramica Del Prodotto
Panoramica del prodotto Prima volta che si utilizza YASHICA DigiMate Inserimento della scheda TF/MicroSD Aprire il coperchio della batteria nella parte inferiore sinistra (obiettivo della fotocamera rivolto verso l'utente) per inserire la scheda TF/MicroSD nell'apposito slot. MicroSD. Quando la scheda è bloccata, si sente un suono di clic. -
Page 29: Istruzioni Operative
Istruzioni operative Montaggio sul treppiede 1. Obiettivo Montare la fotocamera su treppiedi con attacco filettato da 1/4"-20 per Lente di messa a fuoco catturare i momenti in foto o video. 2. La torcia Collegamento di un adattatore o di uno strumento per l'interfaccia da 3,5 mm Torcia elettrica. - Page 30 7. Pulsante Su/Cancella file Impostazioni: Su: Sale nelle impostazioni del menu. - Lingua - Suono del pulsante - Formato Andare al pulsante Impostazione modalità per scegliere - Data e ora - Suono di accensione /spegnimento - Rotazione immagine Riproduzione e scegliere - Sorgente luminosa Frequenza - Spegnimento automatico - Ripristino delle impostazioni di fabbrica...
- Page 31 Pulsante di impostazione della modalità Istruzioni operative (Foto/Video/Time Lapse/Slow motion/Tempo di posa/Foto/ Riproduzione) Impostazione della modalità Impostazioni della fotocamera Premere una volta per visualizzare le seguenti opzioni. La fotocamera supporta foto e video nelle modalità corrispondenti. - Modalità foto - Movimento lento - Modalità...
-
Page 32: Panoramica Del Display
Panoramica del display Come impostare il timer Una volta entrati in questa modalità, il timer predefinito è di 3 secondi per scattare una foto. Premere una volta il pulsante Giù per cambiare l'impostazione in 5 secondi. Premere due volte il pulsante Giù per passare a 10 secondi. Premere tre volte il pulsante Giù... - Page 33 Impostazioni di menu per la modalità Foto Risoluzione delle foto Bilanciamento del bianco È possibile scegliere di impostare le foto nelle seguenti risoluzioni: È possibile scegliere il bilanciamento del bianco tra Auto, Soleggiato, Nuvoloso, Luce incandescente, Luce 48MP/44MP/30MP/24MP/20MP/12MP//8MP/5MP/3MP. fluorescente. L'impostazione predefinita è 48MP. L'impostazione predefinita è...
- Page 34 Impostazioni di menu per la modalità video Risoluzione video Qualità video È possibile scegliere di impostare la risoluzione video nelle seguenti risoluzioni: È possibile impostare la qualità video come generale, buona o ottima. L'impostazione consente di scegliere la 4K 30 FPS 720P 120FPS qualità...
- Page 35 Impostazioni generali del sistema Esposizione Lingua È possibile impostare l'esposizione da +3 a -3. Sono supportate 12 lingue, tra cui L'impostazione predefinita è 0. - Cinese semplificato - Coreano - Portoghese Premere il pulsante Modalità per tornare al menu Impostazioni. - Cinese tradizionale - Tedesco - Bahasa...
- Page 36 L'impostazione predefinita è off. È possibile visualizzare le informazioni sul firmware. Premere il pulsante Modalità per tornare alle impostazioni del menu. Modello: DigiMate Versione: V1.2.0 Spegnimento automatico È possibile scegliere che la funzione di spegnimento automatico sia disattivata/ 1 minuto/ 3 minuti / 5 minuti / 30 Come scaricare file foto/video sul computer con il lettore di schede USB minuti / 60 minuti.
-
Page 37: Pulizia E Manutenzione
Mantenere il pacco batteria asciutto. Non premere i pulsanti troppo velocemente o il sistema della fotocamera Sostituire solo con la stessa batteria YASHICA. potrebbe non essere in grado di gestire il comando. La fotocamera si blocca o lo schermo si Smaltire tempestivamente i pacchi batteria usati come descritto nelle istruzioni. -
Page 38: Specifiche Tecniche
Politica di garanzia Nome del prodotto YASHICA DigiMate Se si verifica un problema con un acquisto YASHICA, si prega di leggere le informazioni riportate di seguito per capire e determinare se il problema Numero di modello YAS-DGM100 è coperto dalla garanzia YASHICA. - Page 39 Per ulteriori domande o commenti, contattare il nostro team di assistenza clienti all'indirizzo cs@yashica.com. デジタルカメラ 使用説明書 P. 48...
-
Page 40: はじめに
はじめに はじめに P. 51 製品機能を適切に使用するために、ご使用前にマニュアルをよくお読みください。 今後のお問い合わせに備えて、このマニュアルを保管してください。 製品概要 P. 52 - 53 操作手順 P. 54 - 59 YASHICA DigiMate には何が含まれていますか ? ディスプレイ概要 P. 60 - 68 1. YASHICA DigiMate カメラ 2. 収納バッグ 3. ユーザーマニュアル クリーニングとメンテナンス P. 68 4. Type-C USB 充電ケーブル... -
Page 41: 製品概要
製品概要 YASHICA DigiMate を初めて使用する場合 TF/MicroSD カードの挿入 左下 ( カメラ レンズがユーザー側 ) のバッテリーカバーを開き、TF/MicroSD カードを TF/MicroSD カードスロット に挿入します。カードがロックされると、「カチッ」という音がします。 カバーを閉じます。 注 : デバイスの電源がオフになっていることを確認してください。 重要 : 初めて使用するときは、TF/MicroSD カードをフォーマットしてください。 C10 以上の速度の TF/MicroSD カードを使用してください。 TF/Micro SD カードがフォーマットされていない場合は、カードをフォーマットするように求めるボックスが表示さ れます。メモリカードのフォーマットに進んでください。 カメラで TF/MicroSD カードをフォーマットします。メニューボタンを押してフォーマット機能に進み、OK を選択 して確定します。 TF/MicroSD カードに既存のデータがある場合は、フォーマットする前にデータをバックアップしてください。TF/ MicroSD カードをフォーマットするオプションをした後は、データを回復できません。... -
Page 42: 操作手順
操作手順 レンズ 右 / フラッシュ設定 / 早送りボタン フォーカス レンズ 上 : メニュー設定で右に移動します 1 回押すとフラッシュが撮影時に点灯します。 フラッシュライト 2 回押すと、十分な光がない場合にフラッシュが自動的に点灯します。 フラッシュライト 3 回押すとフラッシュがオフになります。 ディスプレイ OK ボタン / メニュー ディスプレイ画面 OK: パラメータを選択して設定を確認します。 写真モードのメニュー設定 - エフェクト - 測光モード 充電インジケーター - 写真解像度 - ホワイトバランス - フラッシュライト 緑色のライト... - Page 43 下 / タイマー設定ボタン シャッター ボタン 左 : メニュー設定で左に進みます 写真モードでは、押すと写真を撮影します。 タイマー : 軽く押すとフォーカスを合わせます。 1 回押すと 3 秒のタイマーが設定されます。 ビデオモードでは、1 回押すとビデオが開始します。もう一度押すとビデオが停止します。 2 回押すと 10 秒のタイマーが設定されます。 3 回押すと 15 秒タイマーが設定されます。 3.5mm オーディオインターフェイス 4 回押すと 20 秒タイマーが設定されます。 プロ仕様のマイクや楽器を接続して音質を向上することができます。 5 回押すと 30 秒タイマーが設定されます。 三脚マウント 左 / グリッド設定 / 巻き戻しボタン 左...
- Page 44 操作手順 スローモーションビデオの撮影方法 モード設定ボタンを押して、スローモーションを選択して入力します。 カメラ設定 シャッターボタンを押して、タイムラプスビデオを開始します。録画中は、インジケーターライトとして緑い点滅サ カメラは、対応するモードで写真とビデオをサポートしています。 インがあり、日付と時刻タグの近くに赤い点が表示されます。 スローモーションビデオを停止するには、シャッターボタンを押します。 写真の撮影方法 カメラの電源を入れると、初期設定は写真モードになっています。 タイマーの設定方法 シャッターボタンを押して写真を撮影します。 初期設定のタイマーは 3 秒です。 下ボタンを 1 回押して、設定を 5 秒に変更します。 ビデオの録画方法 下ボタンを 2 回押して、設定を 10 秒に変更します。 モード設定ボタンを押してビデオモードを選択して入ります。シャッターボタンを押して録画を開始 / 停止します。 下ボタンを 3 回押して、設定を 20 秒に変更します。 録画中は、インジケーターライトとして緑い点滅サインがあり、録画は 00:00:01 以降から開始されます。 シャッターボタンを押して録画を停止します。 ファイル ( 写真とビデオ ) の再生と削除方法 モード設定ボタンを押して、再生を選択します。...
- Page 45 ディスプレイの概要 写真モードのメニュー設定 画素設置 写真を次の解像度に設定できます。 48MP/44MP/30MP/24MP/20MP/12MP//8MP/5MP/3 MP 初期設定は 48MP です。 モードボタンを押してメニュー設定に戻ります。 タイマー撮影 タイマー機能は、オフ /3 秒 /10 秒 /15 秒 /20 秒 /30 秒から設定できます。 初期設定はオフです。 モードボタンを押してメニュー設定に戻ります。 連続撮影 連続撮影機能は、1 回の撮影につき 3 枚 /5 枚 /10 枚に設定できます。 初期設定はオフです。 モードボタンを押してメニュー設定に戻ります。 写真 / ビデオモード 効果 写真 / ビデオ解像度 露出...
- Page 46 ビデオ モードのメニュー設定 ビデオ解像度 ホワイトバランス ビデオ解像度を次の解像度に設定できます。 ホワイトバランスを自動、晴れ、曇り、白熱灯、蛍光灯から選択できます。 720P (120FPS) 4K (30 FPS) 初期設定は自動です。 720P (60FPS) 2.7K (30FPS) 好みに応じて写真効果を選択できます。モードボタンを押してメニュー設定に戻ります。 720P (30FPS) 1080P (60 FPS) 1080P (30 FPS) 初期設定は 4K (30FPS) です。 お好みに応じて、自動、100、200、400、800、1600、3200、6400 から ISO を選択できます。 モードボタンを押してメニュー設定に戻ります。 初期設定は自動です。 モード ボタンを押してメニュー設定に戻ります。 サウンドの録音 ビデオにサウンド / オーディオを録音することを選択できます。初期設定はオンです。 露出...
- Page 47 全体的なシステム設定 ホワイトバランス 言語 ホワイトバランスを自動、晴れ、曇り、白熱灯、蛍光灯から選択できます。 サポートされる言語は 12 種類あります。 初期設定は自動です。 - 簡体字中国語 - 韓国語 - ポルトガル語 好みに応じて写真効果を選択できます。 - 繁体字中国語 - ドイツ語 - バハサ語 モード ボタンを押してメニュー設定に戻ります。 - 英語 - イタリア語 - タイ語 - 日本語 - スペイン語 - フランス語 初期の言語は英語です。 好みに応じて、自動、100、200、400、800、1600、3200、6400 から ISO を選択できます。 モード...
- Page 48 自動スクリーンセーバー ファームウェア バージョン スクリーンセーバーオプションをオフ、10 秒、20 秒、30 秒に設定できます。10/20/30 秒に設定すると、設定し ファームウェア情報を確認できます。 た時間後にカメラが非アクティブになり、画面が黒くなります。いずれかのボタンを押すと、カメラがオンになり モデル : DigiMate ます。 バージョン : V1.2.0 初期設定はオフです。 モードボタンを押してメニュー設定に戻ります。 USB カードリーダーを使用して写真 / ビデオ ファイルをコンピューターにダウンロードする方法 TF/MicroSD カードを USB カードリーダーに接続します。 自動シャットダウン ファイルを含むフォルダーが表示されるので、カメラからコンピューターに写真やビデオをダウンロードできます。 自動シャットダウン機能をオフ / 1 分 / 3 分 / 5 分 / 30 分 / 60 分から選択できます。...
-
Page 49: クリーニングとメンテナンス
い。 ーズする。 TF/Micro SD カードが CIass 10 になっているかどうかを確認してください。 焼却または火中に廃棄しないでください。 最大ストレージは 256G 以下です。 損傷または液漏れしているリチウムイオン電池は扱わないでください。 ボタンを素早く押しすぎないでください。カメラシステムがコマンドを処理 電池パックは幼児の手の届かないところに保管してください。 できない場合があります。 電池パックは乾燥した状態に保ってください。 交換する電池は必ず YASHICA 製のものを使用してください。 TF/Micro SD カードが正しく挿入されていることを確認してください。メモ カメラがクラッシュする / 画面がフリ 使用済みの電池パックは、説明書に従って速やかに処分してください。 リカードが逆向きに挿入されていないかどうかを確認してください。 ーズする。 TF/MicroSD カードの写真とビデオをコンピューターまたはその他のストレ ージメディアにバックアップします。 TF/MicroSD カードをフォーマット機 クリーニングとメンテナンス 能またはコンピューターからフォーマットします。 1. カメラを長期間使用しない場合は、電池を取り外し、ほこりのない乾燥した環境で 30° C を超えない温度で保管して... - Page 50 YASHICA DigiMate YASHICA 製品のご購入で問題が発生した場合は、以下の情報をお読みになり、問題が YASHICA の保証の対象かどうかを理解し、判断してくだ 型番 YAS-DGM100 さい。 センサー 8 MP CMOS センサー 自動、100、200、400、800、1600、3200 1. YASHICA 製品は、購入日から満 1 年間、製造上の欠陥に対して保証されます。 メモリ Micro SD/TF カード、最大 128GB までサポート ( カメラには付属していません ) この期間中に欠陥が発生した場合、YASHICA の唯一の義務は、YASHICA の裁量で欠陥のある部品または製品を修理するか、 レンズ 固定、F/3.2 f=7.36mm 同等の部品と交換致します。購入時の領収書またはレシートは保管してください。 フォーカス オートフォーカス 1 メートル...
- Page 51 当該期間中に欠陥が発生した場合、YASHICA の唯一の義務は、YASHICA の裁量により、欠陥のある部品または製品を修理または同等の部品と 交換することです。使用、事故、または通常の消耗による損傷は、本保証またはその他の保証の対象外です。 YASHICA は、本製品の使用に関連または起因する事故、傷害、死亡、損失、 またはその他の請求について一切の責任を負いません。 いかなる場合も、YASHICA は、YASHICA 製品またはその部品の使用に関連または起因する偶発的または結果的な損害について責任を負いませ ん。 部品および製品の返品または交換には、送料、手数料、交換および再入庫手数料がかかる場合があります。 保証書は日本国内においてのみ有効です。 国外に持ち出して修理が必要になった場合は、日本にお持ち帰りの上、修理の手続きをお願いします。 本証書は再発行いたしません。 P. 73 P. 72...
Need help?
Do you have a question about the DigiMate and is the answer not in the manual?
Questions and answers