Lansinoh Signature Pro Manual
- Instructions for use manual (22 pages) ,
- Instructions for use manual (48 pages) ,
- Instructions for use manual (48 pages)
Advertisement
- 1 QUICK START GUIDE
- 2 PARTS DIAGRAMS
- 3 CLEANING INSTRUCTIONS
- 4 ASSEMBLY
- 5 USING THE LANSINOH SIGNATURE PRO DOUBLE ELECTRIC BREAST PUMP
- 6 PUMPING TIPS
- 7 TROUBLESHOOTING
- 8 BREASTMILK STORAGE GUIDELINES
- 9 THE LANSINOH NATURALWAVE NIPPLE
- 10 TECHNICAL DATA
- 11 Intended Use of Breast Pump
- 12 Indications of Breast Pump
- 13 Contraindication of Breast Pump
- 14 Important Safeguards
- 15 Documents / Resources
QUICK START GUIDE
Do NOT wash or sanitize tubing
Before first use, sterilize all parts that will come into contact with milk according to instruction.
Please carefully read all instructions prior to use
Assembly
See detailed instruction. Proper assembly is essential to ensure proper function and suction.

Insert purple diaphragm with the feet down

Attach clear cover and twist so tubing connector faces back

Attach flange

Insert valve

Attach bottle

Attach tubing

Secure Y connector

Secure connector

Attach to pump bas
Connect pump to power using AC Adapter or six AA Alkaline Batteries (not included)
Getting Started
Hold Breastmilk Expression Set to your breasts so that the nipple is aligned to extend straight toward the nipple tunnel of the breast flange, ensuring there are no gaps for air to enter. Make sure set is tilted slightly downward to allow milk to flow into bottles.

2-Phase Technology – Using Let-Down and Expression Phases
Press the power button  to start the pump in let-down phase
  . Let-down phase will run automatically for two minutes.
To begin expression phase sooner, press the Let-down/Expression Toggle button  to move to the expression phase. Press the Let-down/Expression Toggle button again at any point to switch back to Let-down phase.

Customization for Comfort and Efficiency
Pumping Style Selection
Every baby feeds differently. The Signature Pro® offers three different pumping styles to choose from, allowing you to choose the option that is most like your baby's feeding patterns. Change the pumping style using the Style Mode Toggle button  to find the pumping style that works best for you.
NOTE: When you switch to the expression mode the pump will start in Style 2.

Adjusting Suction Levels
Increase or decrease the suction to the maximum level that you find comfortable.
Increase suction by pressing the  button.
Decrease suction by pressing the  button.

Lansinoh® is here to support you. If you have questions, please do not hesitate to contact us at (800) 292-4794
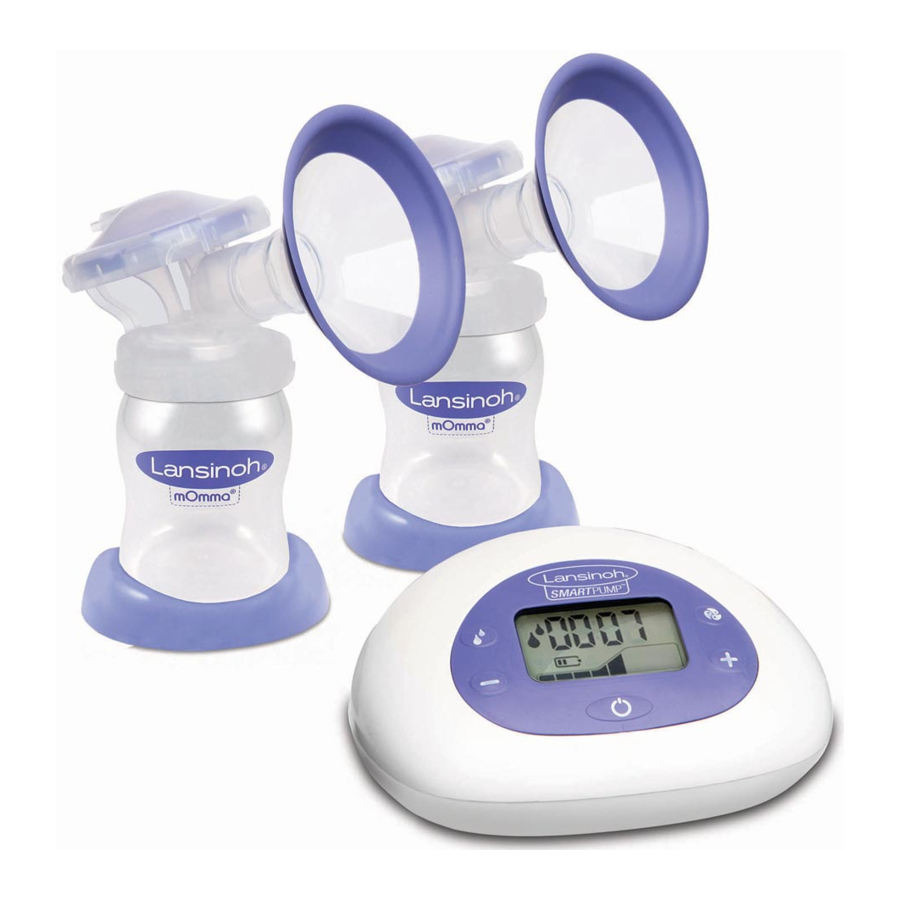
PARTS DIAGRAMS

Basic Controls, Display and Features

- Power, On/Off button
![]()
- Suction Level Increase Control Button
![]()
- Pumping Style Toggle Button
![]()
- LCD Display
- Let-Down/Expression Toggle Button
![]()
- Suction Level Decrease Control Button
![]()
- Let-Down/Expression Phase Indicator
- Time Display
- Pumping Style Indicator
- AC Power Indicator
- Battery Power Indicator
- Suction Level Indicator


- Tubing input
- Battery compartment for 6 AA batteries (not included)
- AC adapter input
AC Adapter

Lansinoh® Signature Pro® Breast Pump Parts

- Signature Pro® Tubing #53458
- Silicone Tubes 300 mm (2)
- Silicone Tube 600 mm
- Signature Pro® Tubing Y Connector #53405
- Signature Pro® Tubing Strap #50417
- Signature Pro® Pump Connnector #53453
- Breastmilk Expression Set Includes
- ComfortFit® Breast Flange 25mm (2) #5340
- Signature Pro® Breast Flange Body (2) #5345
- Signature Pro® Diaphragm (2) #5340
- Signature Pro® Diaphragm Cap (2) #5341
- White Valve (2 + 2 extra) #53400
- 5 oz (150 ml) Bottle (2) #53451
- Storage Lids #53450
- Signature Pro® AC Adapter/power cord #53409
Two extra white valves are included. Larger size flanges are sold separately. To order replacement parts or larger size flanges please visit www.lansinoh.com/store.
CLEANING INSTRUCTIONS
Unless otherwise instructed by your healthcare provider, follow these sanitizing and cleaning instructions.
Do not boil or wash tubing or connector!
Before First Use of Breastmilk Expression Set
When sanitizing parts, use enough water to keep parts afloat!
- Prior to using the set for the first time, disassemble and boil all parts of the Breastmilk Expression Set that come into contact with breastmilk for 5 minutes.
- Ensure you use enough water to keep parts afloat while boiling.
- Do not boil the tubing and tubing connector. The Lansinoh® Signature Pro® is a hygienic, closed system design, which ensures breastmilk will not enter the tubing or motor.
- Remove all parts from water immediately after boiling, using caution as parts will be hot.
- Completely air dry before assembly and use. Partially dried parts may affect operation of the pump. Please ensure parts are completely dry before use.
Cleaning of Breastmilk Expression Set
- Set aside the tubing and tubing connector.
- The breast flange and bottles may be cleaned in the upper rack of your dishwasher or hand washed with dish soap in hot water. For best results, we recommend using a baby bottle brush to clean the bottle and a baby nipple brush to clean the insides of the breast flange. DO NOT use solvents or abrasives. Rinse with hot, clean water.
- All other parts of the Breastmilk Expression Set should be hand washed to prevent loss and to extend their usefulness.
- To clean your breast pump base, wipe with a damp cloth, using only water or mild soap.
Before Each Use of Breastmilk Expression Set
- Always wash hands thoroughly with soap and water before handling the Breastmilk Expression Set, the pump body, or other attachments.
- Ensure that the tubing is free of any liquid or moisture. Do not operate the pump if liquid or moisture is visible in the tubing.
- Ensure diaphragms are completely dry before use.
- Before each use, visually inspect the individual components for cracks, chips, tears, discoloration or deterioration, as this may affect the functionality of the Breastmilk Expression Set. Please visit www.lansinoh.com/store or call 1-800-292-4794 for further guidance and replacement parts.

It is highly recommended not to use any method other than the above mentioned cleaning methods.
Use caution when cleaning the small white valve. It is important for proper suction. Do not use excessive force and do not clean with a baby bottle brush or a nipple brush. Gently wash by hand in hot, soapy water and rinse under hot running water.
To use steam or microwave sterilisers: Follow the manufacturers instructions. Ensure all openings are face down in the steriliser. Ensure you wash your hands before removing equipment from the steriliser.
ASSEMBLY
Assembling the Breastmilk Expression Set

- Place purple silicone diaphragm, the feet down, on the top of flange body. Ensure diaphragm fits securely between rims of breast flange body.

- Place clear diaphragm cap over breast flange body and twist to secure so that the tubing portal is facing the back of the pump.


- Firmly push ComfortFit® Flange into breast flange body.


- Holding the base of the white valve, gently secure the valve into the bottom of the breast flange body.


NOTE: Use care when handling and cleaning the small white valve.
- Screw collection bottle onto breast flange body.


- Attach end of 300 mm tubing to back of diaphragm cap. Ensure that tubing is pushed all the way to the base of the attachment port and completely covers it.


- Attach other end of 300 mm tubing to Tubing Y Connector.


- Repeat assembly process for second breast flange body.


Connecting the Breastmilk Expression Set
Once Breastmilk Expression Set is assembled, connect to pump base:
- Secure one end of 600 mm tubing to Tubing Y Connector.


- Secure other end of 600 mm tubing firmly to the pump connector.

- Insert pump connector into opening on left side of pump.


Connecting for Single Pumping
- Remove one of the 300 mm tubing from the Tubing Y Connector.


- Secure plug into open outlet of Tubing Y Connector.


USING THE LANSINOH® SIGNATURE PRO® DOUBLE ELECTRIC BREAST PUMP
Power Options
The pump may be operated using the following power supply modes:
AC Adapter

- Connect the AC adapter to the power receptacle located on the right side of the pump. Plug the AC adapter into an available electrical outlet.
- Electrical safety can only be achieved when the breast pump is connected to the AC Power adapter supplied with the product.
(See "Technical Data" section)
AA Alkaline Batteries (not included)

- Make sure the batteries are inserted correctly according to the polarity (+) and (-) as indicated.
- Close the compartment by gently pressing the cover until it snaps into place.
- Remove batteries if pump is not in use for a long period of time.
- Dispose of batteries according to regulations for environmental protection and recycling.
- Replace batteries as a simultaneous set. Do not mix old and new batteries.
- Do not mix alkaline and standard (carbon-zinc) batteries.
- If batteries are in the pump, but AC adapter is in use, the pump will use the adapter to power the pump, not the batteries.
For the most economical use, we recommend using your pump with the AC adapter provided. Your AC adapter is a universal AC plug adapter type and can be used with 100 VAC to 240 VAC systems with 50Hz and 60Hz mains.
Getting Started
If possible, wait until your breastmilk supply and breastfeeding schedule are well established. This is normally at least 3-4 weeks after birth, unless told otherwise by your doctor or breastfeeding advisor.

- Hold the Breastmilk Expression Set to your breasts so that the nipple is aligned to extend straight toward the nipple tunnel of the breast flange.
- Make sure the breast completely fills the breast flange so that a vacuum is formed and no air escapes.
- The Breastmilk Expression Set and nipple tunnel must tilt slightly downward to allow milk to flow naturally toward the bottle.
If you experience friction or discomfort on your nipples, you may need a different size flange. Larger size flanges are available. For more details, please call 800-292-4794 or visit lansinoh.com/store.
2-Phase Technology
Using Let-Down and Expression Phases
- Press and hold the On/Off Button to turn the pump on. The Lansinoh® Signature Pro® Double Electric Pump will start in the Let-Down Phase.
- After two minutes, the Let-Down Phase will automatically change to the Expression Phase in Cycle Mode 2.
- If you prefer to bypass the pre-set two minute Let-Down Phase or your milk lets-down sooner than two minutes, press the Let-Down/Expression Toggle Button to move to the Expression Phase.
- The Style Mode Indicator will appear in the display to signify that you are in the Expression Phase.
Customization for Comfort and Efficiency
Using Customizable Pumping Styles
Choose your style
Each baby is unique – right down to the ways they feed. The Lansinoh® Signature Pro® offers three different pumping styles to choose from – so you can select the style that best simulates your baby's feeding style.
 | Pumping Style1 |  |
 | Pumping Style 2 |  |
 | Pumping Style 3 |  |
- With the pump in Expression mode, select the style that is most comfortable and efficient for you by pressing the Pumping Style Toggle Button
![]() .
. - Pressing the button again will select the next style.
- The mode will be indicated on the LCD Display by the Style Mode Indicator.
You may find that the best style for you changes over time. The customization features of the Signature Pro® allow you to adjust with you and your baby.
Tailor for comfort
Within each pumping style, there are eight levels of suction to choose from:

- Adjust for higher suction by pressing the
![]() suction level increase control button.
suction level increase control button. - Adjust for lower suction by pressing the
![]() suction level decrease control button.
suction level decrease control button. - The current suction level will be indicated by the number of dark bars on suction level indicator.
 suction level increase control button.
Note: If at any time the suction on your breast reaches uncomfortable levels, reduce the suction level by pressing the  button on the left side of the LCD screen or disconnect the tubing from its receptacle on the electric pump.
Completing Your Pumping Session
- When a pumping session is finished, turn the pump off with the on/off
![]() button.
button. - After turning the pump off, the display will remain on for a few seconds.
- Make sure there is no suction on the nipple(s) before removing the breast flanges from the breast. If necessary, break the suction by inserting a finger between the breast flange and the breast. Once the suction is broken, the breast flange can be removed safely.
Please note: The LCD display light will automatically switch off if no control buttons are pressed for 20 seconds in order to save power. If the pump unit is left on and unattended for more than 60 minutes, the control system will automatically power off. To turn unit back on, hold the power-on button for several seconds.
PUMPING TIPS
Pumping Tips
The most important part of successful pumping is the ability to trigger the let-down reflex. This is when your milk begins to flow freely. Warm wet compresses applied to the breasts and gentle, circular massaging of the breasts prior to and/or during a pumping session can help encourage this natural reflex. Thinking of or looking at your baby, or a photo of your baby if you are apart, can also be helpful. Some moms can achieve more than one let-down during a pumping session. You may be able to achieve a second by returning to the LetDown phase by pressing the Let-Down/Expression Toggle Button.
How Long To Pump
Double pumping, compared to single pumping, will reduce the time you spend expressing your milk. Breastmilk is produced on a supply and demand basis. Expressing your breastmilk regularly will stimulate your body and help you maintain your milk supply. Just like with breastfeeding, it is not necessary to time your pumping sessions. As you get more experienced with pumping, you will get a better sense of the time it takes for your body to express your milk using a breast pump. If you have any breastfeeding or breastpump related questions, consult with an International Board Certified Lactation Consultant (IBCLC), breastfeeding counselor, or other healthcare provider such as your primary physician.
Pumping and Feeding Tips
- You may pump one breast while nursing the baby on the other. This allows you to maximize pumping effectiveness using the let-down reflex stimulated by your baby's sucking.
- Always test the temperature of any liquid before feeding your baby.
- Do not let a child take a bottle to bed or self-feed for long periods.
- To prevent possible choking hazard, test strength of the nipple by pulling on the bulb portion. Discontinue use if any tear or crack appears.
TROUBLESHOOTING
Troubleshooting the Lansinoh® Signature Pro® Double Electric Breast Pump
Interruption of Electrical Service
If you experience an interruption in the normal operation of the electrical and/or mechanical functioning of the pump, simply do the following:
- Unplug the AC adapter cord from the electrical outlet.
- Wait a few seconds, and then plug the AC adapter cord back into the electrical outlet. If you still experience electrical failure, try using the pump with the six AA batteries making sure the AC adapter is removed.
Discomfort While Pumping
If you feel any discomfort, you may need a different size flange. Visit lansinoh.com/store or call 800-292-4794.
Decreased Suction
If it feels like the suction has decreased, try the following:
- Remove the tubing from pump and place a finger over the tubing connector.
- If you feel suction, the pump is operating properly, but the Breastmilk Expression Set may not be correctly assembled or the white valve may be damaged.
- Make sure the Breastmilk Expression Set has been properly assembled. Check the assembly information in the section "Assembling the Breastmilk Expression Set"
- Inspect the white valve for a tear or pinhole. This component is critical to achieving proper suction. Replace the white valve with one of the spare valves provided with the product.
- If no suction is felt on your finger, try unplugging the adapter from the electrical outlet, wait a few seconds, and plug it back into the electrical outlet.
- When single pumping, check the tubing connector on the front of the pump to make sure it is closed for single pumping. If open, close the connector.
- If double pumping, ensure that the Breastmilk Expression Set is on both breasts before starting the pump.
Increased suction level for single pumping
If it feels like the suction is higher than usual when single pumping, check that the plug for the pipe is clean and that the airway in the plug is not blocked.
BREASTMILK STORAGE GUIDELINES
Breastmilk Storage and Thawing Guidelines for Healthy Term Babies
Check with your healthcare provider or an International Board Certified Lactation Consultant for specific storage instructions. When freezing, store in the back of the freezer and do not store milk in the door as temperature can fluctuate as the door is opened and closed.
| Where | Temperature | Time |
| At Room Temperature | 66-78°F (19-26°C) | 4 hours (ideal) up to 6 hours (acceptable) |
| In a Refrigerator | <39°F (<4°C) | 72 hours (ideal) up to 8 days (acceptable) |
| Freezer | 0°F (-18°C) | 3 months (ideal) up to 6 months (acceptable) |
| Deep Freezer | -4°F (-20°C) | 6 months (ideal) up to 12 months (acceptable) |
Date all breastmilk and use the oldest breastmilk first.
Thawing
Thaw frozen milk in the refrigerator or place the containers under cool running water, gradually warming the water until the milk is thawed. Thawed milk can be kept in a refrigerator for up to 24 hours.
NOTE: DO NOT refreeze milk once it is thawed.
Gently shake thawed milk before feeding to baby to mix the layers that have separated. Breastmilk is not homogenized and the "cream" will rise to the top of the bottle. Breastmilk can vary in color and consistency depending upon the time of the day that the milk was expressed, what you have eaten, and the age of the baby at the time of pumping.
NOTE: DO NOT MICROWAVE HUMAN MILK! Microwaving alters the composition of the milk. Microwaving also may create "hot spots" in the milk that could burn the infant.
NOTE: DO NOT thaw breastmilk in hot or boiling water.
THE LANSINOH® NATURALWAVE® NIPPLE
Clinically proven to reduce nipple confusion in breastfed babies
The patented NaturalWave® Nipple enables baby to replicate natural sucking actions learned at the breast. Exclusive breastfeeding is recommended for at least 3-4 weeks if possible before introducing a bottle and nipple.
 | Latching on Baby's lips open outward and latch onto the areola |
 | Peristaltic "wave-like" tongue movement Baby's tongue moves in "wave-like" motion to compress nipple and extract milk |
 | Swallowing Back of baby's tongue rises, channeling the milk into the esophagus |
Storage & Use:
Prior to use, always inspect and pull the feeding nipple in all directions to check the product. Throw away at the first signs of damage or weakness. For safety and hygiene reasons, replace the nipple every 7 weeks. Before first use, boil all parts for 5 minutes to sanitize. Ensure all parts are completely covered in water and free floating.
Cleaning:
Before first use, place all components in boiling water for 5 minutes, allow to cool and thoroughly rinse all bottle components. Always wash all components of the product immediately after each use. The feeding nipple can be washed in hot soapy water and rinsed in clean water. Dishwasher safe on top rack only. Safe to clean in a microwave-safe, steam sterilizer bag and special sterilizing machine. Do not clean with solvents or harsh chemicals
Assembly:
Once thoroughly dry, insert feeding nipple through the top of the screw cap collar. Attach the screw cap collar securely onto the bottle neck. When carrying a full bottle, make sure it is closed with the collar in place, taking care to position the feeding nipple in the center of the collar to activate the "spillproof" function of the product.

Precautions:
Do not leave bottle in direct sunlight, heat or disinfectant (sterilizing solution), as this may weaken the nipple. Do not clean with or allow feeding nipple to come into contact with solvents or harsh chemicals. Damage could result. Fill with the required amount of liquid and tighten the screw cap before using. Do NOT overfill. Heating in a microwave is NOT recommended as it may produce uneven heating and high localized temperatures. If you choose to heat liquid this way, DO NOT SEAL BOTTLES. Swirl well before use, and always check the temperature before feeding baby. Hot or unevenly heated liquid may burn baby's mouth. Do not warm liquid by placing the bottle directly onto gas or electric rings, warming plates, in electric ovens, etc. Wash after every use. Some liquids and sterile solutions may make the silicone become opaque. This does not alter any of its properties.
DO NOT MICROWAVE HUMAN MILK! Microwaving alters the composition of the milk and may also create "hotspots" in the milk that could burn the infant. Allowing your child to use this product for prolonged periods separate from regular mealtimes or to go to sleep while drinking liquids, other than water, from this bottle may cause or contribute to early childhood tooth decay. Always use this product with adult supervision. Keep all components not in use out of the reach of children. Do not leave baby alone with drinking equipment due to the risk of choking. Never use feeding nipple as a pacifier or soother. Always check liquid temperatures before feeding. Packaging materials are not part of the product. For your child's safety, please remove and discard all packaging materials prior to use but read and retain the instructions for future reference.
Packaging materials are not part of the product. For your child's safety, please remove and discard all packaging materials prior to use but read and retain the instructions for future reference.
TECHNICAL DATA
The expected service life of the pump is 500 hours.
- Power Supply
Battery operation: 6 AA size alkaline batteries, all connected in series
Battery operating time: Minimum 30 minutes. Maximum 2 hours. Results are dependent on battery freshness and pump settings.
AC Adapter operation: 100-240VAC wall plug type AC adapter, galvanically isolated with 9Vdc output voltage
Pump power dissipation: 10.0 Watts maximum
Voltage regulation: Linear voltage regulator with low dropout voltage and short circuit protection - Control System
Control unit: Microcontroller with integral program memory
Program memory: 32K flash ROM, 2K
RAM memory
HMI: LCD display with LED backlight, soft keypad
Single / double control: Single or double breast pumping possible
Selectable pumping rhythm mode: 3 pumping rhythm modes are selectable and controlled from keypad
Adjustable suction level: 8 suction levels are selectable and controlled from keypad
Suction vacuum level (Expression/Double pumping): Minimum 90mmHg, Maximum 280mmHg
| SYMBOLS | MEANING OF THE SYMBOLS |
 | Follow instructions for use |
 | Identifies the manufacturer |
 | Indicates the date of manufacture |
 | Type BF applied part |
 | Class II equipment |
 | Keep the device dry |
 | Keep the device away from sunlight |
 | Indicates the temperature limitation for operation, transport and storage |
 | Indicates the humidity limitation for operation, transport and storage |
 | Indicates the atmospheric pressure limitation for operation, transport and storage |
 | Indicates the protection against ingress of solid foreign objects and against harmful effects due to the ingress of water |
 | This pump is made of various metal and plastics. Before disposal, the device is to be rendered unusable and it must be disposed of as sorted waste in accordance with local waste electrical and electronic equipment regulations. To avoid the harmful effects on the environment and public health align with your defined local return and collection rules for waste electrical and electronic equipment (incl. batteries). |
 | Indicates that the packaging contains products intended to come in contact with food |
 | Indicates the positioning of battery cell |
 | Indicates to handle the fragile device with care |
Technical Data
Power Requirements
AC Adapter (included)
AC Adapter – North American
Plug Configuration
100-240VAC wall plug type
AC adapter, galvanically isolated adapter with 9Vdc output voltage.
Batteries (not included)
6 AA batteries, 1.5V alkaline
To maintain your power adapter follow these instructions:

DO NOT wrap cord of power adapter around the plug body.

CORRECT

DO NOT unplug power adapter by pulling on the cord.

CORRECT
DO NOT use power adapter if damaged.
Children have STRANGLED in cords. Keep the cords out of the reach of children.
Intended Use of Breast Pump
The Lansinoh® Signature Pro® Double Electric Breast Pump is intended to express and collect the breastmilk of a nursing woman for the purpose of feeding collected breastmilk to a baby. The Signature Pro® is intended for a single user.
Indications of Breast Pump
Lansinoh® Signature Pro® Double Electric Breast Pumps are indicated to elimination of clinical situations such as milk stasis in the breast, engorgement and mastitis caused by insufficient milk discharge, relieve sore and cracked nipples and to bring out flat or inverted nipples. Also, Lansinoh® Signature Pro® Double Electric Breast Pumps enable mothers to provide breast milk for babies who cannot feed directly at the breast for a variety of reasons, such as latch-on problems, premature or unwell babies.
Contraindication of Breast Pump
There are no known contraindications.
Important Safeguards
The Lansinoh® Signature Pro® Double Electric Breast Pump is a personal care item and for hygienic reasons should never be shared between mothers or resold from one mother to another. Either of these actions will void the warranty.
If you are a mother who is infected with Hepatitis B, Hepatitis C or Human
Immunodeficiency Virus (HIV), pumping breastmilk using the Lansinoh® Signature Pro® Double Electric Breast Pump will not reduce or remove the risk of transmitting the virus to your baby through your breastmilk.
When using electrical products, especially when children are present, basic safety precautions should always be maintained, including the following:
Read All Instructions Before Using

To reduce the risk of electrocution:
- Always unplug this product immediately after using.
- Do not use while bathing.
- Do not place or store this product where it can fall or be pulled into a tub or sink.
- Do not place or drop pump into water or other liquid.
- Do not reach for an electrical product that has fallen into water.
- Unplug immediately.
![]()
To reduce the risk of burns, electrocution, fire, or injury to persons: - This product should never be left unattended when plugged in.
- Close supervision is necessary when this product is used near children.
- Use this product only for its intended use as described in this manual. Do not use attachments not recommended by the manufacturer.
- Never operate this product if it has a damaged cord or plug, if it is not working properly, if it has been dropped or damaged, or dropped into water.
- Keep the cord away from heated surfaces.
- Never use while sleeping or drowsy.
- Never drop or insert any object into any opening or tubing.
- Do not use this product if it is broken or any parts are missing.
- Do not allow small children or pets to play with the pump unit, AC adapter, etc.
- Do not use outdoors with the AC adapter or operate where aerosol spray products are being used or where oxygen is being administered.

Save These Instructions along with your receipt for future reference.
Your decision to provide your baby with breastmilk, even if you need to be apart, is one of the most precious gifts you can give your baby. The Lansinoh® Signature Pro® is a safe, efficient and effective choice for moms who need to pump regularly.
PLEASE DO NOT RETURN THIS PUMP TO THE RETAILER.
Lansinoh's dedicated Customer Service team is here to help.
If you experience any issues with your Lansinoh® Signature Pro® breast pump please call
800-292-4794 or email customerservice@lansinoh.com, Monday - Friday 8am-8pm EST.
Documents / Resources
References
![www.lansinoh.com]() Shop Breastfeeding & Pumping Products for Moms | Lansinoh
Shop Breastfeeding & Pumping Products for Moms | Lansinoh![lansinoh.com]() Shop Breastfeeding & Pumping Products for Moms | Lansinoh
Shop Breastfeeding & Pumping Products for Moms | Lansinoh
Download manual
Here you can download full pdf version of manual, it may contain additional safety instructions, warranty information, FCC rules, etc.
Advertisement


Need help?
Do you have a question about the Signature Pro and is the answer not in the manual?
Questions and answers