Advertisement
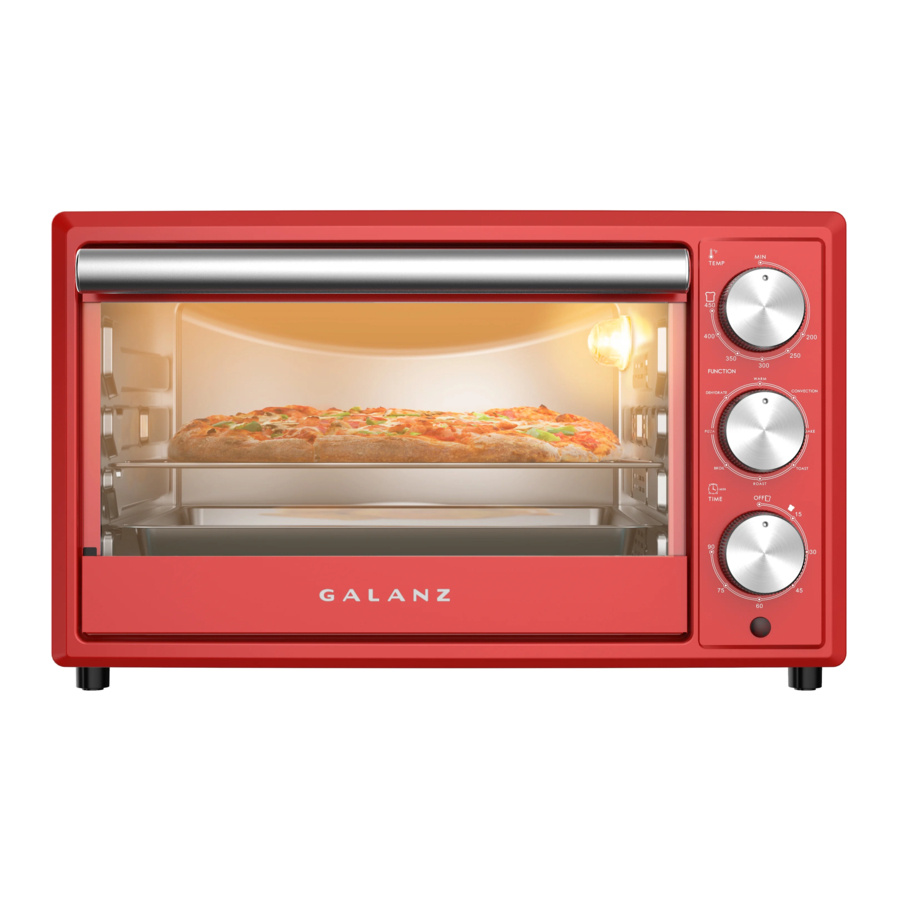
PRODUCT DIAGRAM

- Oven Rack
Place your oven safe cookware here. - Baking and Roasting Pan
For baking and roasting meat, fish and other foods. - Crumb Tray
For collecting small amounts of oil or food crumbs. - Glass Door
A transparent door allows you to see food cooking. It is made of tempered glass which is tougher and safer.
 Housing: Please note the housing gets hot during operation.
NOTE: There might be a slight difference of the product you bought from the above diagram.
CONTROL PANEL

NOTE
It is suggested to only use the appliance for 40 minutes in a two hour period.
OPERATION INSTRUCTIONS
Dehy
Accessory Guide:

For Dehydrate function, suggested cooking temperature can not be selected. Dehydrate function should only be used at 150°F to reach desired results.
Example: Use Dehydrate function to cook for 90 minutes.
- In standby mode, rotate the FUNCTION knob to choose Dehy program.
![]()
![]()
- Rotate the TEMP knob to choose 150°F.
![]()
![]()
- Rotate the TIME knob to choose 90 minutes, and restart the timer if additional time is needed.
![]()
![]()


Toast
Accessory Guide:

For Toast function, three browning levels can be selected by turning the time knob towards the shaded icon.

Example: Toast to Level 3 of Browning.
- In standby mode, rotate the FUNCTION knob to choose Toast program.
![]()
![]()
- Rotate the TEMP knob to choose 450F.
![]()
![]()
- Rotate the TIME knob to choose Level 03
![]()
![]()


| Level of Browning | Longest cooking time |
| 01 | 2:00  |
| 02 | 6:00 |
| 03 | 12:00 |
Keep Warm
Accessory Guide:

For Keep Warm function, suggested temperature can be selected between 125F and 175F the suggested longest cooking time is 90 minutes
Example: Use Keep Warm function to work for 30 minutes at 175°F.
- In standby mode, rotate the FUNCTION knob to choose Keep Warm program.
![]()
![]()
- Rotate the TEMP knob to choose 175°F.
![]()
![]()
- Rotate the TIME knob to choose 30 minutes
![]()
![]()
Bake
Accessory Guide:

For Bake function, suggested cooking temperature can be selected between 150°F and 450°F. The suggested longest cooking time is 90 minutes.
Example: Use Bake function to cook for 40 minutes at 375°F.
- In standby mode, rotate the FUNCTION knob to choose Bake program.
![]()
![]()
- Rotate the TEMP Knob to choose 375°F.
![]()
![]()
- Rotate the TIME knob to choose 40 minutes
![]()
![]()
Roast
Accessory Guide:

For Roast function, suggesting cooking temperature can be selected between 150F to 450F. The suggested lonest cooking time is 90 minutes
Example: Use Roast function to cook for 40 minutes at 325°F.
- In standby mode, rotate the FUNCTION knob to choose Rotiss program.
![]()
![]()
- Rotate the TEMP knob to choose 325°F.
![]()
![]()
- Rotate the TIME knob to choose 40 minutes
![]()
![]()
Broil
Accessory Guide:

For Broil function, The suggested temperature is 450°F. The longest cooking time is 90 minutes.
Example: Use Broil function to cook for 40 minutes.
- In standby mode, rotate the FUNCTION knob to choose Broil program.
![]()
![]()
- Rotate the TEMP knob to choose 450°F.
![]()
![]()
- Rotate the TIME knob to choose 40 minutes
![]()
![]()
Pizza
Accessory Guide:
For Pizza function, suggested cooking temperature can be selected between 150°F and 450°F. The suggested longest cooking time is 90 minutes,
Example: Use Pizza function to cook for 40 minutes at 375°F.
- In standby mode, rotate the FUNCTION knob to choose Pizza program.
![]()
![]()
- Rotate the TEMP knob to choose 375°F.
![]()
![]()
- Rotate the TIME knob to choose 40 minutes
![]()
![]()
Conv
Accessory Guide:

For Convection function, cooking temperature can be selected between150°F and 450°F. The longest cooking time is 90 minutes,
Example: Use Convection function to cook for 40 minutes at 375°F.
- In standby mode, rotate the FUNCTION knob to choose Conv program.
![]()
![]()
- Rotate the TEMP knob to choose 375°F.
![]()
![]()
- Rotate the TIME knob to choose 40 minutes
![]()
![]()
IMPORTANT SAFETY INSTRUCTIONS

When using this appliance, some safety tips should always be followed. They include:
- „Read all instructions carefully before using the appliance.
- „The temperature of a working oven or a just used one could be very high, to avoid getting burned, do not touch.
- „Close supervision is always necessary when this or any appliance is used near children. Do not place this appliance within reach of children.
- „To prevent electric shock, do not immerse the power cord, the plug or any other parts of the appliance in water.
- „Do not hang the power cord over the edge of a counter-top or near hot surfaces.
- „Check the unit frequently for damages to the power cord, the plug or any other parts. If any damage is found, stop using the unit and take it to the nearest maintenance or repair center.
- „Make correct and appropriate use of the accessories to prevent any man made damage.
- „Do not put the toaster oven in a high-temperature environment. Please keep the toaster oven away from heat sources such as heating appliances or fire.
- „When using the toaster oven, pull the unit out a minimum of 2 inches away from walls on all sides.
- „Always unplug the oven after using or before cleaning. Let the appliance cool down completely before moving or cleaning.
- „Do not cover the oven with metal foil, this will cause overheating of the appliance.
- „Please take caution when removing hot foods, cookware or accessories.
- „Please do not attempt to cook oversized foods in the toaster oven. Cooking foods that are not proportionally correct to the size of the cavity could cause fires or electrical shock.
- „A fire may occur if the toaster oven is covered or comes in contact with flammable materials including curtains, draperies and walls etc., when in operation.
- „Do not place any flammable materials in oven, such as paper, cardboard, plastic or anything that may catch fire or melt.
- „Do not store any materials other than manufacturer's recommended accessories in this unit when not in use.
- „To turn this appliance off, shut off all function settings before unplugging it.
- „Please use oven mitts when inserting or removing hot items from the oven.
- „Please take caution when opening or closing the tempered glass door. There is a chance it may break due to improper usage. Please do not scratch or use sharp or abrasive cleaning supplies on the glass. If there's any scratches or nicks, stop using it and contact Galanz at 1-800-562-0738.
- „Please operate the appliance in a well ventilated area. Please do not use outdoors.
- „The product is intended for normal household use only. Do not use it for other unintended purposes.
- „Place less than 3.5 lbs of food evenly onto the baking or roasting tray.
- „Please be careful when lifting or moving the appliance as there might be some sharp edges.
SAVE THESE INSTRUCTIONS
- „Please do not put any objects on the glass door as this can damage the glass or hinges.
- „Be careful not to be burned by hot surfaces of the working oven. This is a Y-connection appliance. Damage to the power
- „This is a Y-connection appliance. Damage to the power cord needs to be fixed by professionals.
- „Do not operate the appliance with an external timer or a separate remote control system.
- „Unplug from outlet when not in use and before cleaning. Allow to cool before putting on or taking off parts.

BE CAREFUL TO AVOID SCALDING BY THE HOT SURFACES!
READ BEFORE USING
- „Read this manual carefully before using the appliance. „
- „Open oven door and remove all printed documents and papers from inside.
- „Check and clean all accessories before using.
- „Dry all accessories thoroughly before inserting them back in.
ELECTRICAL CONNECTIONS
A short power cord is provided to reduce risks of becoming entangled or tripping over a long cord, an extension cord may be used if care is exercised in its use.
- The electrical rating of the extension cord must be at least as great as the appliance. The extension cord must be arranged so that it will not drape over the counter-top or table-top where it can be pulled on by children or tripped over unintentionally.
- Fixing and replacement of the power cord must be done by professionals from the manufacturer's maintenance department or the relevant department.
INSTALLATION GUIDE
- „Make sure that all the packing materials are removed from the inside of the toaster oven.
- „This oven must be placed on a flat, stable surface.
- „For correct operation, the oven must have sufficient airflow. Allow minimum 20cm of free space necessary above the top surface of the oven and 5cm at both sides. Do not cover or block any openings on the appliance. Do not remove feet. „The appliance shall be only used on a countertop over 3 feet (914mm) above the floor.
- „Do not place the oven where heat, moisture, or high humidity are generated, or near combustible materials.
![]()
- „Make sure that the power cord is undamaged and does not run under the oven or over any hot or sharp surfaces.
- „The socket must be readily accessible so the toaster oven can be easily unplugged in an emergency.

SAVE THESE INSTRUCTIONS
IMPORTANT TIPS
- „For gourmet results please cook food that has been already defrosted.
- „Frozen food and thick cut meat take longer to cook.
- „Use the baking and roasting tray to cook foods containing liquids or fat to protect the heating elements from damage.
- „Be careful when opening the toaster oven door as hot air can escape and cause burns.
- „Make sure to use the crumb tray and clean the toaster oven regularly.
- „Do not do any cooking with the door open.
- „Do not place any accessories or cookware on top or in contact with the heating elements.
- „Condensation is normal and can be seen on the glass door as the toaster oven heats up to the set temperature.
| Power supply | 120V/60Hz |
| Rated Power | 1500W |
| Outside Dimensions | 18.3 x 15.8 x 11.3 inches |
| Oven Capacity | 0.9 Cu. Ft. |
| Net Weight | Approx.12.1 lbs |
Documents / ResourcesDownload manual
Here you can download full pdf version of manual, it may contain additional safety instructions, warranty information, FCC rules, etc.
Advertisement


Need help?
Do you have a question about the GRH1209RDRM151 and is the answer not in the manual?
Questions and answers