Table of Contents
Advertisement
Quick Links
Advertisement
Table of Contents

Related Manuals for AirKing AKSF2IN1GY


Summary of Contents for AirKing AKSF2IN1GY
- Page 1 MODEL: AKSF2IN1GY STATIEF VENTILATOR HANDLEIDING | USER MANUAL...
- Page 2 INHOUDSOPGAVE Handleiding - Nederlands Pagina 3 User Manual - Engels Pagina 17 Semaco BV Maaiveldweg 16 2661 CX Bergschenhoek The Netherlands...
- Page 3 Whether you want to install the fan or learn about its features, our video will help you get started. Airking likes to make it easy for its customers, so you can focus on what really mat- ters: fresh air in your environment!
-
Page 4: Optionele Accessoires
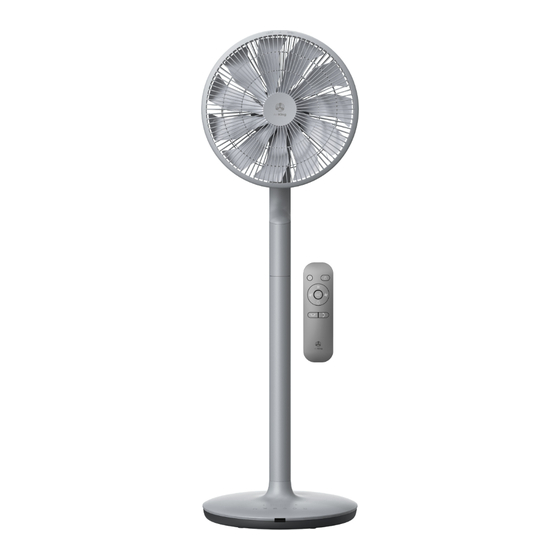
DE VERPAKKING BEVAT Ventilatorblad Motorunit Achtergrill Voorgrill Middenpaal Basisunit Ventilatorschroef Handleiding Ventilatordop DC-dapter Afstandsbediening Schroevendraaier Schroef Indien 1 van de bovenstaande items missen neem dan contact met ons op OPTIONELE ACCESSOIRES Oplaadstation Oplaadbare Batterijmodule en dock (optionele (optionele aankoop) aankoop) De oplaadbare batterijmodule is een optioneel product accessoire en kan apart worden aangeschaft via Air-king.nl... - Page 5 PRODUCT BESCHRIJVING Achtergrill Voorgrill Motorunit Ventilatorblad (achter de voorgrill) Schroef voor bevestiging van de voorbescherming Ontgrendelknop van de middenpaal Middenpaal Basisunit Infraroodontvanger van de afstandsbediening Bedieningspaneel Compartiment voor oplaadbare batterij (Batterij is optioneel) Ontgrendellipje van de batterijdeksel Ontgrendellipje van de middenpaal Aansluiting voor DC-adapter Compartiment voor dockbevestiging Dock (optionele aankoop)
- Page 6 OMSCHRIJVING BEDIENINGSPANEEL & LCD-SCHERM Display Batterij-indicator Kinderbeveiligingsindicator Slimme temperatuurregelingl °C 90° Natuurlijke Wind Modus 95° 60° Slaap Snelheidsindicator Timer-indicator 45° 30° Normale Modus Wind Modus Aan/uit Timer Verticale Horizontale Modus Snelheid Oscillation Oscillation AFSTANDSBEDIENING Kinderslot Aan/uit Modus Snelheid omhoog Snelheid omlaag Timer Horizontale Oscillation Verticale Oscillation...
- Page 7 INSTALLATIE EN INSTELLING VAN DE VENTILATOR Haal alle onderdelen uit de verpakking. Verwijder de beschermhoes en plaats alle onderdelen op een droge, stabiele en vlakke ondergrond. Demonteer de voor- en zijgrill door deze in de klokwijzerzin te draaien. Achtergrill Voorgrill Ventilatorblad Opmerking: Dit stuk karton is bedoeld ter bescherming van het ventilatorblad...
- Page 8 ASSEMBLAGE VAN DE HOOFDUNIT 04. Bevestig de voorgrill aan de hoofdeenheid door 03. Richt de centrale opening van het ventilatorblad deze in de binnenrand van de zijgrill te plaatsen. uit en schuif deze op de motoras. Bevestig de Zorg ervoor dat de voorgrill zich tussen de || ventilatorhouder op de motoras en draai deze markeringen op de zijrooster bevindt.
- Page 9 ASSEMBLAGE VAN DE BEHUIZING ONTKOPPELING VAN DE VERBINDING Om de middenpaal los te maken van de basisunit, Om de motorunit los te maken van de drukt u met één hand op het ontgrendelingslipje en verbindingskoppeling van de middenpaal, trekt u met de andere hand de middenpaal naar drukt u op de ontgrendelknop van de paal buiten om deze uit de unit te verwijderen.
- Page 10 GEBRUIK VAN DE VENTILATOR Bedienings notitie 01. Aan/uit zetten Druk eenmaal op de aan/uit-knop om het apparaat in/uit te schakelen. Standaard begint het apparaat zijn werking in de normale windmodus met ventilatorsnelheid niveau 9. Aan/Uit 02. Modus Druk achtereenvolgens op de modusknop om de gewenste modus te selecteren: Normale Wind, Natuurlijke Wind of Slaapmodus.
- Page 11 05. Verticale Oscillation Druk achtereenvolgens op de knop voor verticale oscillatie om een verticale oscillatiehoek van 45° of 95° te selecteren. De bijbehorende indicator licht op. Let op! Gebruik geen overmatige kracht om de oscillatiehoek te kantelen, om beschadiging van het mechanisme te voorkomen.
-
Page 12: Gebruik Van De Afstandsbediening
GEBRUIK VAN DE AFSTANDSBEDIENING • Vermijd contact met water of extreme vochtigheid. • Als er een obstakel is tussen de afstandsbediening en de signaalontvanger van de ventilator, kan de werking van de afstandsbediening worden beïnvloed. • De werkafstand van de afstandsbediening wordt korter of minder responsief wanneer de batterij bijna leeg is. - Page 13 OPMERKINGEN BIJ HET GEBRUIK VAN DE OPLAADBARE BATTERIJMODULE Om de effectiviteit van de ventilator te waarborgen, wordt aanbevolen de unit maandelijks schoon te maken en te onderhouden, of wanneer deze vuil is. • Zet de voeding uit en koppel de DC-adapter of Dock los voordat u begint met schoonmaken en onderhoud. •...
- Page 14 AirKing. temperature or unusual fan damage to the unit. novita. voorkomen. temperaturen of ongewone circulation occurs. luchtcirculatie.
- Page 15 VEILIGHEIDSVOORSCHRIFTEN Lees de gebruiksaanwijzing zorgvuldig door voordat u de ventilator gebruikt en bewaar deze voor later gebruik. Personen die niet vertrouwd zijn met de gebruiksaanwijzing, evenals kinderen en personen die onder invloed staan van medicatie, alcohol of drugs, wordt geadviseerd de ventilator niet te bedienen, of alleen onder toezicht.
-
Page 16: Technische Specificaties
TECHNISCHE SPECIFICATIES DC-adapter Airking Ventilator Nominale ingangsspanning 100 tot 240 V Maximale Afmetingen 332 mm x 332 mm x 1030 mm Nominale ingangsfrequentie 50 / 60 Hz Maximale invoer stroom 2.0 A 332 mm x 332 mm x 593 mm... -
Page 18: Optional Accessory
THIS PRODUCT PACKAGE INCLUDES Fan Blade Motor Unit Side Guard Front Guard Centre Pole Base Unit Guard Holder Instruction Manual Fan Holder DC Adapter Remote Control Screwdriver Screw Please contact us immediately if any of the above-mentioned items are not included. OPTIONAL ACCESSORY Docking station Rechargeable Battery Module (optional purchase) -
Page 19: Product Description
PRODUCT DESCRIPTION Side Guard Front Guard Motor Unit Fan Blade (Behind The Front Guard) Front Guard Fixing Srew Centre Pole Release Button Centre Pole Base Unit Remote Control Infrared Receiver Control Panel Rechargeable Battery Compartment Rechargeable Battery Cover Eject Latch Centre Pole Release Latch DC Adapter Socket Dock Attachment Compartment... -
Page 20: Remote Control Description
CONTROL PANEL & LCD DISPLAY DESCRIPTION Screen Display Battery Indicator Childlock Indicator Smart Temperature Control °C 90° Natural Wind Mode 95° 60° Sleep Speed Indicator Timer Indicator 45° 30° Normal Mode Wind Mode Power Timer Vertical Horizontal Mode Speed Control Oscillation Oscillation REMOTE CONTROL DESCRIPTION... - Page 21 UNIT INSTALLATION AND SET UP Remove all items and parts from the packaging box. Remove the protective cover and place all the parts on a dry, stable and level surface. Disassemble the front and side guard in a clockwise direction. Back Grill Front Grill Fan Blade...
- Page 22 ASSEMBLY OF THE HEAD UNIT 04. Attach the front guard to the head unit by fitting 03. Align and slot the centre opening of the fan it into the inner rim of the side guard. Ensure the blade onto the motor shaft. Attach the fan holder on the front guard is situated in between the | | onto the motor shaft and rotate anticlockwise to markings on the side guard.
- Page 23 ASSEMBLY OF THE BODY DISCONNECTION THE JOINT To detach the centre pole from the base To detach the motor unit from the centre unit, use one hand to press the release latch, pole connecting joint, please press the pole then use the other hand to pull the centre release buttonasindicated.
-
Page 24: Using The Fan
USING THE FAN UNIT OPERATING NOTE 01. Power On/Off Press the on/off button once to turn ON/OFF the unit A. By default, unit will commence its operation at normal wind mode with fan speed level 9. Power On/Off 02. Mode Press the button consecutively to select Normal Wind, Natural Wind and Sleep Mode and its corresponding indicator illuminates. - Page 25 05. Vertical Oscillation Press the Vertical Oscillation button consecutively to select vertical oscillation angle of 45° or 95° and its correspon- ding light indicator illuminates. To deactivate the Vertical Oscillation function, press the Vertical Oscillation button consecutively until the light indicator stops illuminating. Caution! DO NOT use excessive force to tilt the oscillation angle to prevent damage to the oscillation mechanism.
- Page 26 USING THE REMOTE CONTROL Avoid contact with water or extreme humidity. • In the event when there is an obstacle between the remote control and fan’s signal receiver, remote control operation will be affected. • The remote control effective distance will be shortened or become less responsive when the battery level gets depleted.
- Page 27 RECHARGEABLE BATTERY MODULE OPERATING NOTE To ensure the effectiveness of the fan, it is recommended to clean and maintain the unit on monthly basis, or when it is dirty. • Please turn OFF the power supply and disconnect the DC adapter or Dock before cleaning and maintenance. •...
-
Page 28: Safety Precautions
SAFETY PRECAUTIONS DO NOT operate the unit on DO NOT insert fingers or DO NOT use the fan near Only use the included DO NOT insert fingers or DO NOT use the fan near Only use the included DO NOT operate the unit on uneven or unstable curtains or other obstacles dedicated DC adapter or... -
Page 29: Troubleshooting
SAFETY PRECAUTIONS Read the operating instructions carefully before using the fan and keep it for later reference. Persons who are not familiar with the operating instructions, as well as children & persons under the influence of medication, alcohol or drugs are not advised to operate the fan, or are only advised to operate it under supervision. -
Page 30: Technical Specifications
TECHNICAL SPECIFICATIONS DC Adapter Airking Fan Floor-Standing Dimension Rated Input Voltage 100 to 240 V 332 mm x 332 mm x 1030 mm (W x D x H) Rated Input Frequency 50 / 60 Hz 2.0 A Desktop Dimension Max. Input Electric Current...
Need help?
Do you have a question about the AKSF2IN1GY and is the answer not in the manual?
Questions and answers