Advertisement
Table of Contents
- 1 General Safety Rules
- 2 Motor Specifications
- 3 Power Connections
- 4 Grounding Instructions
- 5 Extension Cords
- 6 Functional Description
- 7 Unpacking and Cleaning
- 8 Operating Controls and Adjustments
- 9 Adjusting Belt Tracking
- 10 Edge Sanding
- 11 Maintenance
- 12 Changing Sanding Belts
- 13 Parts, Service or Warranty Assistance
- Download this manual
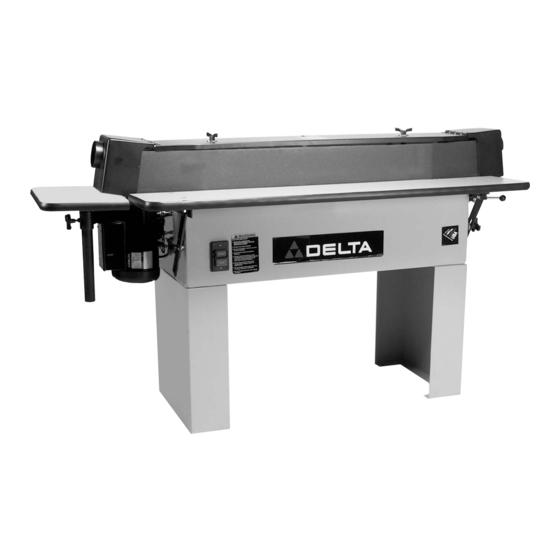
6" Edge Sander
(Model 31-390, 391, 392)
PART NO. 406-11-651-0006 - 03-12-02
Copyright © 2002 Delta Machinery
To learn more about DELTA MACHINERY
visit our website at: www.deltamachinery.com.
For Parts, Service, Warranty or other Assistance,
1-800-223-7278 (
1-800-463-3582).
please call
In Canada call
Advertisement
Table of Contents

Related Manuals for Delta 31-390


Summary of Contents for Delta 31-390
- Page 1 6" Edge Sander (Model 31-390, 391, 392) PART NO. 406-11-651-0006 - 03-12-02 Copyright © 2002 Delta Machinery To learn more about DELTA MACHINERY visit our website at: www.deltamachinery.com. For Parts, Service, Warranty or other Assistance, 1-800-223-7278 ( 1-800-463-3582). please call...
-
Page 2: General Safety Rules
If you have any questions relative to a particular application, DO NOT use the machine until you have first contacted Delta to determine if it can or should be performed on the product. - Page 3 ADDITIONAL SAFETY RULES FOR ABRASIVE FINISHING MACHINES WARNING: FAILURE TO FOLLOW THESE RULES MAY RESULT IN SERIOUS PERSONAL INJURY. DO NOT OPERATE THIS MACHINE UNTIL it is assembled and installed according to the instructions. OBTAIN ADVICE from your supervisor, instructor, or another qualified person if you are not familiar with the operation of this machine.
-
Page 4: Motor Specifications
POWER CONNECTIONS MOTOR SPECIFICATIONS SINGLE PHASE INSTALLATION 31-390 The motor on your tool is wired for 230 Volt, single phase operation. The power cord is equipped with a plug that has two flat current carrying prongs in tandem and one round or "U"... -
Page 5: Extension Cords
FUNCTIONAL DESCRIPTION FOREWORD Delta Model 31-390 is a large capacity Edge Sander for fast, efficient, straight and bevel edge sanding with the added ability to handle contour sanding jobs. The standard unit includes; motor, stand legs, push-button controls, magnetic starter, transformer, overload protection, laminate coated tables, graphite platens, three sanding drums with 80 grit medium abrasive sleeves and 6"... - Page 6 1. Assemble the starter box (A) Fig. 5, to the base of the sander using two 1/4-20 x 1/2" hex head screws (B) with star flatwashers, through the rear of the two pre-drilled holes (D) in the machine base and into the two tapped holes (C) in the back of starter box.
- Page 7 (B) from the machine. To assemble the top guard and dust chute assembly (B) Fig. 8, to the edge sander proceed as follows: 1. Place a 1/2" flatwasher (C) Fig. 9, on studs (D) and (E). 2. Place top guard and dust chute assembly (B) Fig. 9, on studs (D) and (E).
- Page 8 18 x 3/4" long flat head screws (D). 3. Three abrasive drum spindles are supplied as stand- ard equipment with the edge sander. Loosen set screw (E) Fig. 13, in adapter plate (B), and insert the desired abrasive drum spindle, one of which is shown at (F), into the adapter plate (B).
- Page 9 ASSEMBLING AUXILIARY END TABLE ASSEMBLY The auxiliary end table is furnished as standard equip- ment with the edge sander. The table is used when performing contour sanding operations around the drive pulley and auxiliary abrasive drum and spindle assembly. To assemble the auxiliary end table proceed as follows: 1.
-
Page 10: Operating Controls And Adjustments
4. Adjust platen (B) Fig. 28, until the sanding belt is close to, but not contacting tilting table (C). Tighten studs (A) Fig. 28, after adjustments are made. 5. Reassemble top guard and dust chute assembly to edge sander. Fig. 25 Fig. 26 Fig. 27... - Page 11 ADJUSTING LONG PLATEN To adjust the long platen when sanding on the straight table: 1. DISCONNECT TOOL FROM POWER SOURCE. 2. Remove the top guard and dust chute assembly. 3. Loosen two hex nuts (A) Fig.29 holding brackets (B) at each end of the machine, and move platen (C) in or out as needed.
-
Page 12: Adjusting Belt Tracking
ADJUSTING BELT TRACKING To check and adjust the tracking of the sanding belt on the pulleys, proceed as follows: 1. Raise the dust chutes (A) Fig. 34, at both ends of the top guard and dust chute assembly. 2. Make certain the top guard and dust chute assembly is not interfering with the rotation of the sanding belt. -
Page 13: Edge Sanding
EDGE SANDING When edge sanding, it is advisable to raise one end of the table as shown in Fig. 36. This allows cooler belt running, prevents spot wear, reduces material burning and promotes longer belt life. The table should be positioned so it is close to, but not contacting the sanding belt. -
Page 14: Maintenance
CHANGING SANDING BELTS To remove and install sanding belts, proceed as follows: 1.DISCONNECT TOOL FROM POWER SOURCE. 2. The sanding belt can be changed with or without the top guard and dust chute removed from the machine. 3. Push in on belt tension lever (A) Fig. 39, to release belt tension, and remove sanding belt (B) as shown. -
Page 15: Parts, Service Or Warranty Assistance
1-800-223-7278 (In Canada call 1-800-463-3582). Delta will repair or replace, at its expense and at its option, any Delta machine, machine part, or machine accessory which in normal use has proven to be defective in workmanship or material, provided that the customer returns the product prepaid to a Delta factory service center or authorized service station with proof of purchase of the product within two years and provides Delta with reasonable opportunity to verify the alleged defect by inspection. - Page 16 Parts and accessories for Porter-Cable ·Delta products should be obtained by contacting any Porter-Cable·Delta Distributor, Authorized Service Center, or Porter-Cable·Delta Factory Service Center. If you do not have access to any of these, call 800-223-7278 and you will be directed to the nearest Porter-Cable·Delta Factory Service Center. Las Estaciones de Servicio Autorizadas están ubicadas en muchas grandes ciudades.
Need help?
Do you have a question about the 31-390 and is the answer not in the manual?
Questions and answers