Linksys CIT200 User Manual
Cordless internet telephony kit
Hide thumbs
Also See for CIT200:
- User manual (100 pages) ,
- Quick installation (2 pages) ,
- Product data (2 pages)
Table of Contents
Advertisement
Quick Links
Download this manual
See also:
Product Data
Advertisement
Table of Contents

Related Manuals for Linksys CIT200


Summary of Contents for Linksys CIT200
- Page 1 ® A Division of Cisco Systems, Inc. Cordless Internet Telephony Kit User Guide CIT200 Model No.
- Page 3 Specifications are subject to change without notice. Linksys is a registered trademark or trademark of Cisco Systems, Inc. and/or its affiliates in the U.S. and certain other countries. Copyright © 2005 Cisco Systems, Inc. All rights reserved. Other brands and product names are trademarks or registered trademarks of their respective holders.
-
Page 4: Table Of Contents
Cordless Internet Telephony Kit Table of Contents Chapter 1: Introduction Welcome What’s in This User Guide? Chapter 2: Getting to Know the Cordless Internet Telephony Kit The Charger The Base Station The Buttons on the Handset The Handset’s Back Panel Icons shown on the Handset Call Timers Menus and Submenus... - Page 5 Cordless Internet Telephony Kit Appendix A: Troubleshooting Common Problems and Solutions Factory Setting Appendix B: Specifications Appendix C: Regulatory Information IMPORTANT SAFETY INSTRUCTIONS Appendix D: Warranty Information Appendix E: Contact Information...
- Page 6 Cordless Internet Telephony Kit...
- Page 7 Cordless Internet Telephony Kit List of Figures Figure 2-1: The Telephony Kit shown on its Charger Figure 2-2: The Telephony Kit’s Base Station Figure 2-3: Front of Handset Figure 2-4: Side of Handset Figure 2-5: Back Panel of Handset Figure 3-1: The Handset’s Batteries Figure 3-2: Handset on Charger Figure 3-3: Windows Sound Properties Figure 3-4: Volume Control...
-
Page 8: Chapter 1: Introduction Welcome
Cordless Internet Telephony Kit Chapter 1: Introduction Welcome Thank you for choosing the Linksys Cordless Internet Telephony Kit. It will allow you to make phone or fax calls using your broadband connection. Get cordless handset convenience when you use Skype™! Now you don't have to sit in front of your computer when you want to talk to your friends. -
Page 9: What's In This User Guide
Cordless Internet Telephony Kit What’s in This User Guide? This guide covers the steps for installing the Cordless Internet Telephony Kit. • Chapter 1: Introduction This chapter describes the Cordless Internet Telephony Kit’s applications and this User Guide. • Chapter 2: Getting to Know the Cordless Internet Telephony Kit This chapter describes the physical features of the Cordless Internet Telephony Kit. -
Page 10: Chapter 2: Getting To Know The Cordless Internet Telephony Kit
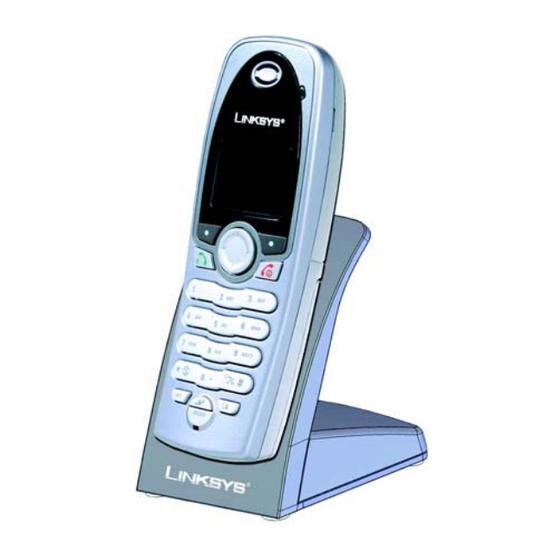
Cordless Internet Telephony Kit Chapter 2: Getting to Know the Cordless Internet Telephony Kit The Charger The Telephony Kit comes with a Charger, which plugs into a power socket. This is used for recharging the phone when it’s power runs low. Simply slide the phone onto the charger, as shown, and the phone will begin recharging automatically. -
Page 11: The Base Station
Cordless Internet Telephony Kit The Base Station The Telephony Kit’s Base Station connects to the USB port of your Skype-enabled PC. This unit receives and transmits the phone signal through your PC and over the Internet through the Skype software. POWER LED The POWER LED lights up when the Base Station is powered on and ready. -
Page 12: The Buttons On The Handset
Cordless Internet Telephony Kit The Buttons on the Handset The buttons of the Cordless IP Phone’s handset are described here. You can have up to four cordless handsets for a single base station (refer to Chapter 3: Setting Up the Cordless Internet Telephony Kit for more information). - Page 13 Cordless Internet Telephony Kit Name Function Star & Ringer This button performs all the functions of a Star key along with turning the phone’s ringer on or off. Pound, Key This button performs all the functions of Lock & Pause a Pound key along with allowing you to lock the keys and enter Pauses.
-
Page 14: Figure 2-4: Side Of Handset
Cordless Internet Telephony Kit Name Function HEADSET Allows you to connect a headset HEADSET Figure 2-4: Side of Handset Chapter 2: Getting to Know the Cordless Internet Telephony Kit The Buttons on the Handset... -
Page 15: The Handset's Back Panel
Cordless Internet Telephony Kit The Handset’s Back Panel The Cordless IP Phone’s speakerphone and battery compartment are located on the back panel of the handset. For directions on how to insert the battery, refer to Chapter 3: Setting Up the Cordless Internet Telephony Kit. Speakerphone Battery Compartment... -
Page 16: Icons Shown On The Handset
Cordless Internet Telephony Kit Icons shown on the Handset Various icons will appear on the Handset’s Display Screen to provide you information about the phone. Some of the icons are: Icon Meaning Icon Meaning Base/Handset Link Name Call in Progress Number Battery Full (This bar goes lower as the battery charge Battery Empty (This bar goes lower as the battery charge... - Page 17 Cordless Internet Telephony Kit Icon Meaning Icon Meaning Alarm Clock Internal Melody Ringer Off External Melody Key Lock Mode Home Phone/PSTN Base Volume Mobile Phone Contrast Gender Office Phone Chapter 2: Getting to Know the Cordless Internet Telephony Kit Icons shown on the Handset...
-
Page 18: Call Timers
Cordless Internet Telephony Kit Icon Meaning Icon Meaning Address (Country, Province, City) Birthday USB Base Language Message Waiting Indicator Online Status Call Timers When you are on a call, a call timer on the Display Screen will show the length of your current call. Chapter 2: Getting to Know the Cordless Internet Telephony Kit Call Timers... -
Page 19: Menus And Submenus
Cordless Internet Telephony Kit Menus and Submenus The Handset’s Display Screen shows a variety of menus with the Telephony Kit’s various features and functions. These menus are displayed here: Main Menu Skype Display Sounds Advanced System Contacts Clock Handset Alarm Clock Register User Status Time Format... - Page 20 Cordless Internet Telephony Kit Phonebook Private Shared View View Use Number Use Number Details Edit Edit To Private To Shared Delete Delete Add Entry Add Entry Status Quick Dial Delete All Status Delete All NOTE: Whenever you are in Menu mode, you must press the Save or OK button to save your changes.
- Page 21 Cordless Internet Telephony Kit Call Records Menu Missed Dialed Received Call Timers Delete Calls Use Number Use Number Use Number Last Call Missed Details Details Details Dialled Dialed Use Number Use Number Use Number Received Received List List List All Calls VMWI To Private To Private...
-
Page 22: Chapter 3: Setting Up The Cordless Internet Telephony Kit Overview
Cordless Internet Telephony Kit Chapter 3: Setting Up the Cordless Internet Telephony Kit Overview This chapter gives instructions on how to set up the Telephony Kit on your network, as well how to set up your PC and how to set the Handset’s clock. Setting Up the Telephony Kit To begin setting up the Telephony Kit: 1. -
Page 23: Figure 3-2: Handset On Charger
Cordless Internet Telephony Kit 3. Connect the Charger’s power plug to a power socket. 4. Place the handset on the charger unit and let the batteries charge for a full 14 hours before using the phone for the first time. NOTE: Handset may get warm during initial charge. -
Page 24: Setting Up Your Pc
Cordless Internet Telephony Kit Setting Up Your PC Before you can use the Telephony Kit, you must have SKYPE software installed on your PC. You must also have an active SKYPE account. As this phone depends upon the SkYPE software to place calls, it will not work without it. For information on how to download and use SKYPE, please visit www.skype.com NOTE: Once the USB driver Next, install the Telephony Kit’s USB driver from the enclosed setup wizard CD, as follows:... -
Page 25: Figure 3-3: Windows Sound Properties
Cordless Internet Telephony Kit Adjusting the Speaker Volume on your PC The speaker volume setting on your PC will affect the Handset’s sound quality. To adjust the speaker volume: 1. Open the Control Panel on your PC. 2. Windows 2000 users should select Sound and Multimedia. Windows XP users should select Sound and Audio devices. -
Page 26: Setting The Handset's Clock
Cordless Internet Telephony Kit Setting the Handset’s Clock Once you have followed all of the directions above, the Handset will obtain the current time from your PC, which will be shown on the Display Screen. If you wish to change the time shown, however, you must do the following: To adjust the time setting: 1. - Page 27 Cordless Internet Telephony Kit To show the clock as a 12-hour or 24-hour clock: 1. Use the Soft Keys to select the Menu option. 2. Using the Up or Down directions on the Navigation Pad, select DISPLAY. Then, click OK with the appropriate Soft Key.
-
Page 28: Chapter 4: Using The Cordless Internet Telephony Kit
Cordless Internet Telephony Kit Chapter 4: Using the Cordless Internet Telephony Kit Making Calls Calling an Ordinary Phone Number 1. Press the Talk & Recall Button. 2. Dial the number you want to call; the number appears on the display and is dialled. SKYPEOUT In order to make SKYPEOUT calls, you need to purchase SKYPEOUT credits;... - Page 29 Cordless Internet Telephony Kit Call timer The call timer shows the duration of your current call on display. Out of range warning If you move too far away from the base unit during a call, your phone will sound an alert tone, and Base/Handset Link icon will flash. If the handset cannot find the base in 30 minutes, it will automatically turn itself off and user will have to manually turn it on again.
- Page 30 Cordless Internet Telephony Kit Search by letter Using the keypad, enter the first letter of the name you wish to find. For example, to find "Sam", press 7 four times, the first contact begins with the letter S is high-lighted. 2.
- Page 31 Cordless Internet Telephony Kit Saving a number from pre-dial: 1. Enter the number in standby. The number appears on the display. 2. Press SAVE. Memory Full If the phonebook is full, FULL is displayed, and then the phone returns to standby. 3.
- Page 32 Cordless Internet Telephony Kit End a call Press the End & On/Off button or place the phone on the charger. Answer a call When you receive a call, the phone will ring and the Call in Progress icon will flash in the display. Press the Talk &...
- Page 33 Cordless Internet Telephony Kit 1. Press the SKYPE button to obtain the contact list. 2. Press DETAILS to view the detail of the contact and then press DIAL to make the second call. After the second call is connected, 1. Press the Talk & Recall button to return to the first call or to toggle between calls. 2.
- Page 34 Cordless Internet Telephony Kit To redial the last contact dialled: 1. Press the Talk & Recall button. 2. Press REDIAL. The last dialled contact appears on the display and is dialled. To redial one of the last 10 dialled numbers: 1.
- Page 35 Cordless Internet Telephony Kit 2. Repeat step 1 to switch off the speaker. Adjusting the volume of the caller's voice You can increase or decrease the volume of a caller's voice during a call. There are 5 volume levels for selection. To adjust the volume, during a call: While the phone is off hook (i.e.
-
Page 36: Using Your Phonebook
Cordless Internet Telephony Kit Using your phonebook You can use your phonebook to manage your phone entries. Your phone has a private phonebook and a shared phonebook. The information in your private phonebook is stored in your handset; therefore, if you have more than one handset, each handset has its own phonebook. - Page 37 Cordless Internet Telephony Kit To add an entry to your phonebook, 1. Press Up or Down to select ADD ENTRY, and then press OK. Memory full If your phonebook is full, FULL is displayed. You have to delete some records before entering new ones. 2.
- Page 38 Cordless Internet Telephony Kit 6. Press SAVE to confirm the information you have entered. Duplicate name You cannot enter an identical name for 2 different records in your phonebook. If so, DUPLICATE NAME is displayed. Press OK to replace the existing record with the new entry or press CANCEL to return to the previous display and make changes to the name.
- Page 39 Cordless Internet Telephony Kit 6. Press OPTIONS. 7. Press Up or Down to select DETAILS. Press OK. The details of the entry you selected are displayed. 8. Press Up or Down to view the details of the other entries in your phonebook. EDIT YOUR ENTRIES 1.
- Page 40 Cordless Internet Telephony Kit COPY YOUR ENTRIES Information of the entries can be shared by copying the entries from the private phonebook to the shared phonebook and vice versa. 1. Press NAMES. 2. Press Up or Down to select the phonebook you want to open, PRIVATE or SHARED. Press OK. 3.
- Page 41 Cordless Internet Telephony Kit QUICK DIAL TO ENTRIES IN YOUR PRIVATE PHONEBOOK This feature allows you to dial to the entries in your private phonebook by pressing and holding a quick dial key that you have assigned. You can assign 9 quick dial keys (keys 1-9). NOTE: Contacts on the contact list cannot be assigned to quick dial keys.
- Page 42 Cordless Internet Telephony Kit Delete a quick dial key 1. Press NAMES. 2. Press Up or Down to select PRIVATE, and then press OK. 3. Press Up or Down to select QUICK DIAL, and then press OK. The first quick dial key is displayed. 4.
- Page 43 Cordless Internet Telephony Kit 7. Press OPTIONS. 8. Press Up or Down to select DELETE. Press OK. CONFIRM? is displayed. Press OK to confirm. DELETE ALL ENTRIES IN YOUR PHONEBOOK 1. Press NAMES. 2. Press Up or Down to select the phonebook you want to open, PRIVATE or SHARED. Press OK. 3.
- Page 44 Cordless Internet Telephony Kit CALL DIRECTLY FROM YOUR PHONEBOOK 1. Press NAMES. 2. Press Up or Down to select the phonebook you want to open, PRIVATE or SHARED. Press OK. 3. Press Up or Down to select VIEW. Press OK. 4.
- Page 45 Cordless Internet Telephony Kit 4. Press Up or Down to scroll to the entry you wish to call or search by letter. If you are in the PRIVATE phonebook, go to step 5. If you are in the SHARED phonebook, go to step 8. 5.
- Page 46 Cordless Internet Telephony Kit To make a call from your phonebook during a call, 1. Press OPTIONS. 2. Press Up or Down to select PHONEBOOK. A list of entries in your phonebook is displayed. 3. Press Up or Down to select the entry you wish to view or search by letter. 4.
-
Page 47: Entering Letters & Special Characters
Cordless Internet Telephony Kit Entering letters & special characters You can enter letters, numbers, and special characters for your handset name, the phonebook record name and other menus. To enter letters and special characters: 1. Find the key with the letter or number or special characters you wish to enter. 2. -
Page 48: Voicemail
Cordless Internet Telephony Kit Voicemail Your phone allows you to access your SKYPE voicemail box with just a few presses. SKYPEVOICEMAIL To get a voicemail account, please go to http://www.skype.com/products/skypevoicemail/ for further details. You have new Voicemail When there are new voicemails waiting for you, the LED on the handset will be blinking and the Message Waiting Indicator icon will appear on the top line of the display during standby. - Page 49 Cordless Internet Telephony Kit Which messages are new messages? When you are browsing the voicemail list, you will see an icon on the left of each voicemail. These icons indicate which messages are retrieved and new. If the icon next to the voicemail is an open envelope, that means this piece of voicemail is already retrieved; if the icon next to the voicemail is a closed envelope, that means this piece of voicemail is new.
-
Page 50: Keep Track Of Your Calls Using The Call Records
Cordless Internet Telephony Kit 5. A confirmation prompt should be shown; press OK. Keep track of your calls using the call records Find out who has called you and who you have called Your phone keeps a record each time you make, receive or miss a call. You can access a list of the last 15 calls that you have missed and a list of the last 10 calls you have dialled and the last 5 calls you have received. - Page 51 Cordless Internet Telephony Kit 2. Press Up or Down to select MISSED, DIALLED or RECEIVED. 3. Press OK. A list of call records is displayed. Press Up or Down to scroll the list. To view the details of the call records entry, go to step 4.
- Page 52 Cordless Internet Telephony Kit 5. Press OPTIONS. Press Up or Down to select DELETE. CONFIRM? is displayed. Press OK to confirm. DELETE ALL CALL RECORDS You can delete each individual (missed, dialled, received) call records list or delete all the call records lists at once.
- Page 53 Cordless Internet Telephony Kit 4. Press OK. The time you spent on the calls is displayed. 5. Press OK when finished. RESET THE CALL TIMER 1. Press the Calls button. 2. Press Up or Down to select CALL TIMERS. Press OK. 3.
- Page 54 Cordless Internet Telephony Kit 5. Press the Talk & Recall button. MAKE A PREPARATORY (PRE-DIAL) CALL FROM YOUR CALL RECORDS With pre-dial, you can edit the phone number you wish to call before dialing. 1. Press the Calls button. 2. Press Up or Down to select MISSED, DIALLED or RECEIVED. 3.
-
Page 55: Additional Features
Cordless Internet Telephony Kit Additional features Change online status using the handset You can change your online status anytime without going back to your computer. 1. Press MENU. 2. Press Up or Down to select SKYPE. Press OK. 3. Press Up or Down to select USER STATUS. Press OK. 4. - Page 56 Cordless Internet Telephony Kit To unlock the keypad: Press UNLOCK. UNLOCK? is displayed. Press OK. The keypad is unlocked. Forgot where you put the handset(s)? Just page your handsets, and they will reveal themselves. To page your handset(s): Press and release the PAGE button on the base unit. All the handsets in standby or screen saver mode connected to that base unit will play a paging melody.
-
Page 57: Personalizing Your Phone
Cordless Internet Telephony Kit Personalizing your phone Your phone comes with a color display and a selection of ringing melodies. Personalize your phone to make it the way you want it to look and the way you want it to sound. Personalize your phone's display SET YOUR HANDSET'S CLOCK AND TIME FORMAT Please refer to section 2: setting up your phone. - Page 58 Cordless Internet Telephony Kit ADJUST THE CONTRAST Change the contrast of your LCD. 1. Press MENU. 2. Press Up or Down to select DISPLAY. Press OK. 3. Press Up or Down to select CONTRAST. Press OK. 4. Press Left/Right to select the proper contrast. 5.
- Page 59 Cordless Internet Telephony Kit CHANGE YOUR WALLPAPER Change the wallpaper to give your phone a refresh look with your style. 1. Press MENU. 2. Press Up or Down to select DISPLAY. Press OK. 3. Press Up or Down to select WALLPAPER. Press OK. 4.
- Page 60 Cordless Internet Telephony Kit Personalize your sounds YOUR HANDSET'S SOUNDS You can assign different ringing melodies for each handset at different volume levels. To find out if it is a call from inside or outside the house, you can assign different ringing melodies for external and internal calls. Your phone sounds key press tones and confirmation tones.
- Page 61 Cordless Internet Telephony Kit To set your handset's key tones 1. Press MENU. 2. Press Up or Down to select SOUNDS. Press OK. 3. Press Up or Down to select HS KEY TONES. Press OK. 4. Press Up or Down to select ON or OFF. Press OK to confirm. To set your handset's confirmation/parking tones 1.
-
Page 62: Managing Your Calls Using Advanced Features
Cordless Internet Telephony Kit Managing your calls using advanced features Use your phone as … An alarm clock TO SET THE ALARM CLOCK 1. Press MENU. 2. Press Up or Down to select ADVANCED. Press OK. 3. Press Up or Down to select ALARM CLOCK. Press OK. 4. - Page 63 Cordless Internet Telephony Kit WHEN THE ALARM CLOCK RINGS 1. Press STOP to turn off and deactivate the alarm clock OR 2. Press SNOOZE. The alarm clock will ring NOTE: When the alarm clock is ringing, if you do not press any key in 1 minute, it will snooze for 10 minutes and then ring again. A countdown timer Afraid you might have forgotten putting a chicken in the oven? You can set a time, and your phone will do the countdown.
- Page 64 Cordless Internet Telephony Kit WHEN THE COUNTDOWN TIMER RINGS The countdown timer will ring once it finishes counting the time you set. Press STOP. The countdown timer will stop ringing. NOTE: When the timer is ringing, if you do not press any key in 1 minute, it will stop ringing. A stopwatch Need to know how long it took you to run 6 laps or how long your presentation is? Your stopwatch starts counting once you press START on your phone.
- Page 65 Cordless Internet Telephony Kit Using touch & dial NOTE: Your phone must be registered to use this feature. Touch & dial allows you to call a number by pressing any key (except CANCEL and the Talk & Recall button) on your handset.
- Page 66 Cordless Internet Telephony Kit Auto answer Auto answer gives you the convenience of answering a call by just picking up the phone from the charger. You do not need to press any key to answer the call. To activate or deactivate auto answer: 1.
-
Page 67: Managing Your Handsets
Cordless Internet Telephony Kit Managing your Handsets NOTE: Your phone must have a link with the base unit in order to use any system features mentioned in this section EXCEPT for registering a handset. Register a handset You can register your phone to up to 4 base units. Each base unit can register up to 4 handsets. Your handset is registered to the base unit by default and is ready to use. - Page 68 Cordless Internet Telephony Kit If registration fails, a warning screen will display. The handset will not display the handset number. The Base/ Handset Link icon will flash. You need to repeat the above procedure. To register your phone to an additional base unit: 1.
- Page 69 Cordless Internet Telephony Kit 1. Press MENU. 2. Press Up or Down to select SYSTEM. Press OK. 3. Press Up or Down to select BASE SELECT. Press OK. 4. Press Up or Down to select the base you wish. Press OK. Delete a handset You can delete any handsets from the base unit.
- Page 70 Cordless Internet Telephony Kit Change PIN A PIN (personal identification number) code is required to access some of the menus in your phone. This ensures secure access to your phone. The factory preset code is "0000". You can change it to a unique code of your own. 1.
- Page 71 Cordless Internet Telephony Kit 5. Press OK to confirm. Your phone returns to standby. Chapter 4: Using the Cordless Internet Telephony Kit Managing your Handsets...
-
Page 72: Using Multi-Handsets
Cordless Internet Telephony Kit Using multi-handsets NOTE: You need at least 2 handsets to carry out the functions mentioned in this section. Call someone in the house You can call someone in the house by using the intercom function on your phone. To make an intercom call: 1. - Page 73 Cordless Internet Telephony Kit Call someone in the house while you are talking on the phone While you are on an outside call, you can put the outside call on hold and make a call (inquiry call) to someone in the house.
- Page 74 Cordless Internet Telephony Kit 4. When the other handset has answered your call, press the End & On/Off button OR Press OPTIONS. Press Up or Down to select TRANSFER. Press OK. The outside call is transferred. Make a 3-way conference call Your can connect an outside call and an inside call and talk to both of them at the same time.
- Page 75 Cordless Internet Telephony Kit Chapter 4: Using the Cordless Internet Telephony Kit Using multi-handsets...
-
Page 76: Appendix A: Troubleshooting
Cordless Internet Telephony Kit Appendix A: Troubleshooting This appendix provides solutions to problems that may occur during the installation and operation of the Cordless IP Phone. Read the description below to solve your problems. If you can't find an answer here, check the Linksys website at www.linksys.com. - Page 77 Cordless Internet Telephony Kit - There will be no beep if the handset's power is turned off previously. 4. Battery icon remains empty although the handset has charged for 24 hours. Either the Handset’s battery is defective or the Handset is not placed properly on the base unit or charger. - Please contact your dealer to purchase new rechargeable battery.
- Page 78 Cordless Internet Telephony Kit Also, verify that the PC is not in standby/hibernate mode 10. Cannot call ordinary phone number If 00, + or 011 is omitted, enter 00, + (press and hold 0) or 011 before the number you are dialing. If your SKYPE account has too little or no credit, purchase more credits.
-
Page 79: Factory Setting
Cordless Internet Telephony Kit Factory Setting Handset Name* CIT200 Touch and Dial Time Format 24 hours Touch and Dial Number Empty Language English Quick Dial Wallpaper Wallpaper 1 Quick Dial Numbers Empty Color Color 1 PIN Code 0000 Handset Ring Volume... -
Page 80: Appendix B: Specifications
Cordless Internet Telephony Kit Appendix B: Specifications Hand Set Frequency Bands Europe:1880-1900MHz, North America:1920-1930MHz, South America:1910-1930MHz Speech Coding 32kbps ADPCM Distance Range 300 Meters Outdoor, 50 meters Indoor Number of Channels 120 duplex channels (Europe & SA), 60 duplex channels (NA) Standards DECT (Digital Enhanced Cordless Telecommunications Standard), GAP (General Access Profile) Modulation Method... - Page 81 Cordless Internet Telephony Kit Charger POWER: 9VDC 150mA Dimensions USB Base Station 2.38” x 3.38” x 0.87” (60.55 mm x 85.90 mm x 22 mm) .24 lbs. (0.11 kg) Handset 1.86” x 5.20” x 1.36” (47.37 mm x 132 mm x 34.62 mm) .29 lbs.
-
Page 82: Appendix C: Regulatory Information
Cordless Internet Telephony Kit Appendix C: Regulatory Information Environment and Safety Safety information: This telephone is not designed for making emergency telephone calls when the power fails. If a power outage occurs, this phone will not function. An alternative should be made available for the making of emergency calls. Power requirements: The USB base station will be powered by the host computer. - Page 83 Cordless Internet Telephony Kit • Do not use the Handset in an explosive hazard area, such as gas stations where there is gas leaking. • Young children should be supervised to ensure that they do not play with the Telephony Kit. Environmental care: Please remember to observe your local regulations regarding the disposal of your packaging materials, exhausted batteries and old phone and, where possible, always recycle.
- Page 84 Cordless Internet Telephony Kit Interference This equipment generates, uses and can radiate radio frequency energy and, if not installed and used in accordance with the instructions, may cause harmful interference to radio communications. However, there is no guarantee that interference will not occur in a particular installation. If this equipment does cause harmful interference to radio or television reception, which can be determined by turning the equipment off and on, the user is encouraged to try to correct the interference by one or more of the following measures: 1.Re-orient or relocate the receiving antenna.
- Page 85 Cordless Internet Telephony Kit Repairs to the Telephony Kit, including the handset, the charger, and the base station, should be made by an authorized maintenance facility designated by the supplier. Any repairs or alterations made by the user to the equipment may render the equipment void in product warranty and compliance. This could also void the user's authority to operate the equipment.
- Page 86 FCC Bulletin 56: Questions and Answers about Biological Effects and Potential Hazards of Radio Frequency Electromagnetic Fields. Additional information can also be obtained form the following organizations as well as from the Cisco white paper on the subject. World Health Organization Internal Commission on Non-Ionizing Radiation Protection. www.who.int/emf Cellular Telecommunications Association: www.wow-com.com...
-
Page 87: Important Safety Instructions
Cordless Internet Telephony Kit IMPORTANT SAFETY INSTRUCTIONS BEFORE USING YOUR TELEPHONE EQUIPMENT, BASIC SAFETY PRECAUTIONS SHOUD ALWAYS BE FOLLOWED TO REDUCE THE RISK OF FIRE, ELECTRIC SHOCK AND INJURY, INCLUDING THE FOLLOWING. • Read and follow all warnings and instructions marked on the product. •... - Page 88 Cordless Internet Telephony Kit BATTERIES • Use only the battery type listed in the instruction manual. Do not use lithium batteries or non-rechargeable batteries that may damage the handset and charger. • Do not dispose of the battery in a fire, as they can explode. •...
- Page 89 Cordless Internet Telephony Kit EUROPEAN UNION Declaration of Conformity with Regard to the EU Directive 1999/5/EC (R&TTE Directive) Appendix C: Regulatory Information IMPORTANT SAFETY INSTRUCTIONS...
- Page 90 Cordless Internet Telephony Kit Appendix C: Regulatory Information IMPORTANT SAFETY INSTRUCTIONS...
- Page 91 Cordless Internet Telephony Kit Note: The full Declaration of Conformity can be found either on the CD or a separate document included with this product. If you need to see this statement in another language or have access to any other technical documentation, see the "Technical Documents” on www.linksys.com/international.
- Page 92 Cordless Internet Telephony Kit Technical Documents on www.linksys.com/international Follow these steps to access technical documents: 1.Browse to http://www.linksys.com/international. 2.Click the region in which you reside. 3.Click the name of the country in which you reside. 4.Click Products. 5.Click the appropriate product category. 6.Select a product.
- Page 93 Cordless Internet Telephony Kit Appendix C: Regulatory Information IMPORTANT SAFETY INSTRUCTIONS...
-
Page 94: Appendix D: Warranty Information
Cordless Internet Telephony Kit Appendix D: Warranty Information LIMITED WARRANTY Linksys warrants to You that, for a period of two years (the “Warranty Period”), your Linksys Product will be substantially free of defects in materials and workmanship under normal use. Your exclusive remedy and Linksys’ entire liability under this warranty will be for Linksys at its option to repair or replace the Product or refund Your purchase price less any rebates. - Page 95 Cordless Internet Telephony Kit Please contact Linksys regarding the warranty for the Product. Appendix D: Warranty Information...
-
Page 96: Appendix E: Contact Information
Cordless Internet Telephony Kit Appendix E: Contact Information Need to contact Linksys? Visit us online for information on the latest products and updates to your existing products at: http://www.linksys.com or ftp.linksys.com Can't find information about a product you want to buy on the web? Do you want to know more about networking with Linksys products? Give our advice line a call at: 800-546-5797 (LINKSYS) - Page 97 Cordless Internet Telephony Kit Need to contact Linksys outside the United States? Visit us online for information on the latest products and updates to your existing products at: http://www.linksys.com/international If you experience problems with any Linksys product, you can e-mail us at: In Europe E-mail Address Austria...
- Page 98 Cordless Internet Telephony Kit In Europe E-mail Address Switzerland support.ch@linksys.com United Kingdom & Ireland support.uk@linksys.com Outside of Europe E-mail Address Latin America support.la@linksys.com U.S. and Canada support@linksys.com Asia Pacific asiasupport@linksys.com (English only) Appendix E: Contact Information...
- Page 99 Cordless Internet Telephony Kit Appendix E: Contact Information...
- Page 100 www.linksys.com...
Need help?
Do you have a question about the CIT200 and is the answer not in the manual?
Questions and answers