dji OSMO MOBILE 7 / 7P Manual
- User manual (31 pages) ,
- Quick start manual (8 pages)
Advertisement
Using this Manual
Legend
 Important
 Hints and Tips
Read Before Use
Video Tutorials
Go to the address below or scan the QR code to watch the tutorial videos, which demonstrate how to use the product safely:

https://www.dji.com/osmo-mobile-7-series/video
Illustration
The general descriptions in this manual apply to both Osmo Mobile 7 and Osmo Mobile 7P. Osmo Mobile 7P is used as an example in the illustrations.
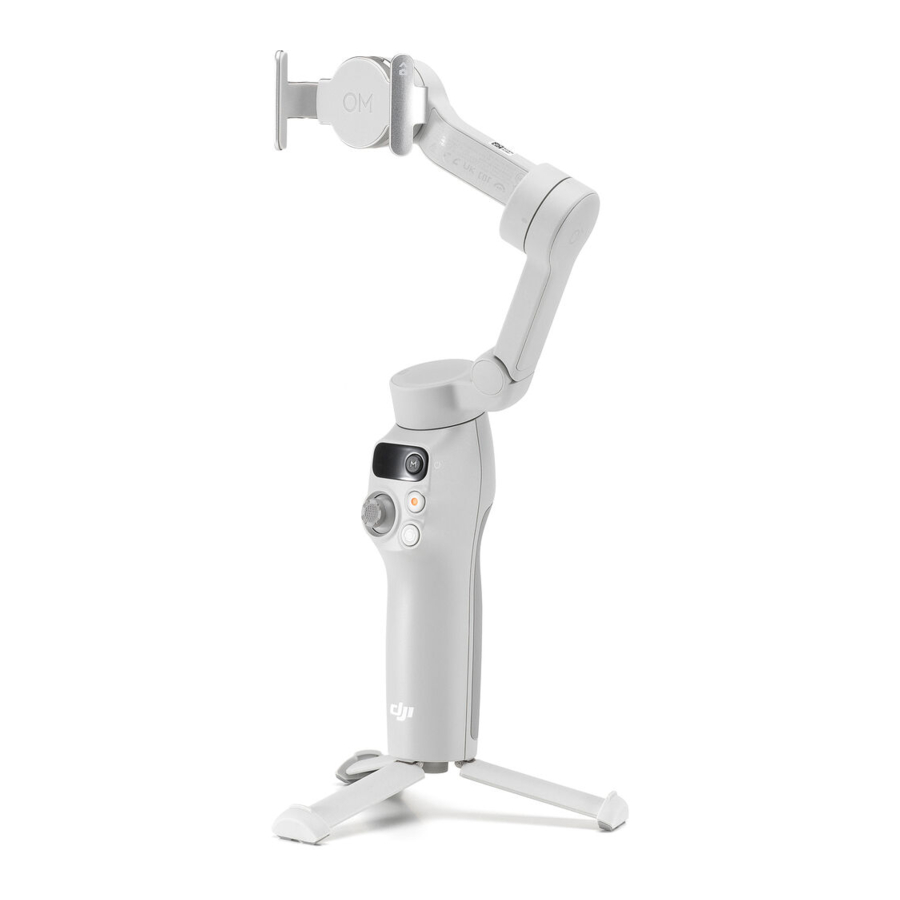
Product Profile
Osmo Mobile 7

- DJI OM Magnetic Phone Clamp 4
- Pan Motor
- Status Panel
- Zoom Slider
- Joystick
- 1/4"-20 UNC Port
- Switch Button
- Shutter/Record Button
- Power/M Button
- Tilt Motor
- Roll Motor
- Trigger
- Charging Port (USB-C)
- Built-in Tripod
Osmo Mobile 7P

- DJI OM 7 Series Magnetic Phone Clamp
- Pan Motor
- Status Panel
- Side Wheel
- Joystick
- 1/4"-20 UNC Port
- Switch Button
- Shutter/Record Button
- Power/M Button
- Tilt Motor
- Roll Motor
- Trigger
- Charging Port (USB-C)
- Built-in Tripod
- DJI OM Multifunctional Module
*DJI OM Multifunctional Module is hereinafter referred to as "Multifunctional Module".
The Osmo Mobile 7P combo includes Multifunctional Module and accompanying accessories. For Osmo Mobile 7, the module and accessories are sold separately.
Multifunctional Module

- Tracking Camera
- Camera Status Indicator
- Fill Light
- Brightness Control Button
- Color Temperature Control/Bluetooth Pairing Button
- Audio Data/Phone Charging Port (USBC)
- Release Button
- Wireless Microphone Status Indicator
Using for the First Time
Charging
The product is fully charged when the Battery Level Indicator turns off.

Unfolding

- The built-in tripod is suitable for stable, level surfaces in windless environments. In other conditions, it is recommended to attach DJI OM Grip Tripod (sold separately) to the bottom of the gimbal.
- Only Osmo Mobile 7P has a built-in extension rod.
If you extend the built-in extension rod, make sure to adjust the Pan Motor to be level with the ground. This ensures balance after the phone is attached to the gimbal.

Attaching the Phone

A steady gimbal mode light ( ) indicates that the gimbal is stabilizing the phone. If the light is not displayed after you attach the phone, press the M button to enable stabilization.
Connecting to the DJI Mimo App
- Scan the QR code to download DJI Mimo.
![]()
- Enable Bluetooth on your phone, open DJI Mimo, and connect to the gimbal.

- To check the Android and iOS operating system versions supported by DJI Mimo, visit https://www.dji.com/downloads/djiapp/dji-mimo.
- The interface and functions of DJI Mimo may vary as the software version is updated. Actual user experience is based on the software version used.
If Bluetooth connection fails, try the following steps:
- Go to Bluetooth settings on your phone. Remove any existing connections with the gimbal and forget the device.
- Reset Bluetooth for the gimbal.
- Tap the new device name in Bluetooth settings. Once connected, relaunch DJI Mimo.
Firmware Update
A prompt will appear in DJI Mimo when new firmware is available. Tap the prompt and follow the on-screen instructions to update the firmware.
Ensure that the Battery Level Indicator shows solid green before the update. DO NOT exit DJI Mimo during the update.
If the update fails, restart DJI Mimo, reestablish the Bluetooth connection, and retry.
Basic Features
Grip Gestures

- Grip gestures apply to both landscape and portrait orientations.
- Only Osmo Mobile 7P has a built-in extension rod.
- If the built-in tripod is extended, grip the handle to ensure stability. DO NOT grip only the tripod.
Follow Modes

- Rotate the handle in the horizontal plane and the phone follows
![]()
- Swing the handle back and forth and the phone follows
![]()
- Rotate the handle in the vertical plane and the phone follows
![]()
- Move the joystick left or right to rotate the phone in the vertical plane
![]()


Indicators

- System Status Indicator
 | Pulses green | Bluetooth disconnected |
| | Solid green | Bluetooth connected |
- Battery Level Indicator
 | Blinks red quickly | ≤5% |
 | Solid red | 6%-19% |
 | Solid yellow | 20%-60% |
 | Solid green | >60% |
- Gimbal Mode Indicator


- Recording Status Indicator
 | Solid red | Recording video using DJI Mimo |
Buttons and Ports
The following features are based on DJI Mimo. Support for certain features in the system camera may vary depending on the phone model. For more information, visit https://www.dji.com/osmo-mobile-7-series.
Power/M Button

When powered off
With the gimbal folded, press once: Check the battery level
With the gimbal unfolded, press once: Power on
When powered on
Press once: Switch between gimbal modes
Press three times: Enter standby mode (press any button to exit)
Press and hold: Power off
* The M button can also control phone charging using the gimbal or Multifunctional Module.
Side Wheel (Osmo Mobile 7P)

Press once: Switch between focus and zoom
Rotate: Control focus or zoom
* The side wheel can control the fill light when used with Multifunctional Module.
Zoom Slider (Osmo Mobile 7)

Push once: Switch between preset zoom levels
Push continuously: Change zoom continuously
Joystick

Move vertically and horizontally to tilt and pan the mobile phone.
The joystick control direction can be set in DJI Mimo.
Shutter/Record Button

Press once: Take a photo or start/stop recording
Press twice: Take a photo during recording
Press and hold: Burst shooting when in photo mode
Switch Button

Press once: Switch between front and rear cameras
Press twice: Switch between landscape and portrait modes
Press three times: Switch between photo and video modes
Trigger

Press once: Start or stop ActiveTrack
Press twice: Recenter the gimbal
Press three times: Rotate the phone 180 degrees in the horizontal plane
Press once, and then press and hold: Adjust the follow speed to fast mode. Release to exit.
Press and hold: Enter lock mode. Release to exit.
Charging Port (USB-C)

Charging the gimbal
Charging the phone
Combination Operation

Press the switch button, shutter/record button, and trigger simultaneously for more than one second to reset the Bluetooth name and connection and reconnect.
Phone Charging

- Make sure that the gimbal is sufficiently charged (the indicator shows
![]() or
or ![]() ).
). - Make sure that the gimbal is powered off.
- Certain phones are charged only after pressing the M button.
 or
or  ).
).Storage

- For Osmo Mobile 7P, retract the extension rod before performing the following steps.
- When the gimbal powers off, it automatically rotates to the folding position. Remove the phone, phone clamp, and Multifunctional Module together. For the next use, attach them as a whole and unfold the gimbal to start shooting.
Advanced Features
Multifunctional Module
The Osmo Mobile 7P combo includes Multifunctional Module and accompanying accessories. For Osmo Mobile 7, the module and accessories are sold separately.
Installing and Removing
Example 1
Capture photos or videos of yourself

Example 2
Capture photos or videos of others

- If the indicator shown in the preceding figure does not turn on after Multifunctional Module is installed, check whether the marks on the gimbal and the phone clamp are aligned.
- If Multifunctional Module is idle for more than five minutes, it automatically enters sleep mode and the indicator turns off. To exit sleep mode, press the trigger on the gimbal.
Avoid blocking the rear camera when shooting in landscape mode.

Remove Multifunctional Module:

Tracking and Shooting
Multifunctional Module allows you to enable tracking in the system camera and third-party camera apps, without the need to use DJI Mimo.
- Multifunctional Module supports tracking people only.
- The tracking and shooting features of Multifunctional Module are disabled in DJI Mimo.
- Position the tracking camera of Multifunctional Module and the phone camera towards the subject. For example, both cameras are used to take selfies in the following illustrations.
- To achieve optimal gesture recognition, keep the subject 0.5m to 3m away from the tracking camera.
- During tracking, keep the subject 0.5m to 8m away from the tracking camera.
Tracking
- Enable Bluetooth on the phone and connect to the gimbal.
![]()
- Enable tracking: Show the
![]() gesture to the camera or press the trigger. The indicator turns solid green.
gesture to the camera or press the trigger. The indicator turns solid green.

- Adjust the composition as needed during tracking.
- Method 1: Use the joystick.
- Method 2: Use hand gestures.
Show the![]() gesture to the camera. The indicator turns solid yellow and tracking is automatically paused. The subject can move to the desired position in the frame.
gesture to the camera. The indicator turns solid yellow and tracking is automatically paused. The subject can move to the desired position in the frame.

Show the![]() gesture again to confirm the composition. The indicator turns solid green and tracking automatically resumes.
gesture again to confirm the composition. The indicator turns solid green and tracking automatically resumes.
To restore the default composition for each method, press the trigger twice.
- Stop tracking: Show the
![]() gesture or press the trigger again. The indicator turns solid red.
gesture or press the trigger again. The indicator turns solid red.

Shooting
Whether tracking is enabled or not, you can use the ![]() gesture to start a countdown for taking a photo or starting/stopping recording. The indicator pulses yellow during the countdown.
gesture to start a countdown for taking a photo or starting/stopping recording. The indicator pulses yellow during the countdown.

Fill Light
Make sure that Multifunctional Module is properly installed.
Adjust brightness:

Adjust color temperature:

Osmo Mobile 7P allows you to control the fill light on Multifunctional Module using the side wheel:
- Press and hold: Turn on/off the fill light
- Rotate: Adjust brightness or color temperature

- Press once: Switch between controlling brightness and color temperature
- Press twice in DJI Mimo: Set the effect of rotating the side wheel to focus/zoom control or brightness/color temperature control

Connecting to Wireless Microphones
Multifunctional Module can connect to two wireless microphone transmitters (hereinafter referred to as "transmitters").
Supported transmitters:
- DJI Mic Mini
- Connect Multifunctional Module to the phone.
![]()
- Enable Bluetooth pairing for Multifunctional Module.
![]()
- Power on the transmitter.
![]()
- Enable Bluetooth pairing for the transmitter.
![]()
- Once paired, both indicators of Multifunctional Module and the transmitter turn solid green. You can start recording.
![]()


- To prevent the cable connecting Multifunctional Module and the phone from obstructing the gimbal, bend the cable as needed.
- For iPhone 14 and earlier models, a USB-C to Lightning cable (sold separately) is required to connect to Multifunctional Module.
- You can configure wireless microphone settings in DJI Mimo.
Phone Charging
Make sure that the gimbal is sufficiently charged (the indicator shows or
or  ).
).

Indicators

- Camera Status Indicator
 | Solid red | Tracking disabled or subject lost |
 | Solid green | Subject being tracked |
 | Blinks green | Subject lost temporarily |
 | Solid yellow | Composition being adjusted |
 | Blinks yellow | Countdown for photo shooting or video recording |
- Wireless Microphone Status Indicator
 | Blinks green quickly | Multifunctional Module pairing with a transmitter |
 | Blinks green slowly | Multifunctional Module paired with a transmitter but not connected to the phone using the cable |
 | Solid green | Ready for audio recording |
 | Solid red | Battery less than 10% for the paired transmitter |
 | Solid yellow | Noise cancelling enabled for the paired transmitter |
Firmware Update
Make sure that Multifunctional Module is properly installed.
When using DJI Mimo to update the gimbal firmware, the module firmware is updated together. Please wait for the upgrade to complete.
Remote Control With Watch
You can use DJI Mimo on an Apple Watch to view the camera feed, control the gimbal, and enable ActiveTrack remotely.
- Pair the watch with your phone and install DJI Mimo on both devices.
- Run DJI Mimo on the phone, connect to the gimbal, and enter the camera view.
- Run DJI Mimo on the watch to start remote control.
- Keep the devices within the Bluetooth range.
- To view the supported watch devices, visit https://www.dji.com/osmo-mobile-7series/faq.
Maintenance
- Put out any product fire using water, sand, fire blanket, or a dry powder fire extinguisher.
- Never disassemble or pierce the product in any way or the battery may leak, catch fire, or explode.
- It is recommended to use a soft, dry cloth to clean the product.
- When the phone is attached to the gimbal, the compass feature of the phone may experience interference. In such cases, calibrate the compass according to the prompts in the phone.
- The NFC (near-field communication) and wireless charging functions of the phone may be affected when the phone clamp is attached. These functions will no longer be affected once the phone clamp has been removed from the phone.
- The built-in extension rod contains a spring. If the extension rod is extended for more than a week, the spring may become deformed and the extension rod can no longer be used normally. It is recommended to retract the extension rod and fold the gimbal after use.
*Only Osmo Mobile 7P has a built-in extension rod.
Documents / Resources
References
![www.dji.com]() Osmo Mobile 7 Series - Tutorials - DJI
Osmo Mobile 7 Series - Tutorials - DJI![www.dji.com]() DJI Mimo - Download Center - DJI
DJI Mimo - Download Center - DJI![www.dji.com]() Osmo Mobile 7 Series - Focus On Every Move - DJI
Osmo Mobile 7 Series - Focus On Every Move - DJI
Download manual
Here you can download full pdf version of manual, it may contain additional safety instructions, warranty information, FCC rules, etc.
Advertisement


Need help?
Do you have a question about the OSMO MOBILE 7 and is the answer not in the manual?
Questions and answers