Singer 2282, 478160 2404 Manual
- Operation and safety notes (72 pages) ,
- Instruction manual (65 pages) ,
- Operation and safety notes (56 pages)
Advertisement
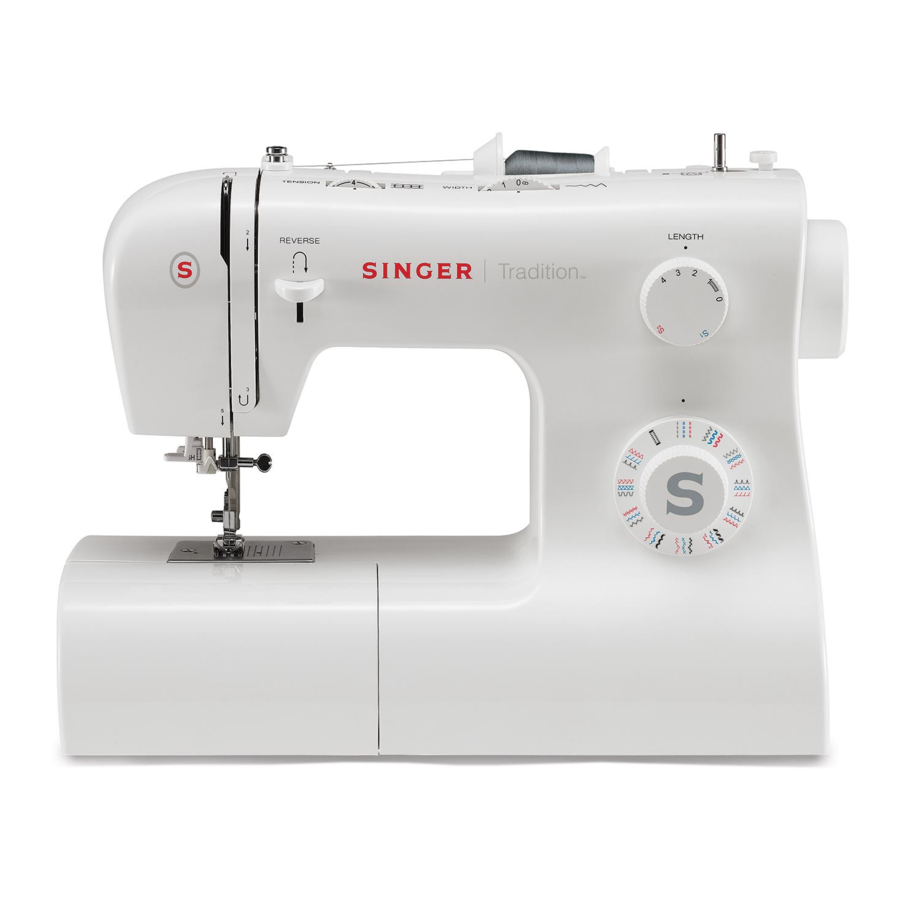
Principal Parts of the Machine

- Thread tension dial
- Thread take-up lever
- Thread cutter
- Presser foot
- Needle plate
- Removable extension table/ accessory storage
- Reverse sewing lever
- Bobbin stopper
- Stitch width dial
- Stitch length dial
- Pattern selector dial
- One step buttonhole lever
- Automatic threader
- Horizontal spool pin
- Bobin winding spindle
- Hole for second spool pin
- Handwheel
- Power and light switch
- Main plug socket
- Bobbin thread guide
- Upper thread guide
- Face plate
- Handle
- Presser foot lifter
- Foot speed control
- Power cord
Accessories

- All purpose foot
- Zipper foot
- Buttonhole foot
- Button sewing foot
- Seam ripper / brush
- Edge/ quilting guide
- Pack of needles
- Spool holder
- Bobbin (3x)
- L-screwdriver
- Darning plate
- Soft cover
Technical Data
| Rated voltage | 120V/ 60Hz (North America) 220-240V~ 50-60Hz (Europa) | |
| Power rating | Machine | 70 Watt |
| Dimensions | When handle is folded down | Approx. 375 x 163 x 270 mm (L x W x H) |
| Cable length | Power cable | Approx. 1.8 m |
| Foot control cable | Approx. 1.4 m | |
| Weight | Machine | Approx. 5.2kg |
| Material | Aluminium / plastic | |
| Operating elements | Mains power switch ON/OFF | Available |
| Foot control for sewing speed | Available | |
| Display elements | Sewing light | Available |
| Looper system | Oscilating Hook | |
| Needle system | 130/705H | |
| Interference-free | In acc. with EU Directive | |
| TUV approved | Yes | |
| Product guarantees | 2 years | |
| Class | II | |
Machine Basics
Connecting Machine To Power Source

Connect the machine to a power source as illustrated. (1)
This appliance is equipped with a polarized plug which must be used with the appropriate polarized outlet. (2)

Attention:
Unplug power cord when machine is not in use.
Foot control
The foot control pedal regulates the sewing speed. (3)

Attention:
Consult a qualified electrician if in doubt of how to connect machine to power source. Unplug power cord when machine is not in use.
Sewing light
Press main switch (A) to "I" for power and light.
- Polarized attachment plug
- Conductor intended to be grounded
Two Step Presser Foot Lifter
When sewing several layers or thick fabrics, the presser foot can be raised to a higher position for easy positioning of the work. (A)

Threading the Machine
Winding the Bobbin
- Place thread and corresponding spool holder on to spool pin. (1/2)

- Snap thread into thread guide. (3)

- Wind thread counterclockwise around bobbin winder tension discs. (4)
![]()
- Thread bobbin as illustrated and place on spindle. (5)
![]()
- Push bobbin spindle to right. (6)
![]()
- Hold thread end. (7)
![]()
- Step on foot control pedal. (8)
![]()
- Cut thread. (9)
![]()
- Push bobbin spindle to left (10) and remove.
![]()


Please Note:
When the bobbin winder spindle is in "bobbin winding" position, the machine will not sew and the hand wheel will not turn.
To start sewing, push the bobbin winder spindle to the left (sewing position).
Inserting the Bobbin
When inserting or removing the bobbin, the needle must be fully raised.
- Remove the extension table, then open the hinged cover. (1)
![]()
- Pull the bobbin case tab (a) and remove the bobbin case. (2)
![]()
- Hold the bobbin case with one hand. Insert the bobbin so that the thread runs in a clockwise direction (arrow). (3)
![]()
- Pull the thread through the slit and under the finger. (4) Leave a 6 inch tail of thread.
![]()
- Hold the bobbin case by the hinged latch. (5)
![]()
- Insert it into the shuttle. (6)


Attention:
Turn power switch to off ("O") before inserting or removing the bobbin.
Thread Tension

Upper thread tension
Basic thread tension setting: "4"
To increase the tension, turn the dial to the next number up.
To reduce the tension, turn the dial to the next number down (1/2).
- Normal thread tension for straight stitch sewing.
![]()
- Thread tension too loose for straight stitch sewing. Turn dial to higher number.
![]()
- Thread tension too tight for straight stitch sewing. Turn dial to lower number.
![]()
- Normal thread tension for zig zag and decorative sewing. Correct thread tension is when a small amount of the upper thread appears on the bottom side of fabric.
![]()


Lower thread tension
To test the bobbin thread tension, remove the bobbin case and bobbin and hold it by suspending it by the thread. Jerk it once or twice. If the tension is correct, the thread will unwind by about an inch or two. If the tension is too tight, it does not unwind at all. If the tension is too loose, it will drop too much. To adjust, turn the small screw on the side of the bobbin case.
Please note:
- Proper setting of tension is important to good sewing.
- There is no single tension setting appropriate for all stitch functions, thread or fabric.
- A balanced tension (identical stitches both top and bottom) is usually only desirable for straight stitch construction sewing.
- 90% of all sewing will be between "3" and "5".
- For zig zag and decorative sewing stitch functions, thread tension should generally be less than for straight stitch sewing.
- For all decorative sewing you will always obtain a nicer stitch and less fabric puckering when the upper thread appears on the bottom side of your fabric.
Threading the Upper Thread
This is a simple operation but it is important to carry out correctly as by not doing so several sewing problems could result.

- Start by raising the needle to its highest point (1), and continue turning the handwheel counterclockwise until the needle just slightly begins to descend. Raise the presser foot to release the tension discs.
Note: For safety, it is strongly suggested you turn off the power before threading.
![]()
- Lift up the spool pin. Place the spool of thread on the holder with the thread coming off the spool as shown. For small thread spools, place small side of spool holder next to spool. (2)
![]()
- Draw thread from spool through the upper thread guide (3) and pulling thread through pre-tension spring as illustrated. (4)

- Thread tension module by leading thread down right channel and up left channel. (5) During this process it is helpful to hold the thread between the spool and thread guide.
![]()
- At the top of this movement pass thread from right to left through the slotted eye of the take-up lever and then downwards again. (6)
![]()
- Now pass thread behind the thin wire needle clamp guide (7) and then down to the needle which should be threaded from front to back. (See instructions on how to use the Automatic needle threader.)
![]()
- Pull about 6-8 inches of thread to the rear beyond the needle eye. Trim thread to length with built in thread cutter. (8)
![]()


Automatic Needle Threader

- Raise the needle to its highest position.
- Press lever (A) down as far as it will go.
- The threader automatically swings to the threading position (B).
- Pass thread around thread guide (C).
- Pass the thread in front of the needle around the hook (D) from bottom to top.
- Release lever (A).
- Pull the thread through the needle eye.
Attention:
Turn power switch to off ("O")!
Raising the Bobbin Thread

Hold the upper thread with the left hand. Turn the handwheel (1) towards you (counterclockwise) lowering, then raising
needle.
Note:
If it is difficult to raise the bobbin thread, check to make sure the thread is not trapped by the hinged cover or the Removable Extension Table.

Gently pull on the upper thread to bring the bobbin thread up through the needle plate hole. (2)

Lay both threads to the back under the presser foot. (3)
Sewing
How to Choose Your Pattern

To select a stitch, simply turn the pattern selector dial. The pattern selector dial may be turned in either direction.
For straight stitch, select pattern "  " with the pattern selector dial. Adjust the stitch length with the stitch length dial.
For zigzag stitch, select pattern "  " with the pattern selector dial. Adjust the stitch length and stitch width according to the fabric being used.
To obtain the other patterns, turn the stitch length dial to "S1" or "S2", select the pattern desired with pattern selector dial, and adjust the stitch width with the stitch width dial.
- Reverse Sewing Lever
- Stitch Width Dial
- Stitch Length Dial S1-S2
- Pattern Selector Dial
Stitch Width Dial & Stitch Length Dial
Function of stitch width dial
The maximum zigzag stitch width for zigzag stitching is 5mm; however, the width can be reduced on any patterns. The width increases as you move zigzag dial from "0" - "5".
The stitch width dial is also the control for the straight stitch infinite needle position. "0" is center needle position, "5" is full left needle position.

Function of stitch length dial while zig- zag stitching
Set the Pattern Selector Dial to zig-zag.
The density of zig-zag stitches increase as the setting of stitch length dial approaches "0".
Neat zig-zag stitches are usually achieved at "2.5" or below.
Dense zig-zag stitches are called satin stitches.

Function of stitch length dial for when straight stitching
For straight stitch sewing, turn the Pattern Selector Dial to the straight stitch setting. Turn the Stitch Length Dial, and the length of the individual stitches will decrease as the dial approached "0". The length of the individual stitches will increase as the dial approaches "4". Generally speaking, use a longer stitch length when sewing heavier weight fabrics or when using a thicker needle or thread. Use a shorter stitch length when sewing lighter weight fabrics or when using a finer needle or thread.

Sewing Straight Stitch

To begin sewing, set the machine for straight stitch.

Place the fabric under the presser foot with the fabric edge lined up with the desired seam guide line on the needle plate. (1)

Lower the presser foot lifter, and then step on the foot controller to start sewing. (2)
Reverse Sewing / Removing the Work / Cutting the Thread

Reverse sewing
To secure the beginning and the end of a seam, press down the reverse sewing lever (A). Sew a few reverse stitches. Release the lever and the machine will sew forwards again. (1)

Removing the work
Turn the handwheel toward you (counterclockwise) to bring the thread take up lever to its highest position, raise the presser foot and remove work behind the needle and presser foot. (2)

Cutting the thread
Pull the threads under and behind the presser foot. Guide the threads to the side of the face plate and into thread cutter (B). Pull threads down to cut. (3)
Choosing Stretch Stitch Patterns
The Stretch Stitch Patterns are indicated with a blue color on the Pattern Selector Dial. To select these stitches, turn the Pattern Selector Dial to the desired pattern. Then, turn the Stitch Length Dial to the indicator marked "S1". Though there are several stretch patterns, here are two examples:

Straight Stretch Stitch
Set the Pattern Selector Dial to "  ".
".
Used to add triple reinforcement to stretch and hardwearing seams.
The machine sews two stitches forward and one stitch backwards.

Ric Rac
Set the Pattern Selector Dial to "  ".
".
Adjust the Stitch Width Dial to between "3" and "5".
Ric Rac Stitch is suitable for firm fabrics like denim, corduroy, poplin, duck, etc.
Blind Hem
For hems on curtains, trousers, skirts, etc.
 Blind hem for stretch fabrics.
 Blind hem for firm fabrics.

Set the Stitch Length Dial with the range shown on the diagram above. Blind hems, however, are normally sewn with a longer stitch length setting. Set the Stitch Width Dial at a setting appropriate for the weight/type of fabric being sewn, within the range shown in the diagram above. Generally, a narrower stitch is used for lighter weight fabrics, and a wider stitch is used for heavier weight fabrics. Sew a test first to make sure the machine settings are appropriate for the fabric.

Blind Hem:
Turn up the hem to the desired width and press. Fold back (as shown in Fig. 1) against the right side of the fabric with the top edge of the hem extending about 7 mm (1/4") to the right side of the folded fabric.
Start to sew slowly on the fold, making sure the needle touches slightly the folded top to catch one or two fabric threads. (2)
Unfold the fabric when hemming is completed and press.
Sew 1-Step Buttonhole
Buttonhole sewing is a simple process that provides reliable results. However, it is strongly suggested to always make a practice buttonhole on a sample of your fabric and stabilizer.
Making a Buttonhole
- Using tailor's chalk, mark the position of the buttonhole on the fabric.
- Attach the buttonhole foot and set the Pattern Selector Dial to "
![]() ".
".
Set stitch length dial to "![]() ". Set the stitch width at "5". The width however may need to be adjusted according to the project, Sew a test first to determine this.
". Set the stitch width at "5". The width however may need to be adjusted according to the project, Sew a test first to determine this.

![]()
- Lower the presser foot aligning the marks on foot with the marks on the fabric (A). (The front bar tack will be sewn first.) (Align the mark on the fabric (a) with the mark on the foot (b).)
![]()
- Open the button plate and insert the button (B).
![]()
- Lower the buttonhole lever and gently push it back (C).
![]()
- While lightly holding the upper thread, start the machine.
- Buttonhole stitching is done in the order (D).
![]()
- Stop the machine when the buttonhole cycle has completed.
 ".
". ". Set the stitch width at "5". The width however may need to be adjusted according to the project, Sew a test first to determine this.


Making a Buttonhole on Stretch Fabrics (E)
When sewing buttonholes on stretch fabric, hook heavy thread or cord under the buttonhole foot. When the buttonhole is sewn the legs will overcast the cord.

- Mark the position of the buttonhole on the fabric with the tailor's chalk, attach the buttonhole foot, and set the pattern selector dial to "
![]() ". Set stitch length dial to "
". Set stitch length dial to " ![]() ".
". - Hook the heavy thread onto the back end of the buttonhole foot, then bring the two heavy thread ends to the front of the foot, insert them into the grooves and temporarily tie them there.
![]()
- Lower the presser foot and start sewing.
*Set the stitch width to match the diameter of the gimp thread. - Once sewing is completed, gently pull the heavy thread to remove any slack, then trim off the excess.
![]()


Sewing on Buttons

Install the darning plate. (1) Change the all purpose foot to the button sewing foot. Set the stitch length to "0".

To sew a few securing stitches, set the machine for straight stitch, with the stitch width set at "0".
Raise the needle out of the fabric. Set the machine for zig-zag stitch, then set the width to number "3" - "5". Turn the handwheel to check that the needle goes cleanly into the left and right holes of the button. Adjust the stitch width, as needed, according to the distance between the holes of the button. Slowly sew on the button with about 10 stitches. (2)


Raise the needle out of the fabric. Set the machine for straight stitch again, with the width at "0" sew a few securing stitches to finish.

If a shank is required, place a darning needle on top of the button and sew. (3)
For buttons with 4 holes, sew through the front two holes first, push the work forward and then sew through the back two holes.
General Information
Installing the Removable Extension Table

Hold the removable extension table horizontal, and push it in the direction of the arrow. (A)
The inside of the removable extension table can be utilized as an accessory box.
To open, flip cover down as shown. (B)
Attaching the Presser Foot Shank

Raise the presser bar (a). Attach the presser foot shank (b) as illustrated. (1)

Attaching the presser foot
Lower the presser foot shank (b) until the cut-out (c) is directly above the pin (d). (2) Raise the lever (e).
Lower the presser foot shank (b) and the presser foot (f) will engage automatically.

Removing the presser foot
Raise the presser foot. (3)
Raise the lever (e) and the foot disengages.

Attaching the edge/ quilting guide
Attach the edge/ quilting guide (g) in the slot as illustrated.
Adjust according to need for hems, pleats, etc. (4)
Attention:
Turn power switch to off ("O") when carrying out any of the above operations!
Needle/ Fabric/ Thread Chart
NEEDLE, FABRIC, THREAD SELECTION GUIDE
| NEEDLE SIZE | FABRICS | THREAD |
| 9-11 (70-80) | Lightweight fabrics-thin cottons, voile, serge, silk, muslin, interlocks, cotton knits, tricots, jerseys, crepes, woven polyester, shirt & blouse fabrics. | Light-duty thread in cotton, nylon, polyester or cotton wrapped polyester. |
| 11-14 (80-90) | Medium weight fabrics-cotton, satin, kettlecloth, sailcloth, double knits, lightweight woolens. | Most threads sold are medium size and suitable for these fabrics and needle sizes. Use polyester threads on synthetic materials and cotton on natural woven fabrics for best results. Always use the same thread on top and bottom. |
| 14 (90) | Medium weight fabrics-cotton duck, woolen, heavier knits, terrycloth, denims. | |
| 16 (100) | Heavyweight fabrics-canvas, woolens, outdoor tent and quilted fabrics, denims, upholstery material (light to medium). | |
| 18 (110) | Heavy woolen, overcoat fabrics, upholstery fabrics, some leathers and vinyls. | Heavy duty thread, carpet thread. |

Match needle size to thread size and weight of fabric
NEEDLE, FABRIC SELECTION
| NEEDLES | EXPLANATION | TYPE OF FABRIC |
| SINGER 2020 | Standard sharp needles. Sizes range thin to large. 9 (70) to 18 (110). | Natural woven fabrics-wool, cotton, silk, etc. Not recommended for double knits. |
| SINGER 2045 | Semi-ball point needle, scarfed. 9 (70) to 18 (110). | Natural and synthetic woven fabrics, polyester blends. Knits-polyesters, interlocks, tricot, single and double knits. Also sweater knits, Lycra, swimsuit fabric, elastic. |
| SINGER 2032 | Leather needles. 12 (80) to 18 (110). | Leather, vinyl, upholstery. (Leaves smaller hole than standard large needle.) |
Note:
- For best sewing results always use genuine SINGER needles.
- Replace needle often (approximately every other garment) and/ or at first thread breakage or skipped stitches.
Darning Plate

For certain types of work, (e.g. darning or free-hand embroidery), the darning plate must be used.
Install the darning plate as illustrated.
For normal sewing, remove the darning plate.
Inserting and Changing Needles
Change the needle regularly, especially if it is showing signs of wear and causing problems. For best sewing results always use SINGER® Brand Needles.

Insert the needle as illustrated as follows:
- Loosen the needle clamp screw and tighten again after inserting the new needle.
- The flat side of the shaft should be towards the back.
C/D. Insert the needle as far up as it will go.
Attention:
Turn power switch to off ("O") before inserting or removing the needle.
Needles must be in perfect condition.
Problems can occur with:

- Bent needles
- Damaged points
- Blunt needles
Trouble shooting
| Problem | Cause | Correction |
Upper thread breaks |
|
|
Lower thread breaks |
|
|
Skipped stitches |
|
|
Needle breaks |
|
|
Loose stitches |
|
|
Seams gather or pucker |
|
|
Uneven stitches / uneven feed |
|
|
The machine is noisy |
|
|
The machine jams | Thread is caught in the hook | Remove the upper thread and bobbin case, turn the handwheel backwards and forwards |
Important Safety Instructions
IMPORTANT SAFETY INSTRUCTIONS
When using an electrical appliance, basic safety precautions should always be followed, including the following:
Read all instructions before using this sewing machine.
Keep the instructions at a suitable place close to the machine. Make sure to hand them over if the machine is given to a third party.

TO REDUCE THE RISK OF ELECTRIC SHOCK:
A sewing machine should never be left unattended when plugged in. The electrical socket, to which the machine is plugged in should be easily accessible. Always unplug this sewing machine from the electric outlet immediately after using and before cleaning, removing covers, lubricating or when making any other user servicing adjustments mentioned in the instruction manual.


TO REDUCE THE RISK OF BURNS, FIRE, ELECTRIC SHOCK, OR INJURY TO PERSON:
- This appliance is intended for use by adults. The appliance can be used with adult supervision by
- children aged from 8 to 12 years and
- persons with reduced physical, sensory or mental capabilities or lack of experience and knowledge if they have been given instruction concerning use of the appliance in a safe way and understand the hazards involved.
- Cleaning and user maintenance shall not be made by children without supervision. It is not allowed for anyone to play with the machine. Children up to 8 years are not allowed to use the machine.
- Do not allow to be used as a toy. Close attention is necessary when this sewing machine is used by or near children.
- Use this sewing machine only for its intended use as described in this manual. Use only attachments recommended by the manufacturer as contained in this manual.
- Never operate this sewing machine if it has a damaged cord or plug, if it is not working properly, if it has been dropped or damaged, or dropped into water.
Return the sewing machine to the nearest authorized dealer or service center for examination, repair, electrical or mechanical adjustment. - Never operate the sewing machine with any air openings blocked. Keep ventilation openings of the sewing machine and foot control free from the accumulation of lint, dust, and loose cloth.
- Keep fingers away from all moving parts. Special care is required around the sewing machine needle.
- Always use the proper needle plate. The wrong plate can cause the needle to break.
- Do not use bent needles.
- Do not pull or push fabric while stitching. It may deflect the needle causing it to break.
- Wear safety glasses
- Switch the sewing machine off ("0") when making any adjustment in the needle area, such as threading needle, changing needle, threading bobbin, or changing presser foot, etc.
- Never drop or insert any object into any opening.
- Do not use outdoors.
- Do not operate where aerosol (spray) products are being used or where oxygen is being administrated.
- To disconnect, turn all controls to the off ("0") position, then remove plug from outlet.
- Do not unplug by pulling on cord. To unplug, grasp the plug, not the cord.
- The foot control is used to operate the machine. Never place other objects on the foot control.
- Do not use the machine if it is wet.
- If the LED lamp is damaged or broken, it must be replaced by the manufacturer or its service agent or a similarly qualified person, in order to avoid a hazard.
- If the cord connected with the foot control is damaged, it must be replaced by the manufacturer or its service agent or a similarly qualified person, in order to avoid a hazard.
- The machine must only be used with foot control of type FC-2902D, (220-240V) / 4C-326G (230V) / 4C-336G (240V)
SAVE THESE INSTRUCTIONS
Service Address
Bogod & Company Ltd. Fortran
Road, St Mellons CF3 0WJ St
Mellons, Cardiff
Great Britain
0044 - 2920774910 (Free Hotline)
sewingsupport@bogod.com
IAN 478160_2404
When inquiring about your product, please have your receipt and product number (e.g. IAN 12345) ready as your proof of purchase
Documents / ResourcesDownload manual
Here you can download full pdf version of manual, it may contain additional safety instructions, warranty information, FCC rules, etc.
Advertisement


Need help?
Do you have a question about the 2282 and is the answer not in the manual?
Questions and answers