Advertisement
Principle and Intended Use
The Keto-Mojo GK+ Blood Glucose and β-Ketone Dual Monitoring System is designed to quantitatively measure the blood Glucose concentration and blood Ketone concentration in fresh capillary whole blood from fingertip. The Keto-Mojo GK+ Blood Glucose and β-Ketone Dual Monitoring System is based on measurement of electrical current caused by the reaction of the Glucose/Ketone with the reagents on the electrode of the test strip. The blood sample is pulled into the tip of the test strip through capillary action. Glucose/Ketone in the sample reacts with the enzyme and the mediator. Electrons are generated, producing a current that is positive correlation to the Glucose/Ketone concentration in the sample. After the reaction time, the Glucose/Ketone concentration in the sample is displayed. The meter is calibrated to display plasma calibrated results.
The Keto-Mojo GK+ Blood Glucose and β-Ketone Dual Monitoring System is intended for use outside the body (in vitro diagnostic use) by people with diabetes at home, as an aid to monitor the effectiveness of diabetes control. The system is for self-testing, intended to be used by a single person and should not be shared. The system should not be used for diagnosis of or screening for diabetes and not for use on neonates.
UNDERSTANDING YOUR TESTING TOOLS
Your Meter System Overview
The Keto-Mojo GK+ Blood Glucose and β-Ketone Meter and Test Strips

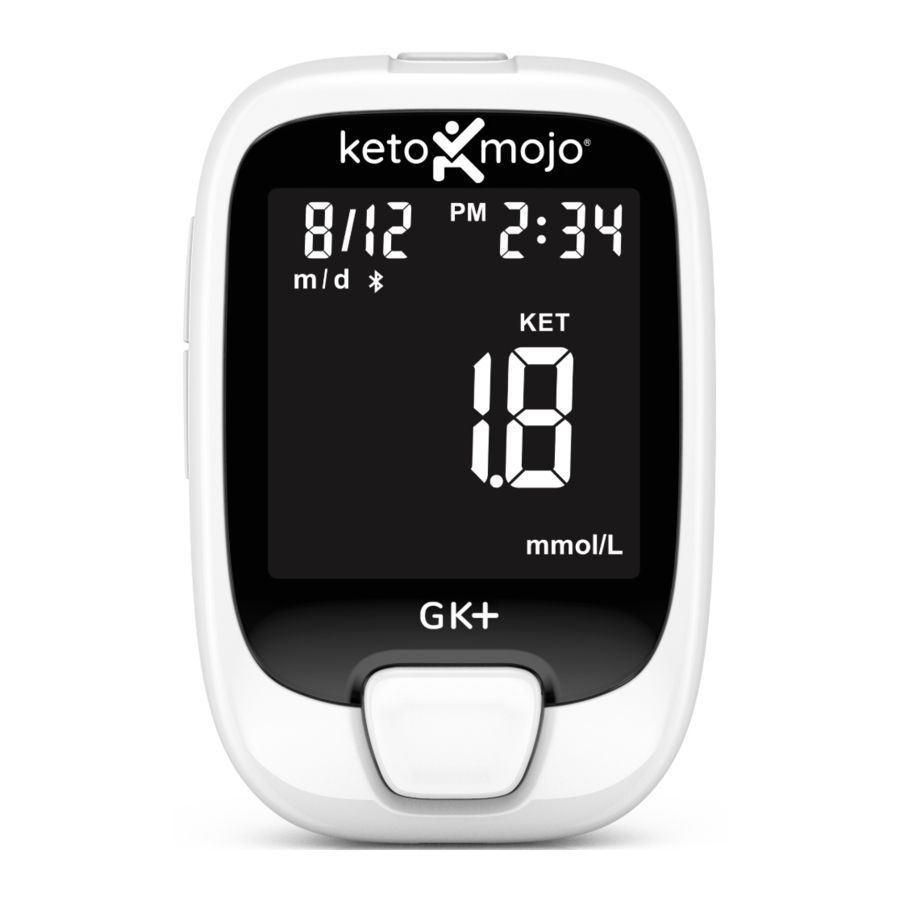
Your Meter Display
The picture below shows all the symbols that appear on your meter display. With the meter off, press and hold the main button to see the complete display. To make sure the display is working properly, all of the segments should be clear and exactly like the picture below. If not, contact Keto-Mojo for further assistance.

| Icon | What it Means |
 | Top left area on the screen indicates date. |
 | Top right area on the screen indicates year or time. |
 | The top middle area on the screen indicates morning or afternoon time. |
 | Indicates the display form of date and month (d/m) or month and day (m/d). |
 | When flashing indicates trying to connect. Solid icon is successful Bluetooth communication. |
 | Indicates failed Bluetooth communication. |
 | Indicates alarms have been set. |
 | Blood Glucose test mode. |
 | Blood Ketone test mode. |
 | Indicates average value. |
 | Indicates low battery or battery needs to be replaced. |
 | Indicates test result history. |
 | Center area on the display that shows test results or error codes. |
 | When strip is inserted the drop will flash, indicating the system is ready to test. |
 | Ketone warning. The symbol of "ketone?" will appear when the blood glucose test result is equal to or above 16.7 mmol/L to indicate user perform blood ketone test to avoid ketoacidosis. |
 | Indicates that a low Glucose test result may cause hypoglycemia. |
 | Pre-meal marker. |
 | Post-meal marker. |
 | Control test result. |
 | Test results are displayed as mmol/L according to local government regulation. |
 | Indicates the temperature is not suitable for testing. |
 Notes:
Your Keto-Mojo GK+ Blood Glucose and β-Ketone Meter is pre-set with beep sound function, the meter will beep when:
- You press the main button.
- While setting the test type.
- When setting the date and time (in set-up mode).
- When the test strip is inserted and is ready for application of blood or control solution.
- When sufficient blood or control solution is pulled into the test strip.
- When the test is complete.
- If any error occurs during operation.
Meter Use and Precautions
- The meter is pre-set to display blood Glucose and blood Ketone concentration in millimoles per liter (mmol/L). This unit of measure cannot be adjusted.
- Do not get water or other liquids inside the meter.
- Keep the strip port area clean.
- Keep your meter dry and avoid exposing it to extremes in temperature or humidity. Do not leave it in your car.
- Do not drop the meter or get it wet. If you do drop the meter or get it wet, check the meter by running a quality control test. Refer to Quality Control Test for instructions.
- Do not take the meter apart. Taking the meter apart will void the warranty.
- Refer to the Caring for Your Meter section for details on cleaning the meter.
- Keep the meter and all associated parts out of reach of children.
Note: Follow proper precautions and all local regulations when disposing of the meter and used batteries.
All systems preventive warnings with regard to EMC
- This instrument is tested for immunity to electrostatic discharge as specified in IEC 61000-4-2. However, use of this instrument in a dry environment, especially if synthetic materials are present (synthetic clothing, carpets, etc.) may cause damaging static discharges that may cause erroneous results.
- This instrument complies with the emission and immunity requirements described in EN61326-1 and EN61326-2-6. Do not use this instrument in close proximity to sources of strong electromagnetic radiation. It may interfere with proper operation of the meter.
- For professional use, the electromagnetic environment should be evaluated prior to operation of this device.
Important Safety Information
- Do not use the meter if it is dropped into water or water splashes on it.
- Test strips and lancets are for single use only.
- Do not drop blood on the flat surface of the test strip.
- Check the expiration dates and discard dates on your test strips foil pouch / kit box and control solution bottle label.
- Use only Keto-Mojo Blood Glucose/Blood Ketone Test Strip with your Keto-Mojo GK+ Blood Glucose and β-Ketone Meter.
- Use only Keto-Mojo Blood Glucose/Blood Ketone Control Solution with your Keto-Mojo GK+ Blood Glucose and β-Ketone Meter.
 Potential Biohazard Potential Biohazard Do not share your products with other persons. All products or objects, which come in contact with human blood, even after cleaning, should be handled as if capable of transmitting viral disease. |
SETTING UP YOUR SYSTEM
Set the Date and Time
Note: Before your first use of the meter for testing, it is important to adjust the meter settings to set the correct date and time, ensuring that results stored in the memory are captured correctly. Follow manual set-up only if not using the App. Use the main button to confirm a setting. If you push past a setting you want to set, keep going forward (you cannot go back), to start the set-up process again. To re-start manual set-up, press and hold the main button until the meter shuts off.
- Enter the setting mode and set the clock
With the meter off, press and hold the main button for more than 3 seconds and release - the meter will beep, then all meter display segments will appear (then disappear) and 24h (or 12h) will flash indicating set-up mode.
Clock format: you have two options for time format - 12h or 24h. Press the buttons on the left side of the meter up or down to adjust and set the clock for 12 or 24-hour mode, then press the main button twice to save your choice. The meter will prompt you to set the date.

- Set the date
The year position will now flash on the display. Press the side button to adjust the year until the year setting is correct, then press the main button to save your choice. The meter will now prompt you to set the date format.
![]()
The display form of date and month will now flash, press the side button to set the date display form for m/d or d/m mode, then press the main button once to save your choice. The meter will prompt you to set the month.

The month will now flash, press the side button to adjust the month. Press the main button until the meter beeps to set.
![]()
The day will now flash, press the side button to adjust the date until the date setting is completed, then press the main button until the meter beeps to set.
![]()
- Set the time
After the date setting is completed, press the main button until the meter beeps to set, the hour will now flash. Press the side button to adjust the current hour until the hour setting is completed, then press the main button until the meter beeps to set.
![]()
The minute will now flash, press the side button to adjust the minute until the minute setting is completed. Press the main button once to save your choice.
![]()


Note:
Before your first use of the meter for testing, please adjust the meter settings to set the correct date and time, ensuring that results stored in the memory are shown with the correct date and time.
Set the Beep Feature
After setting the time, press the main button until the meter beeps to set, the word "beep" will now flash on the screen. Press the side button to set ON or OFF, press the main button to save the beep setting.

Set the Test Alarm
After the audio setting is completed, the meter will enter the test alarm setting mode; this reminder function reminds users to take a measurement. You can set up to 5 reminders per day. If you turn 5 test alarms on (A1, A2, A3, A4 and A5), your meter is pre-set with the following times for your convenience, you can adjust each time to suit your needs.
A1 7:00
A2 9:00
A3 14:00
A4 18:00
A5 22:00
Before you set the time, the ![]() and the word "OFF" will be displayed, symbol "A1" flashes. Press side button to turn the alarm function on or off, and press the main button to save.
and the word "OFF" will be displayed, symbol "A1" flashes. Press side button to turn the alarm function on or off, and press the main button to save.

If you select "On", the hour flashes, "A1" and the ![]() will remain on the display. Press side button to select the hour. Press the main button once to set.
will remain on the display. Press side button to select the hour. Press the main button once to set.

When the minute flashes, press the side button to select 00, 15, 30, or 45. These are the only choices. Press the main button once to set.

The next alarm "A2" flashes on the display with "OFF".

You can set a second alarm by pressing the side button to turn on the second alarm. Perform the same procedures to set the rest alarms.
Note: If the meter is on at the test reminder time, the test alarm will not be activated.
Set the Meal Marker
After setting the test alarm functions, the symbols of ![]() will now flash, along with the word "On" on the display. Press the side button to turn the meal marker function on or off, press the main button once to set
will now flash, along with the word "On" on the display. Press the side button to turn the meal marker function on or off, press the main button once to set

Set the Hypoglycemia (Hypo) Warning
After setting the meal marker, you can set the hypo alarm, which indicates a possible hypoglycemic condition (blood sugar level too low).
After you have confirmed the selection of setting test alarms, the ![]() flashes on the display along with "On" on the display. Press the side button to turn the Hypo alarm function on or off, then press the main button once to set. If you select the hypo alarm to be "on", the display shows 3.9 mmol/L with the symbol of "GLU" on the display, press the main button to set.
flashes on the display along with "On" on the display. Press the side button to turn the Hypo alarm function on or off, then press the main button once to set. If you select the hypo alarm to be "on", the display shows 3.9 mmol/L with the symbol of "GLU" on the display, press the main button to set.
 Warning")
Notes:
- Talk to your healthcare professional to help you decide the hypo level that suits your health condition.
- For healthcare professionals, the hypoglycemic level may vary from person to person. It is recommended that you turn the hypo alarm functionOFF when using the meter in a professional facility.
Set the Ketone Warning
After the hypo warning setting is completed, the  symbol will now flash, along with word "On" on the display. Press the side button to turn the Ketone Warning on or off; press the main button to set.

If you turn the Ketone Warning on, the  symbol will appear with the other symbols that you have set before.
After setting the Ketone Warning, the screen will show all symbols which you have set before. Press the main button and the meter will turn off.

Once all the settings are completed, if you want to change the setting, please press and hold the power main button for 3 seconds when the meter is powered off and then to return to the set-up mode.
Synching Your Meter with the Smartphone
Synching prepares your Keto-Mojo GK+ Blood Glucose and β-Ketone Meter and Smartphone to communicate with each other. The distance between the meter and Smartphone should be within 5 meters. Download the Keto-Mojo App before synching your meter and Smartphone.
Note: TheKeto-Mojo App is compatible with Android software version 8 and above and iOS version 11 and above.

Do Not synch another person's meter with your Smartphone.
Synching allows your Keto-Mojo GK+ Blood Glucose and β-Ketone Meter and Smartphone to communicate with each other. This sets your meter date and time to your Smartphone date and time (manual set-up will then not be necessary).
Follow the guidelines and instructions to successfully synch the meter with the Keto-Mojo App.
Please note that data and reports in the Keto-Mojo GK App are not used for medical care reference by user or healthcare professionals.
Instructions for pairing your meter with the Keto-Mojo iOS and Android App can be found by either scanning the QR code below, or by typing the following weblink into a new browser tab: https://keto-mojo.com/bluetooth-app-connection/

PERFORMING A TEST
Set up your meter correctly and have all the materials you will need ready before you begin testing. This includes your Keto-Mojo GK+ Blood Glucose and β-Ketone Meter, Keto-Mojo Blood Glucose Test Strips, Keto-Mojo Blood Ketone Test Strips, and Keto-Mojo Lancing Device and Lancets.
Preparing the Test Strip
- Wash and dry your hands well before testing.
- Remove a test strip from the test strip foil pouch.
- With the meter off, insert the test strip into the meter in the direction of the arrows. (there is no need to press the main button to begin testing).
![]()
- A symbol with a test strip with a flashing blood will appear letting you know the meter is ready to test.


Note:
Check the expiration and discard dates on the test strip foil pouch. All expiration dates are printed in Year-Month format. 2024-01 indicates January, 2024. Make sure the test strip does not appear damaged. Prior to testing, wipe and dry the test site with an alcohol swab or soapy water. Make sure there is no cream or lotion on the test site.
Preparing the Lancing Device
For fingertip sampling, adjust the depth penetration to reduce the discomfort. You do not need the clear cap for fingertip sampling.
- Unscrew the lancing device cover from the body of the lancing device. Insert a sterile lancet into the lancing device and push it until the lancet comes to a complete stop in the lancing device.


Note: The Keto-Mojo lancing device uses ONLY Keto-Mojo sterile lancets.
- Hold the lancet firmly in the lancing device and twist the safety tab of the lancet until it loosens, then pull the safety tab off the lancet. Save the safety tab for disposing the used lancet.
![]()
- Carefully screw the cover back onto the lancing device. Avoid contact with the exposed needle. Make sure the cover is fully sealed on the lancing device.
![]()
- Adjust the puncture depth by rotating the lancing device cover. There are several different puncture depth settings. To reduce discomfort, use the lowest setting that still produces an adequate drop of blood.

![]()


Adjustment:
1 for delicate skin
2 and 3 for normal skin
4 and 5 for calloused or thick skin
Note: Greater pressure of the lancing device against the puncture site will also increase the puncture depth.
Getting a Blood Drop for Testing
- Pull the cocking barrel back to set the lancing device. You may hear a click to indicate the lancing device is now loaded and ready for obtaining a drop of blood.
![]()
- Press the lancing device against the side of the finger to be lanced with the cover resting on the finger. Push the release button to prick your fingertip. You should hear a click as the lancing device activates.
![]()
- Wipe away the first drop of blood with a clean paper towel to ensure a more accurate result. Gently massage from the base of the finger to the tip of the finger to obtain the required blood volume (half the size of a match head). Avoid smearing the drop of blood. For the greatest reduction in pain, lance on the side of the fingertips. Test immediately after a good blood drop has formed.

- Immediately touch the tip of the test strip to the drop of blood. The blood will be pulled into the test strip through the tip. Make sure that the blood sample has fully filled the check window of the tip of the strip. Hold the tip of the test strip in the blood drop until the meter beeps.
![]()
![information]() Note:
Note:
If the blood sample does not fill the check window, do not add a second drop. Discard the test strip and start over with a new test strip. - For Glucose testing, the meter counts down from 5 to 1, and for Ketone testing, the meter counts down from 9 to 1. The result then appears on the display. The test result will automatically be stored in the meter memory. Please do not touch the test strip during the countdown as this may result in an error.


Discard the Used Test Strip
You can eject and discard the used test strip by using the strip ejector. Meter turns off automatically after a beep.

| Potential Biohazard Dispose of the used test strips as medical waste. |
Questionable or Inconsistent Results:
If your blood Glucose/blood Ketone result does not match how you feel, please:
- Check the expiration date of the test strip.
- Confirm that the room temperature during testing blood Glucose is between 5 and 45°C, and between 7.5 and 45°C for testing blood Ketone.
- Make sure the test strip has been stored in cool, dry place.
- Make sure the test strip was used immediately after removing from the test strip foil pouch or vial.
- Make sure that you followed the test procedure correctly.
- Perform a control solution test (See Performing a Control Test for instructions).
After checking all of the conditions listed above, repeat the test with a new test strip. If you are still unsure of the problem, please contact Keto-Mojo immediately for further assistance.
Removing the Used Lancet
Unscrew the lancing device cover. Place the safety tab of the lancet on a hard surface and carefully insert the lancet needle into the safety tab.

Press the release button to make sure that the lancet is in the extended position. Slide the ejection button forward to discard the used lancet. Place the lancing device cover back on the lancing device.

| Potential Biohazard Always dispose of the used lancet properly to prevent injury or contamination to others. |

- Do not use the lancet if the safety tab is missing or loose when you take the lancet out of the bag.
- Do not use the lancet if the needle is bent.
- Be cautious whenever the lancet needle is exposed.
- Never share lancets or the lancing device with other people to prevent possible infections.
- In order to reduce the risk of infection from prior use of the instrument, always use a new, sterile lancet. Do not reuse lancets.
- Avoid getting the lancing device or lancets dirty with hand lotion, oils, dirt or debris.
Testing with Control Solution
Why Perform Control Tests
Performing a control test lets you know that your meter and test strips are working properly to give reliable test results. Suggestions for when to perform a control test:
- At least once a week(optional)
- When you open a new box of test strip
- When you want to check the meter and test strips
- If your test strips were stored in extreme temperature or humidity
- After cleaning your meter
- If you have dropped the meter
- Your test result does not match with how you feel
About the Control Solutions
- Only use Keto-Mojo Glucose/Ketone Control Solutions (Level 2 and 3) to practice on the system.
- The control solution results are not included in the average value calculation.
- All expiration dates are printed in Year-Month format. 2022-01 indicates January, 2022.
- Do not use control solution that is past the expiry date or discard date (the control solution will expire 6 months after the bottle is opened for the first time).
- Shake the bottle well before use.
- Close the bottle tightly after use.
Performing a Control Test
- Remove a test strip from the test strip foil pouch.
![information]() Note: Check the expiration of the test strips. Do not use expired test strip.
Note: Check the expiration of the test strips. Do not use expired test strip. - With the meter off, insert a test strip into the meter in the direction of the arrows. It is not required to press the main button to begin testing.
![]()
- The meter turns on after a beep. An image of a test strip with a flashing blood drop will appear letting you know the meter is ready to test.

- Shake the control solution bottle thoroughly. Squeeze the control solution bottle gently and discard the first drop. Squeeze out a second small drop on a clean nonabsorbent surface.
![]()
![information]() Note: Do not apply control solution to the test strip directly from the bottle.
Note: Do not apply control solution to the test strip directly from the bottle. - Immediately touch the tip of the test strip to the drop of control solution. The control solution is pulled into the test strip through the strip tip.

![information]() Note: If the control solution sample does not fill the check window, do not add a second drop. Discard the test strip and start over with a new test strip.
Note: If the control solution sample does not fill the check window, do not add a second drop. Discard the test strip and start over with a new test strip. - Hold it in the drop until the meter beeps, and then you see the meter count down on the screen, followed by your control test result.


Note: The meter will automatically recognize and mark the control result for you. Control results are not included in the 7, 14 and 30 day average calculation.
Understand Your Control Test Result
Compare your control test result with the ranges printed on the test strip box or label.
Notes: If your control test result is out of range:
- Check the expiration dates and discard dates of the test strip and control solution. Make sure that the control solution bottle has not been opened for more than 6 months. Discard any expired test strips or control solution.
- Confirm the temperature in which you are testing of Glucose control is between 10 and 40°C, and testing of Ketone control is between 15 and 40°C
- Make sure that the control solution bottle has been tightly capped.
- Make sure the test strip was used immediately after removing from the test strip foil pouch.
- Make sure the control solution was mixed well.
- Confirm that you are using Keto-Mojo control solution.
- Make sure that you followed the test procedure correctly.
After checking all of the conditions listed above, repeat the control solution test with a new test strip. If your results still fall out of the range indicated on the test strip box or label, your meter or test strips may not be working properly. DO NOT use the system to test blood. Contact Keto-Mojo for further assistance.
To turn your meter off, just remove the test strip. Dispose of the used test strips as medical waste. The result will be automatically marked and stored in the meter memory. Control results will not be included in your blood Glucose averages.
Using the Meter Memory
Your meter automatically stores up to 1000 results with time and date. Test results are stored from the newest to the oldest. The meter will also calculate the average values of blood Glucose records from the last 7, 14 and 30 days.
Notes:
- If there are already 1000 records in memory, the oldest record will be erased to make room for a new one.
- It is very important to set the correct time and date in the meter, please make sure the time and date are correct after you change your battery.
- Control results of blood Glucose are not included in the 7, 14 and 30 day average calculation.
Viewing Your Test Results
When your meter is off, press the main button to turn meter on. After a beep, a symbol of strip flashes on the display, press the main button again, the 7-day average of blood Glucose will appear in the center of the display. If you want to review the memory after you immediately performed a test, with the test result on the display, press the main button to see the 7-day of blood Glucose average.
Continue to press the main button to view the 14-day average of blood Glucose, then press the main button again to review the 30-day average of blood Glucose.
Continue to press the main button to review previous results in order (including blood Glucose and blood Ketone). Results will be shown starting with the most recent; each result will show the date and time the test was taken.
When END appears on the display, you have viewed all of the results in the memory.

MAINTENANCE AND TROUBLESHOOTING
Proper maintenance is recommended for best results.
Replace the AAA Batteries
When the meter AAA batteries need to be replaced, the battery symbol ( ![]() ) will appear, or you may receive anE-11 error code.
) will appear, or you may receive anE-11 error code.
- Turn your meter off before changing the batteries.
- Press firmly on the battery cover and slide.
![]()

Note:
After you change the AAA batteries, your meter prompts you to confirm the meter's time and date settings. All of the test results are saved in the memory.
- Lift out and remove the old AAA batteries.
- Place the new AAA batteries under the prongs and into the battery compartment.
![]()
- Slide the battery cover back into place, lining up with the open slots, and close firmly.

![]()
Keep batteries away from children. A lithium battery is poisonous. If swallowed, immediately contact your doctor or poison control center. Discard batteries according to your local environmental regulations.
Caring for Your Keto-Mojo GK+ Blood Glucose and β-Ketone Dual Monitoring System
- Store meter in the carrying case provided whenever possible.
- Wash and dry hands well after handling to keep the meter and test strips free of water and other contaminants.
- The Blood Glucose and β-Ketone Meter is a precision electronic instrument. Please handle it with care.
- Avoid exposing meter and test strips to excessive humidity, heat, cold, dust, or dirt.
Cleaning and Disinfection
Your Keto-Mojo GK+ Blood Glucose and β-Ketone Meter should be cleaned and disinfected a minimum of once per week. Use only CloroxTM Healthcare Bleach Germicidal Wipes, which has been proven to be safe to use with the Keto-Mojo GK+ Blood Glucose and β-Ketone Meter.
Cleaning is part of your normal care and maintenance and should be performed prior to disinfection, but cleaning does not kill germs. After use and exposure to blood, all parts of this kit can potentially transmit infectious diseases. Disinfecting reduces the risk of transmitting infectious diseases.
Note: If the meter is being operated by a second person who is providing testing assistance to you, the meter should be cleaned and disinfected prior to use by the second person.
- Cleaning Your Meter
![]()
Step 1: Take one piece of Clorox™ Healthcare Bleach Germicidal Wipes (EPA Registration No. 67619-12) from the container.
Step 2: Clean the entire meter surface including front side, back side, right side and left side.


The meter should be cleaned when it is visibly dirty or at a minimum of once per week. This cleaning is to prepare the meter surface for a disinfection process.
- Disinfecting Your Meter
Step 1: After cleaning your meter, take out a new piece of Clorox™ Healthcare Bleach Germicidal Wipes.
Step 2: Wipe the entire surface including front side, back side, right side and left side of the meter, with a back and forth movement.


Step 3: Keep the meter surface wet for at least one minute.
Step 4: Wait for the surface of meter to dry.
CloroxTM Healthcare Bleach Germicidal Wipes contain Sodium hypochlorite 0.55%, which has been proven to be safe to use with the Blood Glucose and β-Ketone Dual Monitoring System. CloroxTM Healthcare Germicidal Bleach Wipes are available by contacting Krasity's Medical Supply at 800-537-1394 directly or purchasing at http://www.walmart.com and http://www.staples.com/.
The meter should be disinfected a minimum of once per week. The meter disinfection process has been validated for 608 disinfection cycles, which is equivalent to cleaning and disinfecting your meter every 3 days for 5 years. This is to ensure that your meter will operate properly over the 5-year life of the meter.
Note:
- Do not use alcohol or any other solvent.
- Do not allow liquid, dirt, dust, blood, or control solution to enter the test strip port or the data port.
- Do not squeeze or wipe gauze into the test strip port.
- Do not spray cleaning solution on the meter.
- Do not immerse the meter in any liquid.
Note: Although it has not been observed, some alterations may appear on your meter due to the cleaning and disinfection procedure. Items such as: cloudy display window, plastic housing cracking, meter buttons that do not function, partial display on full screen, unable to execute the meter's initial set up, etc. may appear. If you notice any of these external changes to your meter or any changes to the performance of your meter stop using the meter and please contact the local distributor for further assistance. Please contact your healthcare professional if you need help.
If you have questions about cleaning or disinfection, or if you see evidence of physical damage, please contact the local distributor for further assistance. Please contact your healthcare professional if you need.
Troubleshooting Guide
| What You See | What It Means | What You Should Do |
 | Add sample or control solution before the flashing blood drop appears. | Discard the test strip and repeat the test with a new test strip. Add sample or control solution after you see the flashing blood drop on the display. |
 | The meter is sensing the use of a used or contaminated test strip. | Discard the test strip and repeat the test with a new test strip. Wait until you see the flashing blood drop on the display before testing. |
 | Incorrect test strip. | Discard the test strip and repeat the test with a new test strip. Make sure that you are using Keto-Mojo Glucose / Ketone test strip. |
 | Incorrect sample. | Discard the test strip and repeat the test with a new test strip. Make sure that you are using a blood sample or Keto-Mojo Glucose/Ketone control solution. |
 | Temperature out of range. | Move to an area that is within the operating temperature for the meter. Let the meter adjust to this temperature for 20 minutes before performing a test. |
 | Potential hardware issue. | Take out batteries and restart the meter. If the problem continues, contact Keto-Mojo immediately for further assistance. |
 | Insufficient sample. | Repeat test and apply enough sample to fill check window of the test strip. |
 | Low Battery Indicator | Replace batteries and check date/time/year settings. |
 | Blood Glucose test result is above 33.3 mmol/L; blood Ketone test result is above 8.0 mmol/L. | Wash and dry your hands, then repeat the test using a new test strip. If your result still flashes HI, contact your health care professional as soon as possible. |
 | Blood Glucose test result is below 1.1 mmol/L; blood Ketone test result is below 0.1 mmol/L. | Wash and dry your hands, then repeat the test using a new test strip. If your result still flashes LO, contact your health care professional as soon as possible. |
TECHNICAL INFORMATION
System Specifications
| Feature | Specification |
| Measurement range | Blood Glucose: 1.1-33.3 mmol/L; Blood Ketone: 0.1-8.0 mmol/L |
| Result calibration | Plasma-equivalent |
| Sample | fresh capillary whole blood |
| Sample volume: | Blood Glucose: about 0.5µL; Blood Ketone: about 0.8µL |
| Test time | Blood Glucose: about 5 seconds; Blood Ketone: about 10 seconds; |
| Power source | Two AAA LR03 1.5V batteries |
| Battery life | 12 months or approximately 1,000 tests |
| Units of measure | Blood Glucose: the meter is pre-set to either millimoles per liter (mmol/L); Blood Ketone: millimoles per liter (mmol/L) is the default setting |
| Memory | Up to 1000 records with date and time |
| Automatic shutoff | 2 minutes after last action |
| Dimensions | 90.4 mm x 54.5 mm x 27.8 mm |
| Display size | 39 mm x 41 mm |
| Weight | Approximately 63g |
| Operating temperature | Blood Glucose: 5-45°C Blood Ketone: 7.5-45°C |
| Operating relative humidity | 10-90% (non-condensing) |
| Hematocrit range | Blood Glucose: 20-70%; Blood Ketone: 20-65%; |
| Bluetooth | Bluetooth Low Energy (BLE) |
Limitations
The Keto-Mojo GK+ Blood Glucose and β-Ketone Meter, Keto-Mojo test strips and control solutions have been designed, tested and proven to work together effectively to provide accurate blood Glucose/blood Ketone measurements. Do not use components from other brands.
- Use only with whole blood. Do not use serum or plasma samples.
- Only fingertip sampling is acceptable.
- Hematocrit levels beyond the hematocrit range of the system can cause false results. Talk to your healthcare professional to find out your hematocrit level.
- Abnormally high levels of vitamin C and other reducing substances will produce false high blood Glucose measurements.
- The Keto-Mojo GK+ system is tested to accurately read the measurement of Glucose in whole blood within the range of 1.1-33.3 mmol/L; Ketone in whole blood within the range of 0.1-8.0 mmol/L.
- The Keto-Mojo GK+ Blood Glucose and β-Ketone dual Monitoring System has been tested and shown to work properly up to 10,000ft (3,048 meters) for blood Glucose testing and 8,700 ft (2,651 meters) for blood Ketone testing.
- Severely ill persons should not run the Glucose and Ketone test with the Keto-Mojo GK+ Blood Glucose and β-Ketone Dual Monitoring System.
- Patients using oxygen therapy are not recommended for testing with Keto-Mojo Blood glucose test strips (VGS01).
- Blood samples from patients in shock, with severe dehydration or in a hyperosmolar state are not recommended for testing with Keto-Mojo GK+ Blood Glucose and β-Ketone Dual Monitoring System.
- Dispose of blood samples and materials carefully. Treat all blood samples as if they are infectious materials. Follow proper precautions and obey all local regulations when disposing of materials.
Warranty
Please register your warranty online at keto-mojo.com.
Index of Symbols
These symbols may appear on the packaging and in the instructions for the Keto-Mojo GK+ Blood Glucose and β-Ketone Dual Monitoring System.

Documents / Resources
References
![keto-mojo.com]() MyMojoHealth Data Cloud Connection – KETO-MOJO
MyMojoHealth Data Cloud Connection – KETO-MOJOWalmart | Save Money. Live better.
http://www.staples.com
![keto-mojo.com]() Keto and Low-Carb Living for Ultimate Health & Well-Being | KETO-MOJO
Keto and Low-Carb Living for Ultimate Health & Well-Being | KETO-MOJO
Download manual
Here you can download full pdf version of manual, it may contain additional safety instructions, warranty information, FCC rules, etc.
Advertisement


Need help?
Do you have a question about the GK+ and is the answer not in the manual?
Questions and answers