
Related Manuals for Crestron DM Essentials 4K60 4:4:4


Summary of Contents for Crestron DM Essentials 4K60 4:4:4
- Page 1 View this document in HTML crestron.com/docs/9259 Product Manual DM® Essentials 4K60 4:4:4 Endpoints Crestron Electronics, Inc.
- Page 2 Other trademarks, registered trademarks, and trade names may be used in this document to refer to either the entities claiming the marks and names or their products. Crestron disclaims any proprietary interest in the marks and names of others.
-
Page 3: Table Of Contents
Contents Overview Models Features DM Essentials Interoperability 4K60 4:4:4 and HDR Support Integrated Web Server (Certain Models Only) Automatic Switching of Inputs (Certain Models Only) USB-C DisplayPort Input with Charging Capability (Certain Models Only) Analog Audio Embedding (Certain Models Only) Analog Audio De-Embedding (Certain Models Only) S/PDIF Optical Digital Audio Return (Certain Models Only) USB 2.0 Data Extension (Certain Models Only) - Page 4 Configuring IEEE 802.1X Settings Management Rebooting the Device Restoring Factory Default Settings Using the Web Interface Using the SETUP Button Using Crestron Toolbox Software Updating Firmware Downloading Message Logs Managing Certificates Managing Root Certificates Managing Intermediate Certificates Managing Machine Certificates...
- Page 5 Product Certificates Product Manual — Doc. 9259G Contents • iii...
-
Page 6: Overview
4:4:4 color sampling. A CAT5e or higher cable is used to connect a DM Essentials 4K60 4:4:4 transmitter to a DM Essentials 4K60 4:4:4 receiver. For 1080p, WUXGA, and 2K signals, a cable length of up to 230 ft (70 m) is supported. -
Page 7: Models
Models The following table provides a list of DM Essentials 4K60 4:4:4 transmitters and receivers. NOTE: For assistance in selecting DM Essentials transmitters and receivers, use the DMPS Essentials and DM Essentials Product Selector tool on the Crestron website. Model... - Page 8 Model Description HD-TX-4KZ-211-2G-B 2x1 Auto-Switcher, HDMI and USB-C DisplayPort Signal Extension over CATx Cable, 2 Gang, Black HD-TX-4KZ-211-2G-W 2x1 Auto-Switcher, HDMI and USB-C DisplayPort Signal Extension over CATx Cable, 2 Gang, White HD-TXU-4KZ-111-2G-B USB C DisplayPort and USB 2.0 Signal Extension over CATx Cable, 2 Gang, Black HD-TXU-4KZ-111-2G-W USB C DisplayPort and USB 2.0 Signal Extension over CATx Cable, 2 Gang, White RECEIVERS...
-
Page 9: Features
S/PDIF optical digital audio return (HD-TXCA-4KZ-101 and HD-RXCA-4KZ-101 only) USB-C DisplayPort input with charging capability (HD-TX-4KZ-211-CHGR, HD-TX-4KZ-421-CHGR, and HD-TXU-4KZ-211-CHGR only) Interoperability with a Crestron 3-Series® or later control system (HD-TXU-4KZ-211 Series and HD-RXU-4KZ-202 only) XiO Cloud® service support (HD-TXU-4KZ-211 Series and HD-RXU-4KZ-202 only) .AV Framework™... - Page 10 Power from one of the following: Local 24VDC power pack Remote surface-mountable DM Essentials transmitter or receiver (all models excluding HD- TXU-4KZ-211 Series and HD-RXU-4KZ-202) Remote DMPS Essentials switcher (all models excluding HD-TXU-4KZ Series and HD-RXU- 4KZ Series), HD-RXU-4KZ-101 Series, and Power pack included with surface-mountable DM Essentials transmitters and receivers 5 •...
-
Page 11: Dm Essentials Interoperability
DM Essentials Interoperability The DM Essentials output port of a DM Essentials 4K60 4:4:4 transmitter is designed for connection to a DM Essentials input port of a DM Essentials receiver or DMPS Essentials switcher. Similarly, the DM Essentials input port of a DM Essentials 4K60 4:4:4 receiver is designed for connection to a DM Essentials output port of a DM Essentials transmitter or DMPS Essentials switcher. -
Page 12: Usb-C Displayport Input With Charging Capability (Certain Models Only)
When a multi-input HD-TX-4KZ Series transmitter is used with a DMPS Essentials switcher, the web interface of the switcher or control system programming can be used to configure the AV switching behavior of the transmitter. When a multi-input HD-TXU-4KZ Series transmitter is used with an HD- RXU-4KZ-202, the web interface of the transmitter or control system programming can be used to configure the AV switching behavior of the HD-RXU-4KZ-202. -
Page 13: S/Pdif Optical Digital Audio Return (Certain Models Only)
S/PDIF Optical Digital Audio Return (Certain Models Only) NOTE: S/PDIF optical digital audio return is applicable to the HD-TXCA-4KZ-101 transmitter and HD-RXCA-4KZ-101 receiver only. The HD-TXCA-4KZ-101 receives S/PDIF optical digital audio from a device (for example, a display) connected to the S/PDIF optical digital audio input of the HD-RXCA-4KZ-101. The S/PDIF optical digital audio output of the HD-TXCA-4KZ-101 then transmits the audio to an AV receiver. -
Page 14: Physical Description
Physical Description The following sections provide information about the front and rear panels of DM Essentials 4K60 4:4:4 extenders based on the device type (transmitter or receiver) and form factor (surface-mountable or wall plate): Surface-Mountable Transmitters Wall Plate Transmitters Surface-Mountable Receivers... -
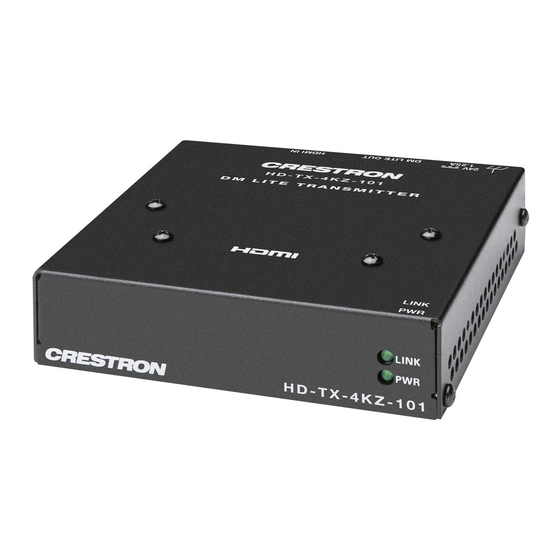
Page 15: Front Panel
Front Panel The following illustration shows the front panel of each of the HD-TX(A)(C)(CA)-4KZ-1x1 Series transmitters. HD-TX(A)(C)(CA)-4KZ-1x1 Series Transmitters, Front Panel OPTICAL OUT Port: JIS F05 female, TOSLINK® optical fiber connector; ① S/PDIF optical digital audio output, functional only when the HD-TXCA-4KZ-101 transmitter is used with the HD-RXCA-4KZ-101 receiver AUDIO IN LED: Green LED, indicates that analog audio is selected ②... - Page 16 COM Port: 3-pin 3.5 mm detachable terminal block; ④ Bidirectional RS-232 port; Passes RS-232 TD/RD data to/from the COM port on a DM Essentials receiver; Supports up to 115.2k baud IR IN/OUT Ports: 4-pin 3.5 mm detachable terminal block; ⑤ Comprised of (1) IR input port and (1) IR output port;...
- Page 17 Rear Panel The following illustration shows the rear panel of each of the HD-TX(A)(C)(CA)-4KZ-1x1 Series transmitters. HD-TX(A)(C)(CA)-4KZ-1x1 Series Transmitters, Rear Panel Ground: Chassis ground lug ① 24V 1.25A Power Connector: 2.1 x 5.5 mm DC power connector; ② 24VDC power input; PW-2420RU power pack included DM OUT Port: 8-pin RJ-45 yellow connector, female, shielded;...
- Page 18 HDMI IN Port: HDMI Type A connector, female; ④ HDMI digital video/audio input; DVI and Dual-Mode DisplayPort™ interface compatible with appropriate adapter or interface cable (CBL-HD-DVI interface cables sold separately) HDMI IN LED: Green LED, indicates that the device is receiving an HDMI signal ⑤...
- Page 19 HD-TX-4KZ-201 and HD-TX-4KZ-401 The front and rear panels of the HD-TX-4KZ-201 and HD-TX-4KZ-401 transmitters provide connectors, controls, and indicators as discussed in the following sections. Front Panel The following illustration shows the front panel of the HD-TX-4KZ-201 and HD-TX-4KZ-401 transmitters. HD-TX-4KZ-201 and HD-TX-4KZ-401 Transmitters, Front Panel PWR LED: Lights to indicate that power is being applied to the device.
- Page 20 HD-TX-4KZ-201 and HD-TX-4KZ-401 Transmitters, Rear Panel 24V 2.5A Power Connector: 2.1 x 5.5 mm DC power connector; ① 24VDC power input; PW-2420RU power pack included DM OUT Port: 8-pin RJ-45 yellow connector, female, shielded; ② DM Essentials output port for connection to the DM Essentials input port of a DM Essentials receiver or DMPS Essentials switcher;...
- Page 21 HD-TX-4KZ-211-CHGR and HD-TX-4KZ-421-CHGR The front and rear panels of the HD-TX-4KZ-211-CHGR and HD-TX-4KZ-421-CHGR provide connectors, controls, and indicators as discussed in the following sections. Front Panel The following illustration shows the front panel of the HD-TX-4KZ-211-CHGR and HD-TX-4KZ-421- CHGR transmitters. HD-TX-4KZ-211-CHGR and HD-TX-4KZ-421-CHGR Transmitters, Front Panel PWR LED: Lights to indicate that power is being applied to the device.
- Page 22 SERVICE: USB 2.0 Type-A connector, female; ⑥ Used for firmware loading, configuration management, or as a USB host port for one TT-100 series cable caddy (sold separately); Can also provide up to 5V 500 mA power to a USB powered device Rear Panel The following illustration shows the rear panel of the HD-TX-4KZ-211-CHGR and HD-TX-4KZ-421-CHGR transmitters.
- Page 23 NOTE: In order for a USB-C DisplayPort input to charge the connected AV source, the DM Essentials transmitter must be powered by the included power pack. If the device is powered by a remote DM Essentials receiver or DMPS Essentials switcher, no charging capability is provided by the USB-C input.
- Page 24 Rear Panel The following illustration shows the rear panel of the HD-TXU-4KZ-111-E transmitter. HD-TXU-4KZ-111-E Transmitter, Rear Panel USB INPUT Port: USB Type-C® connector, female; ① Digital video/audio input using DisplayPort Alt Mode (CBL-USB3G1-C-C-6 and CBL-USB3G2-C- C-3 cables sold separately); USB 2.0 data support DM OUT Port: 8-pin RJ-45 yellow connector, female, shielded;...
- Page 25 HD-TXU-4KZ-211 The front and rear panels of the HD-TXU-4KZ-211 transmitter provide connectors, controls, and indicators as discussed in the following sections. Front Panel The following illustration shows the front panel of the HD-TXU-4KZ-211 transmitter. HD-TXU-4KZ-211 Transmitter, Front Panel PWR LED: Lights to indicate that power is being applied to the device. Amber indicates that the ①...
- Page 26 Rear Panel The following illustration shows the rear panel of the HD-TXU-4KZ-211 transmitter. HD-TXU-4KZ-211 Transmitter, Rear Panel 24V 1.9A Power Connector: 2.1 x 5.5 mm DC power connector; ① 24VDC power input; PW-2420RU power pack included USB INPUT 1 Port: USB Type-C® connector, female; ②...
- Page 27 HD-TXU-4KZ-211-CHGR The front and rear panels of the HD-TXU-4KZ-211-CHGR transmitter provide connectors, controls, and indicators as discussed in the following sections. Front Panel The following illustration shows the front panel of the HD-TXU-4KZ-211-CHGR transmitter. HD-TXU-4KZ-211-CHGR Transmitter, Front Panel PWR LED: Lights to indicate that power is being applied to the device. Amber indicates that the ①...
- Page 28 Rear Panel The following illustration shows the rear panel of the HD-TXU-4KZ-211-CHGR transmitter. HD-TXU-4KZ-211-CHGR Transmitter, Rear Panel 24V 4.5A Power Connector: 2.1 x 5.5 mm DC power connector; ① 24VDC power input; PW-2475DU power pack included 60W USB INPUT 1 Port: USB Type-C® connector, female; ②...
-
Page 29: Wall Plate Transmitters
LAN Port: 8-pin RJ-45 connector, female; ⑦ 100BASE-TX/1000BASE-T Ethernet port for device configuration and management; Green LED indicates that a 100 Mbps link is established, Solid amber indicates that a 1000 Mbps link is established, Flashing amber indicates 1000 Mbps Ethernet activity Ground: Chassis ground lug ⑧... -
Page 30: Front View
Front View The following illustration shows the front of the HD-TX(A)(C)-4KZ-1x1-1G Series transmitters. HD-TX(A)(C)-4KZ-1x1-1G Series Transmitters, Front LINK LED: Green LED, indicates that a DM Essentials link is established ① PWR LED: Lights to indicate that power is being applied to the device. Amber indicates that the ②... - Page 31 AUDIO SELECT: Push button, enables selection of HDMI or analog audio ⑤ AUDIO, HDMI IN LED: Green LED, indicates that HDMI audio is selected AUDIO IN LED: Green LED, indicates that analog audio is selected AUDIO IN Port: 5-pin 3.5 mm detachable terminal block; ⑥...
-
Page 32: Rear View
Rear View The following illustration shows the rear of the HD-TX(A)(C)-4KZ-1x1-1G Series transmitters. HD-TX(A)(C)-4KZ-1x1-1G Series Transmitters, Rear Ground: Chassis ground lug ① DM OUT Port: 8-pin RJ-45 yellow connector, female, shielded; ② DM Essentials output port for connection to the DM Essentials input port of a DM Essentials receiver or DMPS Essentials switcher;... - Page 33 HD-TX-4KZ-211-2G The front and rear of the HD-TX-4KZ-211-2G transmitter provide connectors, controls, and indicators as discussed in the following sections. Front View The following illustration shows the front of the HD-TX-4KZ-211-2G. HD-TX-4KZ-211-2G, Front HDMI IN Port: HDMI Type A connector, female; ①...
- Page 34 USB IN LED: Green LED, lights to indicate that the device is receiving a DisplayPort over USB- ⑧ C (DisplayPort Alt Mode) input signal RESET Push Button: Restores factory default settings ⑨ LINK LED: Green LED, indicates that a DM Essentials link is established ⑩...
- Page 35 Front View The following illustration shows the front of the HD-TXU-4KZ-111-2G. HD-TXU-4KZ-111-2G, Front HOST Ports: USB Type-A connectors, female; ① USB 2.0 host ports; USB signal extender ports for connection to USB mice, keyboards, or other USB 2.0 peripheral devices; Available Power: 500 mA @ 5VDC per port PWR LED: Lights to indicate that power is being applied to the device.
- Page 36 Rear View The following illustration shows the rear of the HD-TXU-4KZ-111-2G. HD-TXU-4KZ-111-2G, Rear Ground: Chassis ground lug ① DM OUT Port: 8-pin RJ-45 yellow connector, female, shielded; ② DM Essentials output port for connection to the DM Essentials input port of a DM Essentials HD-RXU-4KZ Series receiver;...
-
Page 37: Surface-Mountable Receivers
Surface-Mountable Receivers This section provides information about the front and rear panels of the HD-RX(A)(C)(CA)-4KZ-101 Series, HD-RXU-4KZ-101-E, and HD-RXU-4KZ-202 surface-mountable receivers. HD-RX(A)(C)(CA)-4KZ-101 Series HD-RX(A)(C)(CA)-4KZ-101 Series receivers consist of the following: HD-RX-4KZ-101 HD-RXA-4KZ-101 HD-RXC-4KZ-101 HD-RXCA-4KZ-101 Front Panel The following illustration shows the front panel of each of the HD-RX(A)(C)(CA)-4KZ-101 Series receivers. - Page 38 COM Port: 3-pin 3.5 mm detachable terminal block; ③ Bidirectional RS-232 port; Passes RS-232 TD/RD data to/from the COM port on a DM Essentials transmitter; Supports up to 115.2k baud IR IN/OUT Ports: 4-pin 3.5 mm detachable terminal block; ④ Comprised of (1) IR input port and (1) IR output port;...
- Page 39 HD-RXU-4KZ-101-E The front and rear panels of the HD-RXU-4KZ-101-E receiver provide connectors, controls, and indicators as discussed in the following sections. Front Panel The following illustration shows the front panel of the HD-RXU-4KZ-101-E receiver. HD-RXU-4KZ-101-E Receiver, Front Panel PWR LED: Lights to indicate that power is being applied to the device. Amber indicates that the ①...
- Page 40 Rear Panel The following illustration shows the rear panel of the HD-RXU-4KZ-101-E receiver. HD-RXU-4KZ-101-E Receiver, Rear Panel LAN Port: 8-pin RJ-45 connector, female; ① 100BASE-TX/1000BASE-T Ethernet port; Receives Ethernet signal from an HD-TXU-4KZ-111-E transmitter over the DM Essentials connection; Green LED indicates that a 100 Mbps link is established, Solid amber indicates that a 1000 Mbps link is established, Flashing amber indicates 1000 Mbps Ethernet activity DM IN Port: 8-pin RJ-45 yellow connector, female, shielded;...
- Page 41 HD-RXU-4KZ-202 The front and rear panels of the HD-RXU-4KZ-202 receiver provide connectors, controls, and indicators as discussed in the following sections. Front Panel The following illustration shows the front panel of the HD-RXU-4KZ-202 receiver. HD-RXU-4KZ-202 Receiver, Front Panel PWR LED: Lights to indicate that power is being applied to the device. Amber indicates that the ①...
- Page 42 HD-RXU-4KZ-202 Receiver, Rear Panel 24V 1.9A Power Connector: 2.1 x 5.5 mm DC power connector; ① 24VDC power input; PW-2420RU power pack included HDMI OUTPUT 1-2 Ports: HDMI Type A connectors, female; ② HDMI digital video/audio outputs; DVI compatible with appropriate adapter or interface cable (CBL-HD-DVI interface cables sold separately) HDMI INPUT 1 Port: HDMI Type A connector, female;...
-
Page 43: Wall Plate Receivers
Wall Plate Receivers This section provides information about the front and rear of the HD-RX(C)-4KZ-101-1G Series RXU-4KZ-101-2G wall plate receivers. HD-RX(C)-4KZ-101-1G Series HD-RX(C)-4KZ-101-1G Series receivers consist of the following: HD-RX-4KZ-101-1G-B HD-RXC-4KZ-101-G-B Front View The following illustration shows the front of the HD-RX(C)-4KZ-101-1G Series receivers. HD-RX(C)-4KZ-101-1G Series Receivers, Front LINK LED: Green LED, indicates that a DM Essentials link is established ①... - Page 44 IR IN/OUT Ports: 4-pin 3.5 mm detachable terminal block; ⑥ Comprised of (1) IR input port and (1) IR output port; IR IN passes the IR input signal to the IR OUT port on the DM Essentials transmitter; IR OUT transmits the IR signal from the IR IN port on the DM Essentials transmitter; Supports IR up to 60 kHz Rear View The following illustration shows the rear of the HD-RX(C)-4KZ-101-1G Series receivers.
- Page 45 HD-RXU-4KZ-101-2G The front and rear of the HD-RXU-4KZ-101-2G receiver provide connectors, controls, and indicators as discussed in the following sections. Front View The following illustration shows the front of the HD-RXU-4KZ-101-2G receiver. HD-RXU-4KZ-101-2G Receiver, Front HOST Ports: USB Type-A connectors, female; ①...
- Page 46 Rear View The following illustration shows the rear of the HD-RXU-4KZ-101-2G receiver. HD-RXU-4KZ-101-2G Receiver, Rear Ground: Chassis ground lug ① DM IN Port: 8-pin RJ-45 yellow connector, female, shielded; ② DM Essentials input port for connection to the DM Essentials output port of a DM Essentials HD-TXU-4KZ Series transmitter;...
-
Page 47: Specifications
Specifications For product specifications, visit the product pages on the Crestron website. The product pages are listed below based on device type (transmitter or receiver) and form factor (surface-mountable or wall plate). Transmitters, Surface-Mountable: HD-TX-4KZ-101 HD-TXA-4KZ-101 HD-TXC-4KZ-101 HD-TXCA-4KZ-101 HD-TX-4KZ-111 HD-TX-4KZ-201... - Page 48 HD-RXU-4KZ-101-E HD-RXU-4KZ-202 Receivers, Wall Plate: HD-RX-4KZ-101-1G-B HD-RXC-4KZ-101-1G-B HD-RXU-4KZ-101-2G-B 43 • DM® Essentials Product Manual — Doc. 9259G...
-
Page 49: Installation
Installation This section provides the following information related to the installation of DM Essentials transmitters and receivers: Installation guidelines Surface-mountable device installation Wall plate device installation Product Manual — Doc. 9259G DM® Essentials • 44... -
Page 50: Installation Guidelines
DM Essentials Cabling The DM Essentials output port of a DM Essentials 4K60 4:4:4 transmitter must be connected to a DM Essentials input port of a DM Essentials receiver or DMPS Essentials switcher. Similarly, the DM Essentials input port of a DM Essentials 4K60 4:4:4 receiver must be connected to a DM Essentials output port of a DM Essentials transmitter or DMPS Essentials switcher. -
Page 51: Hdmi Cabling
An HDMI input requires an appropriate adapter or interface cable to accommodate a Dual-Mode DisplayPort™ or DVI signal. An HDMI output requires an appropriate adapter or interface cable to accommodate a DVI signal. Crestron CBL-HD-DVI interface cables are sold separately. Power Connection... - Page 52 Surface-Mountable Transmitter Power Connection A 24VDC power pack is included with a surface-mountable DM Essentials transmitter. Be aware of the following: When a surface-mountable DM Essentials transmitter other than an HD-TXU-4KZ-211(-CHGR) is paired with a surface-mountable DM Essentials receiver, either the power pack included with the transmitter or the receiver can be used to power both devices.
- Page 53 Wall Plate Transmitter Power Connection No power pack is included with a wall plate DM Essentials transmitter. Be aware of the following: When a wall plate DM Essentials transmitter is paired with a surface-mountable DM Essentials receiver, the power pack included with the receiver is used to power both devices. Power is transmitted over the CATx cable that connects the wall plate transmitter to the surface- mountable receiver.
-
Page 54: Surface-Mountable Device Installation
Surface-Mountable Device Installation This section provides information about installing and making connections to surface-mountable DM Essentials transmitters and receivers. In the Box Qty. Description DM Essentials transmitter or receiver, surface mountable Additional Items HD-TX-4KZ-101, HD-TX-4KZ-111, HD-RX-4KZ-101, HD-TX-4KZ-201, HD-TX-4KZ-401 , HD-TXU-4KZ-211, and HD-RXU-4KZ-202 Only Bracket, Mounting (2057072) Screw, 4-40 x 1/4 in. - Page 55 Qty. Description Washer, Flat, Steel, Zinc, #6, Type B Regular (2007664) Anchor, Wall, #6 x 1-5/16 in. (2043585) Power Pack, 24VDC, 2.5A, 100-240VAC (2045873) Power Cord, 5 ft 10 in. (1.78 m) (2042043) Connector, 3-Pin (2003575) Connector, 4-Pin (2003576) HD-TXCA-4KZ-101 and HD-RXCA-4KZ-101 Only Bracket, Mounting (2057072) Screw, 4-40 x 1/4 in.
-
Page 56: Installing A Surface-Mountable Device
Qty. Description Washer, Flat, Steel, Zinc, #6, Type B Regular (2007664) Anchor, Wall, #6 x 1-5/16 in. (2043585) Power Pack, 24VDC, 2.5A, 100-240VAC (2045873) Power Cord, 5 ft 10 in. (1.78 m) (2042043) Installing a Surface-Mountable Device A DM Essentials surface-mountable device can be mounted onto a flat surface such as a wall or the underside of a table. - Page 57 Bracket Attachment for HD-TX-4KZ-201/401/211-CHGR/421-CHGR Wall Mounting (HD-TX-4KZ-421-CHGR Shown) Bracket Attachment for HD-TXU-4KZ-111-E and HD-RXU-4KZ-101-E Wall Mounting (HD-TXU-4KZ-111-E Shown) Product Manual — Doc. 9259G DM® Essentials • 52...
- Page 58 Bracket Attachment for HD-TXU-4KZ-211 and HD-TXU-4KZ-211-CHGR Wall Mounting (HD-TXU-4KZ-211- CHGR Shown) Bracket Attachment for HD-RXU-4KZ-202 Wall Mounting 53 • DM® Essentials Product Manual — Doc. 9259G...
- Page 59 2. Using the four included anchors, washers, and 6-32 x 3/4 in. combo truss head screws, attach the device to the wall. For example purposes, the HD-TXCA-4KZ-101 is shown in the following illustration. Wall Mounting (HD-TXCA-4KZ-101 Shown) Product Manual — Doc. 9259G DM®...
- Page 60 Mounting to the Underside of a Table To mount a surface-mountable device to the underside of a table: 1. Using the four included 4-40 x 1/4 in. Phillips pan head screws, attach the two included brackets to the left and right side panels of the device. Side panels vary depending on the physical design of the DM Essentials model.
- Page 61 Bracket Attachment for HD-TXU-4KZ-111-E and HD-RXU-4KZ-101-E Under Table Mounting (HD-TXU-4KZ-111-E Shown) Bracket Attachment for HD-TXU-4KZ-211 and HD-TXU-4KZ-211-CHGR Under Table Mounting (HD-TXU-4KZ- 211-CHGR Shown) Product Manual — Doc. 9259G DM® Essentials • 56...
- Page 62 Bracket Attachment for HD-RXU-4KZ-202 Under Table Mounting 2. Using four screws (not included), attach the device to the underside of a table. For example purposes, the HD-TXCA-4KZ-101 is shown in the following illustration. Under Table Mounting (HD-TXCA-4KZ-101 Shown) 57 • DM® Essentials Product Manual —...
- Page 63 Mounting onto a Rack Rail To mount a surface-mountable device onto a single rack rail: 1. Position one of the mounting brackets so that the holes align with the holes in the rack rail. 2. Secure the device to the rack rail using two rack mount screws (not included). For example purposes, mounting of the HD-TXCA-4KZ-101 onto a rack rail is shown in the following illustration.
-
Page 64: Connecting A Surface-Mountable Device
Connecting a Surface-Mountable Device This section provides information about the following: Surface-mountable transmitter connections Surface-mountable receiver connections Surface-Mountable Transmitter Connections This section provides information about making connections to the following surface-mountable transmitters: HD-TX-4KZ-101 HD-TX-4KZ-401 HD-TXA-4KZ-101 HD-TX-4KZ-421-CHGR HD-TXC-4KZ-101 HD-TXU-4KZ-111-E HD-TXCA-4KZ-101 HD-TXU-4KZ-111-E HD-TX-4KZ-111 HD-TXU-4KZ-211 HD-TX-4KZ-201... - Page 65 HD-TXA-4KZ-101 Connections Refer to the following illustration for general information about HD-TXA-4KZ-101 front and rear panel connections. NOTE: For guidelines regarding DM Essentials cabling, HDMI cabling, and the surface-mountable transmitter power connection, refer to Installation Guidelines. HD-TXA-4KZ-101 Front and Rear Panel Connections Product Manual —...
- Page 66 The front panel of the device includes a 5-pin terminal block connector for balanced or unbalanced analog audio input. Refer to the following table and diagram for pin assignments and connection information. Analog Audio Input Pin Assignments Signal Name Balanced Audio Input Unbalanced Audio Input L+ In L- Signal return, jumper to GND...
- Page 67 HD-TXC-4KZ-101 Connections Refer to the following illustration for general information about HD-TXC-4KZ-101 front and rear panel connections. NOTE: For guidelines regarding DM Essentials cabling, HDMI cabling, and the surface-mountable transmitter power connection, refer to Installation Guidelines. HD-TXC-4KZ-101 Front and Rear Panel Connections Product Manual —...
- Page 68 HD-TXCA-4KZ-101 Connections Refer to the following illustration for general information about HD-TXCA-4KZ-101 front and rear panel connections. NOTE: For guidelines regarding DM Essentials cabling, HDMI cabling, and the surface-mountable transmitter power connection, refer to Installation Guidelines. HD-TXCA-4KZ-101 Front and Rear Panel Connections 63 •...
- Page 69 The front panel of the device includes a 5-pin terminal block connector for balanced or unbalanced analog audio input. Refer to the following table and diagram for pin assignments and connection information. Analog Audio Input Pin Assignments Signal Name Balanced Audio Input Unbalanced Audio Input L+ In L- Signal return, jumper to GND...
- Page 70 HD-TX-4KZ-111 Connections Refer to the following illustration for general information about HD-TX-4KZ-111 rear panel connections. NOTE: For guidelines regarding DM Essentials cabling and the surface-mountable transmitter power connection, refer to Installation Guidelines. HD-TX-4KZ-111 Rear Panel Connections 65 • DM® Essentials Product Manual —...
- Page 71 HD-TX-4KZ-201 Connections Refer to the following illustration for general information about HD-TX-4KZ-201 front and rear panel connections. NOTE: For guidelines regarding DM Essentials cabling, HDMI cabling, and the surface-mountable transmitter power connection, refer to Installation Guidelines. HD-TX-4KZ-201 Front and Rear Panel Connections Product Manual —...
- Page 72 HD-TX-4KZ-211-CHGR Connections Refer to the following illustration for general information about HD-TX-4KZ-211-CHGR front and rear panel connections. NOTE: For guidelines regarding DM Essentials cabling, HDMI cabling, and the surface-mountable transmitter power connection, refer to Installation Guidelines. HD-TX-4KZ-211-CHGR Front and Rear Panel Connections 67 •...
- Page 73 HD-TX-4KZ-401 Connections Refer to the following illustration for general information about HD-TX-4KZ-401 front and rear panel connections. NOTE: For guidelines regarding DM Essentials cabling, HDMI cabling, and the surface-mountable transmitter power connection, refer to Installation Guidelines. HD-TX-4KZ-401 Front and Rear Panel Connections Product Manual —...
- Page 74 HD-TX-4KZ-421-CHGR Connections Refer to the following illustration for general information about HD-TX-4KZ-421-CHGR front and rear panel connections. NOTE: For guidelines regarding DM Essentials cabling, HDMI cabling, and the surface-mountable transmitter power connection, refer to Installation Guidelines. HD-TX-4KZ-421-CHGR Front and Rear Panel Connections 69 •...
- Page 75 HD-TXU-4KZ-111-E Connections Refer to the following illustration for general information about HD-TXU-4KZ-111-E front and rear panel connections. NOTE: For guidelines regarding DM Essentials cabling and the surface-mountable transmitter power connection, refer to Installation Guidelines. HD-TXU-4KZ-111-E Front and Rear Panel Connections NOTE: If the HD-TXU-4KZ-111-E is paired with a DM Essentials receiver other than an HD-RXU-4KZ Series receiver or paired with a DMPS Essentials switcher (HD-PS Series or HD-RX-4K-210-C-E[-POE]), USB 2.0 data extension is not supported.
- Page 76 HD-TXU-4KZ-211 Connections Refer to the following illustration for general information about HD-TXU-4KZ-211 front and rear panel connections. NOTE: For guidelines regarding DM Essentials cabling, HDMI cabling, and the surface-mountable transmitter power connection, refer to Installation Guidelines. HD-TXU-4KZ-211 Front and Rear Panel Connections NOTE: If the HD-TXU-4KZ-211 is paired with a DM Essentials receiver other than an HD-RXU-4KZ Series receiver or paired with a DMPS Essentials switcher (HD-PS Series or HD-RX-4K-210-C-E[-POE]), USB 2.0 data extension is not supported.
- Page 77 HD-TXU-4KZ-211-CHGR Connections Refer to the following illustration for general information about HD-TXU-4KZ-211-CHGR front and rear panel connections. NOTE: For guidelines regarding DM Essentials cabling, HDMI cabling, and the surface-mountable transmitter power connection, refer to Installation Guidelines. HD-TXU-4KZ-211-CHGR Front and Rear Panel Connections NOTE: If the HD-TXU-4KZ-211-CHGR is paired with a DM Essentials receiver other than an HD-RXU- 4KZ Series receiver or paired with a DMPS Essentials switcher (HD-PS Series or HD-RX-4K-210-C-E[-POE]), USB 2.0 data extension is not supported.
- Page 78 HD-RX-4KZ-101 Connections Refer to the following illustration for general information about HD-RX-4KZ-101 rear panel connections. NOTE: For guidelines regarding DM Essentials cabling, HDMI cabling, and the surface-mountable receiver power connection, refer to Installation Guidelines. HD-RX-4KZ-101 Rear Panel Connections 73 • DM® Essentials Product Manual —...
- Page 79 HD-RXA-4KZ-101 Connections Refer to the following illustration for general information about HD-RXA-4KZ-101 front and rear panel connections. NOTE: For guidelines regarding DM Essentials cabling, HDMI cabling, and the surface-mountable receiver power connection, refer to Installation Guidelines. HD-RXA-4KZ-101 Front and Rear Panel Connections Product Manual —...
- Page 80 The front panel of the device includes a 5-pin terminal block connector for balanced or unbalanced analog audio output. Refer to the following table and diagrams for pin assignments and connection information. Analog Audio Output Pin Assignments Signal Name Balanced Audio Output Unbalanced Audio Output L+ Out Open...
- Page 81 HD-RXC-4KZ-101 Connections Refer to the following illustration for general information about HD-RXC-4KZ-101 front and rear panel connections. NOTE: For guidelines regarding DM Essentials cabling, HDMI cabling, and the surface-mountable receiver power connection, refer to Installation Guidelines. HD-RXC-4KZ-101 Front and Rear Panel Connections Product Manual —...
- Page 82 HD-RXCA-4KZ-101 Connections Refer to the following illustration for general information about HD-RXCA-4KZ-101 front and rear panel connections. NOTE: For guidelines regarding DM Essentials cabling, HDMI cabling, and the surface-mountable receiver power connection, refer to Installation Guidelines. HD-RXCA-4KZ-101 Front and Rear Panel Connections 77 •...
- Page 83 The front panel of the device includes a 5-pin terminal block connector for balanced or unbalanced analog audio output. Refer to the following table and diagrams for pin assignments and connection information. Analog Audio Output Pin Assignments Signal Name Balanced Audio Output Unbalanced Audio Output L+ Out Open...
- Page 84 HD-RXU-4KZ-101-E Connections Refer to the following illustration for general information about HD-RXU-4KZ-101-E front and rear panel connections. NOTE: For guidelines regarding DM Essentials cabling, HDMI cabling, and the surface-mountable receiver power connection, refer to Installation Guidelines. HD-RXU-4KZ-101-E Front and Rear Panel Connections NOTE: If the HD-RXU-4KZ-101-E is paired with a DM Essentials transmitter other than an HD-TXU- 4KZ Series transmitter or paired with a DMPS Essentials HD-PS Series switcher, USB 2.0 data extension is not supported.
- Page 85 HD-RXU-4KZ-202 Connections Refer to the following illustration for general information about HD-RXU-4KZ-202 front and rear panel connections. NOTE: For guidelines regarding DM Essentials cabling, HDMI cabling, and the surface-mountable receiver power connection, refer to Installation Guidelines. HD-RXU-4KZ-202 Front and Rear Panel Connections NOTE: If the HD-RXU-4KZ-202 is paired with a DM Essentials transmitter other than an HD-TXU- 4KZ Series transmitter or paired with a DMPS Essentials HD-PS Series switcher, USB 2.0 data extension is not supported.
-
Page 86: Wall Plate Device Installation
Wall Plate Device Installation This section provides information about installing and making connections to DM Essentials wall plate transmitters and receivers. In the Box Qty. Description DM Essentials transmitter or receiver, wall plate Additional Items HD-TX-4KZ-101-1G(-B, -W), HD-TX-4KZ-111-1G(-B, -W), and HD-RX-4KZ-101-1G-B Only Screw, 6-32 x 3/4 in. -
Page 87: Installing A Wall Plate Device
Qty. Description Polycarbonate Overlay, RXC, Black (2064030) HD-TX-4KZ-211-2G(-B, -W), HD-TXU-4KZ-111-2G(-B, -W) and HD-RXU-4KZ-101-2G-B Only Screw, 6-32 x 3/4 in. Truss Head, Combo (2009211) Installing a Wall Plate Device A DM Essentials wall plate device can be mounted into an electrical box (not included) or onto a single rack rail. - Page 88 Connections to Rear of HD-TX(A)(C)-4KZ-1x1-1G Series Transmitter 83 • DM® Essentials Product Manual — Doc. 9259G...
- Page 89 Connections to Rear of HD-RX(C)-4KZ-101-1G Series Receiver 2. Using a Phillips screwdriver (not included) and the two included 6-32 x 3/4-inch combo truss head screws, attach the device to the electrical box. Product Manual — Doc. 9259G DM® Essentials • 84...
- Page 90 3. Attach the adhesive polycarbonate label to the front panel if the terminal block connectors are not in use (HD-TXC-4KZ-101-1G[-B, -W] and HD-RXC-4KZ-101-1G-B only). 4. Attach a decorator style faceplate, such as the Crestron FP-G1 (not included), to the front of the device using two screws (not included).
- Page 91 Mounting of 1-Gang Device into Electrical Box, HD-TX-4KZ-101-1G Shown Installing a 2-Gang Wall Plate Device To install a 2-gang wall plate device into an electrical box: 1. Verify that the required wiring has been fed through the electrical box, and then make connections to the rear of the device.
- Page 92 Connections to Rear of HD-TX-4KZ-211-2G 87 • DM® Essentials Product Manual — Doc. 9259G...
- Page 93 Connections to Rear of HD-TXU-4KZ-111-2G Product Manual — Doc. 9259G DM® Essentials • 88...
- Page 94 Connections to Rear of HD-RXU-4KZ-101-2G 2. Using a Phillips screwdriver (not included) and the four included 6-32 x 3/4-inch combo truss head screws, attach the wall plate device to the electrical box. 89 • DM® Essentials Product Manual — Doc. 9259G...
- Page 95 3. Attach an FP-G2-DM Series decorator style faceplate (black FP-G2-DM-B-T or white FP-G2-DM- W-T, sold separately) to the front of the device. An FP-G2-DM Series faceplate is required. Faceplates other than the FP-G2-DM Series NOTE: are incompatible with DM Essentials 2-gang wall plate devices. Mounting of 2-Gang Device into Electrical Box, HD-TX-4KZ-211-2G Shown Mounting onto a Rack Rail To mount a wall plate device onto a single rack rail:...
- Page 96 Rack Rail Mounting, HD-TX-4KZ-101-1G Shown 91 • DM® Essentials Product Manual — Doc. 9259G...
-
Page 97: Connecting A Wall Plate Device
Connecting a Wall Plate Device This section provides information about the following: Wall plate transmitter connections Wall plate receiver connections Wall Plate Transmitter Connections This section provides information about making connections to the following wall plate transmitters: HD-TX-4KZ-101-1G HD-TXA-4KZ-101-1G HD-TXC-4KZ-101-1G HD-TX-4KZ-111-1G HD-TX-4KZ-211-2G HD-TXU-4KZ-111-2G... - Page 98 HD-TX-4KZ-101-1G Connections, Front and Rear 93 • DM® Essentials Product Manual — Doc. 9259G...
- Page 99 HD-TXA-4KZ-101-1G Connections Refer to the following illustration for general information about connections to the front and rear of the HD-TXA-4KZ-101-1G. NOTE: For guidelines regarding DM Essentials cabling, HDMI cabling, and the wall plate transmitter power connection, refer to Installation Guidelines. Product Manual —...
- Page 100 HD-TXA-4KZ-101-1G Connections, Front and Rear 95 • DM® Essentials Product Manual — Doc. 9259G...
- Page 101 The front panel of the device includes a 5-pin terminal block connector for balanced or unbalanced analog audio input. Refer to the following table and diagram for pin assignments and connection information. Analog Audio Input Pin Assignments Signal Name Balanced Audio Input Unbalanced Audio Input L+ In L- Signal return, jumper to GND...
- Page 102 HD-TXC-4KZ-101-1G Connections, Front and Rear 97 • DM® Essentials Product Manual — Doc. 9259G...
- Page 103 HD-TX-4KZ-111-1G Connections Refer to the following illustration for general information about connections to the front and rear of the HD-TX-4KZ-111-1G. NOTE: For guidelines regarding DM Essentials cabling and the wall plate transmitter power connection, refer to Installation Guidelines. Product Manual — Doc. 9259G DM®...
- Page 104 HD-TX-4KZ-111-1G Connections, Front and Rear 99 • DM® Essentials Product Manual — Doc. 9259G...
- Page 105 HD-TX-4KZ-211-2G Connections Refer to the following illustration for general information about connections to the front and rear of the HD-TX-4KZ-211-2G. NOTE: For guidelines regarding DM Essentials cabling, HDMI cabling, and the wall plate transmitter power connection, refer to Installation Guidelines. Product Manual —...
- Page 106 HD-TX-4KZ-211-2G Connections, Front and Rear 101 • DM® Essentials Product Manual — Doc. 9259G...
- Page 107 HD-TXU-4KZ-111-2G Connections Refer to the following illustration for general information about connections to the front and rear of the HD-TXU-4KZ-111-2G. NOTE: For guidelines regarding DM Essentials cabling and the wall plate transmitter power connection, refer to Installation Guidelines. Product Manual — Doc. 9259G DM®...
- Page 108 HD-TXU-4KZ-111-2G Connections, Front and Rear 103 • DM® Essentials Product Manual — Doc. 9259G...
- Page 109 NOTE: If the HD-TXU-4KZ-111-2G is paired with a DM Essentials receiver other than an HD-RXU- 4KZ Series receiver, USB data extension is not supported. Wall Plate Receiver Connections This section provides information about making connections to the following wall plate receivers: HD-RX-4KZ-101-1G HD-RXC-4KZ-101-1G HD-RXU-4KZ-101-2G...
- Page 110 HD-RX-4KZ-101-1G Connections, Front and Rear 105 • DM® Essentials Product Manual — Doc. 9259G...
- Page 111 HD-RXC-4KZ-101-1G Connections Refer to the following illustration for general information about connections to the front and rear of the HD-RXC-4KZ-101-1G. NOTE: For guidelines regarding DM Essentials cabling, HDMI cabling, and the wall plate receiver power connection, refer to Installation Guidelines. Product Manual —...
- Page 112 HD-RXC-4KZ-101-1G Connections, Front and Rear 107 • DM® Essentials Product Manual — Doc. 9259G...
- Page 113 HD-RXU-4KZ-101-2G Connections Refer to the following illustration for general information about connections to the front and rear of the HD-RXU-4KZ-101-2G. NOTE: For guidelines regarding DM Essentials cabling, HDMI cabling, and the wall plate receiver power connection, refer to Installation Guidelines. Product Manual —...
- Page 114 HD-RXU-4KZ-101-2G Connections, Front and Rear 109 • DM® Essentials Product Manual — Doc. 9259G...
- Page 115 NOTE: If the HD-RXU-4KZ-101-2G is paired with a DM Essentials transmitter other than an HD- TXU-4KZ Series transmitter, USB data extension is not supported. Product Manual — Doc. 9259G DM® Essentials • 110...
-
Page 116: Configuration
Configuration NOTES: This section applies to the HD-TXU-4KZ-211, HD-TXU-4KZ-211-CHGR, and HD-RXU-4KZ-202 only. Prior to configuration, ensure that the latest firmware is running on the device. For instructions to update the firmware, refer to Updating Firmware. in the Management section of this manual. The HD-TXU-4KZ-211-(CHGR) and HD-RXU-4KZ-202 include an integrated web server that provides a web interface. - Page 117 Safari® web browser, version 14.0.3 or later To access the web interface: 1. Using the Device Discovery tool in the Crestron Toolbox™ software, find the IP address of the DM Essentials device. 2. Open a web browser.
- Page 118 Device Administration Page - Sign In a. In the Username text box, enter the username. b. In the Password text box, enter the password. The password is case sensitive. c. Select Sign In. The web interface opens. 113 • DM® Essentials Product Manual —...
-
Page 119: Navigating The Web Interface
Navigating the Web Interface After signing in to the web interface, the web interface appears as shown in the sample screen below. Web Interface (Sample HD-TXU-4KZ-211 Screen Shown) The web interface provides the following navigation tabs: Status (refer to Viewing Status Information for information) Settings (refer to Configuring Setup and Operational Settings... -
Page 120: Saving Configuration Changes
Action Menu The Action menu enables configuration changes to be saved (refer to Saving Configuration Changes information). The Action menu also enables the following device management functions to be performed: Rebooting the device Restoring factory default settings Updating firmware Downloading message logs Managing certificates Managing EDIDs Managing device drivers... - Page 121 saved automatically are enclosed by a green rectangle and include the word Autosaved next to the configuration section name. Example of Configuration Changes Automatically Saved Settings that must be saved manually can be saved by using the Action menu of the web interface. By default, the Action menu provides Save Changes and Revert (undo) menu items that are disabled (grayed out) prior to configuration settings being changed.
-
Page 122: Viewing Status Information
After one or more configuration settings are changed, the Save Changes menu item is enabled. Action Menu - Save Changes Menu Item Enabled Do either of the following: To save one or more configuration changes, select Save Changes. To undo the newly entered configuration changes and revert to the previously saved settings, select the drop-down arrow to the right of the Save Changes menu item and select Revert. -
Page 123: Device
Status Tab (HD-TXU-4KZ-211 Shown) The Status tab consists of the following sections: Device Occupancy Sensor Input/Output Network Control system To open or close any section of the Status tab, select the corresponding section name. Device By default, the Device section is displayed when the Status tab opens. Status Tab - Device (HD-TXU-4KZ-211 Shown) Product Manual —... - Page 124 The Device section displays general information such as the model name, serial number, and firmware version of the device. By default, the More Details section is open, displaying additional information about the device. To close the section, select More Details. The Device section also displays information about the DM Essentials connection.
-
Page 125: Occupancy Sensor
Status Tab - Device, Transmitters (HD-RXU-4KZ-202 Shown) The Transmitters table displays the following information: Name: Displays the name assigned to the DM IN 2 port on the HD-RXU-4KZ-202. Connected: Displays whether the port is connected to a DM Essentials transmitter (Yes or No) Model: Displays the model name of the connected DM Essentials transmitter (for example, HD- TXU-4KZ-211). -
Page 126: Input/Output
Serial Number: Displays the serial number of the occupancy sensor Firmware Version: Displays the firmware version of the occupancy sensor Status: Displays the status of the occupancy sensor as Online or Network Timeout Occupancy: Displays the detected occupancy status of the room as Occupied or Vacant Input/Output To display input and output information: Open the Status tab and navigate to Input/Output. -
Page 127: Network
Resolution: Displays the resolution of the output signal. If no signal is detected, 0x0@0 is displayed. Sink HDCP Capability: For the HD-RXU-4KZ-202, displays the HDCP capability of the display device. For the HD-TXU-4KZ-211(-CHGR), displays the HDCP capability of the display device connected to the DM Essentials receiver. -
Page 128: Control System
Control System To view control system information: Open the Status tab and navigate to Control System. Status Tab - Control System The Control System section displays information about whether the connection to the control system is encrypted (ON or OFF) and information about the IP table. 123 •... -
Page 129: Configuring Setup And Operational Settings
Configuring Setup and Operational Settings Select the Settings tab to configure setup and operational settings. Settings Tab (HD-TXU-4KZ-211 Shown) The Settings tab consists of the following sections: System setup Inputs Outputs Routing To open or close any section of the Settings tab, select the corresponding section name. Product Manual —... -
Page 130: System Setup
System Setup By default, the System Setup section is displayed when the Settings tab opens. Settings Tab - System Setup (HD-TXU-4KZ-211 Shown) System Setup consists of the following sections: Network Front panel Cloud settings Auto update Date/time Control system Service ports To open or close any section of the Settings tab, select the corresponding section name. -
Page 131: Front Panel
Settings Tab - System Setup, Network Refer to the configuration guidelines that follow. Hostname: Specifies the hostname that identifies the DM Essentials device on the network. The hostname is restricted to the letters a to z (not case sensitive), the digits 0 to 9, and the hyphen. -
Page 132: Cloud Settings
Settings Tab - System Setup, Front Panel Refer to the configuration guidelines that follow. Front Panel Lock: Unlocks or locks front panel push buttons excluding the SETUP push button. By default, Front Panel Lock is disabled (the toggle switch is set in the Off position), enabling the push buttons to be unlocked and functional. -
Page 133: Auto Update
Custom URL: (Activated when Auto Update is enabled) By default, Custom URL is disabled (the toggle switch is set in the Off position). When disabled, the server URL defaults to the standard Crestron update server from which the latest firmware file is to be downloaded to the DM Essentials device. - Page 134 To enable entry of a custom update server URL path to the manifest file, set the toggle switch in the On position. 129 • DM® Essentials Product Manual — Doc. 9259G...
- Page 135 Custom URL Path: (Activated when Custom URL is enabled) Enter the path to the manifest file in the following FTP or SFTP URL format: ftp://username:password@host:port/path/filename sftp://username:password@host:port/path/filename where: username is the username on the FTP or SFTP server password is the password for the username host is the fully qualified domain name or IP address of the FTP or SFTP server port is the connection port on the host NOTE: The default FTP port number is 21.
- Page 136 Settings Tab - System Setup, Date/Time Refer to the configuration guidelines that follow. In the Synchronization section, enable or disable Time Synchronization. By default, Time Synchronization of the DM Essentials device with NTP (Network Time Protocol) servers is enabled (the toggle switch is set in the On position). To disable time and date synchronization, set the Time Synchronization toggle switch in the Off position.
- Page 137 (Applicable only when Time Synchronization is enabled) In the NTP Time Servers table, assign NTP servers as required. The default NTP server is pool.ntp.org with a port number of 123 and no authentication method (None). The default NTP server can be changed or deleted if desired as discussed below.
-
Page 138: Service Ports
Settings Tab - System Setup, Control System Refer to the configuration guidelines that follow. Encrypt Connection: By default, Encrypt Connection is disabled (the toggle switch is in the Off position). To enable an encrypted connection between the control system and the DM Essentials device, set the toggle switch in the On position. -
Page 139: Inputs
Settings Tab - System Setup, Service Ports By default, USB Service Port is disabled (the toggle switch is in the Off position). To enable the port, set the toggle switch in the On position. Inputs To view information about the inputs on the DM Essentials device or to configure the inputs: Open the Settings tab and navigate to Inputs. - Page 140 Settings Tab - Inputs (HD-RXU-4KZ-202 Shown) Inputs consists of the following sections: Global EDID Inputs Global EDID In the Global EDID drop-down list, the same EDID (Extended Display Identification Data) can be selected for all inputs if desired. The default setting is DM Default 4k 60Hz 2ch. NOTES: If the desired EDID does not appear in the Global EDID drop-down list, refer to Managing...
- Page 141 EDID: Indicates the EDID that is to be sent to the upstream device connected to the input. Resolution: Indicates the current resolution of the input. If 0x0@0 is displayed, no video signal is being transmitted. HDCP Receiver Capability: Indicates one of the following: Disabled, Auto, HDCP 1.4, or HDCP 2.2. Source HDCP: Indicates one of the following, based on the HDCP of the source: HDCP 1.x, HDCP 2.x, Non-HDCP, or Inactive.
- Page 142 Edit Input Pop-Up Dialog Box - Settings Tab The Settings tab of the Edit Input pop-up dialog box provides the following sections: General EDID General In the General section, edit the following input settings as required: Name: Enter the desired name of the input. HDCP Receiver Capability: Select one of the following to control HDCP (High-Bandwidth Digital Content Protection) support for an input: Disabled: Disables HDCP, causing the input to transmit non-HDCP content only.
- Page 143 Viewing Input Status In the Edit Input pop-up dialog box, select the Status tab of to view additional information about the input signal. Edit Input Pop-Up Dialog Box - Status Tab (HD-TXU-4KZ-211 Shown) The Status tab displays the following information about the input signal: Sync Detected Resolution Source HDCP...
-
Page 144: Outputs
Outputs To view information about the outputs on the DM Essentials device or to configure the outputs: Open the Settings tab and navigate to Outputs. Settings Tab - Outputs (HD-TX-4KZ-211 Shown) The Outputs table displays the following information: Name: Indicates the name assigned to the output. Sink Connected: For the HD-TXU-4KZ-211(-CHGR), displays whether the DM Essentials output is connected to the HD-RXU-4KZ-202 (Yes or No). -
Page 145: Hdmi Output Setting
Edit Output Pop-Up Dialog Box (HD-TXU-4KZ-211 Shown) The Edit Output pop-up dialog box consists of the following sections: HDMI output setting Auto/priority settings (applicable only when automatic routing is enabled) Connected display Output signal Audio settings (HD-RXU-4KZ-202 only) Automatic display power HDMI Output Setting In the HDMI Output Setting section of the Edit Output dialog box, edit the settings of an HDMI output as required. - Page 146 Edit Output Pop-Up Dialog Box - HDMI Output Setting (HD-TXU-4KZ-211 Shown) Refer to the configuration guidelines that follow. Name: Enter the desired name of the output. For the HD-TXU-4KZ-211(-CHGR), the default name is DM LITE 1. For the HD-RXU-4KZ-202, the default name is HDMI 1 or HDMI 2. Disable Output: By default, Disable Output is disabled (the toggle switch is set in the Off position) and the HDMI output is enabled.
- Page 147 Edit Output Dialog Box - Auto/Priority Settings (HD-TXU-4KZ-211 Shown) The Auto/Priority section provides an input priority routing table: The Global Filter search box at the top of the table enables searching for an input based on the input name. The Input column lists the input names of the DM Essentials device. The Priority column enables the routing priority to be set for each input by selecting one of the following: 0: Disables routing priority.
-
Page 148: Output Signal
Edit Output Dialog Box - Connected Display (HD-TXU-4KZ-211 Shown) The following information is displayed: Sink Connected: Indicates whether the HDMI output is connected to a display device (Yes or No) Manufacturer: Indicates the manufacturer of the connected display device Serial Number: Indicates the serial number of the connected display device To download the EDID file (sink.cedid) of the connected display to a computer, select the Save CEDID button. - Page 149 Edit Output Dialog Box - Output Signal (HD-TXU-4KZ-211 Shown) The following information is displayed: Transmitting: Displays whether the output signal is being transmitted to the display device (Yes or No) Resolution: Displays the resolution of the output signal Disabled by HDCP: Displays whether the output signal is disabled by HDCP (Yes or No). If Yes is displayed, video is not being transmitted but audio is being transmitted.
- Page 150 Edit Output Dialog Box - Audio Settings (HD-TXU-4KZ-211 Shown) By default, HDMI Mute is disabled (the toggle switch is set in the Off position), enabling the HDMI output to be unmuted. To mute the HDMI output, set the toggle switch in the On position. Automatic Display Power The Automatic Display Power section of the Edit Output dialog box enables the HDMI output to be configured so that the display device can be powered on or off automatically.
- Page 151 Edit Output Dialog Box - Automatic Display Power (HD-TXU-4KZ-211 Shown) Refer to the configuration guidelines that follow. Product Manual — Doc. 9259G DM® Essentials • 146...
- Page 152 Automatic Power: By default, Automatic Power is enabled (the toggle switch is set in the On position). To disable Automatic Power, set the toggle switch in the Off position. If Automatic Power is enabled, configure the following settings: Automatic Power Trigger: Select one of the following: Select All: Select the checkbox to specify that automatic display power is based on all available selections: Sync, Occupancy, and Schedule.
- Page 153 LF: Line feed CR_LF: Carriage return followed by a line feed For Drivers command interface only: Select the driver. The only available option is Crestron-CEC- Controlled-Display-2.05.001.0032. Output Timeout: Specifies the number of seconds that must pass in which no signal is detected at the HDMI output before the output becomes inactive and the display device automatically turns off.
- Page 154 Command: Do the following as applicable: For Power Off using CEC, select one of the following in the Command drop-down list: Power Off: RCP and SS (Default setting, Remote Control Passthrough and System Standby) Power Off: RCP Only Power Off: SS Only Custom If a setting other than Custom is selected, select the Test button to test the command.
- Page 155 NOTE: If the command format is Hex, the command string must be entered as pairs of characters separated by a space. Valid characters are 0-9, a-f, and A-F. An example of a command string is as follows: 58 00 0D 0A Select the Test button to test the Input Control command.
-
Page 156: Bring Your Own Meeting (Byom)
Bring Your Own Meeting (BYOM) To configure settings for routing USB peripherals, open the Settings tab and navigate to Bring Your Own Meeting (BYOM). The available settings differ between the transmitter and receiver interfaces as described below. HD-RXU-4KZ-202 Settings Tab - Bring Your Own Meeting (BYOM) (HD-RXU-4KZ-202) Choose a setting from the Bring Your Own Meeting (BYOM) drop down: Disabled: USB peripherals connected to the HOST ports of the HD-RXU-4KZ-202 are only available to the DEVICE port of the HD-RXU-4KZ-202. -
Page 157: Routing
HD-TXU-4KZ-211 and HD-TXU-4KZ-211-CHGR Settings Tab - Bring Your Own Meeting (BYOM) (HD-TXU-4KZ-211 and HD-TXU-4KZ-211-CHGR) The BYOM settings of each USB input of the HD-TXU-4KZ-211(-CHGR) can be configured independently. Choose a setting from the desired input drop down: Allow BYOD: The HOST ports of the HD-TXU-4KZ-211(-CHGR) supply +5V USB power only when video sync or USB connection is detected at the input. - Page 158 Settings Tab - Routing (HD-TXU-4KZ-211 Shown) Settings Tab - Routing (HD-RXU-4KZ-202 Shown) Refer to the configuration guidelines that follow. 153 • DM® Essentials Product Manual — Doc. 9259G...
- Page 159 Auto Route: By default, automatic routing is enabled (the toggle switch is set in the On position). When Auto Route is enabled and priority routing is disabled for an input, the last connected input is automatically routed. To disable automatic routing, set the toggle switch in the Off position. NOTE: Auto Route must be enabled in order to set the routing priority...
- Page 160 Routing Table Shown with Inputs in First Column Within a routing cell of the AV routing table, signal type icon buttons represent the two signal types to be routed: : Pink icon represents audio. : Purple icon represents video. NOTE: Audio and video cannot be routed separately. If no route is made between an input and output, the routing cell is shaded gray.
- Page 161 1. Select the Priority Routing icon ( ). The Priority Routing pop-up dialog box opens. Priority Routing Pop-Up Dialog Box 2. In the drop-down list, select the desired routing priority level: 0: Disables priority routing. 1: Sets the routing priority level to the higher priority. 2: Sets the routing priority level to the lower priority.
- Page 162 Clear Route The route is cleared and the routing cell is shaded gray. Route Cleared 157 • DM® Essentials Product Manual — Doc. 9259G...
- Page 163 When a transmitter with multiple inputs (such as the HD-TXU-4KZ-211) is connected to the HD-RXU-4KZ-202, a Multiple Input Sources icon ( ) appears under the input name associated with its DM Essentials input port. To select which input of the transmitter should be sent over the DM Essentials link: 1.
- Page 164 2. Select the desired input in the routing matrix, then close the Multiple Input Sources window. Multiple Input Sources Window 159 • DM® Essentials Product Manual — Doc. 9259G...
-
Page 165: Configuring Security Settings
Configuring Security Settings Select the Security tab to configure SSL (Secure Sockets Layer) mode authentication management settings. Security Tab Product Manual — Doc. 9259G DM® Essentials • 160... -
Page 166: Ssl Mode
SSL Mode SSL mode can be disabled or enabled. When enabled, SSL encryption, validation, or both can be set. Security Tab - SSL Mode (Encrypt and Validation Selection Shown) In the SSL Mode drop-down list, select one of the following: Encrypt and Validation: Specifies both encryption and validation and enables configuration of SSL authentication in the following text boxes: Username: Enter the desired username. - Page 167 Managing Current User Authentication By default, the Current User tab is displayed when the Security tab opens. The Current User tab enables information about the current user to be viewed. In addition, the user password can be changed if necessary. Security Tab, Current User Tab The Current User tab displays the following information: Name: Indicates the username...
- Page 168 Change Password Pop-Up Dialog Box Enter the following information into the corresponding text boxes: Current Password: Enter the current password. Password: Enter a new password using a minimum of 8 characters. The password is case sensitive. Confirm Password: Reenter the new password for confirmation. Select OK to save the new password and close the dialog box.
-
Page 169: Managing User Authentication
Managing User Authentication Select the Users tab to view information about all users, to update user information, to delete a user, or to add a user. Security Tab, Users Tab The Users tab provides a table that displays the following information about each user: Username: Indicates the username AD User: Indicates whether the user is authenticated using Active Directory credential management: Yes or No... - Page 170 View User Details In the Action column of the Users table, select the Information icon () to view details about a particular user listed in the table. The User Details pop-up dialog box opens. Security Tab, Users Tab - User Details Pop-Up Dialog Box The User Details pop-up dialog box displays the following information: Name: Indicates the username Active Directory User: Indicates whether the user is authenticated using Active Directory...
- Page 171 Update User Information In the Action column of the Users table, select the Edit icon ( ) to update information about a particular user listed in the table. The Update User pop-up dialog box opens. Security Tab, Users Tab - Update User Pop-Up Dialog Box The Update User pop-up dialog box displays the username and whether Active Directory credential management is enabled for the user.
- Page 172 Delete a User In the Action column of the Users table, select the Trash icon ( ) to delete a user listed in the table. The Delete Users pop-up dialog box opens, prompting for confirmation that the user be deleted. Security Tab, Users Tab - Delete Users Pop-Up Dialog Box To delete the user, select Yes.
-
Page 173: Create A User
Create a User In the Users tab, select the Create User button to add a user. The Create User pop-up dialog box opens. Security Tab, Users Tab - Create User Pop-Up Dialog Box Create a user as follows: Name: Enter the username. Active Directory User: By default, Active Directory User credential management is disabled (the toggle switch is set in the Off position). - Page 174 Managing Group Authentication Groups are used to group users based on access level and Active Directory credential management settings. Select the Groups tab to view information about all groups, to delete a group, or to add a group. Security Tab, Groups Tab The Groups tab provides a table that displays the following information about each group: Group Name: Indicates the name of the group.
- Page 175 The Action column of the Groups table enables the following actions to be performed: View group details Delete a group To add a group, refer to Create a Group for information. View Group Details In the Action column of the Groups table, select the Information icon ( ) to view details about a particular group listed in the table.
-
Page 176: Delete A Group
Delete a Group In the Action column of the Groups table, select the Trash icon ( ) to delete a group listed in the table. The Delete Groups pop-up dialog box opens, prompting for confirmation that the group be deleted. Security Tab, Groups Tab - Delete Groups Pop-Up Dialog Box To delete the group, select Yes. -
Page 177: Create A Group
Create a Group In the Groups tab, select the Create Group button to add a group. The Create Group pop-up dialog box opens. Security Tab, Groups Tab - Create Group Pop-Up Dialog Box Add a group as follows: Name: Enter the name of the group. Access Level: In the drop-down list, select one of the following access levels: Administrator, Connect, Operator, Programmer, or User. -
Page 178: Configuring Ieee 802.1X Settings
Configuring IEEE 802.1X Settings NOTE: If required, add trusted root certificates prior to selection of certificates in the 802.1x Configuration tab. To do so, refer to Managing Certificates for information. Select the 802.1x Configuration tab to configure IEEE 802.1X network authentication. 802.1x Configuration Tab Refer to the configuration guidelines that follow. - Page 179 Enable Authentication Server Validation: By default, Enable Authentication Server Validation is disabled (the toggle switch is set in the Off position). To enable server validation for increased security, set the toggle switch in the On position. Select Trusted Certificate Authoritie(s): (Applicable when Enable Authentication Server Validation is enabled) NOTE: The DM Essentials device provides a list of preloaded trusted root certificates from the Trusted Root Certification Authorities (CAs) certificate store.
-
Page 180: Management
Management NOTE: This section applies to the HD-TXU-4KZ-211, HD-TXU-4KZ-211-CHGR, and HD-RXU-4KZ-202 only. Management functions of the HD-TXU-4KZ-211(-CHGR) and HD-RXU-4KZ-202 include the following: Rebooting the device Restoring factory default settings Updating firmware Downloading message logs Managing certificates Managing EDIDs Managing device drivers Downloading a configuration file Uploading a configuration file Managing an occupancy sensor... - Page 181 Reboot Pop-Up Dialog Box 2. Select the Yes, Reboot Now button. The Reboot message box opens, indicating that the device is rebooting. In addition, a progress indicator bar displays the percentage of completion of the reboot process. When the reboot process is complete, the progress indicator bar displays 100%.
-
Page 182: Restoring Factory Default Settings
Web interface SETUP button Crestron Toolbox software Using the Web Interface To restore the factory default settings by using the web interface: 1. In the Action menu located in the upper-right corner of the web interface, select Restore. -
Page 183: Using The Setup Button
The device reboots automatically after the default settings are restored. Using Crestron Toolbox Software To restore the factory default settings by using Crestron Toolbox software: From the Tools menu, select Text Console and issue the restore command. Product Manual — Doc. 9259G... -
Page 184: Updating Firmware
To achieve faster upgrade times, upgrade each device independently through its own LAN connection and web interface. 1. Download the latest firmware file (*.puf) from www.crestron.com/firmware to a computer. 2. In the Action menu located in the upper-right corner of the web interface, select Update Firmware. - Page 185 3. Select Browse. File Explorer opens. 4. Navigate to the latest firmware file (*.puf), select the file, and then select Open. The Update Firmware - File Upload dialog box opens. Update Firmware - File Upload Dialog Box 5. Select Upload. The Update Firmware dialog box indicates the progress of the upload and update process.
-
Page 186: Downloading Message Logs
Downloading Message Logs Message logs can be downloaded to a computer for diagnostic purposes. To download message logs: In the Action menu located in the upper-right corner of the web interface, select Download Logs. Action Menu - Download Logs The Loading message appears indicating that the message logs are being downloaded. When the process is complete, the message logs are downloaded in a compressed .tgz file. -
Page 187: Managing Certificates
Managing Certificates To manage root, intermediate, machine, and web server certificates: In the Action menu located in the upper-right corner of the web interface, select Manage Certificates to view information about certificates that reside on the device or to add or delete certificates. Action Menu - Manage Certificates The Manage Certificates pop-up dialog box opens. -
Page 188: Managing Root Certificates
The Manage Certificates pop-up dialog box provides the following tabs based on certificate categories: Root: The Root tab lists all trusted root certificates preloaded into the device. The root certificates are used by the device to verify server certificates when acting as a TLS client. Root certificates are the beginning of a certificate chain. - Page 189 The Root tab provides a table that displays the following information about root certificates: Name: Name of the certificate Expiry Date: Expiration date and time of the certificate Product Manual — Doc. 9259G DM® Essentials • 184...
- Page 190 By default, up to seven certificates are displayed in the table simultaneously. If the number of certificates listed in the table exceeds seven, do either of the following to locate additional certificates: Use the Search box above the table. Use the scroll arrows at the bottom of the table to navigate through the list of certificates. To manage root certificates, delete certificates as required.
- Page 191 Add Certificate - Complete Dialog Box 6. Select OK to close the dialog box. The certificate is added to the root certificate table. 7. Close the Manage Certificates pop-up dialog box by selecting the x in the upper-right corner. Delete a Root Certificate To delete a root certificate: 1.
-
Page 192: Managing Intermediate Certificates
Managing Intermediate Certificates In the Manage Certificates pop-up dialog box, select the Intermediate tab to view information about intermediate certificates that reside on the device or to add or delete intermediate certificates. Manage Certificates Pop-Up Dialog Box - Intermediate Tab The Intermediate tab provides a table that displays the following information: Name: Name of the certificate Expiry Date: Expiration date and time of the certificate... - Page 193 2. Select Browse. File Explorer opens. 3. Navigate to the desired certificate file, select the file, and then select Open. The Add Certificate - Certificate Upload dialog box opens. Add Certificate - Certificate Upload Dialog Box 4. Select Load. When the certificate upload process is complete, the Certificate added successfully message appears in the Add Certificate - Complete dialog box.
- Page 194 Delete an Intermediate Certificate To delete an intermediate certificate: 1. In the Action column of the intermediate certificate table, select the Trash icon ( ) corresponding to the certificate to be deleted. The Delete Certificate pop-up dialog box opens, prompting for confirmation that the certificate be deleted.
-
Page 195: Managing Machine Certificates
Managing Machine Certificates NOTE: Only one machine certificate can reside on the device. In the Manage Certificates pop-up dialog box, select the Machine tab to view information about the machine certificate or to add or delete the certificate. Manage Certificates Dialog Box - Machine Tab The Machine tab provides a table that displays the following information: Name: Name of the certificate Expiry Date: Expiration date and time of the certificate... - Page 196 The Add Certificate - Enter Password dialog box opens. Add Certificate - Enter Password Dialog Box 191 • DM® Essentials Product Manual — Doc. 9259G...
- Page 197 4. Do the following: a. In the Password text box, enter a password. The password cannot be less than 6 characters. b. In the Confirm Password text box, reenter the password for confirmation. c. Select OK to save the password. The Add Certificate - Certificate Upload dialog box opens.
- Page 198 Addition of Machine Certificate 7. Close the Manage Certificates pop-up dialog box by selecting the x in the upper-right corner. Delete the Machine Certificate To delete the machine certificate: 1. In the Action column of the machine certificate table, select the Trash icon ( ) corresponding to the certificate.
-
Page 199: Managing Web Server Certificates
Managing Web Server Certificates NOTE: Only one web server certificate can reside on the DM Essentials device. In the Manage Certificates pop-up dialog box, select the Web Server tab to view information about the web server certificate or to add or delete the certificate. Manage Certificates Pop-Up Dialog Box - Web Server Tab The Web Server tab provides a table that displays the following information: Name: Name of the certificate... - Page 200 Add the Web Server Certificate To add the web server certificate: 1. In the Web Server tab, select the Add Web Server Certificate button. The Add Certificate - Browse pop-up dialog box opens. Add Certificate - Browse Pop-Up Dialog Box 2.
- Page 201 4. Do the following: a. In the Password text box, enter a password. The password cannot be less than 6 characters. b. In the Confirm Password text box, reenter the password for confirmation. c. Select OK to save the password. The Add Certificate - Certificate Upload dialog box opens.
- Page 202 Addition of Web Server Certificate Delete the Web Server Certificate To delete the web server certificate: 1. In the Action column of the web server certificate table, select the Trash icon ( ) corresponding to the certificate. The Delete Certificate pop-up dialog box opens, prompting for confirmation that the certificate be deleted.
- Page 203 Reboot Message Box The Device Administration page opens, enabling sign-in to the device. Product Manual — Doc. 9259G DM® Essentials • 198...
-
Page 204: Managing Edids
Managing EDIDs To view the list of default EDIDs or to add or delete user EDIDs: In the Action menu located in the upper-right corner of the web interface, select Manage EDIDs. Action Menu - Manage EDIDs The Manage EDIDs pop-up dialog box opens. 199 •... -
Page 205: Viewing Default Edids
Manage EDIDs Pop-Up Dialog Box The Manage EDIDs pop-up dialog box provides the following tabs: Default EDIDs (refer to Viewing Default EDIDs for information) User EDIDs (refer to Managing User EDIDs for information) Viewing Default EDIDs In the Manage EDIDs pop-up dialog box, select the Default EDIDs tab to view all default EDIDs. By default, the Default EDIDs tab is displayed when the dialog box opens. - Page 206 Manage EDIDs Pop-Up Dialog Box, Default EDIDs Tab Up to 10 default EDIDs are displayed in the table simultaneously. To locate additional EDIDs in the table: Use the Search box above the table. Use the scroll arrows at the bottom of the table to navigate through the list of EDIDs. 201 •...
-
Page 207: Managing User Edids
Managing User EDIDs In the Manage EDIDs pop-up dialog box, select the User EDIDs tab to view, add, or delete user (custom) EDIDs. Manage EDIDs Pop-Up Dialog Box, User EDIDs Tab Up to 10 user EDIDs can be displayed in the table simultaneously. If the number of user EDIDs exceeds 10, do either of the following to locate one or more EDIDs in the table: Use the Search box above the table. - Page 208 Add a User EDID To add a user EDID (*.cedid): 1. In the User EDIDs tab, select the Add EDID button. The File Upload - Browse dialog box opens. File Upload - Browse Dialog Box 2. Select Browse. File Explorer opens. 3.
- Page 209 File Upload - Complete Dialog Box 5. Select OK to close the dialog box. The newly added EDID file is listed in the User EDIDs table as shown in the example below. Addition of User EDID Product Manual — Doc. 9259G DM®...
-
Page 210: Managing Device Drivers
Delete a User EDID To delete a user EDID: 1. In the Action column of the User EDIDs table, select the Delete button corresponding to the EDID to be deleted. The Delete EDID dialog box opens, prompting for confirmation that the EDID be deleted. Delete EDID Dialog Box 2. -
Page 211: Viewing Default Drivers
Manage Device Drivers Pop-Up Dialog Box The Manage Device Drivers pop-up dialog box provides the following tabs: Default Drivers (refer to Viewing Default Drivers for information) User Drivers (refer to Managing User Drivers for information) Viewing Default Drivers In the Manage Device Drivers pop-up dialog box, select the Default Drivers tab to view the default driver. - Page 212 Manage Device Drivers Pop-Up Dialog Box, Default Drivers Tab The Default Drivers table consists of a single default driver as listed in the screen above. 207 • DM® Essentials Product Manual — Doc. 9259G...
-
Page 213: Managing User Drivers
Managing User Drivers In the Manage Device Drivers pop-up dialog box, select the User Drivers tab to view, add, or delete user (custom) drivers. Manage Device Drivers Pop-Up Dialog Box, User Drivers Tab Up to 5 user drivers can be displayed in the table simultaneously. If the number of user drivers exceeds 5, do either of the following to locate one or more drivers in the table: Use the Search box above the table. - Page 214 Add a User Driver To add a user driver, do either or both of the following: Use the Add Driver button. Use the Import from Cloud button. Use the Add Driver Button To add a user driver using the Add Driver button: 1.
- Page 215 File Upload Dialog Box 4. Select Upload. When the file upload process is complete, the File upload is complete message appears in the File Upload - Complete dialog box. File Upload - Complete Dialog Box 5. Select OK to close the dialog box. The newly added driver file is listed in the User Drivers table as shown in the example below.
- Page 216 1. In the User Drivers tab, select the Import from Cloud button. User Drivers Tab - Import from Cloud Button The Import a Driver pop-up dialog box opens, providing a list of available drivers with 5 drivers displayed simultaneously. Import a Driver Pop-Up Dialog Box 2.
- Page 217 All Drivers Selected Simultaneously To delete one or more user drivers on an individual basis, select the checkbox of the corresponding drivers. Multiple Drivers Selected on an Individual Basis 2. Select the Delete Driver button. Delete Driver Button The selected drivers are deleted from the table. 3.
-
Page 218: Downloading A Configuration File
Downloading a Configuration File The configuration of the HD-TXU-4KZ-211(-CHGR) or HD-RXU-4KZ-202 can be downloaded to a computer as an *.tgz file. The configuration file provides a backup of the device configuration and can be used for uploading to a replacement HD-TXU-4KZ-211(-CHGR) or HD-RXU-4KZ-202. To download a configuration file: 1. -
Page 219: Uploading A Configuration File
Uploading a Configuration File A configuration file (*.tgz) that was downloaded from an HD-TXU-4KZ-211(-CHGR) or HD-RXU-4KZ- 202 being replaced can be uploaded to the replacement device. To upload a configuration file: 1. In the Action menu located in the upper-right corner of the web interface, select Upload Configuration. - Page 220 Device Configuration - Upload Dialog Box 4. Select Upload. A message box opens indicating that the file is being uploaded. Upload Message Box The Reboot dialog box then opens, prompting for confirmation that the device be rebooted in order for the changes toke effect. Reboot Dialog Box 5.
-
Page 221: Managing An Occupancy Sensor
Reboot Message Box The Device Administration page opens, enabling sign-in to the device. Managing an Occupancy Sensor An occupancy sensor that is accessible from the network can be used to control automatic display power of an output. To add or delete an occupancy sensor, do either of the following: In the Action menu located in the upper-right corner of the web interface, select Manage Occupancy Sensor. -
Page 222: Adding An Occupancy Sensor
In the Settings tab, navigate to Outputs and then select the Edit button. In the Edit Output pop-up dialog box, go to the Automatic Display Power section, set the Automatic Power Trigger to include Occupancy, and then select the Manage Occupancy Sensor button. -
Page 223: Removing An Occupancy Sensor
1. In the Manage Occupancy Sensor pop-up dialog box, select the Add button. Manage Occupancy Sensor Pop-Up Dialog Box - Add Button A row is added to the Manage Occupancy Sensor table, enabling an occupancy sensor to be added. Manage Occupancy Sensor Pop-Up Dialog Box for Addition of Occupancy Sensor 2. -
Page 224: Managing Schedules
1. In the Manage Occupancy Sensor table, select the checkbox of the occupancy sensor to be removed. Selection of Occupancy Sensor for Removal 2. Select the Remove button. The occupancy sensor is removed from the Manage Occupancy Sensor table. Managing Schedules Schedules can be added or deleted to control automatic display power of an output. -
Page 225: Adding A Schedule
In the Settings tab, navigate to Outputs and then select the Edit button. In the Edit Output pop-up dialog box, go to the Automatic Display Power section, set the Automatic Power Trigger to include Schedule, and then select the Manage Schedules button. Settings Tab - Outputs, Edit Output Pop-Up Dialog Box, Automatic Display Power, Manage Schedules Button The Manage Schedule pop-up dialog box opens. - Page 226 1. In the Manage Schedule pop-up dialog box, select the Add button. Manage Schedule Pop-Up Dialog Box - Add Button The Add Schedule pop-up dialog box opens. Add Schedule Pop-Up Dialog Box 2. Set a schedule as follows: a. In the Name text box, enter a name for the desired schedule. b.
-
Page 227: Edit A Schedule
Addition of Single Schedule 3. (Optional) If additional schedules are needed (maximum of 10), repeat steps 2 and 3 for each schedule to be added. A maximum of 5 schedules is displayed simultaneously in the table. If more than 5 schedules are added, use the scroll arrows at the bottom of the table to navigate through the list of schedules. - Page 228 1. In the Actions column of the Schedules table, select the Edit button corresponding to the schedule to be edited. Manage Schedule Pop-Up Dialog Box - Edit Button The Edit Schedule pop-up dialog box opens. Edit Schedule Pop-Up Dialog Box 2.
-
Page 229: Deleting A Schedule
1. In the Actions column of the Schedules table, select the Duplicate button corresponding to the schedule to be duplicated. Manage Schedule Pop-Up Dialog Box - Duplicate Button The duplicated schedule is added to the end of the Schedules table. The name of the duplicated schedule is appended by a hyphen (-) and a number based on the order in which the schedule was added to the list. - Page 230 1. In the first column of the Schedules table, select one or more checkboxes corresponding to the schedules to be deleted. If all schedules are to be deleted, select the topmost checkbox in the first column of the table. All checkboxes for all schedules in the table (maximum of 10) are automatically selected.
- Page 231 Product Manual — Doc. 9259G DM® Essentials • 226...
-
Page 232: Resources
Crestron Resource Library Crestron Online Help (OLH) Crestron Training Institute (CTI) Portal Programmer and Developer Resources help.crestron.com: Provides help files for Crestron programming tools such as SIMPL, SIMPL#, and Crestron Toolbox™ software developer.crestron.com: Provides developer documentation for Crestron APIs, SDKs, and other development tools Product Certificates To search for product certificates, refer to support.crestron.com/app/certificates. - Page 233 Crestron Electronics, Inc. Product Manual — Doc. 9259G 15 Volvo Drive, Rockleigh, NJ 07647 02/25/25 Tel: 888.CRESTRON Specifications subject to Fax: 201.767.7656 change without notice. www.crestron.com...
Need help?
Do you have a question about the DM Essentials 4K60 4:4:4 and is the answer not in the manual?
Questions and answers