
Related Manuals for Jensen HD5112


Summary of Contents for Jensen HD5112
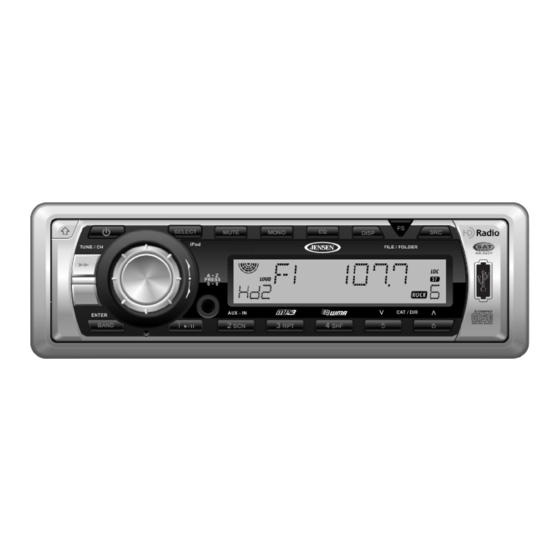
- Page 1 HD5112 Installation and Operation Manual SELECT MUTE MONO DISP iPod FILE / FOLDER TUNE / CH HD5112 READY A ~ Z PRESS 0 ~ 9 CAT / DIR AUX - IN ENTER BAND READY Watts Peak 40W x 4...
-
Page 3: Table Of Contents
HD5112 TABLE OF CONTENTS Introduction ....................1 Preparation ....................2 Wiring .......................3 Installation ....................4 Front Panel Release ................7 Operation ....................8 Tuner Operation ..................10 Satellite Radio Operation ...............12 CD Player Operation ................14 MP3/WMA Operation ................16 iPod Operation ..................20 Remote Control ..................22 Care and Maintenance ................23 Troubleshooting ..................24... - Page 4 HD5112...
-
Page 5: Introduction
HD5112 Introduction Congratulations on your purchase of the Jensen HD5112 Mobile Receiver. It’s a good idea to read all of the instructions before beginning the installation. We recommend having your Jensen HD5112 installed by a reputable installation shop. Features •... -
Page 6: Preparation
Preparation Tools and Supplies NOTE: If the HD5112 is to be installed in a car equipped with an on- The following tools and supplies are needed to install the radio. board drive or navigation computer, do not disconnect the battery •... -
Page 7: Wiring
HD5112 Wiring Antenna Connector SIRIUS XM L XM R Ground (BLACK) TERK XMDJEN100 cables sold separately. Power Antenna (BLUE) Connect to ground TERK XMD1000 Direct Tuner and antenna sold separately. Connect to power antenna terminal or clean, SiriusConnect SC-C1 tuner sold separately. -
Page 8: Installation
HD5112 Installation This unit is designed for installation in cars, trucks and vans with an existing 5. Place the radio in front of the dashboard opening so the wiring can be radio opening. In many cases, a special installation kit will be required to brought through the mounting sleeve. - Page 9 When replacing a fuse, make sure the new fuse is the correct type and 4. Wire the new radio to the vehicle as outlined in the Universal Installation amperage. Using an incorrect fuse could damage the radio. The HD5112 instructions.
-
Page 10: Technical Assistance
HD5112 Removing the Radio To remove the radio after installation, remove the trim ring by pulling outward on one side and then the other. Insert the removal keys straight back, with the notches facing up, until they lock. With the removal keys engaged, pull the radio straight out. -
Page 11: Front Panel Release
HD5112 Front Panel Release • Do not put pressure on the display or control buttons when detaching or (open) button (9) releases the mechanism that holds the front panel re-installing the front panel. to the chassis. • Do not touch the contacts on the front panel or on the main unit body. It Detaching the Front Panel may result in poor electrical contact. -
Page 12: Operation
HD5112 Operation Power Press the (power) button (1) or any other button on the front of the radio (except release) to turn the unit on. Press and hold the power button to turn the unit off. SELECT MUTE MONO DISP... -
Page 13: Menu Operation
HD5112 Menu Operation Setting the Clock If not already showing, press the DISP button (7) to display the clock. With Press and hold the rotary encoder (4) to access the system menu. the clock displayed, press and hold the DISP button and the time will flash Repeatedly press the rotary encoder button to access menu options in the on the display. -
Page 14: Tuner Operation
Mono/Stereo multicasting, you can receive up to three additional multicast channels: HD2, HD3, HD4. With your HD5112 radio, you will receive HD Radio digital Press the MONO button (19) to select mono or stereo reception for analog broadcasts automatically when tuned to a station that offers HD Radio radio stations. -
Page 15: Preset Scan
HD5112 NOTE: HD Radio multicast channels can be stored as preset stations. Recall a Station Select a band (if needed). Press a preset button (13-18) to select the corresponding stored station. Preset Scan Scans stations stored in all FM or AM bands. Select a band (if needed), and then press the PS button (21). -
Page 16: Satellite Radio Operation
HD5112 Satellite Radio Operation Selecting a Station Listeners can subscribe to XM® Radio on the Web by visiting Press the TUNE/CH >> or TUNE/CH << button (10 and 11) to change to www.xmradio.com, or by calling (800) 967-2346. Customers should another station. - Page 17 HD5112 6. Press the BAND/ENTER button to enter the second number and move to the third position. NOTE: Use the TUNE/CH >> or TUNE/CH << button (10 and 11) to move between the first and third positions. 7. Turn the rotary encoder again to select the third digit of the channel you want to tune to (0 - 9).
-
Page 18: Cd Player Operation
HD5112 CD Player Operation CDP mode can only be accessed when a disc is inserted. If a disc is will appear on the display. Press and hold the TUNE/CH >> (10) or TUNE/ already in place, press the SRC button (2) to access CDP mode and begin CH <<... - Page 19 HD5112 ejecting and reloading the disc into the player. While the disc is out of the unit, make sure it is clean and undamaged, and then load it correctly. If this does not solve the problem, pressing the reset button may help, but will erase the time and preset memory.
-
Page 20: Mp3/Wma Operation
HD5112 MP3/WMA Operation MP3 and WMA (Windows Media Audio) music files are digital audio files MP3/WMA Encoder and CD Writer Settings that are compressed to allow more files on a single CD. This unit can play Use the following settings when compressing audio data in MP3 data with MP3/WMA directly from files contained on a CD-R/RW, SD card or USB the MP3 encoder. - Page 21 HD5112 Installing a USB Device FIle Playing Order When selected for play, files and folders (Folder Search, File Search or Gently lift the rubber USB slot cover (22) from the top and pull it down. Folder Select) are accessed in the order they were written by the CD writer.
-
Page 22: Track Select
HD5112 straight out. Most cards have a thin recess on the top of the card that helps Table 1: Search Characters with removal. Number Characters Pause 1 >/|| A, B, C Press the 1/>/|| button (13) to suspend disc play. Press the play/pause... -
Page 23: Display Information
HD5112 2. Turn the rotary encoder (4) to browse all available folder or files in the root directory. 3. Press the rotary encoder button to select a folder or file. If a folder is selected, two apostrophes (‘ ‘ ) appear on the LCD, •... -
Page 24: Ipod Operation
Play/Pause NOTE: The HD5112 will not select video files when the iPod is plugged Press the 1/>/|| button (13) to suspend or resume play. “PAU” flashes on the into the radio. Only music files are supported. -
Page 25: Category Search Mode
HD5112 Shuffle (SHF) Press the SHF button (16) to randomly play the files in all folders Press SHF again to stop the shuffle function and resume normal playback. Press and hold the SHF button to randomly play the files in the current album (folder). -
Page 26: Remote Control
HD5112 Remote Control The remote control will allow you to control the basic functions of the HD5112. The remote control sensor is at the top left below the SELECT button (5). Table 2: Remote Control Functions Tuner CD Player iPod... -
Page 27: Care And Maintenance
HD5112 Care and Maintenance CD Player 2. Never use chemicals such as record sprays or household cleaners to clean CDs, as they can irreparably damage the disc’s surface. The following guidelines will help you extend the life of your CD player: 3. -
Page 28: Troubleshooting
HD5112 Troubleshooting Problem Cause Corrective Action Does not operate No power to yellow wire; Check connection with test light; (display does not no power to red wire check vehicle fuse with test light light) Fuse blown Replace fuse Front panel not installed... -
Page 29: Specifications
HD5112 Specifications General Power Supply ........11 to 16VDC, negative ground Power Antenna (Blue) . - Page 30 HD5112...
-
Page 31: Limited Warranty
The Company extends this warranty to the original retail purchaser of products This Warranty is in lieu of all other express warranties or liabilities. ANY IMPLIED purchased through an authorized Audiovox retailer in the U.S.A., Puerto Rico or WARRANTIES, INCLUDING... - Page 32 Audiovox Electronics Corporation Hauppauge, NY 11788 Technical Assistance: 1-800-323-4815 www.jensen.com © 2007 Audiovox Ver. 101207 Printed in China...
Need help?
Do you have a question about the HD5112 and is the answer not in the manual?
Questions and answers