Advertisement
Table of Contents
Advertisement
Table of Contents

Related Manuals for DeLonghi Pinguino PAC 160


Summary of Contents for DeLonghi Pinguino PAC 160
- Page 1 PAC160intro 25-01-2003 10:23 P A C 1 6 0 P A C 1 6 0 • Use and maintenance manual ..• Mode d’emploi et d’entretien ..• Instrucciones de uso ..•...
- Page 2 PAC160intro 25-01-2003 10:23 Pagina 2 ear Customer, Thank you for purchasing an appliance made by De’ Longhi, the interna- tional leader in portable air conditioning units. Thanks to our years of experi- ence all around the world we are constantly improving the quality and per- formance of Pinguino.
- Page 3 PAC160intro 25-01-2003 10:23 • De s c r i p t i o n • De s c r i p t i o n • De s c r i p t c i ó n • De s c r i z i o n e •...
-
Page 4: Important Safeguards
Avoid using Pinguino in oily or sulphurous atmospheres or near sources of heat. Before moving the air conditioner, empty water from condensation tray (see draina- ge instructions on page 15). Do not place hot or heavy objects on the unit. - Page 5 27°C) and about 50% relative humidity. An air conditioner removes moisture and heat from the room where it is located. One advantage of portable air conditioning units over fitted models is that they can be moved from one room to another in the home or even transferred between different buildings.
-
Page 6: Description Of The Appliance
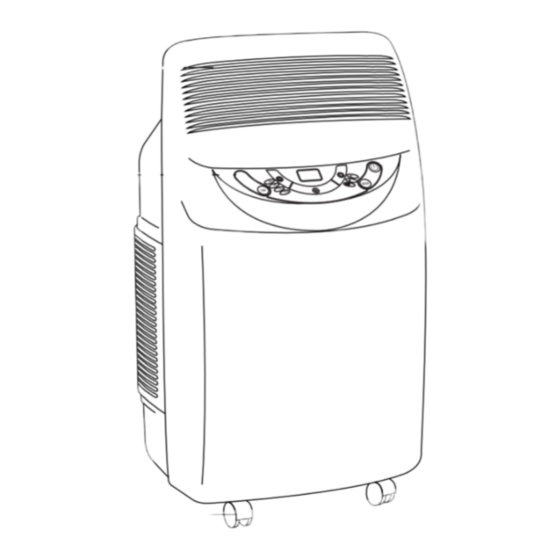
pac160 GB 25-01-2003 10:19 Pagina 6 Description of the appliance DESCRIPTION MODEL 1) Air discharge grill 2) Control Panel 3) Wheels 4) Handles 5) Housing for air exhaust hose 6) Cord winder 7) Air intake grill 8) Rating plate 9) Water collection tank 10)Water drain tube 11)Stopper for drain tube 12)Power cord... - Page 7 pac160 GB 25-01-2003 10:19 Pagina 7 When positioning the appliance, always ensure that nothing obstructs the intake and discharge of AIR CONDITIONING WITHOUT PERMANENT INSTALLATION Only a few simple steps are necessary to obtain the comfort offered by Pinguino. • Fit the air exhaust hose (14) in its housing (5) at the rear of the appliance as shown in fig.1 •...
- Page 8 Insert the nozzle of the exhaust hose into the slot, then connect the hose to the air conditioner (Fig.4). Thanks to the wing nut, it’s possible to use the window bracket also for sliding windows.
- Page 9 pac160 GB 25-01-2003 10:19 Pagina 9 AIR CONDITIONING WITH SEMI-PERMA- NENT INSTALLATION If desired, Pinguino can also be installed on a semi-permanent basis fig. 7. 12 " 30 cm In this case it will be necessary to: • Drill a hole in a perimeter wall or in a win- dow pane.
-
Page 10: Description Of The Control Panel
pac160 GB 25-01-2003 10:19 Pagina 10 Description of the control panel THE DISPLAY A. ON/OFF Button B. Function Button Air-conditioning, dehumidifying, ventila- tion C. Air-conditioning indicator light D. dehumidifying indicator light E. Ventilation indicator light F. Increase temperature button / increase operating time button G. -
Page 11: Switching The Appliance On
pac160 GB 25-01-2003 10:19 Pagina 11 O p e r a t i o n SWITCHING THE APPLIANCE ON Connect the appliance to the mains supply. On the display two lines will appear indicating Stand-by mode Press the ON/OFF button (A) and then the MODE button until the relevant function indicator appears viz.: Indicator C : air-conditioning... -
Page 12: Programming The Timer
pac160 GB 25-01-2003 10:19 Pagina 12 O p e r a t i o n Once the dehumidifying function has been selected, the fan speed cannot be changed. The appliance will automatically select the correct fan mode. VENTILATION Adjust the fan speed by pressing the “FAN” (Q) button, as illustra- ted in the air conditioning function. -
Page 13: Self-Diagnosis
pac160 GB 25-01-2003 10:19 Pagina 13 O p e r a t i o n SELF-DIAGNOSIS The appliance is equipped with a self-diagnosis system which identifies any operating problems. IF THE DISPLAY SHOWS… Insert and re-insert the plug. If the problem persists, call the service H H P P HIGH PRESSURE centre. - Page 14 pac160 GB 25-01-2003 10:19 Pagina 14 R e c o m m e n d a t i o n s Follow these recommendations to achieve maximum efficiency from your air conditio- ning unit: • Close the doors and windows in the room where the unit is functioning.
- Page 15 pac160 GB 25-01-2003 10:19 Pagina 15 Before cleaning or maintenance, switch off the appliance by pressing the ON/OFF button (A) and always unplug it from the mains supply. CLEANING THE EXTERNAL UNIT We recommend cleaning the appliance with a slightly damp cloth. It should then be dried. For safety reasons, do not wash the air-condi- tioner with water.
-
Page 16: Troubleshooting
pac160 GB 25-01-2003 10:19 Pagina 16 Troubleshooting PROBLEM The air-conditioner • the power is off • the appliance is not plugged in does not work The air-conditioner • The exhaust hose is twisted works only for a • The exhaust hose is blocked short time •... -
Page 17: Technical Specification
pac160 GB 25-01-2003 10:19 Pagina 17 Technical specification OPERATING LIMITS Room temperature TECHNICAL SPECIFICATION Power supply Max. absorbed power in air conditioning 21 ÷ 35°C 69 - 95°F Max. absorbed power when dehumidifying Refrigerating capacity* Number of fan speeds Max. air flow Dimensions of internal unit: •... -
Page 18: Limited Warranty
pac160 GB 25-01-2003 10:19 Pagina 18 LIMITED WARRANTY We warrant each DE’LONGHI AIR-CONDITIONER to be free from defects in material and work- manship. Our obligation under this warranty is to provide one year parts and labor free from pur- chase date, with an additional four (4) years on any part of the sealed system consisting of the compressor, evaporator, condenser and factory connected refrigerant tubing.