Advertisement
Conventions Used In This Manual
Note:
This message contains additional instructions for this item.

This information contains instructions that must be followed.

This message contains information about user safety and product safety.
Package Contents

NOTE:
* The power adapter and other accessories included in the box will vary depending on the model parameter or area purchased.
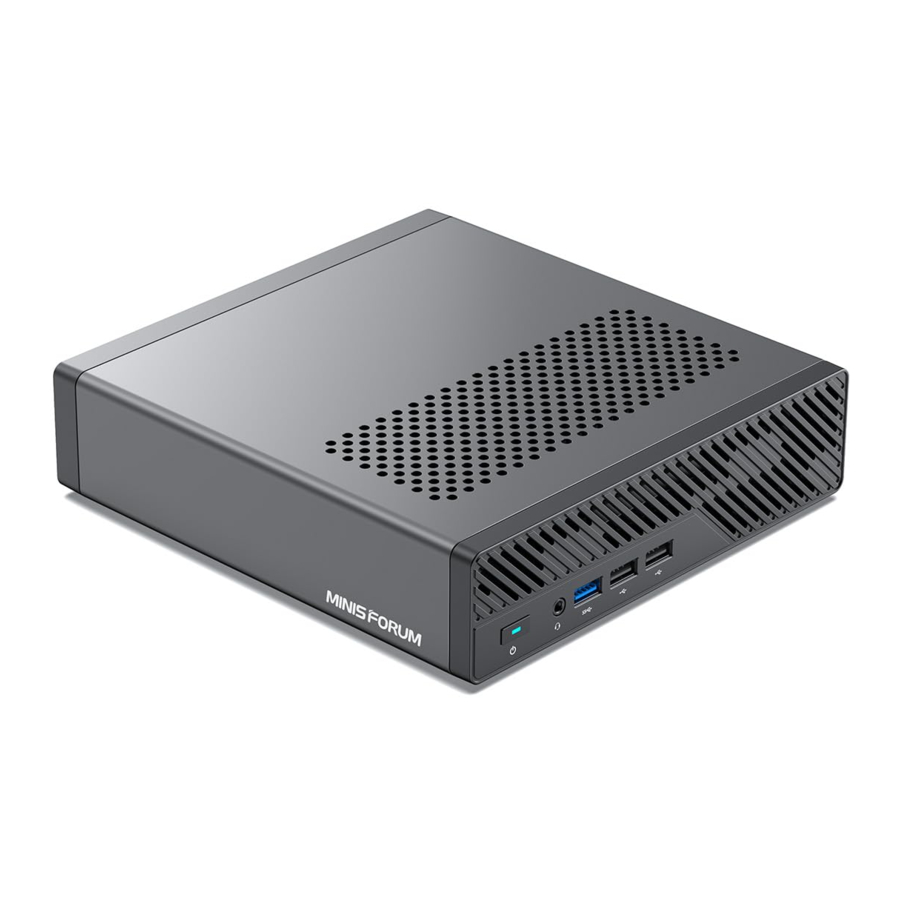
Getting To Know Your Mini PC


Interface
- Power Button
The power button allows you to turn the Mini PC on /off. You can press the power button to put your Mini PC to sleep mode or press it for 10 seconds to force shutdown your Mini PC. - 3.5mm Combo Jack
This connector is used to connect audio output signals to a power amplifier or headphones. You can also use it to connect an external microphone or output signals from audio equipment. - USB2.0 Port
The USB (Universal Serial Bus) port is compatible with USB2.0 or USB1.1 devices such as keyboards, and printers. - USB3.2 Port
USB3.2 (Universal Serial Bus) port provides a transfer rate of up to 5 Gbit/s. It can be connected to keyboards, pointing devices, cameras, hard disks, printers and scanners. - Reset Hole
Please remove the power source and hold the reset hole for ten seconds to restore the BIOS to its factory default settings.
![]()
If you encounter certain issues during use, you can first try to resolve them by holding the reset hole. - RJ-45 LAN Port
This RJ-45 network interface supports standard Ethernet cables and can be connected to a local area network. (Transmission speed 2.5Gbps) - DisplayPort
This DisplayPort supports display output. It can transmit digital audio information while transmitting video signals. - HDMI® Port
The HDMI® port (High-Definition Multimedia interface) is uncompressed, fully digital audio/video interface that provides a common data connection channel for compatible devices, It can be used to connect external display devices and televisions. - Type-C Port
This interface supports different protocols depending on the CPU used.
Note!- When using a Raphael architecture CPU, it supports a full-featured Type-C with USB3.2 protocol. It supports Alt DP. The highest USB speed is 10Gbps.
- When using a PHX architecture CPU, it supports a full-featured Type-C with USB4 protocol. It supports Alt DP. The highest USB4 transmission speed is 40Gbps, and the highest USB3 transmission speed is 10Gbps.
- USB3.2 Gen2 Port
USB3.2 Gen2 (Universal Serial Bus) port provides a transfer rate of up to 10 Gbit/s. It can be connected to keyboards, pointing devices, cameras, hard disks, printers and scanners. - OCuLink Port
This interface supports up to PCIE4.0x4 speed and is capable of connecting external graphics cards and other PCIe devices.
Note! A specialized expansion device is required. - Power Input
The power adapter can convert AC power to DC power. The converted power provides power to your Mini PC through the power input interface. To avoid damaging your Mini PC, please use the power adapter provided with the product.
![]()
When the power supply is in use, the temperature of the power adapter may rise and become hot. Do not place the power adapter close to your body. Power adapter: DC 19V - Air Vent
The air vents allow your Mini PC chassis to expel hot air out.
![]()
For optimum heat dissipation and air ventilation, ensure that the air vents are free from obstructions (such as Paper, books, clothes, transmission lines).
Getting Started With Your Mini PC
- Connect the display to the Mini PC's HDMI® port、DP port or Type-C port.

- Connect the keyboard and mouse.

- Connect the provided power adapter to your Mini PC.

- Turn on the power and start the Mini PC.


If the Mini PC is frozen or slow to respond, press and hold the power button at least for 10 seconds to force it shutdown.
To put your Mini PC on Sleep mode, press the Power button once.
Installation Guide
- Remove the two screws from the bottom cover using the tool, then use the included tool to pull out the motherboard slot at the position shown in the diagram.
![]()
Only use the clip at the position shown in the diagram.


DIY CPU
- First remove the screws from the back of the motherboard's CPU cooling assembly, then remove the screws from the front of the motherboard's cooling module and remove the entire cooling module.

- Install the CPU.
![]()
Match the position of the CPU's foolproof notch.

- Reinstall the cooling module onto the motherboard, securing the screws of the cooling module on the front of the motherboard to the screws of the CPU cooling assembly on the back.


DIY Customized U.2 To M.2
- Assemble the U.2 hard drive to the U.2 to custom M.2 adapter card and lock the screws.

- Insert the U.2-to-private-M.2 adapter card into the M.2 slot and align it with the positioning post.


DIY SSD
- Use the tool to remove the SSD cooling module on both sides, the SSD on the CPU side needs to be unscrewed first with the hexagonal studs.

- Insert the SSD card by tilting it towards the slot notch. For SSDs on the back side, use screws to secure it, and for SSDs on the CPU side, use hexagonal studs to secure it.

1 2 3 4 Raphael architecture PCIE3.0x4 PCIE4.0x1 PCIE4.0x4 PCIE4.0x4 Phoenix architecture PCIE3.0x4 PCIE4.0x1 PCIE4.0x4 PCIE4.0x4


Note: The speed and availability of the SSD on this motherboard may vary when inserting different CPUs. Raphael architecture, such as 7600/7900; Phoenix architecture, such as 8700G/8600G.

- When using a U.2 hard drive in this slot, you need to turn on the ON U.2 switch;
- When using an M.2 hard drive in this slot, make sure the switch is in the ON M.2 position. If the switch is not ON M.2, the M.2 hard drive may be damaged.
DIY DDR
- Align the memory stick with the slot notch and insert it at an angle until the clips on both sides secure it in place.

- Use the tool to reassemble the SSD cooling module on both sides.

- After inserting the motherboard bracket back into the case, lock the motherboard bracket locking screws.


FAQ
- If you have purchased a barebones system and installed the Windows operating system yourself, please make sure to disable the Fast Startup feature of Windows. This feature may cause abnormal behavior in your device.
- The DP function does not support daisy chaining.
- The Oculink expansion connects directly to the CPU's PCIe 4.0 x4 bus. PCIe signals may degrade with each adapter used and the length of the cable. If you use more than three levels of adapters, your Oculink expansion PCIe devices may malfunction.
- Be careful when operating the SSD screws on the CPU side, as they may strip (screw slide).
- This product supports Phoenix and Raphael CPUs, different CPUs with different architectures require different Type-C controller firmware, otherwise the Type-C interface will not work properly, for details, please refer to (www.minisforum.com/new/support) for Type-C controller firmware.
Safety Instructions
Tips for use
- Dust, moisture and drastic temperature changes will affect the product life, so please try to avoid placing the product in these places.
- This product is suitable for use in an indoor environment from 0℃ to 35℃.
- Before using this product, be sure to leave adequate ventilation space around the unit.
Do not block or cover these openings. Do not insert any objects into the ventilation openings. - This equipment should be installed and operated with a minimum distance of 20cm between the radiator and your body.
- When you use the power extension cords, the total current of all connected products should be within the rated current of cables, ensuring stable operation.
Safety Precautions
OCulink must be disconnected when the power is off. Otherwise, it may damage the external expansion device or the host.
All M.2 solid-state drive slots only support SSDs with the NVME protocol and do not support SATA protocol. If you insert an SSD with the SATA protocol incorrectly, your SSD may be damaged.
Please be sure to use a 19V DC-IN power adapter. Using a power adapter with a voltage other than 19V can cause the device to operate unstably and may even lead to power loss issues.
Maintenance Guideline
- Do not step on the power cord or put anything on your Mini PC.
- Do not spill water or any other liquid over this product.
- There's still some current passing through even when the system is off. To avoid severe damage caused by possible electric shock, plug out all power cables from sockets temporarily before cleaning or moving this product.
- If you encounter the technical problems with the product unplug the power cord and contact a qualified service technician or your retailer.
Documents / Resources
References
Download manual
Here you can download full pdf version of manual, it may contain additional safety instructions, warranty information, FCC rules, etc.
Advertisement


Need help?
Do you have a question about the Mini Series and is the answer not in the manual?
Questions and answers