Advertisement
Available languages
Available languages
Quick Links
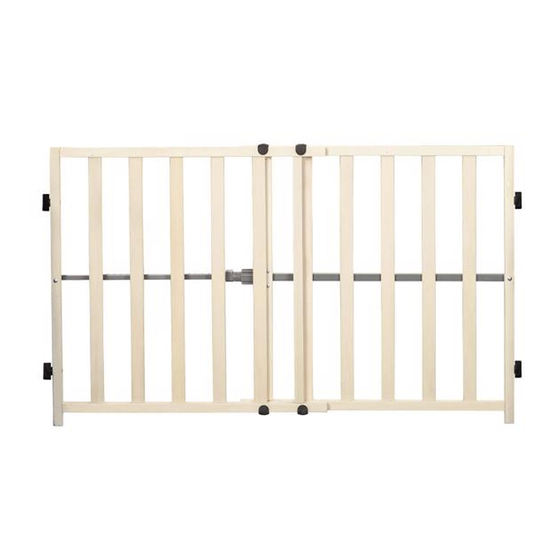
Wooden Expandable Safety Gate
• READ ALL INSTRUCTIONS BEFORE ASSEMBLY AND USE OF GATE.
• KEEP INSTRUCTIONS FOR FUTURE USE.
www.regalo-baby.com
Regalo International, LLC.
3200 Corporate Center Drive, Suite 100 / Burnsville, MN 55306, USA
866.272.5274 (U.S. only) or 952.435.1080
Made in China
Before Assembly
A
PLEASE CHECK TO MAKE SURE YOU HAVE THE FOLLOWING PARTS:
A
Expandable Gate (1)
B
Wall Cups (4)
C
1" Wall Mount Screws (4) (requires a Phillips/cross-head screwdriver)
BEFORE USING PRODUCT
CARE AND MAINTENANCE
Read and follow all instructions
Periodically check the gate for signs of
carefully to ensure that your gate
damage, wear, or missing components.
is properly installed. Improper
Do not use if any part is missing, worn
installation could result in the gate
or damaged. Check the gate regularly to
becoming unstable or dislodged
ensure all the hardware and mountings
from the doorway. The safety of
are tightened. Do not use abrasive
your child is your responsibility.
cleaners or bleach. Clean by sponging
Please keep these instructions for
with warm water and a mild detergent.
your reference.
OWNER'S MANUAL MODEL: 0720, 0720 C
C
B
90 DAYS LIMITED WARRANTY
If, during the first 90 days after consumer
purchase of the item, under reasonable and
non-commercial use and conditions of
maintenance, it fails while owned by the
original purchaser because of the quality of
materials or workmanship of finish and
assembly, Regalo International, LLC, will
replace or repair it at Regalo's option.
PROOF OF PURCHASE REQUIRED.
Installing Your Gate
STEP 1
Place your expandable gate in an opening no
smaller than 26 inches and no larger than 42
inches wide.
NOTE: If the opening has a baseboard or
molding near the floor, be sure to place the
gate above the molding so that the gate is
installed on a vertically even surface.
STEP 2
To lock the gate into position, pull up on the
locking pin and slide the adjustment device
towards the center of the gate.
With one hand on each side of the gate frame,
pull away from the center until the gate spans
the entire length of your doorway or opening.
When the adjustment device can go no further,
push down on the locking pin. The pin will
NOTE: Be sure to pull from the outside frame
insert into one of the holes on the horizontal
of the gate, NOT the inner bars.
bar and secure the adjustment device in place.
Positioning and Attaching Wall Cups
STEP 1
With the gate fully removed, you can now
After you have mounted your gate, and you are
use the outlines you marked during Step 1 as
satisfied with its positioning, draw an outline
on the surface of your doorway or opening
guides for screwing in your (4) wall cups.
around the perimeter of the (4) rubber bumper.
Center each of the wall cups within the guide
outlines and use the provided self-tapping
Next, completely remove the gate from the
screws to fasten them in place via the hole
opening by loosening the turning knob and
through the center of each wall cup.
pulling up on locking pin to depressurize the
gate.
REMOVING YOUR GATE FROM WALL
STEP 1: Rotate the turning knob towards you (counterclockwise) to alleviate the pressure.
STEP 2: Lift up on the locking pin and slide the adjustment device away from the middle of the gate.
STEP 3: With both hands on the outer frame of the gate, slide the panels inward and remove the gate from your doorway or opening.
STEP 3
STEP 5
LOCKING PIN
ADJUSTMENT
DEVICE
Use the turning knob to tighten and secure the
gate in place. Rotate the knob away from you
(clockwise) until enough pressure is created
to stabilize and secure your gate.
STEP 4
NOTE: Test the gate to make sure it is tightly
secured and cannot be easily pushed out.
HORIZONTAL
BAR
STEP 2
STEP 3
Reinstall your gate in the doorway or
opening according to the instructions, using
the newly installed wall cups as anchoring
points for the (4) rubber bumper.
NOTE: Make sure wall
cups are centered onto
your drawn outlines as
shown.
TURNING KNOB
Guide
Outline
Advertisement

Related Manuals for Regalo 0720


Summary of Contents for Regalo 0720
- Page 1 STEP 1 STEP 3 STEP 5 Place your expandable gate in an opening no OWNER’S MANUAL MODEL: 0720, 0720 C smaller than 26 inches and no larger than 42 inches wide. LOCKING PIN NOTE: If the opening has a baseboard or molding near the floor, be sure to place the...
- Page 3 Barrière de sécurité bois extensible ÉTAPE 1 ÉTAPE 3 ÉTAPE 5 Placer votre barrière extensible dans une ouverture GUIDE D'UTILISATION MODÈLE : 0720, 0720 C d'au moins 66 cm (26 po) mais qui n'excède pas 107 cm (42 po) de large. GOUPILLE DE VERROUILLAGE REMARQUE : Si l'ouverture dispose d'une plinthe ou d'un seuil de porte, veiller à...
- Page 4 PASO 1 PASO 3 PASO 5 Coloque la barrera extensible en una abertura no MANUAL DEL PROPIETARIO MODELO: 0720, 0720 C menor de 26 pulgadas (66 cm) ni superior a 42 pulgadas (107 cm) de ancho. DISPOSITIVO DE AJUSTE NOTA: Si la abertura tiene un rodapié...
- Page 5 WARNING • Install according to manufacturer's instructions. • To prevent serious injury or death, securely install gate or enclosure and use according to manufacturer's instructions. • Children have died or been seriously injured when gates are not securely installed. Always install and use as directed using all required parts.
Need help?
Do you have a question about the 0720 and is the answer not in the manual?
Questions and answers