Panasonic ER224 Manual
- Operating instructions manual (11 pages) ,
- Operating instructions manual (14 pages)
Advertisement
Before use
This Beard/Hair Trimmer is for the trimming and care of mustaches, beards and hair. Trimming length can be adjusted between 1 to 20 mm. The trimmer can be operated either from an AC power source or on its own rechargeable battery.
Parts identification

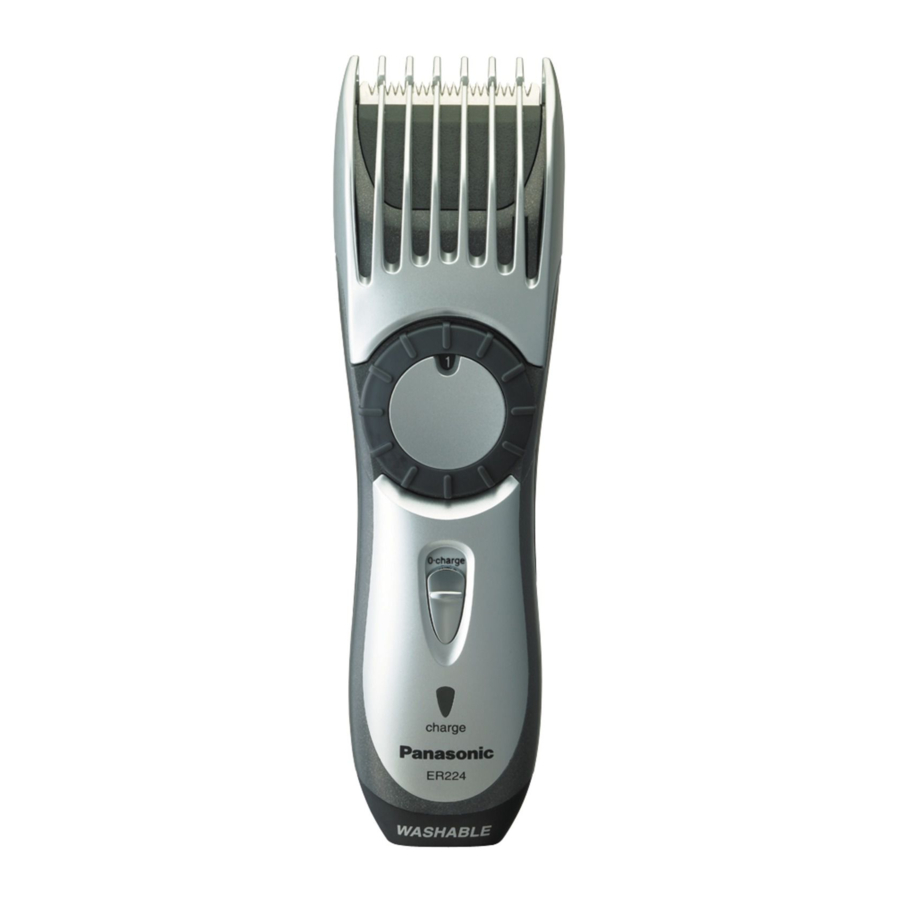
- Switch
Slide up to turn on, slide down to turn off. - Charge Indicator Lamp
Lights when the unit is connected with the adaptor![]() to an AC power source for charging.
to an AC power source for charging. - Main Blade
A precision 39 mm-wide blade which can be used with the comb attachment![]() .
. - Quick Adjust Dial
Turn the dial to a higher setting to raise or lower the comb attachment![]() to the desired length (between 1 and 20 mm) (see fig. 2). The comb attachment is locked in position when the switch is set to "1".
to the desired length (between 1 and 20 mm) (see fig. 2). The comb attachment is locked in position when the switch is set to "1".
![]()
- Trimming Length Indicator
Indicator Trimming Length 1 1.0 mm (1/32˝) 2 2.0 mm (5/64˝) • 3.5 mm (5/32˝) 5 5.0 mm (3/16˝) • 6.5 mm (9/32˝) 8 8.0 mm (5/16˝) • 9.5 mm (3/8˝) 11 11.0 mm (13/32˝) • 12.5 mm (1/2˝) 14 14.0 mm (17/32˝) • 15.5 mm (5/8˝) 17 17.0 mm (21/32˝) • 18.5 mm (23/32˝) 20 20.0 mm (25/32˝) - The actual hair length may be longer than the set trimming hight.
- Comb Attachment for Hair
Use this to control the trimming length.
![]()
- Moving Blade
- Stationary Blade
- Cleaning Lever
Push this lever to remove bits of hair caught between the stationary blade and the moving blade. - Blade Block
Release to remove the blade block from the housing to clean or replace the blade. (see fig. 12) - Finishing blade of Mini Trimmer
Use this when finishing the edges (see fig. 8) and trimming the mustache. - Trimmer guide of Mini Trimmer
Slide it up when finishing blade is used. - Adaptor
Use this to connect the trimmer to an AC power source for recharging or for AC operation. - Oil
Lubricate the space between the stationary and moving blade with 2 or 3 drops of oil after use. (see fig. 16) - Cleaning Brush
 to an AC power source for charging.
  .
. 

Operation
Charging and cordless trimming
When charging the beard/hair trimmer for the first time or when it has not been in use for more than 6 months, charge it for the activation for at least 16 hours before use.
Connect the power cord to the beard/hair trimmer, and plug the adaptor to an AC outlet.
In some areas, a special plug adaptor may be required.
The charge indicator lamp lights up when the trimmer is being charged.

You can fully charge the trimmer in 8 hours if it seems to be losing speed. A full charge will supply enough power for approx. 6 trims (5 minutes per trim for a normal beard).
AC operation
Connect the AC adaptor to the body in the same way as for charging, and set the switch to "1" to use the trimmer.
If the trimmer does not operate after connection as mentioned above, return switch to "0•charge" position for 1 minute and then set switch back to "1" position.
Trimming of beard
Place the angled face of the comb against the skin and cut the beard by moving the trimmer in all directions to obtain a uniform cut.

With curly facial hair, the comb attachment may not cut all of the hair. In this case, remove the comb attachment and use a conventional comb to draw out the remaining uncut, hair.

When shaping the beard, remove the comb attachment. Place the angled edge against the skin and make the border of the beard even.
When finishing the edges (see fig. 8) and trimming the mustache (see fig. 9)

Use the finishing blade of mini trimmer.
Slide the trimmer guide up and then turn the trimmer on (see fig. 7). To smooth off a beard surface, run this blade lightly over the surface.

Cutting of hair
Cut hair to the correct height by moving the trimmer back against the flow of the hair.
Cutting around the ears
Cut a little, and then gently separate the trimmer from the hair.

Cutting the nape of the neck
Bring the trimmer gently away from the hair to finish.

(Do not use the trimmer in an inverted position. This can cut hair too deeply.)
Turn off the trimmer ("0•charge") before changing the trim height or removing the attachment.
Blade Maintenance
The following is the symbol of washable trimmer. The symbol means that hand-held part may be cleaned under water. The trimmer shall not be used until it has dried.

Hold body of the trimmer with Panasonic mark upwards, place the thumb against the blades, and push them away from the main body.

- If washing in water
- Rinse off any hairs that are sticking to the blade in running water.
![]()
- Rinse out any hairs that are inside the trimmer with running water.
![]()
- Shake the trimmer 4-5 times gently, wipe off any water drops from the trimmer and blade, and then place it onto a towel with the "Washable" indicator facing downward to let it fully dry.
![]()
- Apply a few drops of the oil to the points indicated by the arrows.
![]()
- Remount the blade on the trimmer body.
- Rinse off any hairs that are sticking to the blade in running water.


Detach the trimmer from the AC adaptor before cleaning it in water.
- If cleaning with brush
- Remove the blade and brush off the cut hairs from the blade edge.
- Use the cleaning brush to brush off the cut hairs from the trimmer body and from around the blade.

- Brush the cut hairs out from between the stationary blade and the moving blade. Press down on the lever for cleaning in order to raise the moving blade, and brush the cut hairs out from between the blades.

- Apply a few drops of the oil to the points indicated by the arrows. (see fig. 16)
- Remount the blade on the trimmer body.


Blade life
Blade life will vary according to the frequency and length of use. For example, using the unit for 10 minutes every 3 days, the life expectancy is approximately 3 years. If cutting efficiency is reduced substantially despite proper maintenance, the blades have exceeded their service life and should be changed.
The replacement part no. is WER9602.
Battery life
Battery life will vary according to the frequency and length of use. If the battery is charged 3 times a month, the service life will be approximately 6 years. If the unit is left without being charged for more than 6 months, the charge will drain from the battery and their service life may be shortened. Therefore, even when not using regularly, it is recommended that the unit be recharged at least once every 6 months.
Specifications
Power source: 120 V AC, 60 Hz
Motor voltage: 1.2 V DC
Charging time: 8 hours
 Attention
- Do not charge the trimmer at temperatures below 0°C (32°F) or above 40°C (104°F), or where it will be exposed to direct sunlight, or other heat sources.
- Do not continue charging for more than 48 hours. Doing so may damage the battery.
- Clean the housing only with a soft cloth slightly dampened with water or soapy water. Never use a caustic cleaner such as benzene or bleach.
- The trimmer may become warm during operation and normal recharging. This is normal.

- Keep out of reach of children.
- Never tamper with the moving parts.
- Do not pick up the trimmer by the cord. It may become detached, causing damage or injury.
- Do not use on animals.
- Never disassemble the trimmer. Take it to a qualified serviceperson when service or repair is required.
- Do not attempt to use any power cord or adaptor other than one specifically designed for this model. Use only the included AC adaptor.
- Do not pull, twist or severely bend the power cord.
- Do not wrap the power cord tightly around the appliance.
- Dry the trimmer completely before charging it.
- Keep the adaptor away from water and handle it only with dry hands.
- Store the adaptor in a dry area where it will be protected from damage.
- Wash the trimmer in tap water. Do not use salt water or boiling water. Also, do not use cleaning products that are designed for toilets, bathrooms or kitchen appliances. Do not submerge the trimmer for a long time.
- Do not take the housing apart as this can affect the watertight construction.
- Do not clean with water when the trimmer is connected to the power cord.
- This power unit is intended to be correctly oriented in a vertical position or floor mount position.
This product is intended for household use only.
IMPORTANT SAFETY INSTRUCTIONS
When using an electrical appliance, basic precautions should always be followed, including the following: Read all instructions before using this appliance.

To reduce the risk of electric shock:
- Do not reach for an appliance that has fallen into water. Unplug immediately.
- Do not use while bathing or in a shower.
- Do not place or store appliance where it can fall or be pulled into a tub or sink. Do not place in or drop into water or other liquid.
- Always charge this appliance in a cool, dry place.
- Except when charging, always unplug this appliance from the electrical outlet immediately after using.
- Unplug this appliance before cleaning.
- Use only in dry condition.
- Do not submerge this appliance in water.

To reduce the risk of burns, fire, electric shock, or injury to persons:
- Do not use this appliance with damaged blades as injury may occur.
- Close supervision is necessary when this appliance is used by, on, or near children or invalids.
- Use this appliance only for its intended use as described in this manual. Do not use attachments not recommended by the manufacturer.
- Never operate this appliance if it has a damaged cord or plug, if it is not working properly, if it has been dropped or damaged, or dropped into water. Return the appliance to a service center for examination and repair.
- Keep the cord away from heated surfaces.
- Never drop or insert any object into any opening.
- Do not use outdoors or operate where aerosol (spray) products are being used or where oxygen is being administered.
- Always attach plug to appliance first, then to outlet. To disconnect, turn off the switch, then remove plug from outlet.
Documents / ResourcesDownload manual
Here you can download full pdf version of manual, it may contain additional safety instructions, warranty information, FCC rules, etc.
Advertisement


Need help?
Do you have a question about the ER224 and is the answer not in the manual?
Questions and answers