dji AIR 2 S Manual
- User manual (57 pages) ,
- Quick start manual (8 pages) ,
- Repair manual (6 pages)
Advertisement
Using this Manual
Legend

Warning

Important
 Hints and Tips
Before the First Flight
It is recommend to watch all tutorial videos on the official DJI website and read the disclaimer and safety guidelines before using for the first time. Prepare for your first flight by reviewing the quick start guide and refer to this user manual for more information.
Video Tutorials
Go to the address below or scan the QR code to watch the DJI Air 2S tutorial videos, which demonstrate how to use the DJI Air 2S safely:

http://www.dji.com/air-2s/video
Download the DJI Fly App
Make sure to use DJI Fly during flight. Scan the QR code on the right to download the latest version.

The Android version of DJI Fly is compatible with Android v6.0 and later. The iOS version of DJI Fly is compatible with iOS v11.0 and later.
* For increased safety, flight is restricted to a height of 98.4 ft (30 m) and range of 164 ft (50 m) when not connected or logged into the app during flight. This applies to DJI Fly and all apps compatible with DJI aircraft.
Download DJI Assistant 2 (Consumer Drones Series)
Download DJI Assistant 2 (Consumer Drones Series) at http://www.dji.com/air-2s/downloads.
The operating temperature of this product is 0° to 40°C. It does not meet the standard operating temperature for military grade application (-55° to 125°C), which is required to endure greater environmental variability. Operate the product appropriately and only for applications that it meets the operating temperature range requirements of that grade.
Product Profile
This section introduces DJI Air 2S and lists the components of the aircraft and remote controller.
Introduction
DJI Air 2S features both an Infrared Sensing System and Forward, Backward, Upward, and Downward Vision Systems, allowing for hovering and flying indoors as well as outdoors and for automatic Return to Home. The aircraft has a maximum flight speed of 42 mph (68.4 kph) and a maximum flight time of 31 minutes.
The remote controller displays the video transmission from the aircraft to DJI Fly on a mobile device and the aircraft and camera are easy to control using the onboard buttons. The maximum runtime of the remote controller is six hours.
Feature Highlights
Intelligent Flight Modes: With ActiveTrack 4.0, Spotlight 2.0, and Point of Interest 3.0, the aircraft follows or flies around a subject automatically while sensing obstacles in its path. The user can focus on operating the aircraft while the Advanced Pilot Assistance System 4.0 enables the aircraft to avoid obstacles.
Advanced Shooting Modes: Capture complicated shots effortlessly with features such as MasterShots, Hyperlapse, and QuickShots. With just a few taps, the aircraft will take off to record according to the preset path and generate a professional standard video automatically.
Gimbal and Camera: DJI Air 2S uses a 1-inch CMOS sensor camera, which can shoot 20MP photos and 5.4K 30 fps, 4K 60fps, and 1080p120 fps video. 10 bit D-Log video is also supported, making it easier for users to adjust colors during editing.
Video Transmission: DJI Air 2S boasts four built-in antennas and DJI's long-range transmission O3 (OCUSYNCTM 3.0) technology, offering a maximum transmission range of 12 km and video quality of up to 1080p from the aircraft to the DJI Fly app on a mobile device. The remote controller works at both 2.4 and 5.8 GHz, and is capable of selecting the best transmission channel automatically without latency.
- Maximum flight time was tested in an environment with no wind while flying at a consistent 12 mph (19.4 kph) and the maximum flight speed was tested at sea level altitude with no wind. These values are for reference only.
- The remote controller reaches its maximum transmission distance (FCC) in a wide-open area with no electromagnetic interference at an altitude of about 400 ft (120 m). The maximum transmission distance refers to the maximum distance that the aircraft can still send and receive transmissions. It does not refer to the maximum distance the aircraft can fly in a single flight. The maximum runtime was tested in a laboratory environment and without charging the mobile device. This value is for reference only.
- 5.8 GHz is not supported in some regions. Observe the local laws and regulations.
Preparing the Aircraft
All aircraft arms are folded before the aircraft is packaged. Follow the steps below to unfold the aircraft.
- Remove the gimbal protector from the camera.
- Unfold the front arms, and then unfold the rear arms.


Attach the gimbal protector when not in use.
- Attach the propellers with marks to the motors with marks. Press the propeller down onto the motors and turn until it is secure. Attach the other propellers to the unmarked motors. Unfold all the propeller blades.

- All Intelligent Flight Batteries are in hibernation mode before delivery to ensure safety. Use the provided charger to charge and activate the Intelligent Flight Batteries for the first time. It takes approximately 1 hour and 35 minutes to fully charge an Intelligent Flight Battery.


- Unfold the front arms before unfolding the rear arms.
- Make sure the gimbal protector is removed and all arms are unfolded before powering on the aircraft. Otherwise, it may affect the aircraft self-diagnostics.
Preparing the Remote Controller
- Remove the control sticks from their storage slots on the remote controller and screw them into place.
- Pull out the mobile device holder. Choose an appropriate remote controller cable based on the type of mobile device. A Lightning connector cable, Micro USB cable, and USB-C cable are included in the packaging. Connect the end of the cable with the phone icon to your mobile device. Make sure the mobile device is secured.


If a USB connection prompt appears when using an Android mobile device, select the option to charge only. Otherwise, it may fail to connect.
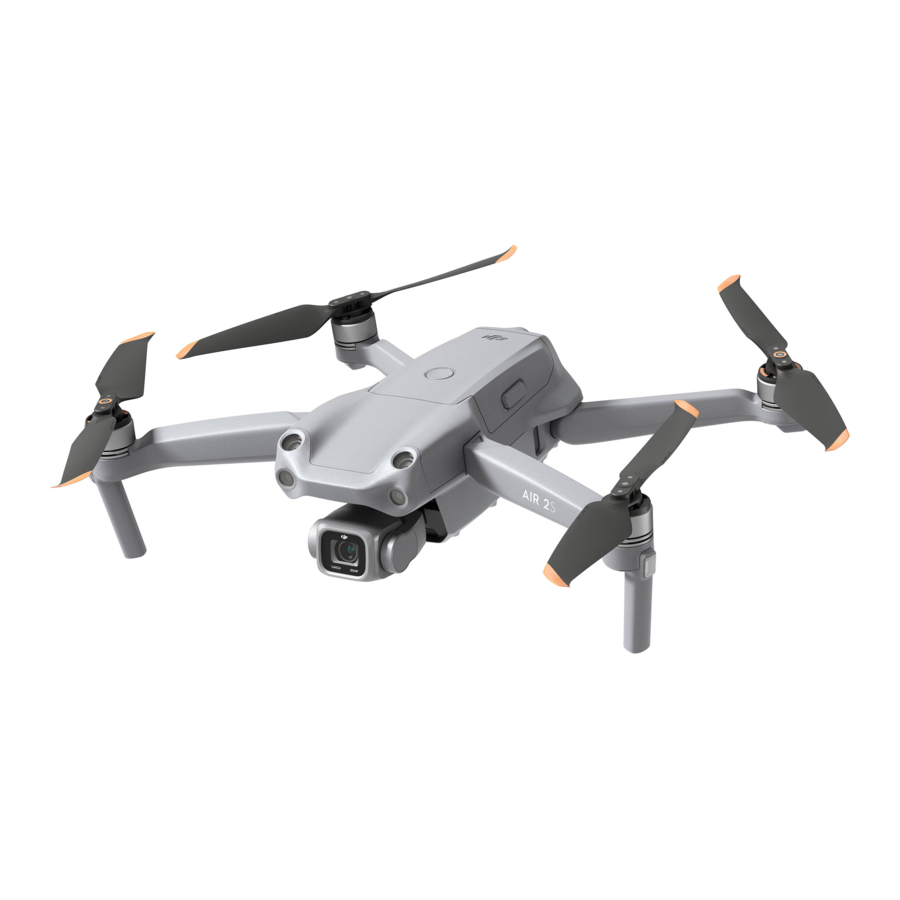
Aircraft Diagram

- Forward Vision System
- Propellers
- Motors
- Landing Gears (Built-in antennas)
- Gimbal and Camera
- Downward Vision System
- Auxiliary Bottom Light
- Infrared Sensing System
- USB-C Port
- Battery Buckles
- Front LEDs
- Aircraft Status Indicators
- Backward Vision System
- Intelligent Flight Battery
- Battery Level LEDs
- Power Button
- microSD Card Slot
- Upward Vision System
Remote Controller Diagram

- Power Button
Press once to check the current battery level. Press once, then again, and hold to power the remote controller on or off. - Flight Mode Switch
Switch between Sport mode, Normal mode, and Cine mode. - Flight Pause/Return to Home (RTH) Button
Press once to make the aircraft brake and hover in place (only when GNSS or Vision Systems are available). Press and hold the button to initiate RTH. The aircraft returns to the last recorded Home Point. Press again to cancel RTH. - Battery Level LEDs
Displays the current battery level of the remote controller. - Control Sticks
Use the control sticks to control the aircraft movements. Set the flight control mode in DJI Fly. The control sticks are removable and easy to store. - Customizable Button
Press once to turn the Auxiliary Bottom Light on or off. Press twice to recenter the gimbal or tilt the gimbal downward (default settings). The button can be set in DJI Fly. - Photo/Video Toggle
Press once to switch between photo and video mode. - Remote Controller Cable
Connect to a mobile device for video linking via the remote controller cable. Select the cable according to the mobile device. - Mobile Device Holder
Used to securely mount the mobile device to the remote controller. - Antennas
Relay aircraft control and video wireless signals. - USB-C Port
For charging and connecting the remote controller to the computer. - Control Sticks Storage Slot
For storing the control sticks. - Gimbal Dial
Controls the tilt of the camera. Press and hold the customizable button to use the gimbal dial to adjust the zoom in video mode. - Shutter/Record Button
Press once to take photos or start or stop recording. - Mobile Device Slot
Used to secure the mobile device.
Activating DJI Air 2S
DJI Air 2S requires activation before using for the first time. After powering on the aircraft and remote controller, follow the on-screen instructions to activate DJI Air 2S using DJI Fly. An internet connection is required for activation.
Aircraft
DJI Air 2S contains a flight controller, video downlink system, vision systems, infrared sensing system, propulsion system, and an Intelligent Flight Battery.
Flight Modes
DJI Air 2S has three flight modes, plus a fourth flight mode that the aircraft switches to in certain scenarios. Flight modes can be switched via the Flight Mode switch on the remote controller.
Normal Mode: The aircraft utilizes GNSS and the Forward, Backward, Upward and Downward Vision Systems and Infrared Sensing System to locate itself and stabilize. When the GNSS signal is strong, the aircraft uses GNSS to locate itself and stabilize. When the GNSS is weak but the lighting and other environment conditions are sufficient, the aircraft uses the vision systems to locate itself and stabilize. When the Forward, Backward, Upward and Downward Vision Systems are enabled and lighting and other environment conditions are sufficient, the maximum flight altitude angle is 35° and the maximum flight speed is 15 m/s.
Sport Mode: In Sport Mode, the aircraft uses GNSS for positioning and the aircraft responses are optimized for agility and speed making it more responsive to control stick movements. The maximum flight speed is 19 m/s. Obstacle sensing is disabled in Sport mode.
Cine Mode: Cine mode is based on Normal mode and the flight speed is limited, making the aircraft more stable during shooting.
The aircraft automatically changes to Attitude (ATTI) mode when the Vision Systems are unavailable or disabled and when the GNSS signal is weak or the compass experiences interference. In ATTI mode, the aircraft may be more easily affected by its surroundings. Environmental factors such as wind can result in horizontal shifting, which may present hazards, especially when flying in confined spaces.
- The Forward, Backward and Upward Vision Systems are disabled in Sport mode, which means the aircraft cannot sense obstacles on its route automatically.
- The maximum speed and braking distance of the aircraft significantly increase in Sport mode. A minimum braking distance of 30 m is required in windless conditions.
- A minimum braking distance of 10 m is required in windless conditions while the aircraft is ascending and descending.
- The responsiveness of the aircraft significantly increases in Sport mode, which means a small control stick movement on the remote controller translates into the aircraft moving a large distance. Make sure to maintain adequate maneuvering space during flight.
Aircraft Status Indicators
DJI Air 2S has front LEDs and aircraft status indicators.

When the aircraft is powered on but the motors are not running, the front LEDs glow solid green to display the orientation of the aircraft. When the aircraft is powered on but the motors are not running, the aircraft status indicators display the status of the flight control system. Refer to the table below for more information about the aircraft status indicators.
After the motor starts, the front LEDs blink green and the aircraft status indicators blink red and green alternately.
Aircraft Status Indicator States

Return to Home
Return to Home (RTH) returns the aircraft to the last recorded Home Point when the positioning system is functioning normally. There are three types of RTH: Smart RTH, Low Battery RTH, and Failsafe RTH. The aircraft automatically flies back to the Home Point and lands when Smart RTH is initiated, the aircraft enters Low Battery RTH, or the video link signal is lost during flight.
| GNSS | Description | |
| Home Point |  10 10 | The default Home Point is the first location where the aircraft received a strong to moderately strong GNSS signal where the icon is white. The Home Point can be updated before takeoff as long as the aircraft receives a strong to moderately strong GNSS. If the GNSS signal is weak then the Home Point cannot be updated. |
Smart RTH
If the GNSS signal is sufficient, Smart RTH can be used to bring the aircraft back to the Home Point. Smart RTH is initiated either by tapping ![]() in DJI Fly or by pressing and holding the RTH button on the remote controller until it beeps. Exit Smart RTH by tapping
in DJI Fly or by pressing and holding the RTH button on the remote controller until it beeps. Exit Smart RTH by tapping ![]() in DJI Fly or by pressing the RTH button on the remote controller.
in DJI Fly or by pressing the RTH button on the remote controller.
Smart RTH includes Straight Line RTH and Power Saving RTH.
Straight Line RTH Procedure:
- The Home Point is recorded.
- Smart RTH is triggered.
-
- If the aircraft is farther than 50 m from the Home Point when the RTH procedure begins, the aircraft adjusts its orientation and ascends to the preset RTH altitude and flies to the Home Point. If the current altitude is higher than the RTH altitude, the aircraft flies to the Home Point at the current altitude.
- If the aircraft is at a distance of 5 to 50 m from the Home Point when the RTH procedure begins, the aircraft adjusts its orientation and flies to the Home Point at the current altitude.
- If the aircraft is less than 5 m from the Home Point when the RTH procedure begins, it lands immediately.
- After reaching the Home Point, the aircraft lands and the motors stop.
If the RTH is triggered through DJI Fly and the aircraft is farther than 5 m from the Home Point, a prompt will appear in the app for users to select a landing option.
Power Saving RTH Procedure:
During Straight Line RTH, if the distance is farther than 480 m and the altitude is more than 90 m above the RTH altitude as well as more than 290 m above the takeoff altitude, a prompt appears in DJI Fly asking the user if they wish to enter Power Saving RTH. After entering Power Saving RTH, the aircraft adjusts to an angle of 14° and flies to the Home Point. The aircraft lands when it is above the Home Point and the motors stop.
The aircraft exits from power saving RTH and enter Straight Line RTH in the following scenarios:
- If the pitch stick is pulled down.
- If the remote controller signal is lost.
- If the Vision Systems become unavailable.


Low Battery RTH
Low Battery RTH is triggered when the Intelligent Flight Battery is depleted to the point that the safe return of the aircraft may be affected. Return home or land the aircraft immediately when prompted.
DJI Fly displays a warning when the battery level is low. The aircraft will automatically return to the Home Point if no action is taken after a 10 second countdown.
The user can cancel RTH by pressing the RTH button or Flight Pause button on the remote controller. If RTH is cancelled following a low battery level warning, the Intelligent Flight Battery may not have enough power for the aircraft to land safely, which may lead to the aircraft crashing or being lost.
The aircraft will land automatically if the current battery level can only support the aircraft long enough to descend from its current altitude. Auto landing cannot be canceled but the remote controller can be used to alter the direction of the aircraft during the landing process.
Failsafe RTH
If the Home Point was successfully recorded and the compass is functioning normally, Failsafe RTH automatically activates after the remote controller signal is lost for more than 6 seconds. The aircraft will fly backwards for 50 m on its original flight route, and then enter Straight Line RTH. If the aircraft is less than 50 m from the Home Point when the video signal is lost, it flies to the Home Point at the current altitude.
After flying for 50 m:
- If the aircraft is less than 50 m from the Home Point, it flies back to the Home Point at the current altitude.
- If the aircraft is farther than 50 m from the Home Point and the current altitude is higher than the preset RTH altitude, it flies back to the Home Point at the current altitude.
- If the aircraft is farther than 50 m from the Home Point and the current altitude is lower than the preset RTH altitude, it ascends to the preset RTH altitude and then flies back to the Home Point.
Obstacle Avoidance During RTH
When aircraft is ascending:
- The aircraft brakes when an obstacle is sensed from in front and flies backward until a safe distance is reached before continuing to ascend.
- The aircraft brakes when an obstacle is sensed from behind and flies forward until a safe distance is reached before continuing to ascend.
- The aircraft brakes when an obstacle is sensed from above and flies forward until a safe distance is reached before continuing to ascend.
- No operation will occur when an obstacle is sensed below the aircraft.
When aircraft is flying forward:
- The aircraft brakes when an obstacle is sensed from in front and files backward to a safe distance. It ascends until no obstacle is sensed and continues to ascend another 5 m and then continues to fly forward.
- No operation will occur when an obstacle is sensed from behind.
- No operation will occur when an obstacle is sensed from above.
- The aircraft brakes when an obstacle is sensed from below and ascends until no obstacle is sensed before flying forward.
- During RTH, obstacles on either side of the aircraft cannot be detected or avoided.
- When ascending in RTH, the aircraft will stop ascending and exit from RTH if the throttle stick is pulled all the way down. The aircraft can be controlled after the throttle stick is released.
- When flying forward in RTH, the aircraft will brake and hover in place and exit from RTH if the pitch stick is pulled all the way down. The aircraft can be controlled after the pitch stick is released.
- If the aircraft reaches the max altitude while it is ascending during RTH, the aircrafts stops and returns to home at the current altitude. If the aircraft reaches the max altitude while it is ascending after detecting obstacles in front, the aircraft will hover in place.
- The aircraft may not be able to return to the Home Point normally if the GNSS signal is weak or unavailable. The aircraft may enter ATTI mode if the GNSS signal becomes weak or unavailable after entering Failsafe RTH. The aircraft will hover in place for a while before landing.
- It is important to set a suitable RTH altitude before each flight. Launch DJI Fly and set the RTH altitude. The default RTH altitude is 100 m.
- The aircraft cannot avoid obstacles during Failsafe RTH if the Forward, Backward, and Upward Vision Systems are unavailable.
- During RTH, the speed and altitude of the aircraft can be controlled using the remote controller or DJI Fly if the remote controller signal is normal. The orientation of the aircraft and the direction of flight, however, cannot be controlled. The aircraft cannot avoid obstacles if the pitch stick is used to accelerate and the flight speed exceeds 15 m/s.
- If the aircraft flies into a GEO zone during RTH it will hover in place.
- The aircraft may not be able to return to a Home Point when the wind speed is too high. Fly with caution.
Landing Protection
Landing Protection will activate during Smart RTH.
- During Landing Protection, the aircraft will automatically detect and carefully land on suitable ground.
- If the ground is determined unsuitable for landing, DJI Air 2S will hover and wait for pilot confirmation.
- If Landing Protection is not operational, DJI Fly will display a landing prompt when the aircraft descends below 0.5 m. Pull down on the throttle stick or use the auto landing slider to land.
Landing Protection activates during Low Battery RTH and Failsafe RTH. The aircraft performs as follows:
During Low Battery RTH and Failsafe RTH, the aircraft hovers at 0.5 m above the ground and waits for the pilot to confirm it is suitable to land. Pull down on the throttle for one second or use the auto landing slider in the app to land. Landing Protection activates and the aircraft performs the steps listed above.
Precision Landing
The aircraft automatically scans and attempts to match the terrain features below during RTH. When the current terrain matches the Home Point terrain, the aircraft will land. A prompt will appear in DJI Fly if the terrain match fails.
- Landing Protection is activated during Precision Landing.
- The Precision Landing performance is subject to the following conditions:
- The Home Point must be recorded upon takeoff and must not be changed during flight. Otherwise, the aircraft will have no record of the Home Point terrain features.
- During takeoff, the aircraft must ascend at least 7 m before flying horizontally.
- The Home Point terrain features must remain largely unchanged.
- The terrain features of the Home Point must be sufficiently distinctive. Terrain such as snow-covered areas are not suitable.
- The lighting conditions must not be too light or too dark.
- The following actions are available during Precision Landing:
- Press the throttle stick down to accelerate landing.
- Move the control sticks in any direction to stop Precision Landing. The aircraft will descend vertically after the control sticks are released.
Vision Systems and Infrared Sensing System
DJI Air 2S is equipped with both an Infrared Sensing System and Forward, Backward, Upward, and Downward Vision Systems.
The Forward, Backward, Upward, and Downward Vision Systems consist of two cameras each and the Infrared Sensing System consists of two 3D infrared modules.
The Downward Vision System and Infrared Sensing System helps the aircraft maintain its current position, hover in place more precisely, and to fly indoors or in other environments where GNSS is unavailable.
In addition, the Auxiliary Bottom Light located on the underside of the aircraft improves visibility for the Downward Vision System in weak light conditions.

Detection Range
Forward Vision System
Detection Range: 0.38-23.8 m; FOV: 72° (horizontal), 58° (vertical)
Backward Vision System
Detection Range: 0.37-23.4 m; FOV: 57° (horizontal), 44° (vertical)
Upward Vision System
Detection Range: 0.34-28.6 m; FOV: 63° (horizontal), 78° (vertical)
Downward Vision System
The Downward Vision System works best when the aircraft is at an altitude of 0.5 to 30 m, and its operating range is 0.5 to 60 m.

Calibrating Vision System Cameras
Auto Calibration
The Vision System cameras installed on the aircraft are factory calibrated. If any abnormality is detected with a vision system camera, the aircraft will automatically perform calibration and a prompt will appear in DJI Fly. No further operation is required.
Advanced Calibration
If the abnormality persists after auto calibration, a prompt appears in the app that advanced calibration is required. The advanced calibration must be used with DJI Assistant 2 (Consumer Drones Series). Follow the steps below to calibrate the Forward Vision System camera and repeat the steps to calibrate other Vision System cameras.
- Point the aircraft toward the screen.
![]()
- Align the boxes.
![]()
- Pan and tilt the aircraft.
![]()


Using the Vision Systems
When GNSS is unavailable, the Downward Vision System is enabled if the surface has a clear texture and sufficient light. The Downward Vision System works best when the aircraft is at an altitude of 0.5 to 30 m.

The Forward, Backward, and Upward Vision Systems will activate automatically when the aircraft is powered on if the aircraft is in Normal or Cine mode and Obstacle Avoidance is set to Bypass or Brake in DJI Fly. Using the Forward, Backward, and Upward Vision Systems, the aircraft can actively brake when detecting obstacles. The Forward, Backward, and Upward Vision Systems work best with adequate lighting and clearly marked or textured obstacles.
- Vision Systems have limited ability to sense and avoid obstacles, and the performance may be affected by the surrounding environment. Make sure to maintain visual line of sight with the aircraft and pay attention to prompts in DJI Fly.
- The max hover altitude of the aircraft is 60 m if there is no GNSS available. The Downward Vision Systems work best when the aircraft is at an altitude from 0.5 to 30 m. Extra caution is required if the altitude of the aircraft is above 30 m as the Vision Systems may be affected.
- The Auxiliary Bottom Light can be set in DJI Fly. If set to Auto, it is automatically enabled when the environment light is too weak.
![warning]() Note that the Vision System cameras performance may be affected when the Auxiliary Bottom Light is enabled. Fly with caution if the GNSS signal is weak.
Note that the Vision System cameras performance may be affected when the Auxiliary Bottom Light is enabled. Fly with caution if the GNSS signal is weak. - The Vision Systems may not function properly when the aircraft is flying over water or snow-covered areas.
- The Vision Systems cannot work properly over surfaces that do not have clear pattern variations. The Vision Systems cannot work properly in any of the following situations. Operate the aircraft cautiously.
- Flying over monochrome surfaces (e.g., pure black, pure white, pure green).
- Flying over highly reflective surfaces.
- Flying over water or transparent surfaces.
- Flying over moving surfaces or objects.
- Flying in an area where the lighting changes frequently or drastically.
- Flying over extremely dark (< 10 lux) or bright (> 40,000 lux) surfaces.
- Flying over surfaces that strongly reflect or absorb infrared waves (e.g., mirrors).
- Flying over surfaces without clear patterns or texture.
- Flying over surfaces with repeating identical patterns or textures (e.g., tiles with the same design).
- Flying over obstacles with small surface areas (e.g., tree branches).
- Keep the sensors clean at all times. DO NOT tamper with the sensors. DO NOT use the aircraft in dusty or humid environments.
- Calibrate the camera if the aircraft is involved in a collision or if prompted to do so in DJI Fly.
- DO NOT fly when it is raining, foggy, or if there is no clear sight.
- Check the following before each takeoff:
- Make sure there are no stickers or any other obstructions over the Infrared Sensing and Vision Systems.
- If there is any dirt, dust, or water on the Infrared Sensing and Vision Systems, clean it with a soft cloth. Do not use any cleanser that contains alcohol.
- Contact DJI Support if there is any damage to the glass of the Infrared Sensing and Vision Systems.
- DO NOT obstruct the Infrared Sensing System.
Intelligent Flight Mode
FocusTrack
FocusTrack includes Spotlight 2.0, ActiveTrack 4.0, and Point of Interest 3.0.
Spotlight 2.0: Control the aircraft manually while the camera remains locked on the subject with this convenient mode. Move the roll stick to circle the subject, move the pitch stick to alter the distance from the subject, move the throttle stick to change the altitude, and move the pan stick to adjust the frame.
ActiveTrack 4.0: ActiveTrack 4.0 has two modes. Move the roll stick to circle the subject, move the pitch stick to alter the distance from the subject, move the throttle stick to change the altitude, and move the pan stick to adjust the frame.
- Trace: The aircraft tracks the subject at a constant distance. In Normal and Cine mode, the maximum flight speed is 12 m/s. The aircraft can sense obstacles in this mode when there are pitch stick movements, but cannot sense obstacles when there are roll stick movements. In Sport mode, the maximum flight speed is 19 m/s and the aircraft cannot sense obstacles.
- Parallel: The aircraft tracks the subject at a constant angle and distance from the side. In Normal and Cine mode, the maximum flight speed is 12 m/s. In Sport mode, the maximum flight speed is 19 m/s. The aircraft cannot sense obstacles in Parallel.
Point of Interest 3.0 (POI 3.0): The aircraft tracks the subject in a circle based on the radius and flight speed that is set. The mode supports both static and moving subjects such as vehicles, boats, and people. Note that the altitude of the aircraft will not change if the altitude of a subject changes and subjects that move too fast may be lost.
Using FocusTrack
- Take off and hover at least 1 m above the ground.
![]()
- Drag a box around the subject in the camera view to enable FocusTrack.

- FocusTrack begins. The default mode is Spotlight. Tap the icon to switch between Spotlight
![]() , ActiveTrack
, ActiveTrack ![]() , and POI
, and POI ![]() . Once subjects can be recognized, ActiveTrack will begin when a wave gesture is detected. Users can wave with a single hand and their elbow above their shoulder.
. Once subjects can be recognized, ActiveTrack will begin when a wave gesture is detected. Users can wave with a single hand and their elbow above their shoulder. - Tap the shutter/record button to take photos or start recording. View the footage in Playback.


Exiting FocusTrack
Tap Stop in DJI Fly or press the Flight Pause button once on the remote controller to exit FocusTrack.
- DO NOT use FocusTrack in areas with people, animals, small or fine objects (e.g., tree branches or power lines), or transparent objects (e.g., water or glass).
- Pay attention to objects around the aircraft and use the remote controller to avoid collisions with the aircraft.
- Operate the aircraft manually. Press the Flight Pause button or tap stop in DJI Fly in an emergency.
- Be extra vigilant when using FocusTrack in any of the following situations:
- The tracked subject is not moving on a level plane.
- The tracked subject changes shape drastically while moving.
- The tracked subject is out of sight for an extended period.
- The tracked subject is moving on a snowy surface.
- The tracked subject has a similar color or pattern to its surrounding environment.
- The lighting is extremely low (<300 lux) or high (>10,000 lux).
- Make sure to follow local privacy laws and regulations when using FocusTrack.
- It is recommended to only track vehicles, boats, and people (but not children). Fly with caution when tracking other subjects.
- Do not track a remote control model car or boat.
- The tracking subject may inadvertently swap to another subject if they pass nearby to each other.
- When using a gesture to activate ActiveTrack, the aircraft only tracks the people who perform the first detected gesture. The distance between the people and aircraft should be 5 to 10 m and the tilt angle of the aircraft should not exceed 60°.
- FcousTrack is disabled when recording at a high resolution such as 2.7K 48/50/60 fps, 1080p 48/50/60/120 fps, 4K 48/50/60 fps, and 5.4K 24/25/30 fps.
MasterShots
MasterShots keeps the subject in the center of the frame while executing different maneuvers in sequence to generate a short cinematic video.
Using MasterShots
- Take off and hover at least 2 m above the ground.
![]()
- In DJI Fly, tap the shooting mode icon to select MasterShots and follow the prompts. Make sure that you understand how to use the shooting mode and that there are no obstacles in the surrounding area.
- Select your target subject in the camera view by tapping the circle on the subject or dragging a box around the subject. Tap Start to begin recording. The aircraft flies back to its original position once shooting is finished.

- Tap
![]() to access the video.
to access the video.


Exiting MasterShots
Press the Flight Pause button once or tap  in DJI Fly to exit MasterShots. The aircraft will hover in place.
- Use MasterShots at locations that are clear of buildings and other obstacles. Make sure that there are no humans, animals, or other obstacles on the flight path. The aircraft will brake and hover in place if there is an obstacle detected. Note that obstacles cannot be detected on either side of the aircraft.
- Pay attention to objects around the aircraft and use the remote controller to avoid collisions with the aircraft.
- DO NOT use MasterShots in any of the following situations:
- When the subject is blocked for an extended period or outside the line of sight.
- When the subject is similar in color or pattern with the surroundings.
- When the subject is in the air.
- When the subject moves fast.
- The lighting is extremely low (<300 lux) or high (>10,000 lux).
- DO NOT use MasterShots in places that are close to buildings or where the GNSS signal is weak. Otherwise, the flight path will be unstable.
- Make sure to follow local privacy laws and regulations when using MasterShots.
QuickShots
QuickShots shooting modes include Dronie, Rocket, Circle, Helix, Boomerang, and Asteroid. DJI Air 2S records according to the selected shooting mode and automatically generates a short video. The video can be viewed, edited, or shared to social media from playback.
 Dronie: The aircraft flies backward and ascends, with the camera locked on the subject.
 Rocket: The aircraft ascends with the camera pointing downward.
 Circle: The aircraft circles around the subject.
 Helix: The aircraft ascends and spirals around the subject.
 Boomerang: The aircraft flies around the subject in an oval path, ascending as it flies away from its starting point and descending as it flies back. The starting point of the aircraft forms one end of the long axis of the oval while the other end of the long axis is at the opposite side of the subject from the starting point. Make sure there is sufficient space when using Boomerang. Allow a radius of at least 30 m around the aircraft and allow at least 10 m above the aircraft.
![]() Asteroid: The aircraft flies backward and upward, takes several photos, and then flies back to the starting point. The video generated starts with a panorama of the highest position and then shows the descent. Make sure there is sufficient space when using Asteroid. Allow at least 40 m behind and 50 m above the aircraft.
Asteroid: The aircraft flies backward and upward, takes several photos, and then flies back to the starting point. The video generated starts with a panorama of the highest position and then shows the descent. Make sure there is sufficient space when using Asteroid. Allow at least 40 m behind and 50 m above the aircraft.
Using QuickShots
- Take off and hover at least 2 m above the ground.
![]()

Documents / Resources
References
Download manual
Here you can download full pdf version of manual, it may contain additional safety instructions, warranty information, FCC rules, etc.
Advertisement


Need help?
Do you have a question about the AIR 2 S and is the answer not in the manual?
Questions and answers