
Related Manuals for Minolta FLASH METER VI


Summary of Contents for Minolta FLASH METER VI
- Page 1 FLASH METER VI Instruction Manual Manuel d’instructions The essentials of imaging L’essentiel de l’image...
- Page 2 Safety Warnings and Cautions and ambient light in a single flash light measurement. ● The Flash Meter VI provides a memory function capable of storing up to To ensure proper use of the instrument, take special care to observe the 10 measured values;...
-
Page 3: Table Of Contents
* Measuring lighting ratio using the Flat Diffuser with the instructions, may cause harmful interference to radio * Using the Flash Meter VI as a simplified illuminance meter communications. However, there is no guarantee that interference will not * Using the Flash Meter VI as a simplified luminance meter occur in a particular installation. -
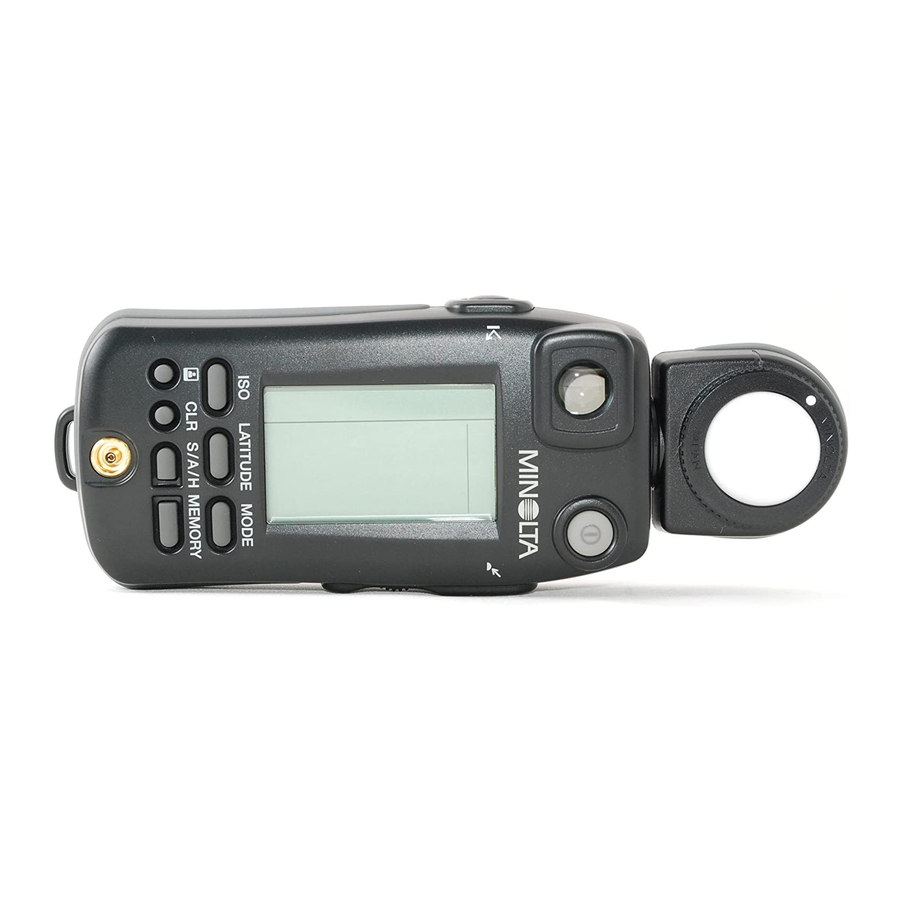
Page 4: Names Of Parts And Displays
Names of Parts and Displays Names of Parts and Displays Incident light receptor Dioptric POWER button Spot measurement adjustment viewfinder dial Incident light Spot measuring measuring button button Up/down dial Data panel ISO button LATITUDE button MODE button MEMORY button Battery chamber cover S/A/H button Strap eyelet... -
Page 5: Data Panel Displays
Names of Parts and Displays Names of Parts and Displays Data panel displays 1. Analog scale status indicator The left (L) and right (R) analog scales are used for incident light measurement and spot measurement, respectively. 1. Analog scale status 2. - Page 6 Names of Parts and Displays Names of Parts and Displays 7. Digital readout When the measurement data display unit is set to "FNo." or "FNo. direct reading," the f-number (FNo.) is displayed. When the display unit is set to "EV," the exposure value (EV) is displayed in 0.1-stop increments. For flash light measurement, only the FNo.
-
Page 7: Viewfinder Display
Names of Parts and Displays Preparations Viewfinder display Battery WARNING Do not throw batteries into fire. Do not recharge (non- rechargeable batteries), short circuit, heat or disassemble batteries. Otherwise, there is a risk of causing fire or injury due to 15.Measuring index an explosion or fluid leakage. -
Page 8: Checking
"b.c." will appear on the display disposal regulations. for approx. 0.5 sec. before the ● The Flash Meter VI can be normal display appears. operated continuously for about 30 hours with a fresh alkaline dry cell. -
Page 9: Setting Film Speed
Preparations Preparations Setting film speed Setting instant film speed for test shooting Specify a film speed with the Up/down dial while holding down the ISO button. ● Turning the control upward If the film speed setting used for the final shooting is different from the instant film speed setting used for test shooting, the instant film speed can increases the film speed in be registered in the meter in advance. -
Page 10: Selecting A Measuring Method Suitable For The Light-Receiving Method
Doing so may result in a fall or other measurement, appropriate to the shooting conditions and nature of the photograph. The Flash Meter VI can measure exposure in either way. For accident. incident light measurement, select either the Spherical Diffuser or optional Flat Diffuser. -
Page 11: Difference Between Incident-Light And Spot (Reflected-Light) Readings
Preparations Preparations Thus, incident-light readings are based on this standard value of 18% Difference between incident-light reflectance. This means that areas of subjects having a reflectance higher and Spot (reflected-light) readings than 18% will turn out brighter (e.g. white), while areas of reflectance lower than 18% will turn out darker (e.g. -
Page 12: Basic Operation
Preparations Basic Operation Here we explain the basics of using the MINOLTA FLASH METER VI Spot (reflected-light) readings to take exposure readings. Spot (reflected-light) exposure readings directly measure the amount of light (luminance) reflected from the subject to the camera. Unlike the case... -
Page 13: Measuring Ambient Light
Basic Operation Basic Operation Measuring ambient light 1. With a still camera Insert a battery (p. 9) ↓ Set film speed (p. 12) Prepare the meter to start Press the MODE button to Specify the desired shutter Press the measuring taking readings. - Page 14 Basic Operation Basic Operation Display example Display units are EV Display units are FNo. An exposure value is displayed regardless of the shutter speed If you set your desired shutter setting. The dot indicator of the speed, the f-number required for If the f-number reading is outside If the f-number reading exceeds or analog scale indicates the f-...
-
Page 15: With A Cine Camera
Basic Operation Basic Operation 2. With a cine camera If the opening of your camera’s Insert a battery (p. 9) shutter is not 180°, the film speed ↓ should be adjusted as follows: Set CINE mode (p. 72) The default setting of TIME/CINE Shutter opening and film speed adjustment mode is “TIME.”... -
Page 16: Measuring Flash Light
Basic Operation Basic Operation Measuring flash light 1. With a sync cord Insert a battery (p. 9) ↓ Set film speed (p. 12) Press the measuring Prepare the meter to start Press the MODE button to button to take readings. taking readings. - Page 17 Basic Operation Basic Operation Display example Attach the flash sync cord Specify the desired shutter Press the measuring to the meter’s sync speed with the up/down button to take a reading. ● When the flash fires, the meter terminal. dial. The f-number corresponding to the ●...
- Page 18 Basic Operation Basic Operation ★ When measuring flash light using a sync cord (CORD mode), the flash may fail to fire (e.g. if the trigger voltage of the flash is too low). In this case, take a reading without sync firing the flash (NON CORD mode). If the f-number reading is outside If the f-number reading exceeds or the meter’s display range, “FNo.”...
-
Page 19: Without A Sync Cord (Incident Light Measurement)
Basic Operation Basic Operation 2. Without a sync cord (Incident light measurement) Insert a battery (p. 9) ↓ Set film speed (p. 12) Prepare the meter to start Set the mode display to Specify the desired shutter Press the incident light taking readings. - Page 20 Basic Operation Basic Operation Display example Fire the flash to take a reading. ● The meter detects the light of the flash and reads and displays the exposure on the digital readout. The measured value is also displayed on the ●...
-
Page 21: Light Ratio Analyze Function
Using the up/down dial to change the shutter speed to 1/15, we can see Light Ratio Analyze function how this change will affect the mix of ambient and flash light. For flash light measurement, the Flash Meter VI uses a method of The aperture has changed to F4.0 and now, only measuring flash light/ambient light separately. -
Page 22: Special Functions
Special Functions Special Functions Here we explain how to use the special functions of the MINOLTA FLASH METER VI. Latitude display function Generally, with a color slide film, the film latitude range that ensures linearity of exposure and density is about 5 to 6 EV. The analog scale L of the Flash Meter VI can display the standard exposure and the latitude range based on the standard exposure. -
Page 23: Combining Incident Light Measurement And Spot Measurement
R with the latitude The Flash Meter VI offers a comparative display of the results of incident areas, and store the displayed on the analog light measurement and spot (reflected light) measurement. Used with the... -
Page 24: Memory Function
Special Functions Special Functions Memory function To store measurement data in memory of the Flash Meter VI, simply press the MEMORY button. Up to ten pieces of data (including incident light measurement data and spot measurement data) can be stored. -
Page 25: S/A/H (Shadow/Average/Highlight) Calculations
The Flash Meter VI provides three types of exposure calculations measured value on the digital (highlight-based exposure, shadow-based exposure, and average display appear on the analog exposure) suited to the nature of the photographic image. These are based scale L. - Page 26 Special Functions Special Functions ● Hold down the S/A/H button to display the average of the memory data Average exposure on the digital display and on the pointer of the analog scale (L). For spot measurement, the meter calculates the average of the maximum and minimum measurements stored in memory.
- Page 27 Special Functions Special Functions ● Hold down the S/A/H button to view the result of the shadow-based Shadow calculations (for spot readings only) exposure calculation on the digital display and on the dot indicator of the analog scale L. When you want to reproduce some detail in the darkest areas of a ●...
- Page 28 Special Functions Special Functions ● Hold down the S/A/H button to display the result of the highlight-based Highlight calculations (for spot readings only) exposure calculation on the digital display and on the dot indicator of the analog scale L. When you want to reproduce some detail in the brightest areas of a ●...
-
Page 29: Brightness Difference Function
Special Functions Special Functions Brightness difference function Measuring brightness difference relative to an exposure reading To fix the displayed measurement result or calculation result, press the In AMBI mode Take a reading and then ● Pressing the incident light LATITUDE button after taking an ordinary measurement or while holding press the LATITUDE measuring button or the spot down the S/A/H button. - Page 30 Special Functions Special Functions If the incident light measuring button is used to take the If the spot measuring button is used to take the measurement measurement described in Step 1 and to monitor the exposure described in Step 1 and to monitor the exposure difference: difference: Measured value for the point Measured value for the point...
- Page 31 Special Functions Special Functions Monitoring exposure difference after shadow-based exposure calculation Take a spot measurement Press the measuring Current measurement value button to take a reading of of the shadow area of the Fixed (In AMBI mode, measurements the area whose brightness subject.
-
Page 32: Measuring Lighting Ratio Using The Flat Diffuser
Special Functions Special Functions Measuring lighting ratio using the Attach a Flat Diffuser to the receptor of the instrument. Flat Diffuser See page 14 for details on how to attach a Flat The lighting ratio is the brightness ratio between the highlight and shadow Diffuser. - Page 33 Special Functions Special Functions Press the incident light Press the MEMORY button Press the incident light measuring button while to store the measurement measuring button while holding the meter near the value. holding the meter near the subject with the Flat subject with the Flat Diffuser facing the main Diffuser facing the fill light...
-
Page 34: Using The Flash Meter Vi As A Simplified Illuminance Meter
Brightness ratio between main (exposure differences) light source and fill light source The Flash Meter VI can also function as a simplified luminance meter. To (lighting ratio) determine approximate luminance, press the spot measuring button in + 1.0 (1 stop) AMBI mode to take a measurement of the desired area of the subject. - Page 35 Special Functions Special Functions ● EV-lx conversion table (with Flat Diffuser attached) ● EV-cd/m conversion table Decimal Decimal Integeral Integeral How to read the EV-lx conversion table How to read the EV-cd/m conversion table The EV-lx conversion table lists the integer component of EV values The EV-cd/m conversion table lists the integer component of EV values vertically and the decimal fraction components of EV values horizontally.
-
Page 36: Custom Settings Mode (Alt Mode)
1) Exposure correction value This sets the exposure correction value. The set value is displayed The operation settings of the Flash Meter VI, such as exposure correction when you turn the power on. value and shutter speed increment settings, can be customized to suit your You can adjust this setting to recalibrate the meter to your choice of preferences. - Page 37 Special Functions Special Functions 2) Shutter speed increments 3) Display unit Choose between increments of 1/2-stop, 1/3-stop and 1-stop, according Select the desired display unit. to the shutter speed settings your camera. Turn the power on while Turn on the power while Turn the up/down dial to Select the desired display pressing the ISO button, or...
- Page 38 Special Functions Special Functions 4) Latitude Specify an upper limit (H) and lower limit (S) for latitude display mode. Specify a shift value (H) for highlight-based exposure calculation and a shift value (S) for shadow-based exposure calculation. Turn on the power while Press the LATITUDE Press the LATITUDE Press the LATITUDE...
- Page 39 Special Functions Special Functions 5) TIME/CINE setting Reference: How to reset to initial settings Switches between shutter speed and framing-rate in AMBI mode Note You can reset various settings changed in custom setting mode to their that it is not possible to switch to another measuring mode (CORD or initial values (default factory settings).
-
Page 40: Accessories
Please contact a Minolta Service Facility. With this diffuser attached, the This is a 5-meter long cord that 2. Storage Flash Meter VI can be used to connects together the Flash Meter measure lighting contrast (ratio of VI, flash unit and camera’s sync... -
Page 41: Handling Instructions
1) Parts for repair of this product shall be available for at least seven years surroundings. So avoid this situation. from the time of purchase. 2) For further details regarding After Service, please contact a Minolta Service Facility. -
Page 42: Specifications
Specifications Specifications Type Hand-held exposure meter for measuring ambient Display range Exposure: F1.0 to 128+0.9 stop and flash light (0.1 stop increments) EV: -17 to 40.9 (0.1 stop increments) Reception method Incident-light and spot reflected-light readings Shutter speed (ambient): 30 min. to 1/16000 sec. Receptors Incident-light readings: Spherical Diffuser, Flat (1, 1/2, 1/3 stop increments) - Page 43 Minolta Co., Ltd. 3-13, 2-Chome, Azuchi-Machi, Chuo-ku, Osaka 541-8556, Japan ©2002 Minolta Co., Ltd. ACMAPA(1) Printed in Japan 9222-8057-11...
Need help?
Do you have a question about the FLASH METER VI and is the answer not in the manual?
Questions and answers