
Related Manuals for Frizzlife MR600


Summary of Contents for Frizzlife MR600
- Page 1 WATER AS IT SHOULD BE OWNER'S MANUAL Model: MR600 REVERSE OSMOSIS Water Filtration System Follow Frizzlife www.frizzlife.com...
-
Page 2: Table Of Contents
CONTENT 1. Before Installation 2. Packing List 3. Product Introduction 4. Sample Connection 5. Installation Tips 6. Installation Steps 7. First Time Usage 8. User Interface 9. Replacement of Filter Cartridge 10. Filter Replacement Instruction 11. Hook Up to Your Refrigerator/Ice Maker 12. -
Page 3: Before Installation
"Product Introduction" and make sure nothing is missing or damaged during shipping. If any parts are cracked or broken, please do not proceed with the installation and contact Frizzlife for an exchange or diagnosis. Technical Parameters Model... -
Page 4: Packing List
2. Packing List Preinstalled System Housing x1 set PPC Filter(ASR511) X1 RO Filter(ASR512-600G) X1 RO Faucet x1 set White 1/4” tubing X1 White 3/8” tubing X1 Preinstalled Red 1/4” tubing X1 Flow restrictor X1 Feed Water Valve X1 1/2”-3/8” Converter Set X1 Drain Saddle X1 Power Adapter X1 Blade X1... -
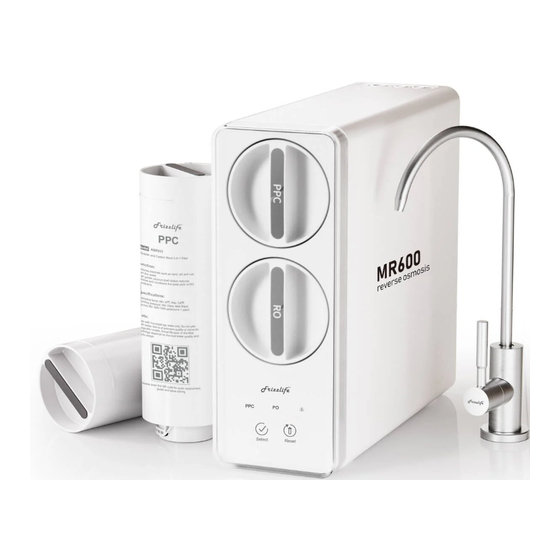
Page 5: Product Introduction
3. Product Introduction Connect to drinking faucet Connect to water supply MR600 Connect to drain pipe Filter life Reset button Power supply Select button 4. Sample Connection Filtered Line Supply Line Drain Line... -
Page 6: Installation Tips
5. Installation Tips How to cut the tubing? Please cut the tubing into two sections in proper length, make sure cut them squarely and cleanly. How to connect/disconnect the tubing? To connect: please push the tubing into the fitting and make sure it is fully inserted. -
Page 7: Installation Steps
6. Installation Steps Precautions: Do not use with water that is microbiologically unsafe or of unknown quality without adequate disinfection. Testing was performed under standard laboratory conditions. actual performance may vary. For cold water use only. This filter must be protected from freezing, which can cause cracking of the filter and water leakage. - Page 8 Connect the end of 3/8" tubing that has been softened into the 3-way feed water valve. Make sure push and squeeze the tubing to the very end. Use a wrench to tighten the nut, please do not over tighten. Note: If the cold water pipe is 1/2", please connect one part of converter to the angle valve and connect another part of converter to the pipe before proceeding to the...
- Page 9 Step 4: Connect the "SUPPLY" water tubing Remove all three plugs by pressing the fitting Remove sleeves. Press Connect the other end of 3/8" tubing into "Supply" port on the back of the system, make sure to insert the tubing about 0.8 inch to the end of the fitting. Inch Put the lock clip on the fitting to secure the connection.
- Page 10 Step 6: Install the drain saddle Disassemble the drain saddle, and peal off the black sticker and stick to saddle valve. Choose a spot on the drain plpe that is convenient for installing the drain saddle. It is recommended to install the drain saddle on the vertical drain pipe.
- Page 11 Step 8: Install the drinking faucet Note: If the thickness of your counter is over 1.9"(4.8cm), please contact support@frizzlife.com Frizzlife customer service at: Note: If your counter top or granite does not have an existing hole, please drill one(1/2")before proceeding.
-
Page 12: First Time Usage
Step 9: Connect the power cord Turn on the angle valve and 3-way feed water valve. Check for leaks. Insert the DC head of the power adapter into the "POWER" port on the back of the system. Note: It is important to turn on the water supply first then connect the power supply! Step 10: Flush the system Plug the power cord to outlet, turn on faucet to running water for 20 minutes... -
Page 13: User Interface
√ × 8. User Interface Power-on When the system is powered on, you will hear a beep. All indicators will be on for 3 seconds. Select Reset Water production When the system is producing water, the power indicator will constantly light in blue. Select Reset Standby Status... - Page 14 Note: The system defaults to have “Recycled Fresh Water Flushing” function. To exist: Select a beep, Recycle Fresh Water Long press the two button, you will hear Flushing” is OFF Select Long press the two button, you will hear two beep, Recycle Fresh Water Flushing”...
-
Page 15: Replacement Of Filter Cartridge
Reset Button A. Select filter: when the system is powered on, long press the " " for 3 seconds, the buzzer will beep and you can start to select the filter you want to change. Press " "button to change between the filters and the Select selected filter lifetime indicator will flash. -
Page 16: Filter Replacement Instruction
10. Filter Replacement Instruction Step 1: Cut off the power and turn on the water faucet to release water pressure Cut off the water supply and power before replacement. Turn on the water faucet to release water pressure. Remove the front cover of the filter. Unscrew the cartridge needs to be replaced counter clockwise. -
Page 17: Hook Up To Your Refrigerator/Ice Maker
PPC filter cartridges, please do not use the water in the first 10 minutes. 11. Hook Up to Your Refrigerator/Ice Maker The MR600 system can be connected with your refrigerator/lce-maker by utilizing an extra lMC-1 ice maker connection kit (not included). -
Page 18: Mini Tank Available Now
2.lf you are encountering the constant on and off issue of the system pump due to unstable/lackof water pressure. Simply search"Frizzlife MWT3" on Amazon, or frizzlife.com, or scan the QR code to purchase. Filtered Line The mini water tank is not included in the package.If you consider the initial lag of... -
Page 19: Maintenance
13. Maintenance Do not use with water that is microbiologically unsafe or of unknown quality without adequate disinfection. If you don't use the system for a long time: A. If the system has not been used for more than 2 days, please turn on the faucet and discharge the filtered water at least 5 minutes before usage. -
Page 20: Trouble Shooting
When the drain pipe is blocked, do not use the system (please turn off the power) to avoid the waste water from soaking the floor. Check the system and water pipe fittings regularly for water leakage to avoid any property damage. Regularly check whether the power supply and wires are damaged or loose to avoid major accidents caused by electric leakage. - Page 21 Pipes or filters are not Please reinstall the system according installed properly. to the instruction or contact customer service team. Please contact customer service team. The O rings are missed. Water leakage Other components are Please contact customer service team. damaged Unchanged filter Electronic controller or...
-
Page 22: Frequently Asked Questions
1 minute to get the water, since the whole system will not release any harmful substances to the water. The TDS removing rate for MR600 is about 94-95%, if your incoming TDS is high, the outlet TDs will be high too. -
Page 23: Limited Product Warranty
1. Frizzlife is not liable for anything that we deem as abuse of the units, including but not limited to, misuse of product outside of intended use, equipment modifications. - Page 24 There are no other warranties which extend beyond what is described above. To receive warranty service, please contact Frizzlife at support@frizzlife.com 150% Extended Warranty 1. Email us your order ID and full name at support@frizzlife.com 2. Scan the QR code below to register...
Need help?
Do you have a question about the MR600 and is the answer not in the manual?
Questions and answers