Advertisement
BOX CONTENTS
WHAT'S IN THE BOX

- Oakcastle CD10 Portable CD Player
- In-line control for headset
- 3.5mm to 3.5mm AUX cable
- USB to DC5V charging cable
- Earphones
- Instructions Guide
- 2 x AA Batteries
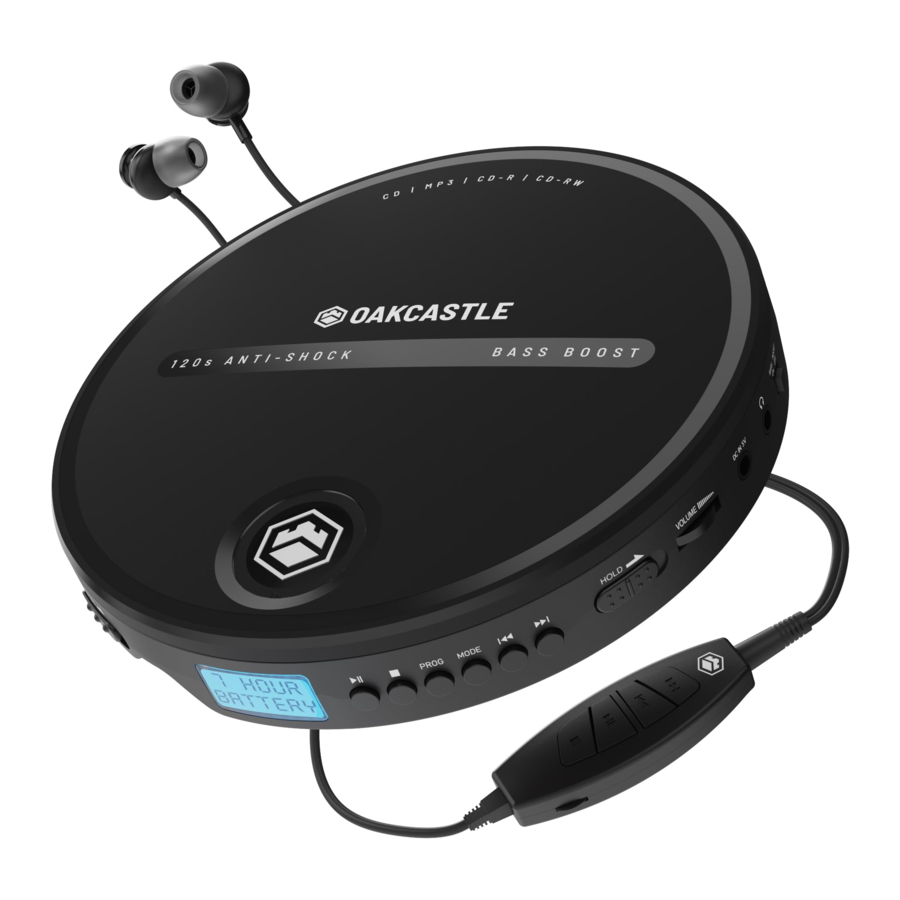
CONTROLS & FUNCTIONS

- Disc door
- Open
- Display screen
- Play/Pause/Power On
- Stop
- Program
- Mode
- Previous/Rewind
- Next/Fast forward

- Battery compartment
- Hold
- Volume
- DC 5V power port
- Headphone port
- BBS (Bass Boost System) switch
Headset Controls
- Stop
- Play/Pause
- Previous/Rewind
- Next/Fast forward
BASIC OPERATIONS
Power on/off
To power on, press the 'Play/Pause/Power On' button (Ref.4). Press the 'STOP' button twice (Ref.5) to turn off the player. If the player will not be used for an extended period of time, ensure that it is switched off.
Hold
While the player is in use, you can switch the Hold button to the 'Hold' position (Ref.11). This will place the unit in 'Hold' mode. In 'Hold' mode, the buttons will be inactive. If any button is pressed while the unit is in 'Hold' mode, the screen will display a lock icon in the top right hand side.
Battery Use
Slide open the battery cover (Ref.10) and insert 2 x AA batteries (included) into the battery compartment. Ensure that the polarities are correct and the negative (-) side is aligned with the smooth end of the battery, and the positive side (+) is aligned with the opposite end of the battery. 2 new AA batteries will provide for approximately 7 hours of battery life.
AC Adapter Use
To use the CD10 connected to a wired power source, connect the USB charging cable (included) from any standard USB 2.0 connection (such as a laptop or mains USB adapter) to the charging port on the device (Ref.13).
Inserting a Disc
Slide the 'OPEN' switch (Ref.2) to the 'OPEN' position to open the device door. Insert the disc into the CD player, label side up, pressing it gently until it snaps into place on the spindle.
Close the disc door gently. Ensure that the disc door is completely closed, otherwise the player will not read the disc.
Compatible disc format support: CD, CD-R, CD-RW, MP3, WMA
Using headphones or external speakers
Listen to your audio CD through headphones by inserting wired headphones (with a standard 3.5mm connector) into the headphone socket of the player (Ref.14). Ensure that the headphone connector is fully inserted into the device.
To listen to your audio CD through external speakers, connect a standard 3.5mm AUX cable from the CD player to your external speakers or output device. Control the playback using the controls on the CD player. You will now be able to hear audio through your external speakers or other output device.
My CD Player displays 'ESP' on the screen. What does this mean?
ESP stands for 'Electronic Shock Protection'. When you see this on the display, it indicates that the ESP is functioning to prevent shocks or bumps to the unit causing the track you are playing to skip.
PLAYING CDS
Basic Controls and Functions
Press Play/Pause (Ref.4)/(Ref.17) to play or pause the CD.
Press Previous (Ref.8)/(Ref.18) to restart the current track or press repeatedly to skip to previous tracks. Press Next (Ref.9)/(Ref.19) to skip to the next track. Press and hold Previous or Next (Ref.8)/(Ref.18)/(Ref.9)/(Ref.19) to rewind or fast forward through a track.
Press 'Stop' (Ref.5)/(Ref.16) to stop the CD. Press 'Stop' twice to power off the unit.
Repeat Modes
Press 'Mode' to switch the playback mode between '1' (repeat current track), 'ALL' (play entire CD repeatedly), 'RND' (play tracks in a random order), INTRO (play the first 10 seconds of each track) and repeat off (display will show blank at the top of the screen).
Program Tracks
Press the PROG button (Ref.6) to begin programming your disc to play in a selected order.
Auto-resume Function
If the player is turned OFF while playing a track or while paused, the next time it is switched on, it will resume playing from that track position.
BBS (Bass Boost System)
Switch the Bass Boost mode On/Off using the BBS switch (Ref.15).
PROGRAMMING YOUR DISC
Follow the steps below to program your CD to play tracks in a specific order other than the default order. To do this, it may help to refer to the album cover or track list. You can program up to a maximum of 20 tracks.
Ensure the CD is stopped. Press PROG to enter program mode (Ref.6).
Using the 'Previous' and 'Next' buttons (Ref.8)/(Ref.18)/(Ref.9)/(Ref.19), select the first song you would like the disc to play. The display will show P01, P02, etc. on the right hand side, to refer to each consecutive track slot - Programmed track 1, Programmed track 2, and so on.
Press PROG again (Ref.6) to confirm. Repeat the above steps until you have programmed each track slot.
Press Play (Ref.4)/(Ref.17) to begin playing the selected track order.
Note: when playback stops, the programmed playback will be erased. To cancel programmed playback, press the play button.
TROUBLESHOOTING
| Observation | Potential Cause/Solution |
| Cannot read discs | Make sure the label side of the disc is facing up. Ensure the disc is fully secured in place. Make sure the disc is not heavily scratched or damaged. Wipe the disc gently from the center out to the edge with a clean, dry, soft cloth. Try another new disc to check if the disc is faulty. Ensure the format of the disc is CD, CD-R, CD-MP3, or CD-RW. Wipe the laser gently with a degreasing cotton swab. Note: Please do not touch the laser with your hands. |
| No sound | Check volume is turned up. Check earphone jack is inserted fully into the headphone port. |
| No power | Ensure that the unit is turned on. Insert new batteries, or connect the unit to the mains or another power source. |
| Scratching sound from earphones or disc when playing | Wipe the disc gently from the center out to the edge with a clean, dry, soft cloth. Try another new disc to check if the disc is faulty. Ensure the format of the disc is CD, CD-R, CD-MP3, or CD-RW. If there is a scratching sound in your earphones when playing the disc, this may be caused by a scratched disc. Please change to another disc, and do not use the old one again in order to protect the unit from damage. |
SPECIFICATION
| Power source | DC 5V/2 x AA batteries (included) |
| Charging voltage | DC 5V/1A |
| Operating Voltage | 5V |
| Power consumption | approx. 0.6W |
| Battery | 2 x AA batteries (included) |
| D/C conversion | 16Bit |
| Sampling frequency | 44.1KHZ |
| Frequency response | 20-20KHZ |
| Power output of earphones | 16mW+16mW/16-32Ohm |
| Impedance of earphones | 32Ohm/16mW |
| Supported disc formats | CD, CDR, CD-RW, MP3, WMA |
| Shockproof time | CDs: up to 4o seconds, CD-R: 120 seconds |
| Size | 145 x 145 x 25 mm |
| Weight | 320g |
Register your product online for a FREE 3 year extended warranty at: www.oakcastle.co.uk
Documents / Resources
References
Download manual
Here you can download full pdf version of manual, it may contain additional safety instructions, warranty information, FCC rules, etc.
Advertisement


Need help?
Do you have a question about the CD-10 and is the answer not in the manual?
Questions and answers