Advertisement
Table of Contents
Contents
Krups FEM2, FEP2 Manual
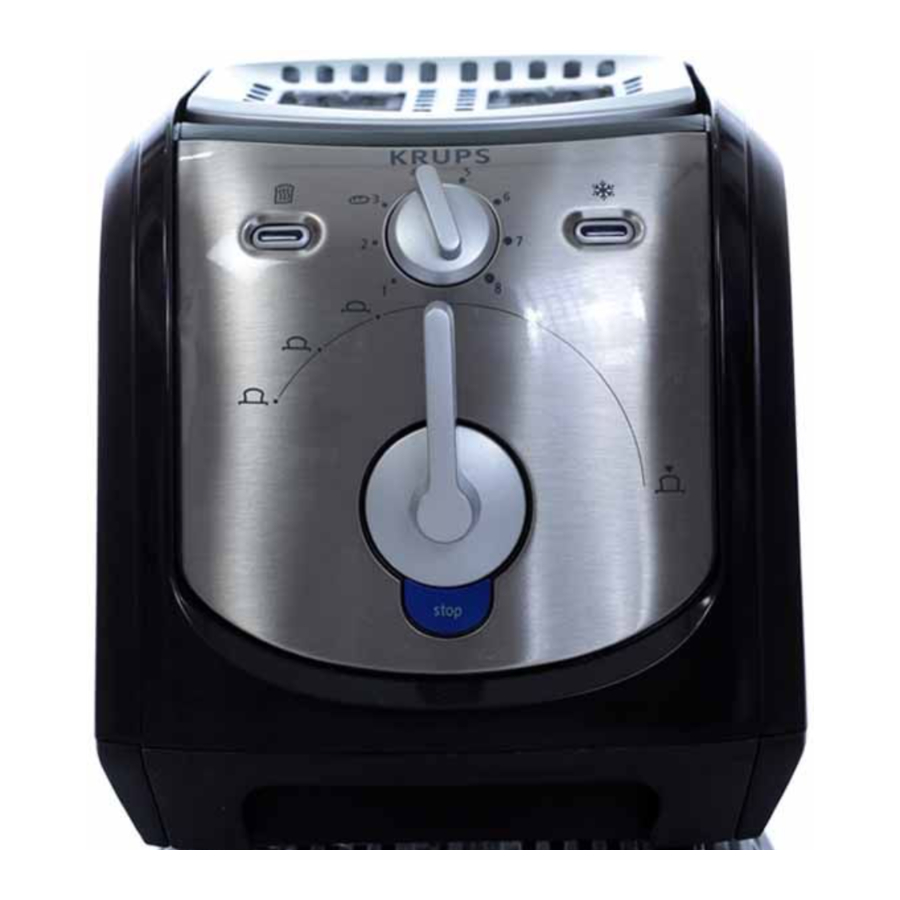
DESCRIPTION

* Depending on model
- Control lever with "HIGH-LIFT" position
- Browning control, 8 positions
- STOP button
- DEFROST button*
- BAGEL button*
- REHEAT button*
- Integrated warming plate (removable)
- Removable crumb tray
- Cord storage
BEFORE USING FOR THE FIRST TIME
- Unpack the toaster and remove any labels.
- Wipe the outside of the toaster with a damp cloth, dry it.
- Unwind the electrical cord entirely before using and plug it in
![]()
![information]() Never operate the appliance with the cord partially unwound.
Never operate the appliance with the cord partially unwound. - Operate the toaster empty twice at the highest toast setting to eliminate the "new smell". (Ventilate the room).
- Helpful hints
Differences in moisture levels from one bread to another can result in varying toasting times and browning levels. Below are some general recommendations:
Slightly dry bread should be toasted on a lower setting.
Very fresh bread or whole wheat bread should be toasted on a slightly darker setting.
Breads with uneven surfaces, such as English muffins, may require a darker setting.
When toasting items with fruit, such as raisin bread or tea-cakes, remove any loose fruit before toasting (raisins may fall into the appliance and create a fire hazard).
When toasting bagels, slice the bagel into two equal halves before toasting.
If you are toasting one slice of bread, set the browning control at a lower setting.
We do not recommend warming or toasting sugar coated or filled items such as toaster pastries - in such cases always set the browning control to the lowest setting.

 Never operate the appliance with the cord partially unwound.
TOASTING BREAD
- Insert the slice(s) of bread into the toasting slots
![]()
- Select browning level, choose one of the 8 positions depending on the type, freshness and the thickness of the bread
![]()
- 1. Very slightly browned
- 2.3. slightly browned
- 4.5. lightly browned
- 6.7. well toasted
- 8. very well toasted
- Lower the control lever until it locks into position
![]()
- The bread slices are automatically centered and the toasting begins.
![information]() The control lever can only be locked in the lower position when the toaster is plugged in.
The control lever can only be locked in the lower position when the toaster is plugged in.
![information]() Any bread protruding out of the slots will not be toasted.
Any bread protruding out of the slots will not be toasted.
![information]() Never leave the toaster unattended during use. We do not recommend toasting sugar coated bread, use caution when toasting sugar coated or filled items (such as toaster pastries) Always set browning control to lowest setting.
Never leave the toaster unattended during use. We do not recommend toasting sugar coated bread, use caution when toasting sugar coated or filled items (such as toaster pastries) Always set browning control to lowest setting.
![information]() Before toasting, be sure that the toaster is not under cabinets or other flammable materials such as curtains.
Before toasting, be sure that the toaster is not under cabinets or other flammable materials such as curtains.
![information]() Reduce the browning level if you are toasting only one slice.
Reduce the browning level if you are toasting only one slice.
![information]() For best results, always toast two slices of bread.
For best results, always toast two slices of bread. - The toaster automatically stops at the end of the toasting cycle, the control lever lifts up and the slices of bread pop up
![]()
- The toasting cycle may be interrupted at any time by pressing the «STOP» button.
![information]() Do not use the control lever to stop the toasting cycle.
Do not use the control lever to stop the toasting cycle.


HI-LIFT FUNCTION
- To remove small slices of bread after the toasting cycle, 3 pop-up options are available:
- Turn the control lever to the left to the first "picture"
![]() for average slices.
for average slices. - Turn the control lever to the left to the 2nd "picture"
![]() for thick slices.
for thick slices. - Turn the control lever to the left to the 3rd "picture"
![]() for very small slices
for very small slices
![]()
- Turn the control lever to the left to the first "picture"
 for average slices.
DEFROST FUNCTION*
- Adjust the browning control, Press the control lever down and press the «defrost» button
![]() . Defrosting the bread will take a little longer to toast as the toaster will automatically defrost the bread first before toasting.
. Defrosting the bread will take a little longer to toast as the toaster will automatically defrost the bread first before toasting.
![]()

BAGEL FUNCTION*
- Insert your bagel or French bread in the toaster with the inside soft part of each slice towards the inside element (cut part faces in).
- Select the browning level desired and press the control lever down. Press the «button»
![]()
- The browning time will be automatically adjusted to the selected browning level.*
- Once browned, the bagel will pop up automatically and the toaster will switch off.

REHEATING FUNCTION*
- Press the control lever down and press the «reheat» button
![]()
![]()
- The toaster will come on for just a short time to heat up bread that has already beentoasted.


WARMING CROISSANTS, bagels and bakery products
- Integrated warming plate used for warming croissants, rolls and other bakery products.
![information]() Do not warm sugar-coated or greasy breads on the warming plate to avoid them melting in the toaster: this may cause a fire hazard.
Do not warm sugar-coated or greasy breads on the warming plate to avoid them melting in the toaster: this may cause a fire hazard. - Do not use the toaster for toasting and warming up bread on the warming plate at the same time.
- Place the bakery product(s) directly on the integrated warming plate
![]()
- Depending on the bakery products:
![]()
- For fragile bakery products such as croissants, set the dial to position 1.
- For buns and other rolls with a thicker crust, turn the browning control dial to the "bun" setting.
- Lower the control lever until it locks into the right position - (fig 4). The toaster is now on and heat will rise to the warming plate.
- The toaster stops automatically, and the control lever springs to the middle. Depending on the thickness of the bread or bakery products, to reheat the other side, turn the bread over using oven mitts or bread tongs as the metal and bread will be hot**
![]()
- Begin a second warming cycle by turning the control lever to the right and leave them to warm through for 1 or 2 minutes.
![]()
The warming plate will be hot.


* Depending on model
** Bread tongs and gloves not provided with the toaster.
MAINTENANCE, CLEANING, STORAGE
- Always unplug the toaster and let it cool before cleaning or handling.
- For cleaning the outside of the toaster, the cord and the warming plate: wipe using a soft cloth or a damp sponge and a mild dish detergent. Dry thoroughly
![]()
- The warming plate is removable: Grip the metal warming plate by the middle, gently pull until it becomes detached and clean with water and a mild detergent then dry thoroughly

- For attaching the warming plate, insert the 4 tabs on the warming plate in the corresponding slots on the toaster and check that it is correctly in place before each use
![]()
![information]() Never use the toaster without the warming plate in place.
Never use the toaster without the warming plate in place. - To clean the crumb tray: pull out the tray completely and discard the crumbs
![]()
- Do not put the crumb tray in the dishwasher.
- Do this regularly, after each use if possible (toasting or re-heating).
- If crumbs or crusts remain inside the heating elements or in the toaster, remove the warming plate then turn the toaster upside down so that these remaining crumbs fall out. Replace the crumb tray and the metal warming plate carefully.
![information]() Do not use any abrasive cleaning agents (no soda-based scouring products, no scouring pads...), no metallic utensils, metal scouring pads etc.
Do not use any abrasive cleaning agents (no soda-based scouring products, no scouring pads...), no metallic utensils, metal scouring pads etc.
![information]() For toasters with a metallized finish*: Do not use any cleaning products designed for metals. Use a soft damp cloth only.
For toasters with a metallized finish*: Do not use any cleaning products designed for metals. Use a soft damp cloth only. - Always let your toaster cool down completely prior to storing especially in a tightly enclosed space, heat may damage any type of flammable material.
- Do not wind the cord around the body of the toaster, simply allow the cord to wind automatically around the inside of the toaster. - (fig 1).


SAFETY INSTRUCTIONS
- For your safety, this toaster complies with applicable technical rules and norms.
- Check that the main voltage corresponds to the voltage indicated on the toaster (alternating voltage only).
- Because of the diversity of applicable norms, if this toaster is used in a country other than the country it was bought in, have it checked by an authorised Service Dealer. (see list attached).
- Use a flat, stable, heat resistant work surface, away from any contact with water and never in a built-in kitchen alcove.
- Do not move the toaster whilst in operation.
- Do not disconnect the toaster by pulling on the cord.
- Do not dismantle the toaster yourself. Use the services of an approved service centre.
SHORT CORD
- A short power cord is provided, to reduce risks resulting from becoming entangled in or tripping over a longer cord.
- Extension cords and may be used if care is exercised in their use.
- If an extension cord is absolutely necessary:
- The marked electrical rating of the extension cord should be at least as great as the electrical rating of the appliance.
- The cord should be arranged so that it will not drape over the countertop or tabletop where it can be pulled on by children or tripped over unintentionally.
- Do not unplug the toaster by pulling on the cord. Instead grasp the plug and pull to disconnect.
- Never wrap the cord around the toaster. Use the cord storage on the underside of the toaster.
IMPORTANT SAFEGUARDS
When using electrical appliances, basic safety precautions should always be followed:
DO
- Read all instructions.
- The toaster must always be used in the upright position (not on its side or tilted forward or back).
- Before each use, make sure that the crumb tray is in its proper location.
- Regularly remove crumbs from the crumb tray.
- The control lever must be in the "Up" position before attaching or disconnecting the plug from the mains socket.
- Unplug from the mains when not in use and before cleaning. Allow to cool down before cleaning and before putting on or taking off parts. Do not attempt to modify the plug in any way.
- If bread jams in the slots after toasting the unit will automatically shut off. Disconnect the plug immediately from the mains socket and wait for the toaster to cool before attempting to remove the bread.
- Disconnect the toaster if it shows any working abnormalities.
DO NOT
- Do not leave the toaster within the reach of children.
- The toaster is not intended for use by young children or infirm persons without close supervision.
- Young children should be supervised to ensure they do not play with the appliance.
- Never leave the toaster unattended during operation, particularly when toasting for the first time or when changing settings.
- Do not use the toaster for anyting else other than its intended use.
- Do not touch the metal parts or hot surfaces of the appliance when it is working. Use handles or knobs.
- Oversized foods, metal foil packages, or utensils must not be inserted in a toaster as they may cause an electric shock or fire..
- The use of accessory attachments are not recommended by the appliance manufacturer as it may cause injuries.
- To protect against electrical shock do not immerse the cord, plugs, or toaster in water or other liquids.
- Do not try to toast sugar coated bread that may melt or drip in the toaster and do not toast crusts as this may damage the appliance or cause a fire.
- Do not try to toast very thick slices of bread that could block the toasting mechanism.
- Do not operate any appliance with:
- a damaged cord or plug;
- after the appliance malfunctions, or has been damaged in any manner. Return the appliance to an Authorised Krups Service Centre for examination, repair, or adjustment, in order to avoid any risk of danger.
- Do not let the cord hang over the edge of countertop or come in contact with hot surfaces.
- Do not use outdoors. Avoid humid environments.
- Do not place on or near a gas or electric burner or near a heated oven.
- Bread can burn, do not cover this appliance while in use and do not use this appliance near any flammable materials such as curtains, under shelving or wall cupboards, etc... it should be attended when in use.
- Do not put paper towels, cardboard or plastic in, on or under the toaster.
- If flames were to arise from parts of the toaster, never attempt to extinguish them with water. Unplug the appliance and smother the flames with a damp cloth.
- Do not attempt to dislodge food when the toaster is plugged in.
- Do not use this appliance as source of heating or drying.
- Do not cover the toaster during use.
- Do not use the toaster for cooking, grilling or defrosting frozen food other than bread products.
This product has been designed for domestic use only. Any professional use, inappropriate use or failure to comply with the instructions will void the warranty.
If you have any product problems or queries, please contact our Customer Relations Team first for expert help and advice:
HELPLINE:
0845 602 1454 - UK
(01) 4751947 - Ireland
or consult our website - www.krups.co.uk
Documents / Resources
References
Download manual
Here you can download full pdf version of manual, it may contain additional safety instructions, warranty information, FCC rules, etc.
Advertisement


Need help?
Do you have a question about the FEM2 and is the answer not in the manual?
Questions and answers