Table of Contents
Advertisement
Available languages
Available languages
Advertisement
Table of Contents

Related Manuals for ROBLIN PILOT MASTER PRO


Summary of Contents for ROBLIN PILOT MASTER PRO
- Page 1 PILOT OPTIMA PRO INSONORISE MASTER PRO NOTICE D’INSTALLATION ET D’UTILISATION INSTRUCTIONS FOR INSTALLATION AND DIRECTIONS FOR USE MONTAGE- UND GEBRAUCHSANWEISUNG LIBRETTO DI ISTRUZIONI INSTRUCCIONES DE INSTALACION E UTILIZACION MONTAGE- EN GEBRUIKSHANDLEIDING...
-
Page 2: Table Of Contents
SOMMAIRE CONTENTS RACCORDEMENT ÉLECTRIQUE ELECTRICAL WIRING CONSEILS D’INSTALLATIONS INSTALLATION ADVICE POSE DE L’APPAREIL FITTING THE APPLIANCE FONCTIONNEMENT OPERATION USEFUL HINTS CONSEILS D’UTILISATIONS ENTRETIEN MAINTENANCE GARANTIE ET SERVICE APRÈS-VENTE GUARANTEE AND AFTER-SALES-SERVICES REMARQUES REMARKS INHALT CONTENUTI COLLEGAMENTO ELETTRICO NETZANSCHLUSS MONTAGEHILFEN CONSIGLI DI INSTALLAZIONE MONTAGE DES GERÄTES POSA DELL’... -
Page 3: Raccordement Électrique
Nous vous remercions de la confiance que vous nous avez accordée en choisissant un appareil de la gamme ROBLIN. Celui-ci a fait l’objet de toute notre attention dans sa conception et sa réalisation. Afin qu’il vous donne entière satisfaction, nous vous recommandons de lire avec attention cette notice qui vous expliquera comment l’installer, l’utiliser et l’entretenir dans les meilleures conditions. -
Page 4: Fonctionnement
Les enfants doivent être surveillés pour s’assurer qu’ils ne jouent pas avec l’appareil. POSE DE L’APPAREIL. Montage et raccordement doivent être réalisés par un installateur* qualifié. (*) Le non-respect de cette condition entraîne la suppression de la garantie du constructeur et tout recours en cas d’accident. -
Page 5: Garantie Et Service Après-Vente
Il est indispensable de procéder à un NETTOYAGE PÉRIODIQUE de ces filtres à la main (avec un déter- gent liquide à l’eau tiède et rinçage) ou au lave- vaisselle (tous les deux mois environ pour une utilisation normale). • Carrosserie. Nettoyer régulièrement celle-ci en utilisant des produits détergents, non abrasifs et une éponge légèrement humide. - Page 6 Thank you for buying a ROBLIN product which has been manufactured to the highest quality standards to meet your requirements. We recommend you carefully read this booklet in which you will find instructions for installation, hints for use and maintenance.
- Page 7 green / yellow : earth blue : neutral brown : live As the colours of the wires in the mains lead of this appliance may not correspond with the coloured markings identifying the terminals in your plug, proceed as follows. The wire which is coloured green and yellow must be connected to the terminal in the plug which is marked with the letter E or by the earth symbol or coloured green or green and yellow.
- Page 8 USEFUL HINTS • To obtain the best performance we recommend you to switch ‘ON’ the cooker hood a few minutes (in the boost setting) before you start cooking and you should leave it running for approximately 15 minutes after finishing. •...
- Page 9 • In the event of damage to the mains supply cable, this can only be replaced by at approved repair centre appointed by the manufacturer who will have the required tools and equipment to carry out any repairs properly. Repairs carried out by other persons will invalidate the guarantee. •...
-
Page 10: Montagehilfen
Wir danken Ihnen für Ihre Kaufentscheidung und das Vertrauen, welches Sie mit dem Kauf dieses ROBLIN-Produktes bewiesen haben. D i e s e s G e r ä t w u r d e m i t e i n e m h o h e n M a ß a n K r e a t i v i t ä t e n t w i c k e l t u n d m i t größter Sorgfalt gefertigt. -
Page 11: Betrieb Des Gerätes
Achtung ! Bitte beachten Sie bei der Montage das Gewicht der kompletten Dunstesse. Die Tragfä- higkeit der Decke oder alternativ der Trägerplatte für diese Zugbelastung muss vor der Montage geprüft und gegebenenfalls durch die Anbringung von geeigneten Befestigungs-oder Stabilisie- rungselementen hergestellt werden. Kann eine hinreichende Tragfähigkeit nicht sichergestellt werden, ist von einer Montage abzusehen. -
Page 12: Garantie Und Kundendienst
• Herausnehmen des Metallfilters : Es ist unerläßlich, diese Filter REGELMÄßIG falls notwendig auch in kurzen Intervallen, mit der Hand (lauwarmes Wasser mit Waschmittel und Spülen) oder in der Geschirrspülmaschine zu REINIGEN. Diese Maßnahmen vermindern die Brandgefahr (starke Fettrückstände sind leicht brennbar). •... - Page 13 La ringraziamo per la fiducia accordataci nell’aver scelto un prodotto della gamma ROBLIN. Questo apparecchio è stato studiato e realizzato con la massima cura, secondo i più alti criteri di qualità. Le raccomandiamo di leggere attentamente questo opuscolo, nel quale troverà le istruzioni per installare, utilizzare e conservare al meglio il suo apparecchio ed ottenere dal suo acquisto il massimo dei benefici.
- Page 14 dovuta alla perforazione ed al fissaggio. Il gruppo di aspirazione si incastra nel fondo della cappa (spessore da 12 a 22 mm).(Fig 1) Inserire la spina e provvedere all’istallazione dei tubi di evacuazione. Inserire l’apparcchio nell’apertura ; i sistemi di fissaggio regolabili permettono, grazie alla loro elasticità, una posa molto rapida, senza previo smontaggio.
- Page 15 umida. Non utilizzare mai spugne o panni bagnati. Non introdurre alcun oggetto e tanto meno le mani nell’apertura d’evacuazione dell’aria. • Condotto d’evacuazione. Verificare ogni 6 mesi la buona evacuazione dell’aria viziata. Rispettare le norme nazionali vigenti relative all’evacuazione dell’aria viziata. •...
-
Page 16: Conexion Electrica
Le agradecemos la confiancia que nos participan ustedes elegiendo un aparato de la gama ROBLIN quien fue el objeto de toda nuestra atención en su concepción y realisación. Para que les de entera satisfacción, les aconsejamos ustedes leer con atención esta noticia que les explicara ustedes como instalarle, utilisarle y mantenerle en las mejores condiciones. -
Page 17: Instalacion Del Aparato
sensoriales o mentales estan reducidas, ni por personas que no tienen la experiencia o el conocimiento de este tipo de aparatos a menos de estar bajo el control y la formación de personas responsables de ella securidad. Las niños deben ser cuidados para asegurarse que no juegan con el aparato. INSTALACION DEL APARATO La instalación y conexión debe ser realizada por un instalador autorizado *. -
Page 18: Mantenimiento
• Los fritos necesitan una vigilancia permanente, el aceite recalentado podría producir llama. MANTENIMIENTO Desconectar el cable de alimentación de la campana para proceder a cualquier intervención técnica. La campana ha sido concebida de manera a facilitar al máximo las operaciones de mantenimiento , sinónimo de buen funcionamiento y rendimiento de la campana en el tiempo. - Page 19 NOTA Este aparato esta en conformidad con la norma europea en relación con baja tensión 2006/95/CE de la securidad electrica y a las normas europeas 2004/108/CE en relatión con la compatibilad electroma- gnetica y C.E.E 93/68 en relación con la marcación CE. Cuando vea este símbolo de una papelera con ruedas tachada junto a un producto, esto significa que el producto está...
-
Page 20: Electrische Bedrading
Wij danken U voor de goede keuze en het vertrouwen dat U ons, ROBLIN specialist op het gebied van afzuigkappen geeft, om in de toekomst met een afzuigkap uit het gamma ROBLIN te werken. Wij raden U aan om alvorens U de ROBLIN afzuigkap in werking zet deze handleiding aandachtig te lezen. -
Page 21: Gebruiksadvies
(*) Het niet respecteren van deze voorwaarde houd in dat de garantie en de verantwoordelijkheid van de fabrikant vervalt. Let op! Zorg dat u pluggen gebruikt die geschikt zijn voor het type wand. Vraag advies aan de fabrikant. Indien nodig vastmetselen. Wij zijn niet aansprakelijk in geval van defecte bevestiging veroorzaakt door de in de muur gemaakte boorgaten en de gebruikte pluggen. -
Page 22: After Sales Service
kan worden uitgevoerd, waardoor het langer mee gaat. • Verwijderen van de filters: De filters dienen regelmatig gereinigd te worden in overeenstemming met het gebruik. Ze kunnen handmatig worden schoongemaakt d.m.v. een warm sopje waarin de filters worden gespoeld, of in de afwasmachine. - Page 23 PILOT OPTIMA PILOT MASTER PRO PILOT OPTIMA SM PILOT PRO INSONORISE PILOT MASTER PRO SM Pilot Optima...
- Page 24 Pilot Pro Insonorisé Pilot Master Pro ACCESSOIRES ACCESSORI ACCESSORIES ACCESORI ZUBEHÖRE ACCESSOIRES Pilot Optima 13MC076 Halogène GU10 290 x 145 x 8mm 50W - 230 V Code 12EC006 5403003 Pilot Optima SM 13MC076 Halogène GU10 290 x 145 x 8mm...
- Page 25 Pilot Pro Insonorisé Halogène GU10 Pilot Master Pro 50W - 230 V Code 12EC006 13MC076 290 x 145 x 8mm 5403003 Halogène GU10 Pilot Master Pro SM 50W - 230 V Code 12EC006 13MC076 290 x 145 x 8mm...
- Page 28 PILOT OPTIMA PILOT OPTIMA SM...
- Page 29 185.5 PILOT PRO INSONORISE...
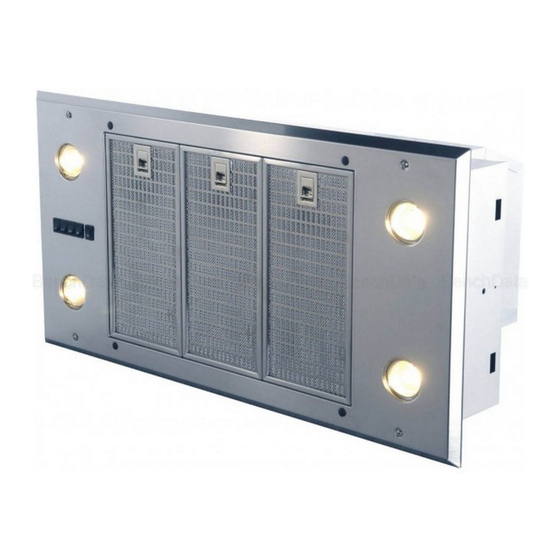
- Page 30 669.4 PILOT MASTER PRO 669.4 PILOT MASTER PRO SM...
- Page 31 LAMPES HALOGENES HALOGEN 2 x 50 W - 230 V HALOGEN BELEUCHTUNG PILOT OPTIMA 10 µF 5 µF 4 µF 250 V 250 V 250 V Blue Green-Yellow Green-Yellow 3 µF 400 V 140 W 220 - 240 V 50Hz 220 V 60Hz Green-Yellow AZUR - AZUR - AZUR BLAU...
- Page 32 LAMPES HALOGENES HALOGEN 2 x 50 W - 230 V PILOT OPTIMA SM HALOGEN BELEUCHTUNG 10 µF 250 V Black AZUR - AZUR - AZUR BLAU BLACK - NOIR- SCHWARZ BLUE - BLEU - BLAU BROWN - BRUN - BRAUN GREEN YELLOW - VERT JAUNE - GRÜN GELB GREY - GRIS - GRAU LIGHT BLUE - BLEU CLAIR - HELL BLAU...
- Page 33 Green-Yellow LAMPES HALOGENES HALOGEN 2 x 50 W - 230 V PILOT PRO INSONORISE HALOGEN BELEUCHTUNG 10 µF Black 250 V Grey Black White 350 W Azur 220 - 240 V 50Hz Brown 10 µF 220 V 60Hz Yellow 400 V Green-Yellow AZUR - AZUR - AZUR BLAU BLACK - NOIR- SCHWARZ...
- Page 34 Green-Yellow LAMPES HALOGENES HALOGEN 4 x 50 W - 230 V HALOGEN BELEUCHTUNG PILOT MASTER PRO Black 10 µF Grey 250 V White Black 350 W Azur 220 - 240 V 50Hz Brown 10 µF 220 V 60Hz Yellow 400 V...
- Page 35 LAMPES HALOGENES HALOGEN 4 x 50 W - 230 V PILOT MASTER PRO SM HALOGEN BELEUCHTUNG 10 µF 250 V Black AZUR - AZUR - AZUR BLAU BLACK - NOIR- SCHWARZ BLUE - BLEU - BLAU BROWN - BRUN - BRAUN GREEN YELLOW - VERT JAUNE - GRÜN GELB...
- Page 36 Composants Componenti Components Componentes Bauelemente Onderdelen Pilot Optima Pilot Optima SM...
- Page 37 Pilot Pro Insonorisé Pilot Master Pro...
- Page 38 Pilot Master Pro SM...
- Page 39 Plaque Signalétique de la hotte Rating plate of the cookerhood Typenschild im Inneren der Dunstesse Etichetta all'interno della cappa Etiqueta de la campana Typeplaatje van de afzuigkap Modèle Model Modell Modello Modelo Model Numéro de série Serial number Seriennummer Numero di serie Numero de serie Serienummer...
- Page 40 50800 VILLEDIEU-LES-POËLES - France Tél. 02 33 91 26 50 - Fax 02 33 51 54 79 - e-mail : com.france@roblin.fr For outside France : Tel. +33 (0)2 33 91 26 57 - Fax. : +33 (0)2 33 51 54 79 e-mail : com.export@roblin.fr...
Need help?
Do you have a question about the PILOT MASTER PRO and is the answer not in the manual?
Questions and answers