Table of Contents
Advertisement
Quick Links
OPERATOR'S MANUAL
MIG 2014 P INVERTER
Part No. 9115H
IMPORTANT
Read this Operator's Manual completely before attempting to use this equipment.
Save this manual and keep it handy for quick reference.
Pay particular attention to the safety instructions we have provided for your protection.
Contact your distributor if you do not fully understand this manual.
Advertisement
Table of Contents
Troubleshooting

Related Manuals for SWP Stealth Cobra MIG 2014 P


Summary of Contents for SWP Stealth Cobra MIG 2014 P
- Page 1 OPERATOR’S MANUAL MIG 2014 P INVERTER Part No. 9115H IMPORTANT Read this Operator’s Manual completely before attempting to use this equipment. Save this manual and keep it handy for quick reference. Pay particular attention to the safety instructions we have provided for your protection. Contact your distributor if you do not fully understand this manual.
-
Page 2: Table Of Contents
CONTENT CONTENT §1 Safety ..............................1 §2 Overview .............................. 9 §2.1 Features ..............................9 §2.2 Technical Data ............................10 §2.3 Brief Introduction ..........................10 §2.4 Duty cycle and Over-heat ........................11 §2.5 Working Principle ..........................12 §2.6 Volt-Ampere Characteristic ........................ 12 §3 Panel Functions &... - Page 3 CONTENT §4.5 Welding Parameters ..........................57 §4.6 Operation Environment ........................58 §4.7 Operation Notices ..........................58 §5 Welding Trouble Shooting ......................59 §5.1 Troubleshooting ............................ 59 §5.2 MIG Welding - Trouble Shooting ...................... 60 §5.3 MIG Wire Feed - Trouble Shooting ....................62 §5.4 DC TIG Welding - Trouble Shooting ....................
-
Page 4: Safety
SAFETY §1 Safety Notice: The instructions are for reference only. The manufacturer reserves the right to explain the differences between the description and the product due to product changes and upgrades! The device is manufactured using state-of-the-art technology and according to recognised safety standards. If used incorrectly or misused, however, it can cause: ... - Page 5 SAFETY Excessive ambient temperature will cause the machine heat dissipation is not smooth, so that the internal components of the machine heat seriously. Usually the maximum operating temperature is 104°F (40°C). Low temperature may lead to performance degradation or damage of components inside the product, resulting in ice inside the water tank.
- Page 6 SAFETY Many harmful phenomena, such as noise, bright light and harmful gas, will inevitably occur in the welding process. In order to avoid harmful By product phenomena causing harm to the human body, it is necessary to make corresponding preparations in advance. Arc rays from the welding process produce intense visible and invisible ultraviolet and infrared rays that can burn eyes and skin.
- Page 7 SAFETY Welding may produce fumes and gases hazardous to health. Avoid breathing these fumes and gases. Do not breathe the smoke and gas generated whilst welding or cutting, keep your head out of the fumes. Use enough ventilation and/or exhaust at the arc to keep fumes and gases away from the breathing zone.
- Page 8 SAFETY Flying sparks from the welding arc, hot work piece, and hot equipment can cause fires and burns. Accidental contact of electrode to metal objects can cause sparks, explosion, overheating or fire. Welding sparks and hot materials from welding can easily go through small cracks and openings to adjacent areas.
- Page 9 SAFETY cylinder outlet valve and gas regulator. Use only compressed gas cylinders containing the correct shielding gas for the process used and properly operating regulators designed for the gas and pressure used. All hoses, fittings, etc. should be suitable for the application and maintained in good condition.
-
Page 10: Safety Device
SAFETY maintenance. Don’t sling cables or leads around either the body or parts of the body. The electrode (rod electrode, tungsten electrode, welding wire, etc) must Never be immersed. Never be touched when current is flowing. When the machine is connected to the power supply, there is electricity inside the machine. - Page 11 SAFETY Shield off entire welding installation. Radiation Class A Device. Only can be used in the industrial area. If it is used in other area, it may cause connection and radiation problems of circuit. Radiation Class B device. ...
-
Page 12: Overview
OVERVIEW §2 Overview §2.1 Features New appearance and new panel design: More trendy and humanized. LCD screen for accurate setting & feedback of welding output. New PWM technology and IGBT inverter technology. Active PFC technology for increased duty cycle and energy efficiency. ... -
Page 13: Technical Data
OVERVIEW §2.2 Technical Data Models BT MIG 2014 P Parameters Input Voltage (V) 1-110±10% 1-230±10% Frequency (HZ) 50/60 Input Current (A) 35.7 35.3 34.5 37.6 39.4 26.8 22.2 21.5 28.6 30.7 Input Power (KW) 3.91 3.87 3.79 4.12 4.32 6.16 5.10 4.94 6.56... -
Page 14: Duty Cycle And Over-Heat
OVERVIEW TIG welds. TIG functionality includes adjustable Down Slope & Post Gas as well as being gas solenoid-valve equipped. The stick welding (MMA) capability delivers easy electrode welding with high quality results, including cast Iron, stainless and low hydrogen. An additional feature is the Spool gun ready function that allows the simple connection of Spool Gun for the use of thin or softer wires that don’t have the column strength to feed through MIG torches, such as aluminum wire. -
Page 15: Working Principle
OVERVIEW fanrunning. When operating the machine again, the welding output current or the duty cycle should be reduced. §2.5 Working Principle The working principle of BT MIG series welding machine is shown as the following figure. Single-phase 110V/230V work frequency AC is rectified into DC (320V), then is converted to medium frequency AC (about 20KHz) by 1st inverter device (IGBT), after reducing voltage by medium transformer (the main transformer) and rectifying by medium frequency rectifier (fast recovery diodes), and is outputted by two ways. - Page 16 OVERVIEW...
-
Page 17: Panel Functions & Descriptions
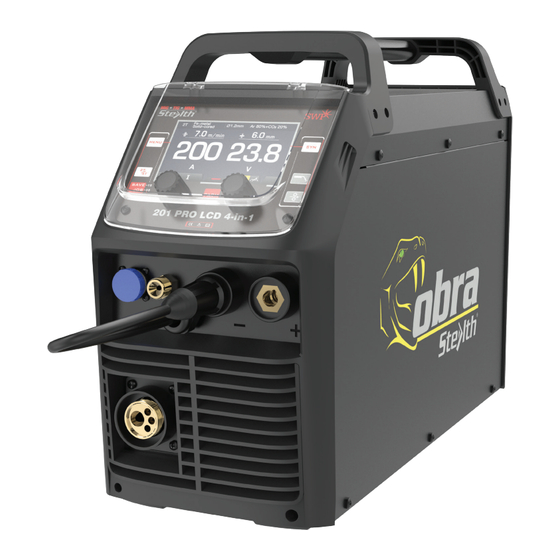
PANEL FUNCTIONS & DESCRIPTIONS §3 Panel Functions & Descriptions §3.1 Machine Layout Description Front and rear panel layout of welding machine 1. TIG torch gas connector. 2. 9 core air socket. 3. Polarity change power connection. 4. MIG torch euro connector. 5. -
Page 18: Layout For Control Panel
PANEL FUNCTIONS & DESCRIPTIONS §3.2 Layout for Control panel §3.2.1 Control panel 1. Welding mode button: Press it to select Stick DC/ Stick AC/ TIG HF/ TIG Lift/ MIG Manual/ MIG Synergic welding mode. 2. Trigger mode button: Press it to select 2T or 4T trigger mode. 3. -
Page 19: Mma Ac/Dc Display Introduction
PANEL FUNCTIONS & DESCRIPTIONS §3.2.2 MMA AC/DC display introduction 1. Welding mode button: Press it to select Stick DC or Stick AC welding mode. 2. L parameter knob: Turn it to welding current. 3. R parameter knob: Press it to select Hot Start or Arc Force and turn it to adjust values. -
Page 20: Tig Hf/Lift Display Introduction
PANEL FUNCTIONS & DESCRIPTIONS §3.2.3 TIG HF/Lift display introduction 1. Welding mode button: Press it to enter TIG HF or TIG Lift welding mode. 2. Trigger mode button: Press it to select 2T or 4T trigger mode. 3. Function button: Press it to enter the function interface. 4. -
Page 21: Function Interface
PANEL FUNCTIONS & DESCRIPTIONS tungsten size, to prevent the tungsten overheating. Increased forward cycle bias will give the opposite effect, less cleaning effect, greater weld penetration and less heat in the tungsten. AC Frequency Only be available in AC welding mode. Increasing AC frequency will focus the shape of the arc, resulting in a tighter, more controlled arc causing increased penetration and less heated affected area for the same current setting. - Page 22 PANEL FUNCTIONS & DESCRIPTIONS 9. Pulse Frequency: 0.5~999Hz. (Only available in Pulse mode.) * 10. Duty Cycle: 5~95%. (Only available in Pulse mode.) * 11. Down Slope: 0~10s. 12. Post Current: 10~200A. 13. Post Flow: 0~10s. *Denotes more detailed explanation of function to follow. Further Controls Explained 2T Mode (3) The trigger is pulled and held on to activate the welding circuit, when the trigger is...
- Page 23 PANEL FUNCTIONS & DESCRIPTIONS alternately; otherwise, output the setting value of welding current; (5) t3: Release the gun switch, the welding current will drop in accordance with the selected down-slope time. (6) t3~t4: The current drops to the minimum welding current from the setting current (I or I ), and then arc is turned off.
-
Page 24: Pulse Frequency
PANEL FUNCTIONS & DESCRIPTIONS (5) t2~t3: The output current rises to the setting value (I or I ), the upslope time can be adjusted; (6) t3~t4: Welding process. During this period, the gun switch is loosen; Note: Select the pulsed output, the base current and welding current will be outputted alternately;... -
Page 25: Mig Manual Display Introduction
PANEL FUNCTIONS & DESCRIPTIONS Function interface of Spot weld: 1. Post Flow: 0.1~2s. 2. Welding current: 10~200A. 3. T time: 0.2~1s. 4. T time: 0~10s. 5. Post Flow: 0.1~10s. §3.2.4 MIG Manual display introduction 1. Welding mode button: Press it to select MIG Manual welding mode. 2. - Page 26 PANEL FUNCTIONS & DESCRIPTIONS 3. Function button: Press it to enter the function interface. 4. L parameter knob: Turn it to adjust wire feeding speed. In function interface, turn it to select parameters, such as Pre Flow, Post Flow. 5. R parameter knob: Press it to select welding voltage or inductance. Turn it to adjust value.
-
Page 27: Mig Syn Display Introduction
PANEL FUNCTIONS & DESCRIPTIONS Slow feed This function is used to regulate the speed of wire feeding increasing. Range: 0-10s. §3.2.5 MIG SYN display introduction The operator simply sets the welding current like MIG welding and the machine calculates the optimal voltage and wire speed for the material type, wire type and size and shielding gas being used. - Page 28 PANEL FUNCTIONS & DESCRIPTIONS 6. R parameter knob: Press it to select welding voltage or inductance. Turn it to adjust value. In SYN item, turn to select and press to confirm. 7. Air check button. 8. Manual wire button. Function interface: 1.
-
Page 29: Job Display Introduction
PANEL FUNCTIONS & DESCRIPTIONS §3.2.6 JOB display introduction 1. JOB button: Press it for 3s to enter JOB programs and press it for 1s to save parameters. 2. Parameters display: Here are all the selected parameter that you settings. 3. JOB number display. 4. -
Page 30: Installation & Operation
INSTALLATION & OPERATION §4 Installation & Operation §4.1 Installation & Operation for MMA Electrode Welding §4.1.1 Set-Up Installation Two sockets are available on this welding machine, One Positive (+) and one Negative (-) polarity, to connect MMA/Electrode holder cable and earth clamp cable. Various electrodes require different polarity for optimum results and careful attention should be paid to the polarity, refer to the electrode manufacturers information for the correct polarity. -
Page 31: Mma/Stick Electrode Welding
INSTALLATION & OPERATION (5) Strike the electrode against the work piece to create and arc and hold the electrode steady to maintain the arc. §4.1.2 MMA/Stick Electrode Welding One of the most common types of arc welding is manual metal arc welding (MMA) or stick welding. -
Page 32: Mma Welding Fundamentals
INSTALLATION & OPERATION ● creating a protective slag coating over the weld ● establishing arc characteristics ● adding alloying elements Stick electrodes serve many purposes in addition to filler metal to the molten pool. These additional functions are provided mainly by the various coverings on the electrode. - Page 33 INSTALLATION & OPERATION current is accompanied by overheating of the electrode resulting undercut and burning through of the base metal and producing excessive spatter. Normal current for a particular job may be considered as the maximum, which can be used without burning through the work, over-heating the electrode or producing a rough spattered surface.
-
Page 34: Installation & Operation For Tig Welding
INSTALLATION & OPERATION mill scale, rust or any other material that will hinder the arc and contaminate the weld material. Joint preparation will depend on the method used include sawing, punching, shearing, machining, flame cutting and others. In all cases edges should be clean and free of any contaminates. - Page 35 INSTALLATION & OPERATION (10) Set torch operation for 2T, 4T or Spot trigger mode. (11) Select welding current as required. The selected welding current will show on display. Set down slope time as required. The down slope time will show on the digital display.
-
Page 36: Dctig Welding
INSTALLATION & OPERATION IMPORTANT! – It is recommended that you check for gas leaks prior to operation and that the operator close the cylinder valve when the machine is not in use. §4.2.2 DCTIG Welding The DC power source uses what is known as DC (direct current) in which the main electrical component, known as electrons, flow in only one direction from the negative terminal (-) to the positive terminal (+). -
Page 37: Tig Welding Fusion Technique
INSTALLATION & OPERATION (amps) are necessary to melt the material. LIFT ARC IGNITION for TIG Welding Lift Arc is a form of arc ignition where the machine has voltage on the electrode to only a few volts, with a current limit of one or two amps (well below the limit that causes metal to transfer and contamination of the weld or electrode). - Page 38 INSTALLATION & OPERATION TIG Welding with Filler Wire Technique It is necessary in many situations with TIG welding to add a filler wire into the weld pool to build up weld reinforcement and create a strong weld. Once the arc is started the torch tungsten is held in place until a weld pool is created, a circular movement of the tungsten will assist is creating a weld pool of the desired size.
-
Page 39: Tungsten Electrodes
INSTALLATION & OPERATION §4.2.4 Tungsten Electrodes Tungsten is a rare metallic element used for manufacturing TIG welding electrodes. The TIG process relies on tungsten’s hardness and high-temperature resistance to carry the welding current to the arc. Tungsten has the highest melting point of any metal, 3,410 degrees Celsius. - Page 40 INSTALLATION & OPERATION Ceriated (Orange) Ceriated tungsten electrodes (AWS classification EWCe-2) contain a minimum of 97.30 percent tungsten and 1.80 to 2.20 percent cerium and are referred to as 2% ceriated. Ceriated tungsten performs best in DC welding at low current settings. They have excellent arc starts at low amperages and become popular in such applications as orbital tube welding, thin sheet metal work.
-
Page 41: Tungsten Preparation
INSTALLATION & OPERATION Tungsten Electrodes Rating for Welding Currents Tungsten DC Current Amps AC Current Amps AC Current Amps Diameter Torch Negative Un-Balanced Wave Balanced Wave 2% Thoriated 0.8% Zirconiated 0.8% Zirconiated 1.0mm 15-80 15-80 20-60 1.6mm 70-150 70-150 60-120 2.4mm 150-250 140-235... - Page 42 INSTALLATION & OPERATION Electrode Shape & Angle The shape of the tungsten electrode tip is an important process variable in precision arc welding. A good selection of tip/flat size will balance the need for several advantages. The bigger the flat, the more likely arc wander will occur and the more difficult it will be to arc start.
-
Page 43: Installation & Operation For Mig Welding
INSTALLATION & OPERATION Have a more consistent arc Tungsten Diameter at Constant Included Current Range Current Range Diameter the Tip - mm Angle - Degrees Amps Pulsed Amps 1.0mm .250 05 - 30 05 - 60 1.6mm .500 08 - 50 05 - 100 1.6mm .800... - Page 44 INSTALLATION & OPERATION tighten locking nut securely. (3) A- Insert the polarity switching cable plug into the positive socket on the front of the machine and tighten it. (Gas shielded wire) B - Insert the polarity switching cable plug into the Negative (-) socket on the front of the machine and tighten it.
-
Page 45: Wire Feed Roller Selection
INSTALLATION & OPERATION (10) Carefully open the valve of the gas cylinder, set the required gas flow rate. (11) Remove the gas nozzle and contact tip from the torch neck. (12) Press and hold the manual wire button to feed the wire through to the torch neck, release the manual wire button when the wire exits the torch neck. - Page 46 INSTALLATION & OPERATION Solid Hard Wire - like Steel, Stainless Steel requires a drive roller with a “V” shape groove for optimum grip and drive capability. Solid wires can have more tension applied to the wire from the top pressure roller that holds the wire in the groove and the “V” shape groove is more suited for this.
-
Page 47: Wire Installation And Set-Up Guide
INSTALLATION & OPERATION §4.3.3 Wire Installation and Set-Up Guide Again the importance of smooth consistent wire feeding during MIG welding cannot be emphasized enough. The correct installation of the wire spool and the wire into the wire feed unit is critical to achieving an even and consistent wire feed. A high percentage of faults with MIG welders emanate from poor set up of the wire into the wire feeder. - Page 48 INSTALLATION & OPERATION (5) Feed the wire through the drive roller (6) Lock down the top pressure roller and and into the outlet guide tube of the wire apply a medium amount of pressure using feeder. the tension adjustment knob. (7) Check that the wire passes through the center of the outlet guide tube without touching the sides.
-
Page 49: Mig Torch Liner Types And Information
INSTALLATION & OPERATION (9) The weight and speed of the wire spool turning creates an inertia that can cause the spool to run on and the wire loop over the side of the spool and tangle. If this happens increase the pressure on the tension spring inside the spool holder assembly using the tension adjustment screw. - Page 50 INSTALLATION & OPERATION 1.2mm through 2.4mm have much higher columnar strength but it is important to make sure the liner has enough internal diameter clearance. Most manufacturers will produce liners sized to match wire diameters and length of welding torch cable and most are color coded to suit.
-
Page 51: Torch & Wire Feed Set-Up For Aluminum Wire
INSTALLATION & OPERATION improve the electrical conductivity of the welding power transfer to the wire. It is recommended for all Aluminum and Silicone Bronze welding applications. Copper Neck Liner §4.3.5 Torch & Wire Feed Set-Up for Aluminum Wire The same method is used for Teflon and/or Polyamide Liners (PA). §4.3.6 MIG Welding Definition of MIG Welding MIG (metal inert gas) welding also known as GMAW (gas metal arc welding) or MAG... - Page 52 INSTALLATION & OPERATION The wire touches the work The wire cannot support The current flow creates creating short circuit. all the current flow so a magnetic field that Because there is no space resistance builds up and begins pinch between the wire and the the wire begins to melt.
- Page 53 INSTALLATION & OPERATION Perpendicular Technique - The wire is fed directly into the weld, this technique is used primarly for automated situations or when conditions make it necessary. The weld profile is generally taller and a deeper penetration is achieved. Drag Technique - The gun and wire are dragged away from the weld bead.
- Page 54 INSTALLATION & OPERATION Angle 5°- 15° Not enough angle Angle more than 20° Good level of control over Less control over the weld Poor control, unstable arc, the weld pool, even flat pool more spatter. less penetration, lots of weld. spatter.
- Page 55 INSTALLATION & OPERATION Normal stick out Too short Too long Even arc, good Unstable arc, spatter, Unstable arc, spatter, penetration even over heat contact tip. poor penetration and fusion, good finish. fusion. Travel Speed - Travel speed is the rate that the gun is moved along the weld joint and is usually measured in inches per minute (IPM).
- Page 56 INSTALLATION & OPERATION Too Slow Travel Speed large wide bead porosity lack of fusion cold lap lack of joint penetration Correct Travel Speed - The correct travel speed keeps the arc at the leading edge of the weld pool allowing the base metal to melt sufficiently to create good penetration, fusion and wetting out of the weld pool producing a weld deposit of good quality.
- Page 57 INSTALLATION & OPERATION Argon/CO Penetration Pattern for Steel Argon gas at 100% mixture is good for aluminum and silicone bronze applications. It offers good penetration and weld control. CO is not recommended for these metal alloys. Wire types and sizes - Use the correct wire type for the base metal being welded. Use stainless steel wire for stainless steel, aluminum for aluminum and steel wires for steel.
-
Page 58: Installation & Operation For Spool Gun
INSTALLATION & OPERATION §4.4 Installation & Operation for Spool Gun (1) Insert the earth cable plug into the negative (-) socket on the front of the machine and twist to tighten. (2) Plug the Spool Gun into the euro-connect socket on the front panel and tighten. IMPORTANT: When connecting the torch be sure to tighten the adaptor nut completely tight. - Page 59 INSTALLATION & OPERATION (8) Remove the spool cover by pressing (9) Place a spool of wire inside the button and lifting off the cover. spool holder on post. (11) Pull the trigger to drive the wire down (10) Feed the wire through the drive the neck until it exits the contact tip.
-
Page 60: Welding Parameters
INSTALLATION & OPERATION §4.5 Welding Parameters Process reference for CO butt welding of low carbon steel solid welding wire Process reference for CO corner welding of low carbon steel solid welding wire... -
Page 61: Operation Environment
INSTALLATION & OPERATION §4.6 Operation Environment ▲ Height above sea level ≤1000 M. ▲ Operation temperature range 14 ~ 104°F (-10 ~ +40°C). ▲ Air relative humidity is below 90%. ▲ Preferable site the machine some angles above the floor level does not exceed 15°. ▲... -
Page 62: Welding Trouble Shooting
WELDING TROUBLR SHOOTING §5 Welding Trouble Shooting §5.1 Troubleshooting Before the welding machines are dispatched from the factory, they have already been tested and calibrated accurately. Do not change settings on the equipment! Maintenance course must be operated carefully. If any wire becomes flexible or is misplaced, it maybe potential danger to user! ... -
Page 63: Mig Welding - Trouble Shooting
WELDING TROUBLR SHOOTING The drive roll doesn’t fit with the Change the roll diameter of weld wire Wire reel damaged Change it Wire feed pipe is jammed Repair or change it Tip is jammed because of splash Repair or change it Output cable is connected incorrectly Screw it down or No striking arc and no output... - Page 64 WELDING TROUBLR SHOOTING Wrong gas Check that the correct gas is being used Check the gas is connected, check hoses, gas valve and torch are not Inadequate gas flow or too much restricted. Set the gas flow between gas flow 20-40 CFh (6-12 l/min) flow rate.
-
Page 65: Mig Wire Feed - Trouble Shooting
WELDING TROUBLR SHOOTING Material too thick. Joint preparation and design needs to allow access to bottom of groove while maintaining proper Poor in incorrect joint welding wire extension and arc Lack of preparation characteristics. Keep the arc at the leading edge of the weld pool and Penetration −... -
Page 66: Dc Tig Welding - Trouble Shooting
WELDING TROUBLR SHOOTING Try to clear the liner by blowing out with Liner worn or clogged (the most compressed air as a temporary cure, it is common causes of bad feeding) recommended to replace the liner Wrong size liner Install the correct size liner Blocked or worn inlet guide tube Clear or replace the inlet guide tube Wire misaligned in drive roller... - Page 67 WELDING TROUBLR SHOOTING weld is finished seconds after arc stoppage. 1 second for each 10amps of welding current. Keep tungsten from contacting weld Touching tungsten into the puddle. Raise the torch so that the weld pool tungsten is off the work piece 2 - 5mm Contaminated Keep the filler wire from touching the tungsten...
-
Page 68: Mma Welding - Trouble Shooting
WELDING TROUBLR SHOOTING grinding method and wheel. Remove contaminating materials like Contaminated base metal or paint, grease, oil, and dirt, including filler wire mill scale from base metal. Remove all grease and oil from filler metal Incorrect machine set up Check machine set up is correct Check the gas is connected and cylinder valve open, check hoses, gas... - Page 69 WELDING TROUBLR SHOOTING Use the correct welding technique or Poor welding technique seek assistance for the correct technique Increase the amperage or choose a Insufficient heat input larger electrode Use the correct welding technique or Poor welding technique seek assistance for the correct Lack of penetration technique Check the joint design and fit up,...
-
Page 70: Maintenance & Troubleshooting
MAINTENANCE & TROUBLESHOOTING §6 Maintenance & Troubleshooting §6.1 Maintenance The operator must understand the maintenance procedure of inverter welding machine and carry on simple examinations, cleanings and inspections. Do your best to protect the machine from contamination environment and leaving unit ON when not in use to lengthen service life of inverter arc welding machine. -
Page 71: List Of Error Codes
MAINTENANCE & TROUBLESHOOTING examination Especially for clearing up the dusts on aluminium heat-sinks, inductors, IGBT modules, fast recover diodes, PCB’s, etc. Check the screws and bolts in the machine. If any are loose, please tighten. Check all torches, earth clamp and hose connections to insure they are securely in place.
Need help?
Do you have a question about the Stealth Cobra MIG 2014 P and is the answer not in the manual?
Questions and answers