Table of Contents
Advertisement
Quick Links
Safety Instructions
Disclaimer
WARNING
NOTES
Attention
What's in the Box
What You Need
Product Overview
LED Indicators
Pre-Installation
System Overview
Installation Scenarios
Installation
Install the Anker SOLIX Home Power Panel.
Install the 12-Circuit Backup Load Center (Optional)
Electrical Connections
Wiring to Home Main Panel
Wiring to 12-Circuit Backup Load Center (Optional)
Checking Connection
Completing Installation
Reinstall the Panels
Connect to Anker SOLIX F3800 Portable Power Station
Turning On Anker SOLIX Home Power Panel
Starting to Use Your Anker SOLIX Home Power Panel
The Anker App for Smart Control
Specifications
Customer Service
Advertisement
Table of Contents

Related Manuals for Anker A17B1


Summary of Contents for Anker A17B1
- Page 1 Checking Connection Completing Installation Reinstall the Panels Connect to Anker SOLIX F3800 Portable Power Station Turning On Anker SOLIX Home Power Panel Starting to Use Your Anker SOLIX Home Power Panel The Anker App for Smart Control Specifications Customer Service...
-
Page 2: Safety Instructions
2. When using this product, please ensure you strictly follow the ambient temperature range specified in this user guide. 3. Use appropriate personal protective equipment (PPE) and follow safe electrical work practices. 4. Anker SOLIX Home Power Panel is designed for indoor use. Make sure the product is installed in a dry and ventilated location. - Page 3 4. If a solar power system is connected to your home's main panel, the 100A current transformer can be clamped on the wire connected to the solar panel. 5. When Anker SOLIX Home Power Panel is connected to two Anker SOLIX F3800 Portable Power Stations, connect an equal number of expansion batteries to each Anker SOLIX F3800 Portable Power Station.
-
Page 4: What's In The Box
What's in the Box Anker SOLIX Home Power Panel Backplate Bracket Wall Bracket (×2) (×2) Anker SOLIX Home Power Panel F3800 to Home Power Panel Cable (1.5m) 200A Current Transformer 100A Current Transformer (×1) (Model: XH-SCT-S24) (Model: CTSA016-100A/100mA) (Accuracy: 0.5%) (Accuracy: 0.5%) -
Page 5: What You Need
What You Need Warning: Use appropriate personal protective equipment (PPE) and follow safe electrical work practices. Note: The following components are not included in this package. Consult a professional electrician and assess your installation needs before purchasing the recommended accessories. 1in / 25.4 mm 1in / 25.4 mm 1.25in / 31.8 mm... -
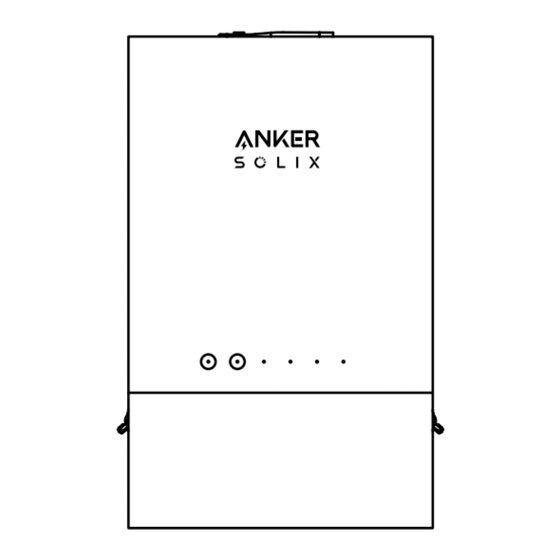
Page 6: Product Overview
Product Overview 12.2 in / 310 mm 19.6 in / 500 mm 1.33 in / 33.8 mm 1.33 in / 33.8 mm 1.73 in / 44 mm 5.6 in / 44 mm 1.73 in / 44 mm On/Off Button To Power On/Off: Press for 2 seconds. This button can be used to turn on the Bluetooth hotspot. - Page 7 Power Station Connected with Anker SOLIX Home Power Panel Flashing White Device Connection Malfunction Power Station Not Connected with Anker SOLIX Home Power Panel Backup Load Indicator Steady White Anker SOLIX Home Power Panel is Supplying Power to Home Loads...
-
Page 8: Pre-Installation
Load Center Installation Scenarios Warning: Anker SOLIX Home Power Panel is designed for indoor use. Make sure the product is installed in a dry and ventilated location. Installation personnel need to wear insulating gloves, safety glasses, and rubber-soled shoes. Turn o the main circuit breaker and solar breaker. - Page 9 3. If your Home Main Panel is outdoors. If the Home Main Panel is outdoors, we recommend the distance between the Home Main Panel and Anker SOLIX Home Power Panel is no more than 16 ft / 5 m. To facilitate the transfer of backup loads to 12-Circuit Backup Load Center, we suggest the 12-Circuit Backup Load Center be installed next to the Home Main Panel.
-
Page 10: Installation
Installation Install the Anker SOLIX Home Power Panel. 1. Reserve at least 5 in / 127 mm of space next to the Home Main Panel and mark the position of Anker SOLIX Home Power Panel on the wall. 5 in / 127 mm 2. - Page 11 4. Install the backplate brackets on the back of Anker SOLIX Home Power Panel. Tighten all the screws with 1.6N·m torque. M4*10 (×6) 5. Secure the backplate brackets on Anker SOLIX Home Power Panel with the wall brackets. 6. Lock the backplate brackets from the side. You need to install 4 screws with 1.6N·m torque.
-
Page 12: Electrical Connections
Install the 12-Circuit Backup Load Center (Optional) Open the 12-Circuit Backup Load Center, align the casing's screws with the holes, and secure them to the wall with 5N*m torque. Electrical Connections Warning: During the wiring process, make sure the circuit breaker for the entire system is o . To protect the wires and ensure electrical safety, users need to purchase and install waterproof conduits with appropriate wire lengths. - Page 13 1. Remove the cover. Remove the cover of the Home Main Panel. Remove the panel from the wiring area beneath Anker SOLIX Home Power Panel. 2. Install the 100A circuit breaker. Warning: Please make sure to use a bolt to secure the hole in the middle of the breaker.
- Page 14 Tilt the breaker back~45° and insert "FOOT" into the back pan. While pulling the breaker towards the back pan slot, rotate down to lock into place. 3. Install cables. Use a screwdriver to unscrew the grid wiring connectors with 5N·m torque. Connect 4 cables to the grid wiring connectors with 5N·m torque.
- Page 15 Run the 4 cables through the left hole of Anker SOLIX Home Power Panel and thread them into the bottom hole of the Home Main Panel. Loosen the wire screws and insert 2 live wires into the 100A circuit breaker.
- Page 16 Loosen the wire screws, insert 1 neutral wire and 1 ground wire into the unused openings on the neutral bar and ground bar respectively. Then tighten the screws. Ground Bar Neutral Bar 4. Connect current transformers. 200A 200A 100A PV Line 1 Line 2...
- Page 17 100A Insert the current transformers into the CT port of Anker SOLIX Home Power Panel. The cables of two 200A current transformers are connected to the connectors labeled L1 and L2, and the cable of the 100A current transformer is connected to the connector labeled Solar.
- Page 18 Wiring to 12-Circuit Backup Load Center (Optional) Neutral Bar Ground Bar 1. Remove the green screw. For circuit safety, remove the green screw to disconnect the neutral and ground bars.
- Page 19 2. Install the ground bar kit. First, find the pre-drilled screw holes inside the 12-Circuit Backup Load Center, align the screw holes on the ground bar kit with them, and finally use screws to install the ground bar kit inside the 12-circuit backup load center. 3.
- Page 20 Run the 4 cables through the right hole of Anker SOLIX Home Power Panel and thread them into bottom hole of the 12-Circuit Backup Load Center.
- Page 21 Connect two live wires to the backup load center's L1 and L2 connectors.
- Page 22 Loosen the wire screws and insert a neutral wire into the neutral bar and a ground wire into the ground bar. Neutral Bar Ground Bar 4.Install the branch breaker. Warning: Make sure to connect live and neutral conductors to the 12-Circuit Backup Load Center. Move the branch or circuit breakers that require emergency backup load from the main panel to the 12-Circuit Backup Load Center as needed.
-
Page 23: Completing Installation
Confirm that the CT direction is consistent with the current flow. Completing Installation Reinstall the Panels Reinstall the panels of Anker SOLIX Home Power Panel, the Home Main Panel, and the 12-Circuit Backup Load Center. Connect to Anker SOLIX F3800 Portable Power Station Warning: Before connecting Anker SOLIX F3800, make sure the circuit breaker for the entire system is o . - Page 24 Note: Anker SOLIX Home Power Panel can be connected with 1 or 2 power stations. 2. Turn on either Breaker 1 or Breaker 2 on the side of Home Power Panel, depending on the connection of Anker SOLIX F3800. For two Anker SOLIX F3800 units, activate the breakers on both sides.
- Page 25 Turning On Anker SOLIX Home Power Panel Warning: When using Anker SOLIX F3800 Portable Power Station for the first time, please ensure its power is below 95% to ensure that the system starts the self-test successfully. 1. Check that the connection of the entire system has been completed.
- Page 26 Starting to Use Your Anker SOLIX Home Power Panel To learn how to use the Anker SOLIX Home Power Panel and the app, please scan the QR code below to view the user guide. The Anker App for Smart Control You can remotely control your Anker SOLIX F3800 Portable Power Station and Anker SOLIX Home Power Panel using the Anker app.
-
Page 27: Specifications
12kW Max (Continuous), 50A Max (Continuous), 60Hz, L1+L2+N+PE Output Power Factor Rating One Anker SOLIX F3800, (30% Load) 1.9 W Load, PF > 0.96 Two Anker SOLIX F3800s, (60% Load) 3.8kW Load, PF > 0.98 Two Anker SOLIX F3800s, (100% Load) 6kW Load, PF > 0.985... -
Page 28: Customer Service
Customer Service US/CA: support@anker.com US/CA: +1 (800) 988 7973...
Need help?
Do you have a question about the A17B1 and is the answer not in the manual?
Questions and answers