
Related Manuals for Astor-Bannerman CTX2


Summary of Contents for Astor-Bannerman CTX2
- Page 1 Astor CTX2 Height Adjustable Changing and Showering Table Installation and User Guide 50.036.08.0002 (Rev1)
- Page 2 Contents Introduction ..............................3 Product labels.............................. 4 Warranty ..............................6 Caution, safety information & checks ....................7 Standard symbols ........................7 General safety ..........................9 EMC declaration ........................10 Regular checks ......................... 11 Finding your way round the product ..................... 12 Quick guide to operation ........................
- Page 3 Operating environment The CTX2 is designed for use in private homes. However, it could be used in any indoor O O p p e e r r a a t t i i n n g g E E n n v v i i r r o o n n m m e e n n t t facility at room temperature.
- Page 4 Product labels 2 Product labels The labels shown below are labels that will be placed on your CTX2. An explanation of all symbols found on our products can be found in Section 4. The reference number shown identifies the model of your product.
- Page 5 Product labels CTX2 variants Reference No Product 00.036.00.1521 CTX2 Changing Table, Height Adjustable, 1500mm, Front Guard CTX2 Changing Table, Height Adjustable, 1500mm, Front Guard, 00.036.00.1525 LH End Guard CTX2 Changing Table, Height Adjustable, 1500mm, Front Guard, 00.036.00.1526 RH End Guard CTX2 Changing Table, Height Adjustable, 1500mm, Front Guard, 00.036.00.1527...
- Page 6 Warranty 3 Warranty Once registered, this product has a 3 year warranty against all defects in manufacture of the product. This does not affect your statutory rights. To validate your warranty and for full terms and conditions, please register your product and your details immediately: online at: www.astorbannerman.co.uk/services email our support team: support@astorbannerman.co.uk...
- Page 7 Caution, safety information & checks 4.1 Standard symbols Below are some common symbols used throughout this document and on the product labelling. This product is CE-marked and is certified to BS EN 60601-1:2006+A12:2014 Medical electrical Equipment General Requirements for Basic Safety and Essential Performance, and to BS EN 60601-1-2:2015 for EMC. It also complies with Supply of Machinery (Safety) Regulations 2008, Electrical Equipment (Safety) Regulations 2016, BS EN 349:1993+A1:2008 Minimum gaps to avoid crushing parts of the human body, ISO 10535 Hoists for the transfer of disabled persons, ISO 17966 Assistive products for personal hygiene that support users and BS EN 62262.
- Page 8 Caution, safety information & checks 4.1 Standard symbols (cont.) Parts of this product can be recycled. Parts of this product must be separated when being disposed of. The battery used in this product contains Lead. Details of product manufacturer. Symbol indicated the date of manufacture. This product has been tested for water ingress in accordance with IPX4.
- Page 9 S S e e c c t t i i o o n n 4 4 . . 2 2 G G e e n n e e r r a a l l s s a a f f e e t t y y i i n n f f o o r r m m a a t t i i o o n n Caution, safety information &...
- Page 10 4.3 EMC declaration The CTX2 changing table has been tested for compliance to EN 60601-1-2:2015 and is intended for use in the electromagnet- ic environments specified below. The responsible organisation should assure that it is used in such an environment.
- Page 11 Caution, safety information & checks 4.4 Regular checks Please note that the cover must be removed to complete servicing tasks (this includes all annual tasks) which must only be done by a qualified person. DO NOT carry out these checks or service this changing table when a person is lying on the stretcher.
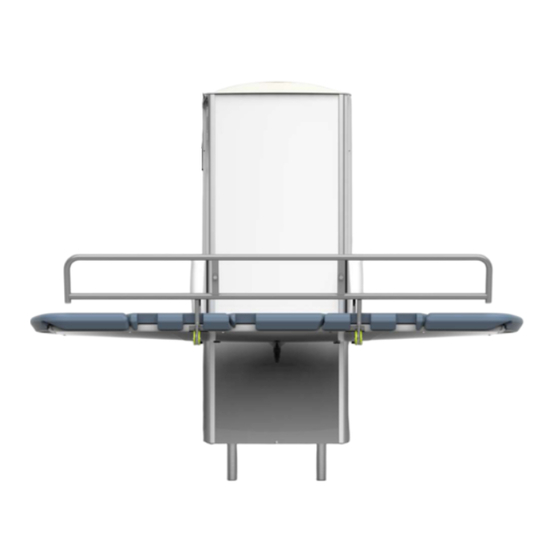
- Page 12 Finding your way around the product 5 Finding your way round the product Handset label Front cover label Light Front cover End guard LH (optional) Handset Front guard Gas spring cover Stretcher Drain End guard RH (optional) Pads Water collection tray Product label Standard Build Unit (SBU) - the unit mounted to the wall...
- Page 13 Quick guide to operation 6.1 Daily checks Carry out the following checks daily before using the changing table: • Check the weight of the user and ensure the equipment is rated for the weight to be lifted. • Check the mains electrical supply is connected and turned on. If mains supply is not turned on inform your facility manager.
- Page 14 Quick guide to operation 6.3 How to stow the stretcher • Stow the guards as shown in Section 6.5. • Place your hand on the underside of the stretcher. • Pull gently upwards and the stretcher will begin to rotate up. •...
- Page 15 Quick guide to operation 6.4 Adjusting the height of your changing table • The changing table is operated using the handset. (Fig 6.4a/b) • The handset buttons will raise or lower the changing table to the desired height. • The handset button with a light symbol will turn the integrated light on and off. •...
- Page 16 Quick guide to operation 6.5 Using the front guard The CTX2 changing table has a front guard and optional end guards. ACTION: Always deploy the front guard before moving the changing table with a person on the stretcher. To deploy guard into place: Fig 6.5a...
- Page 17 Quick guide to operation 6.6 Optional extra - using the end guards The CTX2 changing table has optional end guards. To deploy the end guard into place: • Pull the black index plunger to release the locking pin. • Rotate end guard to highest position.
- Page 18 Cleaning & care 7 Cleaning & care The Astor CTX2 should be regularly cleaned and must be cleaned between users to prevent the risk of cross contamination of infection. Cleaning: • Before cleaning, try a small test first in an inconspicuous area with the cleaning agent you are proposing to use.
- Page 19 Troubleshooting 8 Troubleshooting Problem: The stretcher won't move up or down Suggestion: Check that the mains power supply is switched on. Check that you are using the correct button for the direction of your choice. If the stretcher still won't move, please contact Astor Bannerman service team on +44 (0)1242 820820 or support@astorbannerman.co.uk Problem:...
- Page 20 Technical specification 9 Technical specification AC input 110VAC-240VAC, 50/60Hz, 382VA Power supply Class II power supply Applied part Applied part type 'B' Lead acid battery/ "non-spillable" Input 30V - Output 24V Battery specification Supplier reference - TiMotion (TBB2-4307-001) Battery model TiMotion TBB2 1.2A Fuses 5Amp fuses (External to the device, part of the mains supply system)
- Page 21 Overall dimensions 10 Overall dimensions Fig 10a Fig 10b 50.036.08.0002 (Rev1)
- Page 22 Pre-installation 11 Pre-installation Before your CTX2 can be installed, the wall and mains electrical supply must have been prepared as set out below. Pre-Installation works should be carried out by a competent and qualified professional in compliance with local and national building code standards.
- Page 23 Pre-installation Fig 11.1 Preparing the wall 50.036.08.0002 (Rev1)
- Page 24 Pre-installation Astor Invincible 11.2 Fitting the Emergency Stop & Switched, Waterproof, Flex outlet 11.2 Fitting the switched, waterproof, flex outlet The provided Emergency Stop must be fitted at the position shown in Figure 11.2. • A switched, waterproof flex outlet is required for hard wiring the product to. This outlet ·...
- Page 25 Pre-installation 11.3 Finished pre-installation & checks • The finished pre-installation should appear like Fig 11.3. • Drywall/plasterboard is fitted to appear flush with the marine plywood. This wall can then be blended/painted so to appear as a finished wall. Fig 11.3 Fixing points of SBU Checks: •...
- Page 26 Installation 12 Installation The CTX2 must be installed by a competent and qualified technician in compliance with local and national building code standards. Ensure that all pre-installation works have been carried out & checked in accordance to Section 11. Externally accessed security fixings require specific tools which are provided. Please keep them safe after completing installation for future servicing.
- Page 27 Installation 12.1 Connecting the battery The product has been provided without the battery connected. • Looking at the rear of the product, locate the female connector, as shown in Fig 12.1a. • Make the connection by rotating the female connector clip cover and fully insert the male connector.
- Page 28 Installation 12.2 Connecting the power outlet WARNING: Ensure the mains electrical supply is isolated from power while connecting the product to the mains electrical supply. A switched, waterproof flex outlet should have been previously fitted in accordance with Section 11. The outlet cannot be any larger than 7 1/2” (191 mm) tall or 5 5/8” (142 mm) wide and must be flush or sub-flush to the level of the wall.
- Page 29 Installation 12.3 Attaching the standard build unit to the wall • The wall must have been suitably prepared and reinforced as explained in Section 11 during the pre-installation phase. • Align the SBU to the wall about the centreline ensuring it is level. If the floor is uneven the feet can be manually adjusted.
- Page 30 Installation 12.3 Attaching the standard build unit to the wall • With the product in place, mark out the five fixing holes, set the SBU aside and then pilot drill your suitable fixings. • Using suitable fixings fit the top three first and then lower two. Ensure you have used the provided spacers on the bottom two fixings.
- Page 31 Installation 12.4 Fit the front cover The front cover can now be fitted. Care should be taken not to scratch the front cover. • Pull the light strip connectors through the top of the SBU before fitting the cover (loosely tape to secure). •...
- Page 32 Installation 12.5 Fit the light WARNING: Ensure the electrical mains supply is isolated from power while connecting the light. The light can now be fitted. • Remove the two screws from the top of the SBU as shown in Fig 12.5a. •...
- Page 33 Installation 12.6 Fit the stretcher CAUTION: Take care when fitting the stretcher to the product. This is a heavy item and we recommend two people install the stretcher. Remove the pads by lifting them vertically as shown in Fig 12.6a to aid with installation. Fig 12.6a •...
- Page 34 Installation 12.6 Fit the stretcher • With two people, lift the stretcher vertically and slot the SBU arms in the middle of each stretcher brackets, see Fig 12.6c. Fig 12.6c • Once in position secure the provided M10 x 16 mm bolts and M10 nuts provided. Finish by covering the nut with the caps provided as shown in Fig 12.6d.
- Page 35 12.7 Optional extra - fit the end guards End guards are an optional extra which must be specified during your purchase of the CTX2. They cannot be retrofitted. Please continue to the next section if you did not require end guards.
- Page 36 Installation 12.7 Optional extra - fit the end guards • Once the fixings are secure, the index plunger may be pulled to test the two positions available for the end guards. Ensure bolts are not overtightened which could restrict the movement of the guard.
- Page 37 Installation 12.8 Fit the gas spring covers The gas spring covers can now be fitted. • Locate the gas spring covers and rotate into position, as shown in Fig 12.8a. Fig 12.8a 50.036.08.0002 (Rev1)
- Page 38 Installation • Align the four screw holes. • Ensure the spacer for the middle horizontal screw is fitted between the internal bracket and cover as shown in Fig 12.8b. Please use the longer M5 x 12 mm screw for this fitting. •...
- Page 39 For further advice, please contact Astor Bannerman: email our support team: support@astorbannerman.co.uk or call us on: +44 (0)1242 820820 15 Replaceable parts The CTX2 is supplied for use with the following parts and accessories; • SBU (main unit) 10.036.01.0003 •...
- Page 40 Service record 16 Service record Service engineer's name Date of service Actions undertaken Signature 50.036.08.0002 (Rev1)
- Page 41 Training record 17 Training record Trainee's Date of Type of Trainee's Trainer's name training training signature signature 50.036.08.0002 (Rev1)
- Page 42 Notes 50.036.08.0002 (Rev1)
- Page 43 Notes 50.036.08.0002 (Rev1)
- Page 44 Notes 50.036.08.0002 (Rev1)
- Page 45 Specialist Bathing Patient Handling Changing & Showering Astor Bannerman The Elephant Works, Andoversford Link, Cheltenham GL54 4LB Phone: +44 (0) 1242 820820 Website: www.astorbannerman.co.uk Email: sales@astorbannerman.co.uk support@astorbannerman.co.uk 50.036.80.0002 (Rev1)
Need help?
Do you have a question about the CTX2 and is the answer not in the manual?
Questions and answers