
Related Manuals for 969.Coffee Artika Series


Summary of Contents for 969.Coffee Artika Series
- Page 1 Serie Artika Manuale d’uso e manutenzione Istruzioni originali Use and maintenance manual Translation of the original instructions...
- Page 2 If this is the first time you have purchased a 969.coffee®, machine, we thank you for trust, and if you are already a customer, we are very grateful for your loyalty.
- Page 3 ITALIANO...
- Page 4 Sommario 1. DICHIARAZIONE DI CONFORMITÀ..................6 2. INFORMAZIONI PRELIMINARI.................... 7 2.1. Destinatari del manuale........................7 2.2. Conservazione del manuale......................7 2.3. Spiegazione dei simboli utilizzati nella documentazione.............. 7 3. INTRODUZIONE........................8 3.1. Presentazione della macchina......................8 3.2. Normative di riferimento........................8 3.3.
- Page 5 PRIMA MESSA IN FUNZIONE.................... 34 10. FUNZIONAMENTO ED USO....................35 10.1. Operazioni preliminari giornaliere....................35 10.2. Preparazione del caffè........................36 10.3. Preparazione del cappuccino......................36 10.4. Preparazione di the, tisane etc....................... 37 10.5. Riscaldamento di una bevanda...................... 37 10.6. Utilizzo di tazze “mug”........................37 10.7.
- Page 6 DICHIARAZIONE DI CONFORMITÀ 969.coffee® Azienda: Hauptstrasse 38 – D-97249 Eisingen Indirizzo: Rothenbad 18 – CH-6015 Luzern Macchine del caffè serie Artika Prodotti: I prodotti descritti sopra sono in conformità con: Edizione / Documento N° Titolo Data di emissione 2006/42/CE Direttiva 2006/42/CE del Parlamento...
- Page 7 Si consiglia di eseguire una copia del manuale per l‟operatore e di conservare sempre l‟originale. La “969.coffee AG®” si riserva il diritto di apportare le modifiche che riterrà convenienti a scopo di miglioramento, senza impegnarsi ad aggiornare questa documentazione.
- Page 8 LED che ne facilitano l‟uso. Nella versione con display, sulla parte frontale della macchina, è presente un‟interfaccia che permette di controllarla. 3.2. Normative di riferimento La macchina è stata progettata e costruita da 969.coffee AG® in conformità ai requisiti di sicurezza previsti dalla direttiva 2006/42/CE del 17.05.2006. 3.4. Destinazione d’uso La macchina da caffè...
- Page 9 3.7. Caratteristiche tecniche DATO U.d.M. VALORE Codice macchina A8002 A8002DP Versione Senza Display Con Display N° Gruppi unità Gruppo automatico (E61) Gruppi alti Di serie Lancia aqua TEA centrale Di serie Kit scaldatazze Opzionale Kit gas Opzionale Dimensioni 750 x 580 x 550 Peso Corrente assorbita Monofase...
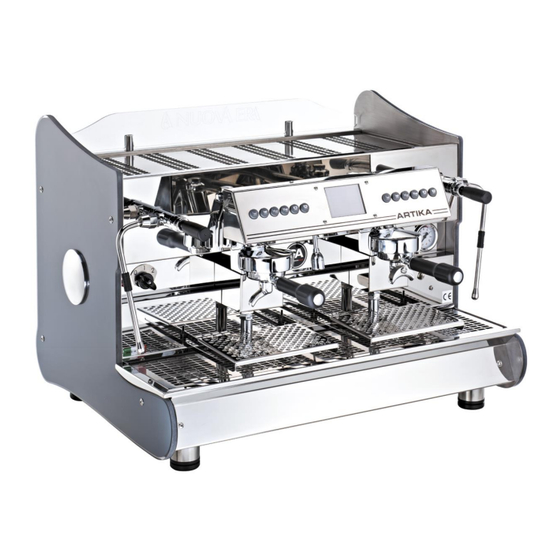
- Page 10 DESCRIZIONE E DENOMINAZIONE DELLE PARTI PRINCIPALI Piedino regolabile 12) Pulsanti funzionamento semiautomatico Portafiltro 13) Pulsante erogazione acqua TEA manuale Gruppi di erogazione 14) Leva lancia vapore sx Lancia acqua TEA 15) Lancia vapore sx Griglia poggia tazze 16) Commutatore Manometro caldaia 17) Indicatore di livello (solo per Artika) Manometro gruppo di erogazione 18) Interfaccia touch (solo per Artika con...
- Page 11 4.1. Pulsantiera gruppo erogatore 11a) Caffè espresso singolo 11d) Due caffè lunghi 11b) Caffè lungo singolo 11e) Erogazione continua 11c) Due caffè espresso 11f) Pulsante erogazione acqua TEA dosata Ad entrambi i gruppi di erogazione è associata una pulsantiera per il comando dell‟erogazione caffè.
- Page 12 4.3. Lancia acqua TEA Sulla macchina è installata una lancia per l‟acqua TEA, comandata dal pulsante erogazione acqua TEA manuale (13) e dai pulsanti erogazione acqua TEA dosata (11f), che può essere programmata per erogare una quantità predefinita d‟acqua o essere controllata manualmente. 4.4.
- Page 13 DESCRIZIONE INTERFACCIA TOUCH (solo per Artika con dispaly) La macchina Artika, nella versione con display, è dotata di un‟interfaccia touch-screen che permette di visualizzare e di modificare le impostazioni della macchina in generale, ed in particolare della caldaia e dell‟erogazione di caffè in tempo reale. Una volta che viene alimentata la macchina, l‟interfaccia si accende mostrando la schermata di avvio, nella quale vengono visualizzati l‟ora ed i due pulsanti descritti più...
- Page 14 5.1. Schermata di home Una volta avviata la macchina, sull‟interfaccia verrà visualizzata la schermata di home, dalla quale è possibile visualizzare il livello dell‟acqua nella caldaia principale, il tempo di erogazione di caffè per entrambi i gruppi e la temperatura della caldaia. Durata erogazione gruppo 1 Temperatura caldaia principale Livello acqua in caldaia principale...
- Page 15 5.3. Schermata funzioni ATTENZIONE! Le impostazioni (pulsante d3) sono accessibili solo a personale G.A. EREDI S.A.S o ad un tecnico specializzato. Questa è la schermata successiva a quella di erogazione nell‟ordine di navigazione delle schermate principali. Da qui è possibile accedere alle impostazioni della macchina Pulsante accesso schermata allarmi Pulsante accesso schermata Pulsante gestione scaldatazze...
- Page 16 5.3.2. Schermata abilitazione scaldatazze (se presente scaldatazze) È possibile accedere a questa schermata tramite il pulsante di gestione scaldatazze (d2) posto nella Schermata Funzioni; da qui può essere abitato o disabilitato lo scaldatazze della macchina. Checkbox abilitazione scaldatazze 5.3.3. Schermata tempo scaldatazze Seconda schermata del menù...
- Page 17 5.3.4. Schermata accensione programmata A questa schermata vi si accede premendo il pulsante di accesso alla schermata di accensione programmata (d5) e permette di impostare ed abilitare o disabilitare gli orari di accensione e spe-gnimento, oltre al giorno di riposo nel quale la macchina non si avvierà. Non è infatti necessario porre ogni giorno il commutatore in posizione 0, ma è...
- Page 18 5.3.5. Schermata contatori Si accede a questa pagina tramite il pulsante di accesso alla schermata contatori (d6) dalla Scher-mata Funzioni; da qui è possibile visualizzare il volume di acqua erogata dai gruppi. È possibile distinguere di quale funzione il valore indichi le erogazioni, grazie al simbolo accanto al valore stesso.
- Page 19 5.3.7. Schermata abilitazione programmazione dosi Questa è la prima schermata del menù delle impostazioni accessibili al tecnico o a personale GA Eredi S.a.s. tramite il pulsate (d3). Da questa schermata è possibile abilitare o disabilitare la programmazione delle dosi grazie alla checkbox presente. 5.3.8.
- Page 20 5.3.10. Schermata cicli manutenzione Schermata successiva a quella di abilitazione preinfusione, consente di impostare, tramite i due pulsanti di selezione, il volume di acqua erogata dopo il quale viene segnalata la necessità di chiamare il tecnico per la manutenzione. 5.3.11. Schermata modifica nome macchina Schermata successiva a quella di impostazione dei cicli di manutenzione, consente di modificare il nome con cui si identifica la macchina, tramite il pulsante di passaggio a carattere successivo (j1).
- Page 21 5.3.13. Schermata modifica numero di telefono assistenza Schermata successiva a quella di scelta unità di misura temperatura, permette di modificare il numero di telefono dell‟assistenza tramite i pulsanti di selezione (k1) ed il pulsante di passaggio a carattere successivo (l1). 5.3.14.
- Page 22 5.3.16. Schermata scelta modalità di funzionamento LED Schermata successiva a quella di abilitazione dell‟acqua miscelata, permette di scegliere la mo- dalità di funzionamento dei LED della pulsantiera; se accesi, spenti o a rotazione. 5.3.17. Schermata scelta della modalità di mantenimento della temperatura in caldaia Schermata successiva a quella di scelta della modalità...
- Page 23 5.3.18. Schermata impostazione time-out di riempimento caldaia Schermata successiva a quella di scelta della modalità di mantenimento della temperatura in caldaia, permette di impostare il time-out allarmi. 5.3.19. Schermate impostazione banda caldaia Schermate successive a quelle di impostazione dei valori di KP, KI e KD, permettono di impostare la banda del mantenimento di temperatura della caldaia, ovvero il delta di diminuzione della tem-peratura dopo il quale vengono riattivate le resistenze.
- Page 24 5.3.21. Schermata abilitazione buzzer allarmi Schermata successiva a quella di impostazione valore alarme filtro, consente di abilitare o disa- bilitare il segnale acustico che viene visualizzato della schermata principale. 5.3.22. Schermata abilitazione riempimento in erogazione Schermata successiva a quella di abilitazione del buzzer allarmi, permette di abilitare o disabilitare il riempimento della caldaia anche in fase di erogazione.
- Page 25 5.4. Menù impostazioni utilizzatore Questo menù è accessibile tramite il percorso: schermata di macchina in stand-by > preferenze > menù impostazioni utilizzatore. In questo menù sono contenute le impostazioni che possono essere modificate se in possesso del livello di password più basso. 5.4.1.
- Page 26 5.4.3. Schermata impostazione ora Terza schermata del menù delle impostazioni per l‟utilizzatore, consente di modificare la ora. 5.4.4. Schermata impostazione giorno Quarta schermata del menù delle impostazioni per l‟utilizzatore, consente di modificare il giorno della settimana. 5.4.5. Schermata cambio password Ultima schermata del menù...
- Page 27 PRESCRIZIONI DI SICUREZZA Questo manuale costituisce parte integrante ed essenziale del prodotto e dovrà essere conservato con cura. Leggere attentamente le avvertenze qui contenute prima di qualsiasi altra operazione, in quanto riguardanti la sicurezza, l‟uso e la manutenzione. Questo apparecchio può essere utilizzato da un solo operatore alla volta, la non osservazione di questa indicazione potrà...
- Page 28 AVVERTENZA! Pericolo di elettrocuzione. Per la sicurezza elettrica, è obbligatoria la presenza dell‟impianto di messa a terra realizzato in ottemperanza delle relative normative. Rivolgendosi ad un professionista munito di patentino, per la verifica dell‟adeguata portata dell‟impianto in relazione alla massima potenza assorbita dalla macchina.
- Page 29 AVVERTENZA! Pericolo di ustione. Durante l‟utilizzo della lancia a vapore (15) prestare particolare attenzione a non mettere le mani sotto ad essa o a toccarla subito dopo il suo utilizzo. Rivolgersi ad un operatore qualificato per eseguire le operazioni di installazione, manutenzione, scarico e regolazione;...
- Page 30 TRASPORTO E MOVIMENTAZIONE 7.1. Trasporto La macchina può essere trasportata per via stradale, ferroviaria, marittima ed aerea, se opportunamente imballata. Le operazioni di disimballo, sollevamento e movimentazione devono essere eseguite da personale autorizzato all‟uso delle attrezzature idonee. 7.2. Movimentazione AVVERTENZA! Le operazioni di movimentazione devono essere svolte da personale formato sui rischi e relative contromisure.
- Page 31 INSTALLAZIONE E OPERAZIONI PRELIMINARI Al ricevimento del prodotto, assicurarsi che imballo e macchina siano integri ed asciutti, verificare inoltre la presenza degli accessori. Previo posizionamento della macchina, accertarsi che la superficie sulla quale andrà posizionata sia orizzontale, piana e sufficientemente robusta da sostenerne il peso, che ci sia uno spazio di almeno 10 cm tra la macchina e le pareti posteriore e laterali.
- Page 32 AVVERTENZA! Pericolo di elettrocuzione, il collegamento elettrico deve essere effettuato da personale professionalmente abilitato. Prima di effettuare il collegamento elettrico è indispensabile accertarsi che l‟interruttore automatico 969.coffee AG® onnipolare sia aperto. non è responsabile di eventuali danni a cose o persone, conseguenti alla non ottemperanza delle indicazioni espresse in questo manuale.
- Page 33 PRIMA MESSA IN FUNZIONE ATTENZIONE! La prima messa in funzione della macchina deve essere effettuata da un tecnico specializzato. Prima di eseguire la procedura necessaria per il primo avviamento, assicurarsi che il rubinetto posto a monte dell‟addolcitore e il rubinetto dell‟addolcitore (vedi manuale addolcitore) siano aperti.
- Page 34 10. FUNZIONAMENTO ED USO AVVERTENZA! Non muovere le lance mentre sono in funzione. Se la valvola è chiusa, toccare le lance solo sulla zona isolata termicamente in gomma. Le lance rimangono calde anche dopo l’erogazione. 10.1. Operazioni preliminari giornaliere AVVERTENZA! Se durante la procedura di accensione si porta il commutatore in posizione 2 ed il livello dell’acqua non è...
- Page 35 10.2. Preparazione del caffè AVVERTENZA, PERICOLO DI USTIONE! Durante la procedura di preparazione del caffè, non mettere le mani sotto al gruppo, non tenere la tazzina con le mani, non tentare di sganciare il portafiltro durante l’erogazione. • sganciare il portafiltro (2) ruotando la leva verso sinistra (guardando la macchina da davanti) finché...
- Page 36 ID03747 rev. 0.0. del 05/02/2019...
- Page 37 • spostare la lancia del vapore appena sotto la superficie con piccoli movimenti in senso verticale, tenere il beccuccio della lancia vapore appena sotto la superficie del latte; • al raggiungimento della temperatura, chiudere l‟erogazione del vapore portando la leva in posizione orizzontale-centrale.
- Page 38 11. PROGRAMMAZIONE La programmazione della macchina può essere modifi-cata mediante le pulsantiere (12) relative ai gruppi di ero- gazione. Programmando le “dosi caffè” sulla pulsantiera di sinistra, viene programmata anche la pulsantiera di destra. Nel caso si volesse programmare la pulsantiera di destra, si dovrà...
- Page 39 11.3. Abilitazione alla pre-infusione (solo per Artika) La macchina può essere configurata per far precedere la preinfusione all‟erogazione. Il „normale‟ ciclo di erogazione viene preceduto da un breve getto, per inumidire la polvere di caffè prima del passaggio dell‟effettiva erogazione. Ad ogni dose può essere associata la pre-infusione. Per inserire lo stesso programma in tutte le pulsantiere, settare la pulsantiera di destra.
- Page 40 12. MANUTENZIONE Questo capitolo raggruppa le operazioni quotidiane che devono essere eseguite sulla macchina. AVVERTENZA, PERICOLO DI USTIONE! Le operazioni di manutenzione effettuate con la macchina in funzione devono essere svolte con molta cautela. Non mettere le mani sotto gli erogatori o sotto i gruppi mentre la macchina è calda. AVVERTENZA! Usare soltanto detergenti specifici per pulizia di macchine da caffè.
- Page 41 Entrambi i LED lampeggeranno insieme per tutta la fase di lavaggio mentre gli altri saranno spenti; al termine del ciclo di lavaggio la macchina si riporta automaticamente in condizione operativa. • sganciare il portafiltro; • toglierle la membrana; • sciacquare filtro e membrana in acqua corrente; •...
- Page 42 12.5. Pulizia macchina AVVERTENZA! La pulizia della macchina deve essere effettuata con macchina spenta e fredda (commutatore in posizione 0). ATTENZIONE! Pulire esternamente la macchina utilizzando un panno inumidito con acqua. NON utilizzare prodotti corrosivi, abrasivi, solventi, alcool, prodotti a base di cloro, ammoniaca o detergenti profumati.
- Page 43 13. ASSISTENZA TECNICA E RICAMBI Per tutti i problemi relativi alla macchina e per qualsiasi fabbisogno di ricambi rivolgersi solo alla rete di vendita autorizzata. In caso di riparazioni usare esclusivamente ricambi originali in quanto garantiscono i requisiti di igiene e sicurezza previsti e la macchina manterrà invariate nel tempo le proprie caratteristiche tecniche.
- Page 44 14. DEMOLIZIONE E MESSA FUORI SERVIZIO AVVERTENZA! Per le operazioni di smaltimento della macchina, rivolgersi a personale specializzato e abilitato. AVVERTENZA, pericolo di folgorazione! Rivolgersi a personale specializzato e abilitato intervenire sulla linea elettrica. 14.1. Messa fuori servizio temporanea Se la macchina non deve essere utilizzata per molto tempo, è importante, per motivi igienici e di corretto utilizzo, effettuare le seguenti operazioni: •...
- Page 45 15. RICERCA E SOLUZIONE GUASTI Per tutti gli inconvenienti non compresi nella tabella seguente, o se il problema persiste e/o si ripete, rivolgersi al Servizio di Assistenza Tecnica. PROBLEMI CAUSA SOLUZIONE Perdita tra gruppo e portafiltro Residui di sporco nella sede del Pulire durante l’erogazione dei caffè...
- Page 46 ENGLISH...
- Page 47 Summary 2. PRELIMINARIES......................... 50 2.1. Intended recipient of the manual....................50 2.2. Storing the manual.......................... 50 2.3. Explanation of the symbols used in the manual................50 3. INTRODUCTION......................... 51 3.1. Machine presentation........................51 3.2. Reference standards........................51 3.3. Manufacturer........................... 51 3.4.
- Page 48 COMMISSIONING....................... 77 10. OPERATION AND USE....................... 78 10.1. Daily preliminary operations......................78 10.2. Making coffee..........................79 10.3. Making cappuccino......................... 79 10.4. Making tea, herbal teas, etc......................80 10.5. Heating drinks..........................80 10.6. Use of mugs............................. 80 10.7. Machine stand-by (only for Artika with display)................80 10.8.
- Page 49 DECLARATION OF CONFORMITY 969.coffee AG® Company: Hauptstrasse 38, D-97249 Eisingen Address: Rothenbad 18, CH-6015 Luzern Artika series coffee machines Products: The above-mentioned products conform with: Edition/ Document No. Title Release date 2006/42/EC Directive 2006/42/EC of the European 17 May 2006 Parliament and of the Council of 17 May 2006 on machinery.
- Page 50 We recommend making a copy of the manual for each operator and storing the original. “969.coffee AG®” reserves the right to make any changes it deems necessary for improvement, without obligation to update this manual.
- Page 51 LED lights facilitating their use. In the version with display, on the front of the machine, there is an interface that is used to control it. 3.2. Reference standards The machine has been designed and manufactured by 969.coffee AG® in compliance with the safety requirements of Directive 2006/42/EC of 17/05/2006. 3.4. Intended use The Artika coffee machine is intended for professional use in the preparation of coffee drinks such as espresso, cappuccino, latte macchiato and for the heating of beverages.
- Page 52 3.7. Technical features DATA U. M. VALUE Machine code A8002 A8002DP Version Without Display With Display No of Groups units Automatic group (E61) High groups Standard Central TEA water wand Standard Cup heater kit Optional Gas kit Optional Dimensions 750 x 580 x 550 Weight Input current Single-phase...
- Page 53 DESCRIPTION AND NAMES OF MAIN PARTS Adjustable foot 12) Semi-automatic operation buttons Filter holder 13) Manual TEA hot water serving button Dispensing groups 14) Left steam wand lever TEA hot water wand 15) Left steam wand Work grid 16) Switch Boiler pressure gauge 17) Level indicator (only for Artika) Serving group pressure gauge...
- Page 54 4.1. Serving group push-button panel 11a) Espresso single 11d) Two long coffees 11b) Long coffee single 11e) Continuous serving 11c) Two espressos 11f) Dosed TEA hot water serving button Both serving groups have their own push-button panel to control coffee serving. The type of serving associated with each button is illustrated on the buttons themselves.
- Page 55 4.3. TEA hot water wand A TEA hot water wand is installed on the machine, controlled by the manual TEA hot water serving button (13) and by the dosed TEA hot water serving buttons (11f), which can be programmed to deliver a predefined quantity of water or be controlled manually.
- Page 56 TOUCH INTERFACE DESCRIPTION (only for Artika with display) The Artika machine, in the version with display, is equipped with a touch-screen interface that is used to display and change the settings of the machine in general, and in particular of the boiler and the serving of coffee in real time.
- Page 57 5.1. Home screen Once the machine has started, the home screen will be displayed on the interface, from which it is possible to view the water level in the main boiler, the coffee serving time for both groups and the boiler temperature. Duration of serving group 1 Main boil temperature Level of water in main boiler...
- Page 58 5.3. Functions screen WARNING! The settings (button d3) can be accessed by 969.coffee AG® personnel only or an authorised technician. This is the next screen after the serving screen in the list of main screens. From here it is possible to access the machine settings...
- Page 59 5.3.2. Cup warmer enabling screen (if cup warmer included) This screen can be accessed by pressing the cup warmer management button (d2) from the Func-tions Screen; from here, the machine cup warmer can be enabled or disabled. Cup warmer enabling checkbox 5.3.3.
- Page 60 5.3.4. Programmed power-on screen This screen can be accessed by pressing the programmed power-on screen button (d5) and allows the setting and enabling or disabling of power-on and power-off times, as well as a day off when the machine will not be turned on. It is not necessary to place the switch every day in position 0;...
- Page 61 5.3.5. Counters screen This screen can be accessed by pressing the meters screen button (d6) from the Functions Screen; from here, it is possible to view the amount of water dispensed by the groups. It is possible to distinguish the function to which the dispensing values refer by way of the symbol next to the value itself.
- Page 62 Dose programming enabling screen This is the first screen of the settings menu accessible to the maintenance technician or 969.coffee AG® personnel by pressing button (d3). From this screen it is possible to enable or disable dose programming by means of the check-box.
- Page 63 5.3.10. Maintenance cycles screen The next screen after the pre-infusion enabling screen, from here, using the two selection buttons, it is possible to set the volume of dispensed water after which the user is notified of the need for maintenance. 5.3.11.
- Page 64 5.3.13. Assistance phone number editing screen The screen subsequent to that for temperature unit of measure screen is used to change the telephone number of the assistance using the selection buttons (k1) and the button for switching to the next character (l1). 5.3.14.
- Page 65 5.3.16. LED operating mode selection screen The screen subsequent to that for mixed water enabling is used to select the operating modes of the push-button panel LED lights, whether on, off or rotating. 5.3.17. Screen for selection of the mode for maintaining temperature in the boiler The next screen after the LED operating mode selection screen, from here it is possible to select the method using which the service boiler temperature is held.
- Page 66 5.3.18. Boiler filling time-out setting screen The screen following that for selection of the mode for maintaining the temperature in the boilers used to set the alarms time-out. 5.3.19. Boiler band setting screens The screens subsequent to those for setting the values of KP, KI and KD are used to set the band for maintaining the temperature of the boiler, or the temperature decrease delta after which the resistances are reactivated.
- Page 67 5.3.21. Alarm buzzer enabling screen Screen following that of filter alarm value setting screen is used to enable or disable the acoustic signal that is displayed on the main screen. 5.3.22. Filling during serving enabling screen The next screen after the alarm buzzer enabling screen, from here it is possible to enable or disable boiler filling even while serving.
- Page 68 5.4. User settings menu This menu can be accessed using the following path: machine stand-by screen > preferences > user settings menu. This menu contains the settings that can be modified using the lowest level password. 5.4.1. Language selection screen This is the first screen of the user settings menu and allows the interface language to be changed, choosing a language from among those displayed.
- Page 69 5.4.3. Time setting screen This is the third screen of the user settings menu and allows the time to be changed. 5.4.4. Day setting screen This screen of the user settings menu allows the day of the week to be changed. 5.4.5.
- Page 70 SAFETY PRECAUTIONS This manual is an integral and essential part of the product and should be stored with care. Read the instructions carefully in this manual before any other operation, as they relate to safety, use and maintenance. This appliance can only be used by one operator at a time, failure to respect this indication may cause injury to the person using the appliance and/or damage to the appliance WARNING! Dispose of packaging properly.
- Page 71 CAUTION! Risk of electrocution. For electrical safety, there must be an earthing system implemented in accordance with the relevant regulations. Consult a licensed professional to check that the power supply to the system is adequate in comparison to the maximum power absorbed by the machine. It is strictly prohibited to use extension cords or adapters that have not been approved by a licensed electrician.
- Page 72 CAUTION! Risk of burns. When using the steam wand (15), be careful not to put your hands under it or touch it immediately after use. Contact a qualified technician to carry out the installation and any drainage, maintenance and adjustment tasks; during these operations, work gloves and safety shoes should be worn. The serving groups (3) are also a place of danger during coffee serving, as indicated by the "CAUTION HOT"...
- Page 73 TRANSPORT AND HANDLING 7.1. Transport The machine can be transported via road, rail, sea and air, if properly packaged. Unpacking, lifting and handling operations must be carried out by personnel authorized to use the special-purpose equipment. 7.2. Handling CAUTION! Handling operations by personnel must be carried out based on risks and corresponding countermeasures.
- Page 74 INSTALLATION AND PRELIMINARY OPERATIONS On receiving the product, make sure that the packaging and machine are intact and dry, also check that the accessories are present. After positioning the machine, make sure that the surface on which it is placed is horizontal, flat, and strong enough to support the weight, that there is a space of at least 10 cm between the ma-chine and the rear and side walls.
- Page 75 Before making the electrical connection, make sure that the omnipolar circuit breaker is open. 969.coffee AG® is not responsible for any damage or injury resulting from non-compliance with the indications outlined in this manual. Before connecting the machine to the mains, check that the machine data is compatible with the network data.
- Page 76 COMMISSIONING WARNING! First-time use of the machine must be carried out by a specialised technician. Before carrying out the procedure for the initial start-up, make sure the valve located upstream of the softener and the softener valve (see softener manual) are open. Moreover, check that there are no leaks between the shut-off valve and the machine;...
- Page 77 10. OPERATION AND USE CAUTION! Do not move the wands when they are in operation. If the valve is closed, touch the wand only on the thermally insulated rubber area. The wands are hot even after dispensing. 10.1. Daily preliminary operations CAUTION! If during the ignition procedure the switch is turned to position 2 and the water level is not above the minimum level, the electric resistance will melt after a few seconds.
- Page 78 10.2. Making coffee CAUTION, DANGER OF BURNS! While preparing the coffee, never place hands under the group, do not hold the cup with your hands, do not detach the filter holder during serving. • detach the filter holder (2) by turning the lever to the left (looking at the machine from the front) as far as it will go and pull it downwards;...
- Page 79 steam wand nozzle just below the surface of the milk; • when the temperature is reached, close the steam dispensing by bringing the lever to the horizontal-central position. • remove the steam wand from the jug and pour the foam onto the prepared espresso; •...
- Page 80 11. PROGRAMMING The machine programs can be modified using the push- button panels (12) for each serving group. When “coffee doses” are programmed on the left-hand side push- button panel, the right-hand side push-button panel is also programmed. If the right-hand side push-button panel needs to be programmed separately, do so using that push-button 11a 11b 11c 11d 11e 11f...
- Page 81 11.3. Pre-infusion enabling (only for Artika) The machine can be configured to include pre-infusion before dispensing. The 'normal' dispensing cycle is preceded by a brief spurt to moisten the coffee powder before the actual dispensing phase. Each dose may include pre-infusion. To insert the same program in all the push-button panels, set the right push-button panel.
- Page 82 12. MAINTENANCE This chapter groups together the daily operations that must be performed on the machine. CAUTION, BURN HAZARD! Maintenance carried out on the machine when in operation must be performed with great care. Do not place your hands under the wands or the groups while the machine is hot.
- Page 83 Both LEDs will flash together throughout the wash phase while the others will be off; at the end of the wash cycle the machine automatically returns to the operating condition. • detach the filter holder; • remove the membrane; • rinse the filter and membrane under running water;...
- Page 84 12.5. Cleaning the machine CAUTION! The machine must be cleaned with the machine off and cold (switch in position 0). WARNING! Clean the external part of the machine using a damp cloth. Do NOT use corrosive and abrasive products, solvents, alcohol, chlorine-based products, ammonia or scented detergents.
- Page 85 13. TECHNICAL SUPPORT AND SPARE PARTS For all problems related to the machine and for any spare parts requirements, please contact only the authorized sales network. If repairs are required, use only original spare parts insofar as these guarantee compliance with health and safety standards and ensure the machine maintains its technical characteristics over time.
- Page 86 14. DEMOLITION AND DECOMMISSIONING CAUTION! For machine dismantling operations, contact specialized and authorized personnel. CAUTION, danger of electrocution! Contact personnel who are qualified and authorized to intervene on the power line. 14.1. Temporary shut-down If the machine will not be used for a long time, it is important carry out the following operations, for reasons of hygiene and correct use: •...
- Page 87 15. TROUBLESHOOTING For any issues not included in the following table, or if the problem persists and/or is repeated, please contact the technical support service. PROBLEMS CAUSE SOLUTION Leak between the group and Dregs in filter holder slot Clean filter holder when coffee is being Uneven, dented filter edge served The group gasket is worn Replace...
Need help?
Do you have a question about the Artika Series and is the answer not in the manual?
Questions and answers