Advertisement
Available languages
Available languages
Quick Links
Advertisement

Related Manuals for Matsui MSS60WHN


Summary of Contents for Matsui MSS60WHN
- Page 1 Built-in Oven MSS60WHN...
- Page 2 contents getting to know your built-in oven ........important safety notes .
- Page 3 Thank you for choosing this Matsui built-in oven. We hope the following information will help you to familiarise yourself with the features of the oven, and to use it successfully and safely. Please read the instructions in this user guide before using the oven and keep it for future reference.
- Page 4 Getting to know your built-in oven Wire shelf x1 Shallow Tray x 2 Deep Tray x 1 PLEASE NOTE: The electrical connection of this oven should be carried out by a qualified electrician, according to the instructions in this guide and in compliance with the current regulations.
- Page 5 Important safety notes We have included this section for your safety. Please read this information carefully before using your built-in oven. WARNING: It is hazadous for anyone other than authorised service personal, to carry out servicing or repairs which involve the removal of covers. To avoid the risk of an electric shock, do not attempt repairs yourself.
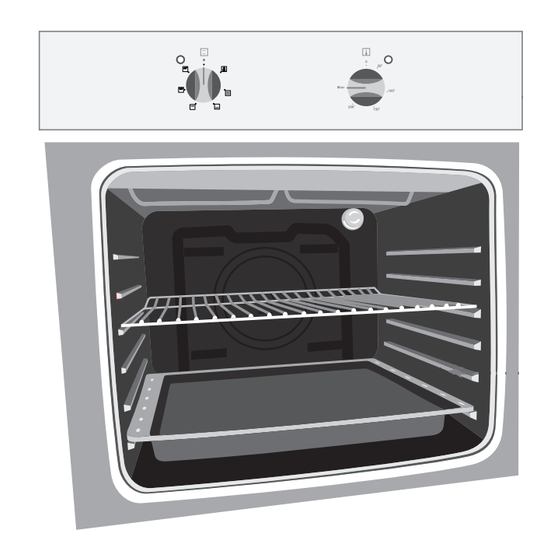
- Page 7 Control panel Oven controls - the function and temperature controls To use an oven function, first select the function with the left hand dial (the power light will illuminate), then set the temperature of the function (if appropriate) with the right hand dial.
- Page 8 Instructions for use Using the oven Select the oven function you require. Select the temperature you require. Before placing food in the oven you may need to pre-heat the oven for 10 minutes. The red thermostat light will go out when the chosen temperature has been reached. To switch the oven off turn the function control dial to the off position ‘0’.
- Page 9 instructions for use Using the elements wire shelf wire shelf wire shelf...
- Page 10 Hints and tips Baking tips Always place baking tins in the centre of the wire shelf. Make sure you use bakeware that is oven proof. Do not place bakeware too close to the rear of the oven wall. You can influence the degree of browning by changing the temperature setting. If a cake collapses after removing it from the oven: - Use less liquid on your next attempt.
- Page 11 Hints and tips Cleaning the outside of the oven You should regularly wipe over the control panel, oven door and oven sides using a soft cloth and liquid detergent as spilt liquids may damage the enamel. Wash enameled or chrome plated parts of the oven with warm soapy water or with non-abrasive detergents.
- Page 12 Hints and tips Removing the door for easier cleaning We recommend you have someone to assist you during removal of the door. Open the door completely. The door hinge has a small latch. Lift the latch on both hinges. Lift the door slightly as if closing, and then with both hands supporting the door, pull it away from the oven.
- Page 13 Installation instructions WARNING: The electrical connection of this oven should be carried out by a qualified electrician, according to the instructions in this guide and in compliance with the current regulations. In the event of any damage that occurs as a result of improper connection or installation, the warranty will not be valid.
- Page 14 Installation instructions Once the oven has been positioned into the gap, the front frame of the oven can be fixed to the surrounding kitchen unit using the mounting screws and secured into place with the spacers. (refer to detail B). DETAIL B Kitchen unit Making an electrical connection...
- Page 15 Installation instructions Power connection box For this oven, the cable type must be H05V V-F 3 x 1.5mm and the connection should be made as in the diagram. 3X1.5 mm , H05VV-F type power supply cord must be used. Grounding lead must be connected to screw with symbol.
- Page 16 MS62SBGN Model MSS60WHN Rated Voltage (V) 230-240 Rated 'Frequency (Hz) 3200-3500 Power (W) 14-14,5 Current (A) Top element (W) 1200 Bottom element (W) 1100 Grill (W) 2000 30.2 Net Weight (kg) Product Dimensions (cm) 59.5x59x59 Oven Capacity (lt) Energy Efficiency class...
- Page 17 Troubleshooting If the oven is not working: Check that the fused switch is turned on at the wall switch. Check that the fuse in the wall switch has not blown, and that the mains lead is undamaged. If the oven door window fogs up: This occurs normally with moist cakes or with very large roasts.
- Page 18 This symbol on the product or in the instructions means that your electrical and electronic equipment should be disposed at the end of its life separately from your household waste. There are separate collection systems for recycling in the EU. For more information, please contact the local authority or your retailer where you purchased the product.
- Page 19 MSS60WHN...
- Page 21 Indbygningsovn Control panel Ovnrist Wire racks...
- Page 22 Wire hylden x 1 Wire shelf x1 Flad bakke x 2 Shallow Tray x 2 Deep Tray x 1 Dyb bakke x 1 BEMÆRK VENLIGST: Den elektriske tilslutning af denne ovn bør udføres at en autoriseret el- installatør i henhold til instruktionerne i denne vejledning, og i overensstemmelse med gældende love.
- Page 23 Undgå at børn klatrer eller sidder på døren, når den er åben.
- Page 25 For at bruge en funktion, skal du først vælge funktionen på venstre knap (herefter begynder strømindikatoren at lyse), hvorefter du skal indstille temperaturen (hvis relevant) på højre knap. Herefter begynder termostatindikatoren at lyse. Når temperaturen inde i ovnen når den indstillede temperatur, slukker termostaten for varmeelementet og lyset i termostatindikatoren går ud.
- Page 26 Symbol Ovnen lyset bliver tændt. Ovnens termostatindikator og strømindikator samt det nedre og øvre varmeelement tændes. Ovnens øvre varmeelement tændes. Ovnens nedre varmeelement tændes. Ovnens termostat- og strømindikator, samt grillvarmer tændes. Ovnens termostat- og strømindikator, det øvre varmeelement og grillvarmeren tændes.
- Page 34 MSS60WHN...
- Page 36 Symbolet på produktet eller på pakken angiver, at dette produkt ikke må behandles som husholdningsaffald. Det skal i stedet overgives til en affaldsstation for behandling af elektrisk og elektronisk udstyr. Ved at sørge for at dette produkt bliver bortskaffe t på den rette måde, hjælper du med til at forebygge eventuelle negative påvirkninger af miljøet og af personers helbred, der ellers kunne forårsages af forkert bortskaffelse af dette produkt.Kontakt det lokale kommunekontor, affaldsselskab eller den forretning, hvor produkt er købt, for yderligere oplysninger om genanvendelse af dette produkt.
- Page 37 MSS60WHN...
- Page 39 Erillisuuni Control panel Johtolokerot Wire racks...
- Page 40 Lanka hyllylle x 1 Wire shelf x1 Matala astia x 2 Shallow Tray x 2 Syvä astia x 1 Deep Tray x 1 HUOMAA: Tämän uunin sähköliitännän tulee suorittaa vain pätevän sähköammattilaisen tässä oppaassa olevien ohjeiden mukaisesti ja yhdenmukaisesti nykyisten säädösten kanssa.
- Page 42 Kun luukku on auki, älä anna lasten kiivetä tai istua luukun päälle.
- Page 43 Käyttäessäsi uunitoimintoa valitse ensin toiminto vasemman puolen valitsimella (virtavalo palaa), sen jälkeen aseta toiminnon lämpötila (jos sopiva) oikean puoleisella valitsimella. Termostaatin valo palaa. Kun lämpötila uunin sisällä saavuttaa asettamasi lämpötilan, termostaatti katkaisee lämmityselementin ja termostaatin valo sammuu. Kun lämpötila putoaa asetuslämpötilan alle, lämmityselementti käynnistyy uudelleen ja termostaatin valo palaa.
- Page 44 Symbol Uunin valo on päällä. Uunin termostaatin valo ja virtavalot sekä alemmat ja ylemmät lämmityselementit kytketään päälle. Uunin ylemmät lämmityselementit kytketään päälle. Uunin alemmat lämmityselementit kytketään päälle. Uunin termostaatti ja virtavalot, grillin lämmitin, kytketään päälle. Uunin termostaatti ja virtavalot, ylempi lämmityselementti ja grillin lämmitin, kytketään päälle.
- Page 52 MSS60WHN...
- Page 54 Tuotteessa tai sen pakkauksessa oleva oheinen symboli tarkoittaa, että tätä tuotetta ei saa panna kotitalousjätteen joukkoon. Sen sijaan se on vietävä sähköisten ja elektronisten laitteiden kierrätystä varten perustettuun keräyspisteeseen. Varmista, että tuote hävitetään oikein. Näin estät ympäristölle ja ihmisten terveydelle aiheutuvat kielteiset seuraukset, jotka ovat mahdollisia, jos tuotetta käsitellään jätteenä...
- Page 55 MSS60WHN...
- Page 57 Control panel Grillrister Wire racks...
- Page 58 Wire sokkel x 1 Wire shelf x1 Fat x 2 Shallow Tray x 2 Skål x 1 Deep Tray x 1 MERK: Den elektriske tilkoblingen av denne ovnen må utføres av en kvalifisert elektriker i henhold til instruksjoenene i denne veiledningen og i overensstemmelse med gjeldende bestemmelser.
- Page 60 Mens døren er åpen, må du ikke la barn klatre på eller sitte i døren.
- Page 61 For å bruke en ovnsfunksjon må du først velge funksjonen med hjulet på venstre side (strømlampen vil lyse), så må du angi funksjonens temperatur (hvis passende) med hjulet på høyre side. Termostatlampen vil lyse. Når temperaturen inne i ovnen oppnår temperaturen du har angitt, vil termostaten skru av varmeelementet, og termostatlampen vil slukke.
- Page 62 Symbol Ovnen lyset blir slått på. Ovnens termostatlampe og strømlamper og de nedre og øvre varmeelementene vil bli slått på. Ovnens øvre varmeelement vil bli slått på. Ovnens nedre varmeelement vil bli slått på. Ovnens termostat- og strømlamper og grillens varmeelement vil bli slått på.
- Page 70 MSS60WHN...
- Page 72 Symbolet på produktet eller produktemballasjen viser at det ikke må behandles som vanlig husholdningsavfall. Det skal i stedet leveres inn på et aktuelt innsamlingssted for elektrisk og elektronisk avfall. Ved å passe på at dette produktet kasseres på riktig måte, bidrar du til å hindre mulige skadevirkninger på mennesker og miljø. Slike virkninger kan ellers oppstå...
- Page 73 MSS60WHN...
- Page 74 ..17...
- Page 75 Inbyggd ugn Control panel Trådställ Wire racks...
- Page 76 Tråd hyllan x1 Wire shelf x1 Grund bricka x 2 Shallow Tray x 2 Djup bricka x 1 Deep Tray x 1 OBS: Ugnens elanslutning måste utföras av behörig elektriker enligt instruktionerna i den här guiden samt uppfylla gällande föreskrifter. Ge den här guiden till elektrikern.
- Page 78 Låt inte barn klättra eller sitta på luckan när den är öppen.
- Page 79 Vid användning av ugnsfunktionen, välj funktionen med det vänstra vredet (strömindikatorn tänds) och ställ sedan in temperaturfunktionen (om tillämpligt) med det högra vredet. Termostatindikatorn tänds. När ugnstemperaturen når den inställda temperaturen stänger termostaten av värmeelementet och termostatindikatorn släcks. När temperaturen faller under den inställda temperaturen går värmeelementet igång igen och termostatindikatorn tänds.
- Page 80 Symbol Ugnen ljus kommer att slås på. Termostat- och strömindikatorn tänds och det nedre och övre värmeelementet går igång. Ugnens övre värmeelement går igång. Ugnens nedre värmeelement går igång. Termostat- och strömindikatorn tänds och grillvärmaren går igång. Termostat- och strömindikatorn tänds och det övre värmeelementet och egrillvärmaren går igång.
- Page 88 MSS60WHN...
- Page 90 Symbolen på produkten visar att den inte får hanteras som hushållsavfall. Den ska i stället överlämnas till korrekt insamlingsställe för återvinning av elektrisk och elektronisk utrustning. Genom att säkerställa att produkten kasseras på rätt sätt hjälper du till att förhindra negativa följder för miljö och hälsa som orsakas av olämplig avfallshantering. Mer information om återvinning av produkten kan du få...
Need help?
Do you have a question about the MSS60WHN and is the answer not in the manual?
Questions and answers